


Android开发——布局详解(上)
在昨天的学习中,我们动手实现了第一个Android程序:手机拨号程序。今天学习的是关于布局(Layout),让我想起了之前学过的HTML布局和在JFrame中学习的布局方式(GUI):BorderLayout、FloowLayout、GridbagLayout等等。
Android的布局方式和以前学习的布局方式如出一辙。Android的布局方式分为四种:
1.LinearLayout(线性布局)
2.RelativeLayout(相对布局)
3.TableLayout(表格布局)
4.AbsoluteLayout(绝对布局)【暂时没讲】
下面分别介绍一下各种布局方式:
线性布局,就是在该标签下的所有子元素会根据其orientation属性的值来决定是按行还是按列逐个显示。
小总结:orientation有两个属性值:一个是按列的“vertical”,一个是按行布局的“horizontal”;
写一个线性布局的实例:
Main.xml
<?xml version="1.0"encoding="utf-8"?>
<LinearLayoutxmlns:android="http://schemas.android.com/apk/res/android"
android:layout_width="fill_parent"
android:layout_height="fill_parent"
android:orientation="vertical" >
<TextView
android:layout_width="fill_parent"
android:layout_height="wrap_content"
android:text="@string/name_text" />
<EditView
android:layout_width="fill_parent"
android:layout_height="wrap_content"
android:id="@+id/EditView"
/>
<Button
android:layout_width="wrap_content"
android:layout_height="wrap_content"
android:text="@string/ok_text"
android:layout_aglin/>
</LinearLayout>
如上是整个LinearLayout布局文件,我们可以看到布局文件是XML格式的,命名空间:Android指向网络上的一个文件,意味着书写所有属性的时候都需要以“Android”开头;
Android:layout_width和Android:layout_height这两个属性是用来设置组件元素的宽和高,无论用哪种布局方式,这些属性都是通用的;这两个属性有三个值:
a)值一:Fill_parent,代表填满元素,对于顶级元素来说,父级元素就是手机屏幕了。
b)值二:wrap_content,代表元素的大小仅包裹自身内容,数字代表占用相应的px值。
c)值三:match_parent,也就是我们以前设置的数字大小,自定义组建的宽高,单位是dp(最好使用dp,当然也可以使用px【查的资料上这么说】)
然后说一下实例中的三种常见组建:<TextView>,就是标签组件,我觉得就是类似于HTML中的表单属性一样,只不过Android中把组件中的属性都写在了自己的元素集合中,例如:

在这里文本组件中,我们定义了组建的宽高和属性值,定义了静态内部类id中名为EditView的唯一标识符,属性值的定义后面再复习。
第二种组件是:<EditView>,文本组件,相当于HTML写表单的<input type=”text”>一样,用来输入内容的组件。
第三种组件是:<Button>,按钮组件。
线性布局文件的根元素是:<LinearLayout>
接着说一下string.xml文件内容的读取
当我们在string.xml文件中写好了所有的文本和数值内容后,我们需要在使用组件的时候把这些值赋给组件的属性,例如:
<TextView
Android:text=”@string/name”
/>
如上代码所示,赋值的格式为这样的,”@”是固定格式,后面是值所在的文件名,“/”后面是string.xml文件中对应的“name”的值。
最后简单写一个表单实例:
String.xml文件:
<?xml version="1.0"encoding="utf-8"?>
<resources>
<stringname="system">页面布局作业</string>
<stringname="user">用户名:</string>
<stringname="pass">密码:</string>
<stringname="ok">登录</string>
<stringname="cancle">取消</string>
</resources>
<!—一共是五条文本属性-->
布局文件main.xml:
<?xml version="1.0"encoding="utf-8"?>
<LinearLayoutxmlns:android="http://schemas.android.com/apk/res/android"
android:layout_width="fill_parent"
android:layout_height="wrap_content"
android:orientation="vertical" >
<TextView
android:layout_width="fill_parent"
android:layout_height="wrap_content"
android:layout_gravity="center"
android:text="@string/system"
/>
<TextView
android:layout_width="wrap_content"
android:layout_height="wrap_content"
android:text="@string/user"
android:id="@+id/user_text"
android:layout_alignParentLeft="true"
/>
<EditText
android:layout_width="fill_parent"
android:layout_height="wrap_content"
android:id="@+id/text1"
android:layout_toRightOf="@id/user_text"
/>
<TextView
android:layout_width="wrap_content"
android:layout_height="wrap_content"
android:text="@string/pass"
android:id="@+id/pass_text2"
android:layout_alignParentLeft="true"
/>
<EditText
android:layout_width="fill_parent"
android:layout_height="wrap_content"
android:id="@+id/text2"
android:layout_toRightOf="@id/pass_text2"
/>
<Button
android:id="@+id/cancle_button"
android:layout_width="wrap_content"
android:layout_height="wrap_content"
android:text="@string/cancle"
android:layout_alignParentRight="true"
/>
<Button
android:id="@+id/ok_button"
android:layout_width="wrap_content"
android:layout_height="wrap_content"
android:text="@string/ok"
android:layout_toLeftOf="@id/cancle_button"
/>
</LinearLayout>
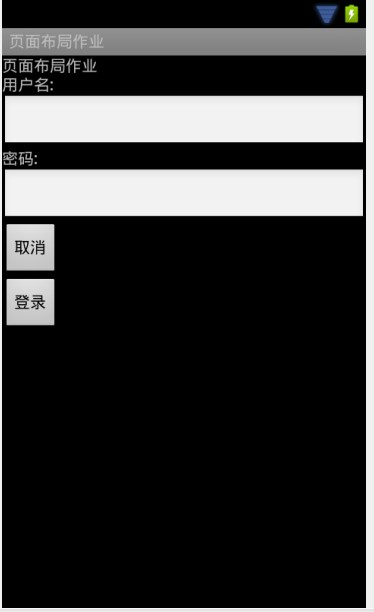
在布局文件中,我写了一个登录的表单,实现后的效果如图:
================================================================
线性布局就说这么多,下面说一下相对布局方式。
相对布局中的视图组件是按相互之间的相对位置来确定的,并不是线性布局中的必须按行或按列单个显示。我觉得相对布局比线性布局唯一好的一点是:能够在一行内显示多个组件,不像线性布局只能按行或列排列不同组件且每行都只能有一个组件。
相对布局方式的根元素为:<RelativeLayout>,同线性布局一样,也是XML文件,命名空间也是:Android;在不同组件排列的时候,提供了多种方式,比如:
Android:layout_below=”@id/text”:将该元素放到id为text的元素的下面
Android:layout_toLeftOf=”@id/ok”:放到id为ok的元素左边
android:layout_alignParentRight="true"把该元素放到最右端
在写今天作业的时候,要求“登录”和“取消”这两个Button按钮居中排列,我就是使用:
<Button
Android:layout_alignParentRight=”true”
Android:id=”@+id/cancle”/>
<Button
Android:layout_toLeftOf=”@id/cancle/>
通过如上代码,先把“取消”这个按钮放到最右边,再让“登录”按钮排列到“取消”按钮的左边,实现它们的正确排列。
Android:gravity="center"设置文本的对齐方式(图中为居中)
Android:layout_alignTop=”@id/ok”:对齐id为ok的元素的顶部 android:layout_alignBaseline="@+id/cancel_button"该元素文本值对准基线
padding属性指定视图与视图内容之间的内边距——今天遇到<TextView>元素的值与<EditView>元素的边框之间有很大的距离无法紧靠,现在指出是因为padding的边距不为0px导致的。
=============================================
相对布局提供了很多对齐方式,详细的可以查一下API。常用的方式是线性布局和相对布局的嵌套,只要正确添加根标签就可以实现。
下面用线性布局方式中的实例通过嵌套实现登录表单:
<?xmlversion="1.0" encoding="utf-8"?>
<LinearLayoutxmlns:android="http://schemas.android.com/apk/res/android"
android:layout_width="fill_parent"
android:layout_height="wrap_content"
android:orientation="vertical" >
<TextView
android:layout_width="fill_parent"
android:layout_height="wrap_content"
android:layout_gravity="center"
android:text="@string/system"
/>
<!-- 使用绝对定位对齐用户框 -->
<RelativeLayout
android:layout_width="wrap_content"
android:layout_height="wrap_content"
>
<TextView
android:layout_width="wrap_content"
android:layout_height="wrap_content"
android:text="@string/user"
android:id="@+id/user_text"
android:layout_alignParentLeft="true"
/>
<EditText
android:layout_width="fill_parent"
android:layout_height="wrap_content"
android:id="@+id/text1"
android:layout_toRightOf="@id/user_text"
/>
</RelativeLayout>
<!-- 使用绝对定位对齐密码框 -->
<RelativeLayout
android:layout_width="wrap_content"
android:layout_height="wrap_content"
>
<TextView
android:layout_width="wrap_content"
android:layout_height="wrap_content"
android:text="@string/pass"
android:id="@+id/pass_text2"
android:layout_alignParentLeft="true"
/>
<EditText
android:layout_width="fill_parent"
android:layout_height="wrap_content"
android:id="@+id/text2"
android:layout_toRightOf="@id/pass_text2"
/>
</RelativeLayout>
<!-- 使用绝对定位对齐Button按钮 -->
<RelativeLayout
android:layout_width="wrap_content"
android:layout_height="wrap_content"
>
<Button
android:id="@+id/cancle_button"
android:layout_width="wrap_content"
android:layout_height="wrap_content"
android:text="@string/cancle"
android:layout_alignParentRight="true"
/>
<Button
android:id="@+id/ok_button"
android:layout_width="wrap_content"
android:layout_height="wrap_content"
android:text="@string/ok"
android:layout_toLeftOf="@id/cancle_button"
/>
</RelativeLayout>
</LinearLayout>
接着讲一下今天学的最后一个布局方式<TableLayout>表格布局
我觉得表格布局可以较好的实现多数常见的布局方式,今天在用表格布局方式写登录表单的时候发现,同一列的组件宽高都是统一的,不能更改,也就是说同一列的组件不能有大小不等的组件(个人意见可能不实),这是表格布局的一个缺陷吧,不过我觉得可以利用多种布局方式进行嵌套解决这个问题,比如表格布局中的一个单元格里嵌套相对布局或者其他的布局方式。
说一下表格布局方式的格式:根元素为:<TableLayout>,行元素标签为<TableRow>,没有列标签,也就是说在一行中可以添加不同的组件,有几个组件就是几列。
用表格布局方式实现登录表单的实例:
<?xml version="1.0"encoding="utf-8"?>
<TableLayoutxmlns:android="http://schemas.android.com/apk/res/android"
android:layout_width="match_parent"
android:layout_height="match_parent" >
<TableRow>
<TextView
android:layout_width="fill_parent"
android:layout_height="wrap_content"
android:text="@string/system"
android:gravity="center"
android:textSize="20dip"/>
</TableRow>
<TableRow>
<TextView
android:id="@+id/user_text1"
android:layout_width="50dp"
android:layout_height="fill_parent"
android:text="@string/user"
android:textSize="20dp" />
<EditText
android:layout_width="130dp"
android:layout_height="40dp"
android:id="@+id/text1"
/>
</TableRow>
<TableRow>
<TextView
android:id="@+id/pass_text2"
android:layout_width="50dp"
android:layout_height="fill_parent"
android:text="@string/pass"
android:textSize="20dp" />
<EditText
android:layout_width="130dp"
android:layout_height="40dp"
android:id="@+id/text2"
/>
</TableRow>
<TableRow
android:gravity="center">
<Button
android:id="@+id/ok_button"
android:layout_width="wrap_content"
android:layout_height="wrap_content"
android:text="@string/ok"
android:textSize="15dp"
/>
<Button
android:id="@+id/cancle_button"
android:layout_width="wrap_content"
android:layout_height="wrap_content"
android:text="@string/cancle"
android:textSize="15dp"
/>
</TableRow>
</TableLayout>
上述代码的宽高有的用了尺寸定义的。一共是写了一个四行两列的表格,其中第一行是项目名,第二、三行由<TextView><EditView>这两个元素组件组成,实现用户名和密码的输入;最后一行放了两个<Button>元素组件。
表单根目录有一个Android:stretchColumns=“0,1,2,3”属性,这个属性
指定每行都由第“0,1,2,3”列占满空白空间。
最后一种布局方式是:绝对布局,今天没有讲,所以留到明天总结。


 179
179


 被折叠的 条评论
为什么被折叠?
被折叠的 条评论
为什么被折叠?
 到【灌水乐园】发言


