


下面记一下怎样通过代码的方式为选项卡添加视图。
1、创建一个基于Empty Application的项目
2、创建两个新类,基类选择UIViewController,勾选With XIB for user interface分别命名为"OneController'和"TwoController",
3、分别更改OneController.xib和TwoController.xib文件的view背景颜色,便于区分
4、在AppDelegate.m文件中的 - (BOOL)application:(UIApplication *)application didFinishLaunchingWithOptions:(NSDictionary *)launchOptions{ }函数做如下修改(记得导入OneController和TwoController的头文件)
- (BOOL)application:(UIApplication *)application didFinishLaunchingWithOptions:(NSDictionary *)launchOptions
{
    self.window = [[[UIWindow alloc] initWithFrame:[[UIScreen mainScreen] bounds]] autorelease];

    //将tabBar(选项卡)添加进来
    UITabBarController *tabBarController = [[[UITabBarController alloc] init] autorelease];

    //为选项卡添加子控制器
    OneController *one = [[[OneController alloc] init] autorelease];
    [tabBarController addChildViewController:one];

    TwoController *two = [[[TwoController alloc] init] autorelease];
    [tabBarController addChildViewController:two];


    self.window.rootViewController = tabBarController;

    [self.window makeKeyAndVisible];
    return YES;
}
运行效果如下:
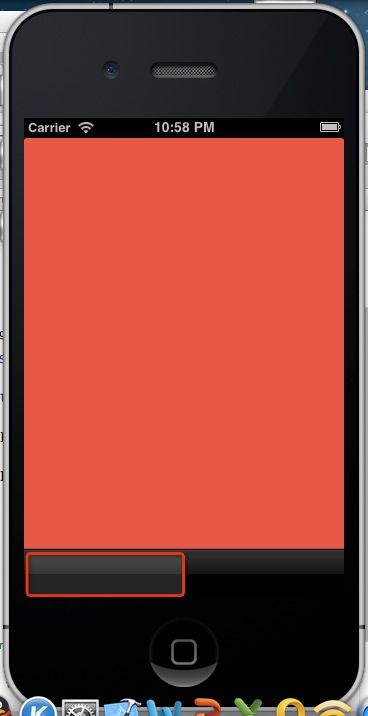
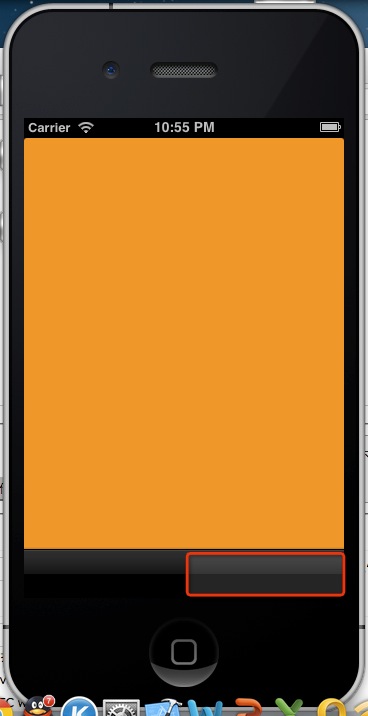
现在创建好的选项卡下面是没有图标和文字的,,,现在我们通过代码给它们添加一些图标和文字,注意,,选项卡的图标和文字是子控制器决定的而不是tab Bar Controller,,这点要记住。
- (BOOL)application:(UIApplication *)application didFinishLaunchingWithOptions:(NSDictionary *)launchOptions
{
self.window = [[[UIWindow alloc] initWithFrame:[[UIScreen mainScreen] bounds]] autorelease];
//将tabBar(选项卡)添加进来
UITabBarController *tabBarController = [[[UITabBarController alloc] init] autorelease];
//为选项卡添加子控制器
OneController *one = [[[OneController alloc] init] autorelease];
one.tabBarItem = [[[UITabBarItem alloc] initWithTabBarSystemItem:UITabBarSystemItemDownloads tag:0] autorelease];//增加系统自带的下载图标
[tabBarController addChildViewController:one];
TwoController *two = [[[TwoController alloc] init] autorelease];
//添加一个自定义的图标和文字
two.tabBarItem.title = @"two";
two.tabBarItem.image = [UIImage imageNamed:@"success.png"];
[tabBarController addChildViewController:two];
self.window.rootViewController = tabBarController;
[self.window makeKeyAndVisible];
return YES;
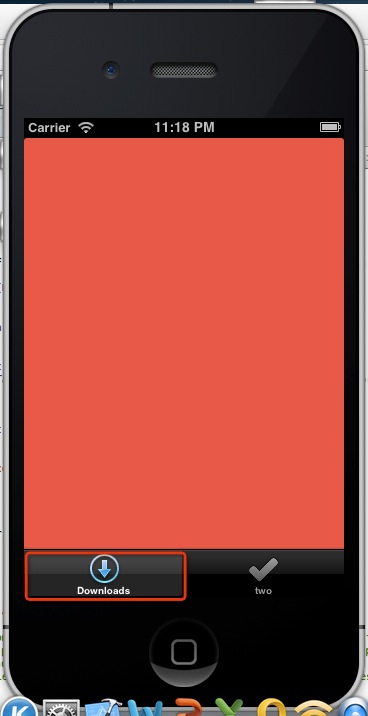
}以上代码中,我在第一个Controll View 中添加了一个系统自带的下载图标,,在第二个Controller View中添加了一个自定义的图标(先将图标导入到项目中)和文字。
运行效果如下:

以上的所有代码我都是在AppDelegate.m文件中得
- (BOOL)application:(UIApplication *)application didFinishLaunchingWithOptions:(NSDictionary *)launchOptions{ }函数中实现的,,,这仅仅只是为了操作方便才这样写的,,大多数情况下是写在该tab Bar Controller 的实现文件中的,如这里是在的MyTabController.m文件中的- (id)init{ } 函数中实现的。


 8731
8731

 被折叠的 条评论
为什么被折叠?
被折叠的 条评论
为什么被折叠?
 到【灌水乐园】发言


