原文:
- http://dev.csdn.net/author/ioriogami/02f1ca60584a47cf88f7da6bd53da025.html
- http://dev.csdn.net/author/ioriogami/da108320646d4bed926ab0468a3c97be.html
- http://dev.csdn.net/author/ioriogami/2fbcfae8b0ca4b85b327c362c94dba0c.html
4、使用Graphics来创建图形
在SWT中,graphic context(GC)可以单独创建为一个对象,也可以通过PaintEvent获得。但是在Draw2d中,Figure
可以从2.1节中讲述的那些paint方法中获得Graphics(方法参数)。Graphics的绝大多数方法都和CG中的相同,最大
的不同是Draw2d允许Graphics对象利用translate()方法移动。
然而,Draw2d提供了更为强大的功能来创建和操纵几何图形(Shapes)。它有好几个包、很多类用来处理几何图形。
4.1、使用Graphics类
如前所述,Graphics类的方法和SWT的GC基本一样,所以,在这一小节里,我们将创建图C.2种列出的那些组件,即
如下三种Figure:
1)DecisionFigure——即程序流程图中的分支结构,一个输入,两个输出(是/否)。
2)ProcessFigure——流程图中的某个处理,一个输入,一个输出。
3)TerminatorFigure——表示一个程序流程的开始或者结束,只有一个输入(结束)或输出(开始)。
对于我们的以上三种Figure,他们的大小由一个叫做size的变量来控制,他们上面显示的文字由一个叫做message
的String来设置。这些限制都来自于Figure对象的外部,所以暂时你还看不到。
这些类的代码如下:(列表C.3至C.5)
列表C.3:DecisionFigure.java
package com.swtjface.AppC;
import org.eclipse.draw2d.*;
import org.eclipse.draw2d.geometry.*;
public class DecisionFigure extends ActivityFigure
{
FixedAnchor inAnchor, yesAnchor, noAnchor;
public DecisionFigure()
{
inAnchor = new FixedAnchor(this);
inAnchor.place = new Point(1, 0);
targetAnchors.put("in_dec",inAnchor);
noAnchor = new FixedAnchor(this);
noAnchor.place = new Point(2, 1);
sourceAnchors.put("no",noAnchor);
yesAnchor = new FixedAnchor(this);
yesAnchor.place = new Point(1, 2);
sourceAnchors.put("yes",yesAnchor);
}
public void paintFigure(Graphics g)
{
Rectangle r = bounds;
PointList pl = new PointList(4);
pl.addPoint(r.x + r.width/2, r.y);
pl.addPoint(r.x, r.y + r.height/2);
pl.addPoint(r.x + r.width/2, r.y + r.height-1);
pl.addPoint(r.x + r.width, r.y + r.height/2);
g.drawPolygon(pl);
g.drawText(message, r.x+r.width/4+5, r.y+3*r.height/8);
g.drawText("N", r.x+7*r.width/8, r.y+3*r.height/8);
g.drawText("Y", r.x+r.width/2-2, r.y+3*r.height/4);
}
}
由于分支结构不是规则图形(它是个棱形),无法使用既有图形,所以我们需要指定一系列点来描绘它;谢天谢地,
ProcessFigure是一个矩形(Rectangle),所以容易创建地多。
列表C.4:ProcessFigure.java
package com.swtjface.AppC;
import org.eclipse.draw2d.*;
import org.eclipse.draw2d.geometry.*;
public class ProcessFigure extends ActivityFigure
{
FixedAnchor inAnchor, outAnchor;
public ProcessFigure()
{
inAnchor = new FixedAnchor(this);
inAnchor.place = new Point(1, 0);
targetAnchors.put("in_proc", inAnchor);
outAnchor = new FixedAnchor(this);
outAnchor.place = new Point(1, 2);
sourceAnchors.put("out_proc", outAnchor);
}
public void paintFigure(Graphics g)
{
Rectangle r = bounds;
g.drawText(message, r.x + r.width/4, r.y + r.height/4);
g.drawRectangle(r.x, r.y, r.width-1, r.height-1);
}
}
TerminatorFigure的左右两条边是圆弧,所以比ProcessFigure要麻烦点,但代码却是不难理解的。
列表C.5:TerminatorFigure.java
package com.swtjface.AppC;
import org.eclipse.draw2d.*;
import org.eclipse.draw2d.geometry.*;
public class TerminatorFigure extends ActivityFigure
{
FixedAnchor inAnchor, outAnchor;
public TerminatorFigure()
{
inAnchor = new FixedAnchor(this);
inAnchor.place = new Point(1, 0);
targetAnchors.put("in_term",inAnchor);
outAnchor = new FixedAnchor(this);
outAnchor.place = new Point(1, 2);
sourceAnchors.put("out_term",outAnchor);
}
public void paintFigure(Graphics g)
{
Rectangle r = bounds;
g.drawArc(r.x + r.width/8, r.y, r.width/4, r.height-1, 90, 180);
g.drawLine(r.x + r.width/4, r.y, r.x + 3*r.width/4, r.y);
g.drawLine(r.x + r.width/4, r.y + r.height-1, r.x + 3*r.width/4,
r.y + r.height-1);
g.drawArc(r.x + 5*r.width/8, r.y, r.width/4, r.height-1, 270, 180);
g.drawText(message, r.x+3*r.width/8, r.y+r.height/8);
}
}
显然,这些类不会只负责将图形画出来就完事了,还有两个更复杂的方面:一是这些Figure需要连接到其他的Figure
上去,这需要使用ConnectionAnchors(叫做FixedAnchors)。第二,这些图形将来在讲述GEF的时候还要用到,很
多方法现在解释还为时过早(作者这里主要指拖拽、编辑上面的文字等功能)。
由于所有这三个类都继承了ActivityFigure,所以现在该它登场了。这个基类包含上述三个Figure的共性。如列表
C.6所示,他的大部分方法用来跟踪Connections以及Connections的anchors。
列表C.6:ActivityFigure.java
package com.swtjface.AppC;
import org.eclipse.draw2d.*;
import org.eclipse.draw2d.geometry.*;
import java.util.*;
abstract public class ActivityFigure
extends Figure
{
Rectangle r = new Rectangle();
Hashtable targetAnchors = new Hashtable();
Hashtable sourceAnchors = new Hashtable();
String message = new String();
public void setName(String msg)
{
message = msg;
repaint();
}
public ConnectionAnchor ConnectionAnchorAt(Point p)
{
ConnectionAnchor closest = null;
long min = Long.MAX_VALUE;
Hashtable conn = getSourceConnectionAnchors();
conn.putAll(getTargetConnectionAnchors());
Enumeration e = conn.elements();
while (e.hasMoreElements())
{
ConnectionAnchor c = (ConnectionAnchor) e.nextElement();
Point p2 = c.getLocation(null);
long d = p.getDistance2(p2);
if (d < min)
{
min = d;
closest = c;
}
}
return closest;
}
public ConnectionAnchor getSourceConnectionAnchor(String name)
{
return (ConnectionAnchor)sourceAnchors.get(name);
}
public ConnectionAnchor getTargetConnectionAnchor(String name)
{
return (ConnectionAnchor)targetAnchors.get(name);
}
public String getSourceAnchorName(ConnectionAnchor c)
{
Enumeration enum = sourceAnchors.keys();
String name;
while (enum.hasMoreElements())
{
name = (String)enum.nextElement();
if (sourceAnchors.get(name).equals(c))
return name;
}
return null;
}
public String getTargetAnchorName(ConnectionAnchor c)
{
Enumeration enum = targetAnchors.keys();
String name = null;
while (enum.hasMoreElements())
{
name = (String)enum.nextElement();
if (targetAnchors.get(name).equals(c))
return name;
}
return null;
}
public ConnectionAnchor getSourceConnectionAnchorAt(Point p)
{
ConnectionAnchor closest = null;
long min = Long.MAX_VALUE;
Enumeration e = getSourceConnectionAnchors().elements();
while (e.hasMoreElements())
{
ConnectionAnchor c = (ConnectionAnchor) e.nextElement();
Point p2 = c.getLocation(null);
long d = p.getDistance2(p2);
if (d < min)
{
min = d;
closest = c;
}
}
return closest;
}
public Hashtable getSourceConnectionAnchors()
{
return sourceAnchors;
}
public ConnectionAnchor getTargetConnectionAnchorAt(Point p)
{
ConnectionAnchor closest = null;
long min = Long.MAX_VALUE;
Enumeration e = getTargetConnectionAnchors().elements();
while (e.hasMoreElements())
{
ConnectionAnchor c = (ConnectionAnchor) e.nextElement();
Point p2 = c.getLocation(null);
long d = p.getDistance2(p2);
if (d < min)
{
min = d;
closest = c;
}
}
return closest;
}
public Hashtable getTargetConnectionAnchors()
{
return targetAnchors;
}
}
对于ConnectionAnchor和Connection,我们将稍后再讨论。现在让我们看一下Draw2d的几何包。
4.2、Draw2d中的几何和图论
你已经看过如何使用Point和Rectangle,但Draw2d还提供了其他更多的类来处理几何图形。例如更高精度的类
PrecisionPoint,PrecisionRectangle,以及PrecisionDimension。此外还有Ray对象,其作用就像数学中的向量
一样;以及Transform类,用来实现移动、旋转、缩放等功能。
包org.eclipse.draw2d.graph里面有一些用来创建和分析有向图的工具类,例如基本的Node和Edge,以及特有的
布局管理器DirectedGraphLayout。图论已远超本书范围,但如果你对此有兴趣,这个包应该是很有用的。
Draw2d的Figure之间并非是用Edge连接的,而是用Connection,下面来讨论这个类。
5、理解Connection
在前面的代码里,我们不止一次地看到了FixedAnchor这个类,它继承了AbstractConnectionAnchor,使得你可
以可以给两个Figure之间添加连线。由于Connection创建组件之间的联系,所以它们在系统模型和图表中担任重要
角色。管理Connection以及它们的ConnectionAnchor比较复杂,因此理解它们的机制是非常重要的。
5.1、使用ConnectionAnchor
ConnectionAnchor并不可见,它只是指定Figure上的一个点,这个点可以接受Connection。你通过构造函数将
Figure传入,这个Figure叫做ConnectionAnchor的owner,而非parent。使用锚点(anchor)的难点不在于将它
关联到某个Figure,而是如何找准其位置,为此,我们需要重写ConnectionAnchor的getLocation()方法:
列表C.7:FixedAnchor.java
package com.swtjface.AppC;
import org.eclipse.draw2d.*;
import org.eclipse.draw2d.geometry.*;
public class FixedAnchor
extends AbstractConnectionAnchor
{
Point place;
public FixedAnchor(IFigure owner)
{
super(owner);
}
public Point getLocation(Point loc)
{
Rectangle r = getOwner().getBounds();
int x = r.x + place.x * r.width/2;
int y = r.y + place.y * r.height/2;
Point p = new PrecisionPoint(x,y);
getOwner().translateToAbsolute(p);
return p;
}
}
每当owner的位置变动时,getLocation()方法都会被调用。该方法返回的Point对象告诉GUI锚点应被置于何处。
在上例中,我们用getOwner()得到owner的边界,并且用了一个叫做place的成员变量,这个变量用比例的形式指明
锚点在owner中的位置。如此,就算Figure的大小改变,锚点仍能够被置于合适的位置上。
例如,我们想让DesisionFigure的入连接位于他的边界的顶部中点(即棱形的上顶点),那么会是这样:
inAnchor = new FixedAnchor(this);
inAnchor.place = new Point(1, 0);
这里,place被设置为(1,0),即锚点将被放置在相对于Figure的边界水平方向的1/2,垂直方向的0/2处。
5.2、给GUI添加Connection
使用Connection要比使用其anchor容易一些,因为Draw2d框架负责画连接线。Draw2d对Connection接口的实现
是类PolylineConnection,我们的PathFigure则是它的子类:
列表C.8:PathFigure.java
package com.swtjface.AppC;
import org.eclipse.draw2d.*;
public class PathFigure extends PolylineConnection
{
public PathFigure()
{
setTargetDecoration(new PolylineDecoration());
setConnectionRouter(new ManhattanConnectionRouter());
}
}
当然,Connection不仅仅是一条连接线。我们需要设置它的起始和目标Figure,还可以设置它的外观以及经过的
路径,例如可以调用setSourceDecoration()或者setTargetDecoration()方法来设置两个端点的形状。在我们的
例子中,我们为Connection的目标端点创建了一个PolylineDecoration,看上去是个三角形箭头。
除了这些修饰符(decoration),你还可以使用ConnectionEndpointLocator来添加Label甚至其他的Figure。
这些对象通过一个Connection对象和一个boolean变量(该变量指明Figure被加在起始端还是目标端)创建;然后
用setVDistance()方法指定距离Connection的起始端点或目标端点的距离。
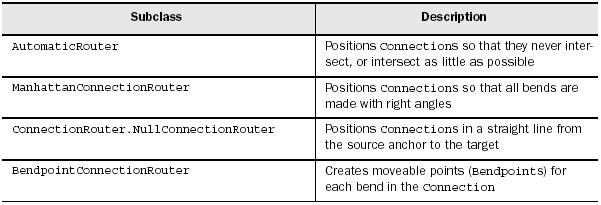
Connection的路径(router)指的是从一个锚点到另一个锚点所经过的路径。以下是AbstractConnectionRouter
的四个子类,列于表C.5
表C.5
在图C.2中(见第二部分),你可以看到,我们的PathFigure总是向右拐角,这是因为我们采用了ManhattanConnectionRouter。
请注意,如果你的LayeredPane包含有一个ConnectionLayer,你也可以用它来设置路径。
现在,我们理解了Draw2d的Figure和Connection,在最后,我们将这两者结合起来。
6、集成
现在,我们几乎可以动手来写flowchart的主类代码了。但在此之前,我们先来了解一下在Draw2d中如何实现对Figure
的拖拽。另外,我们还会加入一个FigureFactory类,专门用来创建Figure。
6.1、Draw2d的拖拽
我们前面提到过一些Draw2d中比较重要的listener和event,但里面没有像SWT中的DragSource、DropTarget那样含义
直观的类。这是因为在写本文的时候,Draw2d尚未加入该特性,所以,我们下面要讲的Dnd类,将依赖Figure本身的特性,
将自己移动到合适的位置。
列表C.9:Dnd.java
package com.swtjface.AppC;
import org.eclipse.draw2d.*;
import org.eclipse.draw2d.geometry.*;
public class Dnd extends MouseMotionListener.Stub
implements MouseListener
{
public Dnd(IFigure figure)
{
figure.addMouseMotionListener(this);
figure.addMouseListener(this);
}
Point start;
public void mouseReleased(MouseEvent e){}
public void mouseClicked(MouseEvent e){}
public void mouseDoubleClicked(MouseEvent e){}
public void mousePressed(MouseEvent e)
{
start = e.getLocation();
}
public void mouseDragged(MouseEvent e)
{
Point p = e.getLocation();
Dimension d = p.getDifference(start);
start = p;
Figure f = ((Figure)e.getSource());
f.setBounds(f.getBounds().getTranslated(d.width, d.height));
}
}
这个类继承了MouseMotionListener.Stub,这实际上是MouseMotionListener的一个空实现,使得你不必重写接口
MouseMotionListener内所有的方法。另外,由于我们需要在鼠标点击的时候做些事,所以实现了MouseListener接口。
6.2、使用FigureFactory创建Figure
我们将使用工厂模式来创建各个Figure,对应的类如下:
列表C.10:FigureFactory.java
package com.swtjface.AppC;
import org.eclipse.draw2d.IFigure;
public class FigureFactory
{
public static IFigure createTerminatorFigure()
{
return new TerminatorFigure();
}
public static IFigure createDecisionFigure()
{
return new DecisionFigure();
}
public static IFigure createProcessFigure()
{
return new ProcessFigure();
}
public static PathFigure createPathFigure()
{
return new PathFigure();
}
public static ChartFigure createChartFigure()
{
return new ChartFigure();
}
}
现在,我们已经创建了所有需要的Figure类以及生成它们的工厂,可以动手写可执行的主类了。
6.3、Flowchart类
最后的Flowchart如下:(译注:在这个类里,原作者并没有使用FigureFactory创建Figure,是疏漏)
列表C.11:Flowchart.java
package com.swtjface.AppC;
import org.eclipse.swt.widgets.*;
import org.eclipse.draw2d.*;
import org.eclipse.draw2d.geometry.*;
public class Flowchart
{
public static void main(String args[])
{
Shell shell = new Shell();
shell.setSize(200,300);
shell.open();
shell.setText("Flowchart");
LightweightSystem lws = new LightweightSystem(shell);
ChartFigure flowchart = new ChartFigure();
lws.setContents(flowchart);
TerminatorFigure start = new TerminatorFigure();
start.setName("Start");
start.setBounds(new Rectangle(40,20,80,20));
DecisionFigure dec = new DecisionFigure();
dec.setName("Should I?");
dec.setBounds(new Rectangle(30,60,100,60));
ProcessFigure proc = new ProcessFigure();
proc.setName("Do it!");
proc.setBounds(new Rectangle(40,140,80,40));
TerminatorFigure stop = new TerminatorFigure();
stop.setName("End");
stop.setBounds(new Rectangle(40,200,80,20));
PathFigure path1 = new PathFigure();
path1.setSourceAnchor(start.outAnchor);
path1.setTargetAnchor(dec.inAnchor);
PathFigure path2 = new PathFigure();
path2.setSourceAnchor(dec.yesAnchor);
path2.setTargetAnchor(proc.inAnchor);
PathFigure path3 = new PathFigure();
path3.setSourceAnchor(dec.noAnchor);
path3.setTargetAnchor(stop.inAnchor);
PathFigure path4 = new PathFigure();
path4.setSourceAnchor(proc.outAnchor);
path4.setTargetAnchor(stop.inAnchor);
flowchart.add(start);
flowchart.add(dec);
flowchart.add(proc);
flowchart.add(stop);
flowchart.add(path1);
flowchart.add(path2);
flowchart.add(path3);
flowchart.add(path4);
new Dnd(start);
new Dnd(proc);
new Dnd(dec);
new Dnd(stop);
Display display = Display.getDefault();
while (!shell.isDisposed())
{
if (!display.readAndDispatch())
display.sleep();
}
}
}
虽然这个类的代码较长,但很容易理解。首先,将ChartFigure加到LightweightSystem上,然后创建并初始化四个Figure,
它们通过PathFigure相连接。当所有的Figure都加到图上后,每个Figure都和一个Dnd对相关联,以提供鼠标拖拽功能。


 1199
1199

 被折叠的 条评论
为什么被折叠?


