


废话不多说,直接上代码:
Java代码:
Main.java
package com.JavaTiger;
import android.app.Activity;
import android.app.AlertDialog;
import android.content.DialogInterface;
import android.content.Intent;
import android.os.Bundle;
import android.view.KeyEvent;
import android.view.View;
import android.view.Window;
import android.view.View.OnClickListener;
import android.widget.Button;
import android.widget.TextView;
public class Main extends Activity {
@Override
public void onCreate(Bundle savedInstanceState) {
setTheme(R.style.CustomTheme);
super.onCreate(savedInstanceState);
requestWindowFeature(Window.FEATURE_CUSTOM_TITLE);
setContentView(R.layout.main);
getWindow().setFeatureInt(Window.FEATURE_CUSTOM_TITLE, R.layout.title);
tvTitle = (TextView) findViewById(R.id.Titletext);
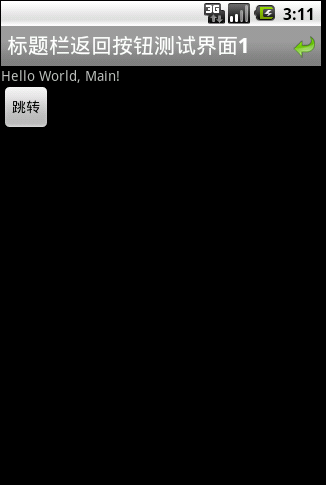
tvTitle.setText("标题栏返回按钮测试界面1");
btnBack = (Button) findViewById(R.id.TitleBackBtn);
btnBack.setOnClickListener(new OnClickListener() {
public void onClick(View v) {
KeyEvent newEvent = new KeyEvent(KeyEvent.ACTION_DOWN,
KeyEvent.KEYCODE_BACK);
onKeyDown(KeyEvent.KEYCODE_BACK, newEvent);
}
});
btnNext = (Button) findViewById(R.id.Button);
btnNext.setOnClickListener(new OnClickListener() {
public void onClick(View v) {
Intent intent = new Intent();
intent.setClass(Main.this, Next.class);
startActivity(intent);
}
});
}
@Override
public boolean onKeyDown(int keyCode, KeyEvent event) {
if (keyCode == KeyEvent.KEYCODE_BACK && event.getRepeatCount() == 0) {
// 按下的如果是BACK,同时没有重复
askForOut();
return true;
}
return super.onKeyDown(keyCode, event);
}
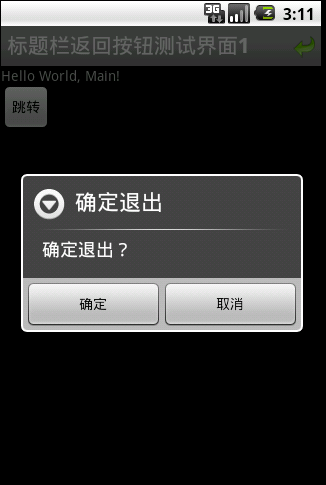
private void askForOut() {
AlertDialog.Builder builder = new AlertDialog.Builder(this);
builder.setTitle("确定退出").setMessage("确定退出?").setPositiveButton("确定",
new DialogInterface.OnClickListener() {
@Override
public void onClick(DialogInterface dialog, int which) {
finish();
}
}).setNegativeButton("取消",
new DialogInterface.OnClickListener() {
@Override
public void onClick(DialogInterface dialog, int which) {
dialog.cancel();
}
}).setCancelable(false).show();
}
public TextView tvTitle;
public Button btnBack;
public Button btnNext;
}
注意:上面代码中红色代码的顺序,不能随便改变,一定要按照次顺序,否则会报错!
Next.java
package com.JavaTiger;
import android.app.Activity;
import android.os.Bundle;
import android.view.KeyEvent;
import android.view.View;
import android.view.Window;
import android.view.View.OnClickListener;
import android.widget.Button;
import android.widget.TextView;
public class Next extends Activity {
@Override
public void onCreate(Bundle savedInstanceState) {
setTheme(R.style.CustomTheme);
super.onCreate(savedInstanceState);
requestWindowFeature(Window.FEATURE_CUSTOM_TITLE);
setContentView(R.layout.next);
getWindow().setFeatureInt(Window.FEATURE_CUSTOM_TITLE, R.layout.title);
tvTitle = (TextView) findViewById(R.id.Titletext);
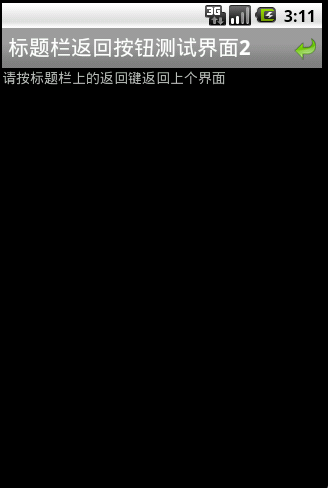
tvTitle.setText("标题栏返回按钮测试界面2");
btnBack = (Button) findViewById(R.id.TitleBackBtn);
btnBack.setOnClickListener(new OnClickListener() {
public void onClick(View v) {
KeyEvent newEvent = new KeyEvent(KeyEvent.ACTION_DOWN,
KeyEvent.KEYCODE_BACK);
onKeyDown(KeyEvent.KEYCODE_BACK, newEvent);
}
});
}
public Button btnBack;
public TextView tvTitle;
}xml布局文件:
style.xml
<?xml version="1.0" encoding="utf-8"?>
<resources>
	<style name="CustomTheme" parent="android:Theme">
		<item name="android:windowTitleSize">40dip</item>
	</style>
</resources> <?xml version="1.0" encoding="utf-8"?>
<RelativeLayout xmlns:android="http://schemas.android.com/apk/res/android"
android:layout_width="fill_parent"
android:layout_height="fill_parent">
<TextView
android:id="@+id/Titletext"
android:layout_width="wrap_content"
android:layout_height="wrap_content"
android:layout_alignParentLeft="true"
android:textSize="21dp"
android:layout_marginTop="3dp"
android:textColor="#ffffffff"
android:textStyle="bold"/>
<Button
android:id="@+id/TitleBackBtn"
android:layout_width="wrap_content"
android:layout_height="wrap_content"
android:background="@drawable/back"
android:gravity="center"
android:layout_marginTop="9dp"
android:layout_alignParentRight="true"/>
</RelativeLayout>
main.xml
<?xml version="1.0" encoding="utf-8"?>
<LinearLayout xmlns:android="http://schemas.android.com/apk/res/android"
    android:orientation="vertical"
    android:layout_width="fill_parent"
    android:layout_height="fill_parent">
	<TextView
	    android:layout_width="fill_parent"
	    android:layout_height="wrap_content"
	    android:text="@string/hello"/>
	<Button
		android:text="跳转"
		android:id="@+id/Button"
		android:layout_width="wrap_content"
		android:layout_height="wrap_content"/>
</LinearLayout>
<?xml version="1.0" encoding="utf-8"?>
<LinearLayout xmlns:android="http://schemas.android.com/apk/res/android"
    android:orientation="vertical"
    android:layout_width="fill_parent"
    android:layout_height="fill_parent">
	<TextView
	    android:layout_width="fill_parent"
	    android:layout_height="wrap_content"
	    android:text="请按标题栏上的返回键返回上个界面"/>
</LinearLayout>
欲行效果图如下:
demo源码下载链接 TitliBarBackBtn.rar


 5534
5534

 被折叠的 条评论
为什么被折叠?
被折叠的 条评论
为什么被折叠?
 到【灌水乐园】发言


