


首先是spring的配置文件
<?xml version="1.0" encoding="UTF-8"?>
<beans xmlns="http://www.springframework.org/schema/beans"
	xmlns:xsi="http://www.w3.org/2001/XMLSchema-instance" xmlns:p="http://www.springframework.org/schema/p"
	xmlns:aop="http://www.springframework.org/schema/aop" xmlns:util="http://www.springframework.org/schema/util"
	xsi:schemaLocation="http://www.springframework.org/schema/beans http://www.springframework.org/schema/beans/spring-beans.xsd
						http://www.springframework.org/schema/aop http://www.springframework.org/schema/aop/spring-aop-2.5.xsd
						http://www.springframework.org/schema/util http://www.springframework.org/schema/util/spring-util-2.5.xsd">

	<bean id="producer" class="springJMS.Producer">
		<property name="jmsTemplate" ref="jmsTemplate" />
	</bean>

	<bean id="consumer" class="springJMS.Consumer">
		<property name="jmsTemplate" ref="jmsTemplate" />
	</bean>

	<bean id="jndiTemplate" class="org.springframework.jndi.JndiTemplate">
        <property name="environment">
            <props>
                <prop key="java.naming.factory.initial">com.tibco.tibjms.naming.TibjmsInitialContextFactory</prop>
                <prop key="java.naming.provider.url">tibjmsnaming://gftsint.nam.nsroot.net:7222</prop>
                <prop key="java.naming.factory.url.pkgs">com.tibco.tibjms.naming</prop>
            </props>
        </property>
    </bean>

    <bean id="jndiQueueConnectionFactory" class="org.springframework.jndi.JndiObjectFactoryBean">
        <property name="jndiName" value="tech.na.cars.QueueCF"/>
        <property name="jndiTemplate" ref="jndiTemplate"/>

    </bean>

    <bean id="queueConnectionFactory" class="org.springframework.jms.connection.CachingConnectionFactory">
        <property name="targetConnectionFactory" ref="jndiQueueConnectionFactory"/>
        <property name="sessionCacheSize" value="1"/>
	</bean>

	<bean id="queueDestination" class="org.springframework.jndi.JndiObjectFactoryBean">
   		<property name="jndiTemplate" ref="jndiTemplate"/>
   		<property name="jndiName" value="tech.na.cars.cvas5.request.queue"/>
	</bean>

	<bean id="jmsTemplate" class="org.springframework.jms.core.JmsTemplate">
		<property name="connectionFactory" ref="queueConnectionFactory" />
		<property name="receiveTimeout" value="600000" />
		<property name="timeToLive" value="3600000" />
		<property name="defaultDestination" ref="queueDestination"/>
	</bean>
</beans>
编写Producer类,用来发送JMS
import javax.jms.JMSException;
import javax.jms.Message;
import javax.jms.Session;
import javax.jms.TextMessage;

import org.springframework.jms.core.JmsTemplate;
import org.springframework.jms.core.MessageCreator;

public class Producer {
    private JmsTemplate jmsTemplate;

    public void send(){
        jmsTemplate.send(new MessageCreator(){

            @Override
            public Message createMessage(Session session) throws JMSException {
                TextMessage message = session.createTextMessage("Hello, this is a spring JMS message");

                return message;
            }

        });
    }

    public JmsTemplate getJmsTemplate() {
        return jmsTemplate;
    }

    public void setJmsTemplate(JmsTemplate jmsTemplate) {
        this.jmsTemplate = jmsTemplate;
    }
}
编写Consumer类,用来接收消息
import javax.jms.JMSException;
import javax.jms.TextMessage;

import org.springframework.jms.core.JmsTemplate;

public class Consumer {
    private JmsTemplate jmsTemplate;

    public void receive(){
        TextMessage message = (TextMessage) jmsTemplate.receive();
        if(message == null){
            System.out.println("no message received!");
        }else{
            try {
                System.out.println(message.getText());
            } catch (JMSException e) {
                e.printStackTrace();
            }
        }
    }

    public JmsTemplate getJmsTemplate() {
        return jmsTemplate;
    }

    public void setJmsTemplate(JmsTemplate jmsTemplate) {
        this.jmsTemplate = jmsTemplate;
    }
}
最后编写测试类:
import org.springframework.context.support.ClassPathXmlApplicationContext;

public class TestJMS {
    private static ClassPathXmlApplicationContext factory = null;

    public static void main(String[] args){
        String[] xmlProperties = new String[] { "beans/spring-jms-test.xml"};
        factory = new ClassPathXmlApplicationContext(xmlProperties);

        Producer producer = (Producer) factory.getBean("producer");
        producer.send();

        Consumer consumer = (Consumer) factory.getBean("consumer");
        consumer.receive();
    }
}
说明:
可以看到,用JmsTemplate收发消息非常简单,因为JmsTemplate几乎帮我们做了大多数的工作,相关关系如下图所示(可结合app-context.xml理解):
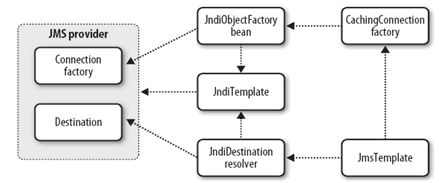
步骤与不使用Spring相似,只是都是通过配置完成的。


 1万+
1万+


 被折叠的 条评论
为什么被折叠?
被折叠的 条评论
为什么被折叠?
 到【灌水乐园】发言


