


这两天也调了一下ios的录音,原文链接:http://www.iphoneam.com/blog/index.php?title=using-the-iphone-to-record-audio-a-guide&more=1&c=1&tb=1&pb=1
这里ios的录音功能主要依靠AVFoundation.framework与CoreAudio.framework来实现
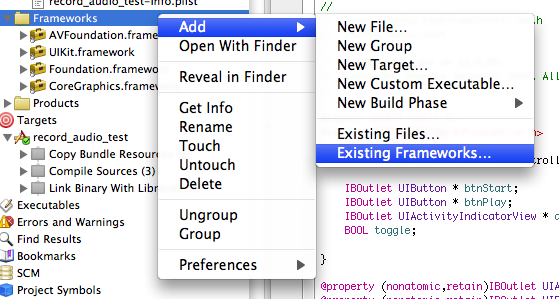
在工程内添加这两个framework
我这里给工程命名audio_text
在生成的audio_textViewController.h里的代码如下
#import <UIKit/UIKit.h> #import <AVFoundation/AVFoundation.h> #import <CoreAudio/CoreAudioTypes.h> @interface audio_textViewController : UIViewController { IBOutlet UIButton *bthStart; IBOutlet UIButton *bthPlay; IBOutlet UITextField *freq; IBOutlet UITextField *value; IBOutlet UIActivityIndicatorView *actSpinner; BOOL toggle; //Variable setup for access in the class NSURL *recordedTmpFile; AVAudioRecorder *recorder; NSError *error; } @property (nonatomic,retain)IBOutlet UIActivityIndicatorView *actSpinner; @property (nonatomic,retain)IBOutlet UIButton *bthStart; @property (nonatomic,retain)IBOutlet UIButton *bthPlay; -(IBAction)start_button_pressed; -(IBAction)play_button_pressed; @end audio_textViewController.m
#import "audio_textViewController.h" @implementation audio_textViewController - (void)viewDidLoad { [super viewDidLoad]; //Start the toggle in true mode. toggle = YES; bthPlay.hidden = YES; //Instanciate an instance of the AVAudioSession object. AVAudioSession * audioSession = [AVAudioSession sharedInstance]; //Setup the audioSession for playback and record. //We could just use record and then switch it to playback leter, but //since we are going to do both lets set it up once. [audioSession setCategory:AVAudioSessionCategoryPlayAndRecord error: &error]; //Activate the session [audioSession setActive:YES error: &error]; } /* // The designated initializer. Override to perform setup that is required before the view is loaded. - (id)initWithNibName:(NSString *)nibNameOrNil bundle:(NSBundle *)nibBundleOrNil { self = [super initWithNibName:nibNameOrNil bundle:nibBundleOrNil]; if (self) { // Custom initialization } return self; } */ /* // Implement loadView to create a view hierarchy programmatically, without using a nib. - (void)loadView { } */ /* // Implement viewDidLoad to do additional setup after loading the view, typically from a nib. - (void)viewDidLoad { [super viewDidLoad]; } */ /* // Override to allow orientations other than the default portrait orientation. - (BOOL)shouldAutorotateToInterfaceOrientation:(UIInterfaceOrientation)interfaceOrientation { // Return YES for supported orientations return (interfaceOrientation == UIInterfaceOrientationPortrait); } */ - (IBAction) start_button_pressed{ if(toggle) { toggle = NO; [actSpinner startAnimating]; [bthStart setTitle:@"停" forState: UIControlStateNormal ]; bthPlay.enabled = toggle; bthPlay.hidden = !toggle; //Begin the recording session. //Error handling removed. Please add to your own code. //Setup the dictionary object with all the recording settings that this //Recording sessoin will use //Its not clear to me which of these are required and which are the bare minimum. //This is a good resource: http://www.totodotnet.net/tag/avaudiorecorder/ NSMutableDictionary* recordSetting = [[NSMutableDictionary alloc] init]; [recordSetting setValue :[NSNumber numberWithInt:kAudioFormatAppleIMA4] forKey:AVFormatIDKey]; [recordSetting setValue:[NSNumber numberWithFloat:[freq.text floatValue]] forKey:AVSampleRateKey]; [recordSetting setValue:[NSNumber numberWithInt: [value.text intValue]] forKey:AVNumberOfChannelsKey]; //Now that we have our settings we are going to instanciate an instance of our recorder instance. //Generate a temp file for use by the recording. //This sample was one I found online and seems to be a good choice for making a tmp file that //will not overwrite an existing one. //I know this is a mess of collapsed things into 1 call. I can break it out if need be. recordedTmpFile = [NSURL fileURLWithPath:[NSTemporaryDirectory() stringByAppendingPathComponent: [NSString stringWithFormat: @"%.0f.%@", [NSDate timeIntervalSinceReferenceDate] * 1000.0, @"caf"]]]; NSLog(@"Using File called: %@",recordedTmpFile); //Setup the recorder to use this file and record to it. recorder = [[ AVAudioRecorder alloc] initWithURL:recordedTmpFile settings:recordSetting error:&error]; //Use the recorder to start the recording. //Im not sure why we set the delegate to self yet. //Found this in antother example, but Im fuzzy on this still. [recorder setDelegate:self]; //We call this to start the recording process and initialize //the subsstems so that when we actually say "record" it starts right away. [recorder prepareToRecord]; //Start the actual Recording [recorder record]; //There is an optional method for doing the recording for a limited time see //[recorder recordForDuration:(NSTimeInterval) 10] } else { toggle = YES; [actSpinner stopAnimating]; [bthStart setTitle:@"开始录音" forState:UIControlStateNormal ]; bthPlay.enabled = toggle; bthPlay.hidden = !toggle; NSLog(@"Using File called: %@",recordedTmpFile); //Stop the recorder. [recorder stop]; } } - (void)didReceiveMemoryWarning { // Releases the view if it doesn't have a superview. [super didReceiveMemoryWarning]; // Release any cached data, images, etc that aren't in use. } -(IBAction) play_button_pressed{ //The play button was pressed... //Setup the AVAudioPlayer to play the file that we just recorded. AVAudioPlayer * avPlayer = [[AVAudioPlayer alloc] initWithContentsOfURL:recordedTmpFile error:&error]; [avPlayer prepareToPlay]; [avPlayer play]; } - (void)viewDidUnload { // Release any retained subviews of the main view. // e.g. self.myOutlet = nil; //Clean up the temp file. NSFileManager * fm = [NSFileManager defaultManager]; [fm removeItemAtPath:[recordedTmpFile path] error:&error]; //Call the dealloc on the remaining objects. [recorder dealloc]; recorder = nil; recordedTmpFile = nil; } - (void)dealloc { [super dealloc]; } @end 最后在interface builder里面绘制好界面,如
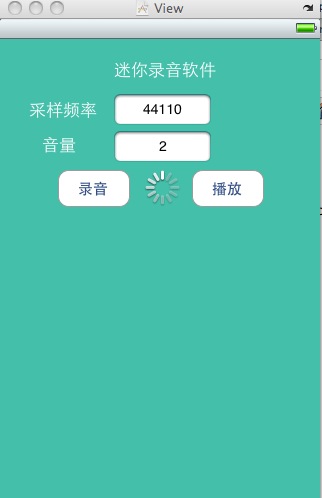
设置下按键的属性

基本就ok了,可以开始录音了。


 4万+
4万+

 被折叠的 条评论
为什么被折叠?
被折叠的 条评论
为什么被折叠?
 到【灌水乐园】发言


