


Android布局ConstraintLayout
public class ConstraintLayout
extends ViewGroup

java.lang.Object
   ↳	android.view.View
 	   ↳	android.view.ViewGroup
 	 	   ↳	android.support.constraint.ConstraintLayout
ConstraintLayout 布局继承自 ViewGroup,它可以很灵活的指定控件的位置和大小。
注意:ConstraintLayout 在Android系统API 9(Gingerbread)开始引入。随着时间的推移,官方一直在丰富其API和功能。
目前有以下一些约束类型可用:
- Relative positioning,相对定位
- Margins,边距
- Centering positioning,中心定位
- Circular positioning,圆形定位
- Visibility behavior,可见性行为
- Dimension constraints,维度约束
- Chains,链条
- Virtual Helpers objects,虚拟辅助对象
- Optimizer,优化
注意: 在约束条件下,不能有循环依赖关系。
开发指南
Relative positioning (相对定位)
相对定位,是 ConstraintLayout布局 中创建布局的基本构件之一。它可以将控件A以相对于控件B的约束方式去定位。你可以在水平和竖直的方向去约束控件:
- Horizontal Axis: 左、右、开始、结束方向
- Vertical Axis: 上、下、文本基线方向
一般来说就是:用一个控件的某一条“边”,去约束其他一个控件的另一条“边”。
例如,为了把控件B放在控件A的右边(图1):

图 1 - 相对定位举例
代码是这样的:
<Button android:id="@+id/buttonA" ... />
         <Button android:id="@+id/buttonB" ...
                 app:layout_constraintLeft_toRightOf="@+id/buttonA" />
这样告诉系统,我们要把控件B的“左边”用控件A的“右边”来约束。这种位置的约束意味着,系统将试图把两条边共享一个位置。

图 2 - 相对定位约束
下面是图2中可用线束:
- layout_constraintLeft_toLeftOf
- layout_constraintLeft_toRightOf
- layout_constraintRight_toLeftOf
- layout_constraintRight_toRightOf
- layout_constraintTop_toTopOf
- layout_constraintTop_toBottomOf
- layout_constraintBottom_toTopOf
- layout_constraintBottom_toBottomOf
- layout_constraintBaseline_toBaselineOf
- layout_constraintStart_toEndOf
- layout_constraintStart_toStartOf
- layout_constraintEnd_toStartOf
- layout_constraintEnd_toEndOf
它们都需要引用别一个控件的id或parent(即指引用父容器,例如):
<Button android:id="@+id/buttonB" ...
                 app:layout_constraintLeft_toLeftOf="parent" />
Margins(边距)

图 3 - 相对定位边距
如果设置了边距,它们将被应用到相关的约束(图3),使得两个控件之间有边距大小的间隙。有这样一些边距属性可以用于这种效果:
- android:layout_marginStart
- android:layout_marginEnd
- android:layout_marginLeft
- android:layout_marginTop
- android:layout_marginRight
- android:layout_marginBottom
注意,边距必须是正数或零。
Margins when connected to a GONE widget(当相连不可见控件时的边距)
当一个约束目标的可见性被设为View.GONE 时,可以使用另一个边距属性保持控件的位置不变,它们与layout_marginXXX 对应:
- layout_goneMarginStart
- layout_goneMarginEnd
- layout_goneMarginLeft
- layout_goneMarginTop
- layout_goneMarginRight
- layout_goneMarginBottom
Centering positioning and bias(居中定位与偏向)
当ConstraintLayout处理“不可能”约束时另一方面的作用。例如,有如下代码:
<android.support.constraint.ConstraintLayout ...>
             <Button android:id="@+id/button" ...
                 app:layout_constraintLeft_toLeftOf="parent"
                 app:layout_constraintRight_toRightOf="parent/>
         </>
除非Button的大小与布局大小一致,不然不可能同时满足上述两种约束(两条边都不能到达它们要去的位置)。

图 4 - 居中定位
对于这种情况,这时的约束行为就像有两个水平方向相同的力,将控件往相反的方向拉(如图4),以致于控件A最终停在父容器的中间位置。垂直方向也是类似的。
Bias(偏向)
当遇到两个相反方向的约束时,默认情况下控件是居中的;然而要想让控件偏向某一边,可以使用bias属性:
- layout_constraintHorizontal_bias
- layout_constraintVertical_bias
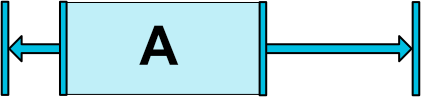
图 5 - 偏向居中定位
例如,下面代码将控件放在水平方向30%的位置(而不是默的50%),这样使得左边距离变短(图5):
<android.support.constraint.ConstraintLayout ...>
             <Button android:id="@+id/button" ...
                 app:layout_constraintHorizontal_bias="0.3"
                 app:layout_constraintLeft_toLeftOf="parent"
                 app:layout_constraintRight_toRightOf="parent/>
         </>
使用偏向属性,可以更好地设计出适配各种屏幕的用户界面。
Circular positioning (圆形定位,v1.1中新加)
图形定位,通过一个控件的中心,以圆形的方式去约束另一个控件,被约束的控件是通过与约束控件的半径与角度来确定的(见图6)。有以下属性可用:
- layout_constraintCircle : 引用另一个控件(圆心控件)id
- layout_constraintCircleRadius : 与圆心控件的距离
- layout_constraintCircleAngle : 垂直角度 ([0,360])

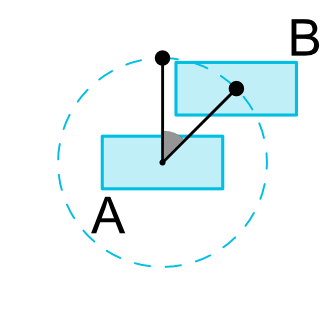
图 6 - 圆形定位
<Button android:id="@+id/buttonA" ... />
  <Button android:id="@+id/buttonB" ...
      app:layout_constraintCircle="@+id/buttonA"
      app:layout_constraintCircleRadius="100dp"
      app:layout_constraintCircleAngle="45" />
Visibility behavior(可见性行为)
ConstraintLayout 布局对不可见(View.GONE)控件有一个特殊的处理。
通常,不可见(View.GONE)控件不会被显示,并且本身已不是布局的一部分(例如,它们的实际维度不会被改变)。
但是,就布局的计算而言,标记为GONE的控件仍然是布局的一部分,有一个重要的区别:
- 对于布局传递,它们的尺寸会被视为0(基本上,它们被解析成一个点);
- 如果它们约束了其他的控件,那么它们将仍然被尊重,但是它们的边距也会被为视为0。

图 7 - 可见性行为
这个特定的行为,可以在不破坏布局的情况下临时将控件标记为GONE(图7),这在做简单的布局动画时特别有用。
注意: 最终的边距是B在连接到A时定义的边距(见图7)。在某些情况下,这可能不是你想要的边距(例如,A对容器有一个100dp的边距,B对A有16dp的边距,当A标记为GONE时,B对容器只有16dp的边距)。出于这个原因,当约束控件为GONE时,你可以指定一个可变的边距值(见:gone margin attributes)。
Dimensions constraints(尺寸约束)
Minimum dimensions on ConstraintLayout(ConstraintLayout最小尺寸)
你可以指定 ConstraintLayout 布局本身的最小值和最大值:
- android:minWidth 指定布局最小宽度
- android:minHeight 指定布局最小高度
- android:maxWidth 指定布局最大宽度
- android:maxHeight 指定布局最大高度
这些值只有在 ConstraintLayout 的尺寸设置为 WRAP_CONTENT 的时候才有效。
Widgets dimension constraints(控件尺寸约束)
控件的尺寸通过 android:layout_width 和 android:layout_height 属性设置,设置方式有3种:
- 直接指定宽、高值(如:123dp)
- 使用 WRAP_CONTENT,让控件去计算本身的尺寸
- 使用 0dp,等价于 MATCH_CONSTRAINT

图 8 - 尺寸约束
前两种方式与其它布局用法类似。第三种方式,会调整控件大小,以匹配约束(见图8,(a)为 wrap_content ,(b)为0dp)。如果设置了边距,它们将会在计算中被考虑进去。
重要:不建议在 ConstraintLayout 布局中用来约束控件。使用 MATCH_CONSTRAINT 来达到类型的功能,只需将控件约束的左/右或上/下设置为 parent。
WRAP_CONTENT : enforcing constraints (v1.1中新加)
当版本1.1之前,如果一个维度设置为WRAP_CONTENT,控件将试图将控件设置为文字尺寸 – 意味着,约束将不会限制尺寸的结果。然而,一般情况下这已经够用(而且更快),在某些情况下,我们可能想要使用WRAP_CONTENT,并且能保持对尺寸结果有强的约束。这时,我们可以下面的相关属性:
- app:layout_constrainedWidth=“true|false”
- app:layout_constrainedHeight=“true|false”
MATCH_CONSTRAINT dimensions (v1.1中新加)
当一个维度设置为MATCH_CONSTRAINT,默认的行为是使得大小占用所有可用的空间。
- **layout_constraintWidth_min and layout_constraintHeight_min : **指定维度的最小值
- **layout_constraintWidth_max and layout_constraintHeight_max : **指定维度的最大值
- **layout_constraintWidth_percent and layout_constraintHeight_percent : **指定这个维度的大小设置为父容器的百分比
Min and Max(最小值和最大值)
min和max和表示的值,可以是Dp,或"wrap",它将使用与 WRAP_CONTENT 相同的值。
Percent dimension(百分比维度)
为了使用百分比,你需要这样设置:
- 维度需要设置为 MATCH_CONSTRAINT (0dp)
- 默认值应该设置为app:layout_constraintWidth_default=“percent” 或 **app:layout_constraintHeight_default=“percent” **(**注意:**这在1.1-beta1和1.1-beta2中是必需的,然而在之后的版本不需要)
- 然后将 layout_constraintWidth_percent 或 layout_constraintHeight_percent 设置为0到1之间的值
Ratio(比率)
你也可以定义控件一个维度作为另一个维度的比率。为此,至少有一个维度为设置为0dp(即 MATCH_CONSTRAINT),并将 layout_constraintDimensionRatio 设置为给定的比率。例如:
         <Button android:layout_width="wrap_content"
                   android:layout_height="0dp"
                   app:layout_constraintDimensionRatio="1:1" />
将按钮的高度设置为与宽度相同。
这个比率可以表示为:
- 浮点数,表示width和height的比值
- 比率,格式为"width:height"
如果两个维度都被设置为 MATCH_CONSTRAINT (0dp),也可以使用比率。在这种情况下,系统设置最大的维度满足所有约束,并保持指定的宽/高比。为了根据另一个方面的维度来约束一个特定的维度,可以预先添加W,或H,来限制宽度或高度。例如,如果一个维度受到两个目标的约束(例如宽度是0dp,并以父容器为中心),可以通过在比率前面加上字母W(用于约束宽度)或H(用于约束高度),用逗号隔开:
         <Button android:layout_width="0dp"
                   android:layout_height="0dp"
                   app:layout_constraintDimensionRatio="H,16:9"
                   app:layout_constraintBottom_toBottomOf="parent"
                   app:layout_constraintTop_toTopOf="parent"/>
将按16:9的比例设置按钮的高度,而按钮的宽度将与父容器的约束相匹配。
Chains(链)
Chains(链)在单轴(水平或垂直)中提供类似于“组”的行为。而另一个轴可以独立地约束。
Creating a chain(创建链)
如果通过双向连接将一组控件连接在一起(见图9,显示一个最小的链,有两个控件)。

图 9 - 链
Chain heads(链头)
Chains由链的第一个元素(链头)的属性控制:

图 10 - 链头
Margins in chains(链的边距)
如果在连接上指定了边距,它们会考虑进去。在扩展链的情况下,边距将从分配的空间中扣除。
Chain Style(链样式)
当在链条的第一个元素上设置属性 layout_constraintHorizontal_chainStyle 或 layout_constraintVertical_chainStyle 时,链条的行为将根据指定的样式进行更改(默认为CHAIN_SPREAD)。
- CHAIN_SPREAD – 元素将被展开(默认样式)
- Weighted chain – 在 CHAIN_SPREAD 模式下,如果一些控件被设置为 MATCH_CONSTRAINT,它们将分割可用空间
- CHAIN_SPREAD_INSIDE – 类似,但链条的端点不会分散开来
- CHAIN_PACKED – 链条的组成部分将被打包在一起。然后,子控件的水平或垂直偏差属性会影响填充元素的位置

图 11 - 链样式
Weighted chains(权重链)
链的默认行为是在可用空间中均匀地分布元素。如果一个或多个元素使用 MATCH_CONSTRAINT ,它们将使用可用的空闲空间(在它们之间平均分配)。属性 layout_constraintHorizontal_weight 和 layout_constraintVertical_weight 将控制如何使用匹配约束来在元素之间分配空间。例如,在一个包含两个元素的链上,使用匹配约束,第一个元素权重为2,第二个元素的权重为1,第一个元素所占用的空间将是第二个元素的两倍。
Margins and chains (边距与链,v1.1可用)
当在链条上使用边距时,边距是附加的。
例如,在水平链上,如果一个元素定义了10dp的右边距,而下一个元素定义了5dp的左边距,那么这两个元素之间的边距是15dp。
当计算链用来定位物品的剩余空间时,一个物品加上它的边距被考虑在一起。剩余的空间不包含边距。
Virtual Helper objects(虚拟辅助对象)
除了前面详细介绍的内在功能之外,您还可以在 ConstraintLayout 中使用特殊的辅助对象来辅助布局。目前,有Guideline可用于 ConstraintLayout 容器的水平和垂直参考线。然后,可以通过将控件限制在这些参考线中来定位。在1.1中,也加入了 Barrier 和 Group。
Optimizer (优化器,v1.1可用)
在1.1版本中,公开了约束optimizer(优化器)。您可以通过添加属性app:layout_optimizationLevel 来决定ConstraintLayout 中哪些元素需要优化。
- **none : **不使用优化
- standard : 默认。只对direct和barrier约束进行优化
- **direct : **优化直接约束
- barrier : 优化屏障约束
- **chain : **优化链式约束(实验性的)
- **dimensions : **优化维度测量(实验性的),减少匹配约束元素的测量数量
这个属性是一个掩码,因此您可以通过列出您想要的选项来决定开启或关闭特定的优化。例如:app:layout_optimizationLevel=“direct|barrier|chain”
Guideline(参考线)
public class Guideline
extends View

java.lang.Object
   ↳	android.view.View
 	   ↳	android.support.constraint.Guideline
工具类Guideline(参考线类)用于 ConstraintLayout 的辅助对象。辅助对象不会显示在设备上(它们被标记为View.GONE),并且仅用于布局。它们只用于 ConstraintLayout 。
Guideline可以是水平的,也可以是垂直的:
- 垂直参考线:宽度为0,高度为 ConstraintLayout 父容器的高
- 水平参考线:高度为0,宽度为 ConstraintLayout 父容器的宽
有3种不同的水平定位Guideline:
- 从左边或布局顶部指定一个固定的距离(layout_constraintGuide_begin)
- 从布局的右边或底部指定一个固定的距离(layout_constraintGuide_end)
- 指定布局的宽度或高度的百分比(layout_constraintGuide_percent)
这样,控件就可以被这个参考线约束,可以很容易地从一个参考线定位多个控件。
例如,用垂直的参考线约束一个按钮:
<android.support.constraint.ConstraintLayout
        xmlns:android="http://schemas.android.com/apk/res/android"
        xmlns:app="http://schemas.android.com/apk/res-auto"
        xmlns:tools="http://schemas.android.com/tools"
        android:layout_width="match_parent"
        android:layout_height="match_parent">

    <android.support.constraint.Guideline
            android:layout_width="wrap_content"
            android:layout_height="wrap_content"
            android:id="@+id/guideline"
            app:layout_constraintGuide_begin="100dp"
            android:orientation="vertical"/>

    <Button
            android:text="Button"
            android:layout_width="wrap_content"
            android:layout_height="wrap_content"
            android:id="@+id/button"
            app:layout_constraintLeft_toLeftOf="@+id/guideline"
            android:layout_marginTop="16dp"
            app:layout_constraintTop_toTopOf="parent" />

</android.support.constraint.ConstraintLayout>
参考:
[1] https://developer.android.google.cn/reference/android/support/constraint/ConstraintLayout
[2] https://developer.android.google.cn/reference/android/support/constraint/Guideline


 3006
3006


 被折叠的 条评论
为什么被折叠?
被折叠的 条评论
为什么被折叠?
 到【灌水乐园】发言


