


 本文介绍了如何使用Python爬取微信公众号文章,解析HTML内容,下载图片,并将内容保存到word文档中。主要涉及requests、BeautifulSoup和python-docx库,详细阐述了每个步骤,包括获取文章标题、内容,解析HTML结构,下载并插入图片到word,以及最终保存文档的完整过程。
1. 相关工具
- Python 3.6。用到了bs4,requests,docx包
- Chrome浏览器
- VS Code
2. 实现原理
使用Python发送URL访问请求,对Response进行中的HTML使用bs4进行解析,截取里面的段落、图片等,最终将其整合成一个完整的word文档。
2.1 HTML解析
使用浏览器打开一个公众号文章,F12查看分析HTML内容。
- 获取title:选择Inspect (红色框)指向Title。查看Elements显示的内容(黑色框)。见下图。在这里可以看到微信公众号title对应的html标签以及此标签的Id、text。

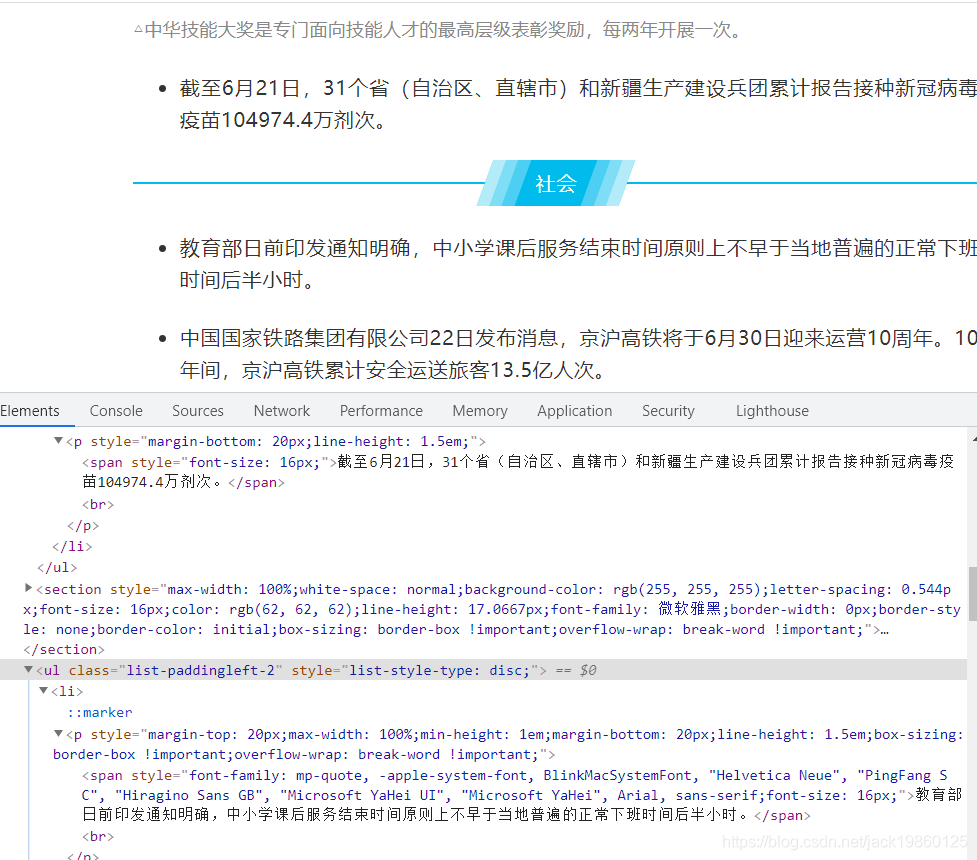
- 获取公众号内容:同样的方式,获取内容,查看标签和Id等信息。如下图:

同时,展开子节点,逐个点击会发现每一个字标签都对应一个段落,这样就方便我们后续的操作了。 - 确保共通性:打开另外一个微信公众号文章,查看Title和Content是否都是同样的标签和Id。结果是一样的。
3. 编码
3.1 pip装包
pip install beautifulsoup4 -i http://pypi.douban.com/simple/ --trusted-host pypi.douban.com
pip install requests -i http://pypi.douban.com/simple/ --trusted-host pypi.douban.com
pip install python-docx -i http://pypi.douban.com/simple/ --trusted-host pypi.douban.com
3.2 HTML解析
获取公众号页面内容
# 导入包
import requests
from bs4 import BeautifulSoup, NavigableString

# 发送公众号的Url请求
response = requests.get('https://mp.weixin.qq.com/s/aYNgwcPLsLeUahE_XZgppw')
# 获取返回内容,这里的htmlText一个完整的HTML页面。也就是F12->Elements tab下看到的。
htmlText = response.text
# 以HTML缩进解析字符串
bs = BeautifulSoup(htmlText, 'html.parser')
print(bs)
在输出bs后,你会得到以下内容:
<!DOCTYPE html>
<html class="">
<head>
xxxxx
<h2 class="rich_media_title" id="activity-name">早啊!新闻来了〔2021.06.23〕</h2>
xxxx
<div class="rich_media_content" id="js_content" style="visibility: hidden;">
xxxx
通过上述内容,我们能够发现:前面截图的公众号title在这里是可以找到的。同样,公众号内容也可以找到。接下来我们需要做的就是,获取公众号的title和content。
首先,我们尝试对获取对应的title,titile标签内容如下:
<h2 class="rich_media_title" id="activity-name">早啊!新闻来了〔2021.06.23〕</h2>
使用bs4,查找上述包含title的h2标签
# 查看bs字符串中的h2标签。同时,标签的id属性等于activity-name
titleDiv = bs.find(name='h2', attrs={'id': {'activity-name'}})
title = titleDiv.text.strip
print(title ) # 输出内容:早啊!新闻来了〔2021.06.23〕
title已经获取到了,接下来我们来获取公众号的内容。代码如下:
# 找到包含内容的Div控件。
contentDiv = bs.find(name='div', attrs={'id': {'js_content'}})
# 输出控件内容。输入内容见下图
print(contentDiv)
print的返回值与Debbug窗口内容一致:

上图可以看到contentDiv节点下包含了很多的子节点,我们对子节点展开,并与公众号内容对比一下:
会发现文本内容和图片都保存在子节点的叶子节点中。基于这个结论,我们就可以继续获取公众号内容了。
def _recursiveTag(self, tag, isInPFlag):
text = ''
currentUpdateFlag = False
# tag.contents获取Html标签的全部子标签
for childTag in tag.contents:
if isInPFlag:
pFlag = isInPFlag
else:
# 检查标签名字,一般内容都在P或者h3标签中
pFlag = childTag.name == 'p' or childTag.name == 'h3'
currentUpdateFlag = True if pFlag else False
if isinstance(childTag, NavigableString):
# 当前tag是一个字符串,非HTML标签。例如:
# <span> ● <strong>xxx</strong> 老年人打车服务专线年底开通 </span>
# 遍历到● 和 老年人打车服务专线年底开通 时进入到此分支。
if childTag != '\n':
# 获取内容
text += self._getText(tag, pFlag)
elif len(childTag.contents) == 0:
# 当前标签无子节点,获取标签内容
text += self._getText(childTag, pFlag)
else:
# 递归遍历
text += self._recursiveTag(childTag, pFlag)
if currentUpdateFlag:
if text != '' and not text.endswith('\n'):
text += '\n'
currentUpdateFlag = False
return text
# 获取页面下的包含所有内容的主节点
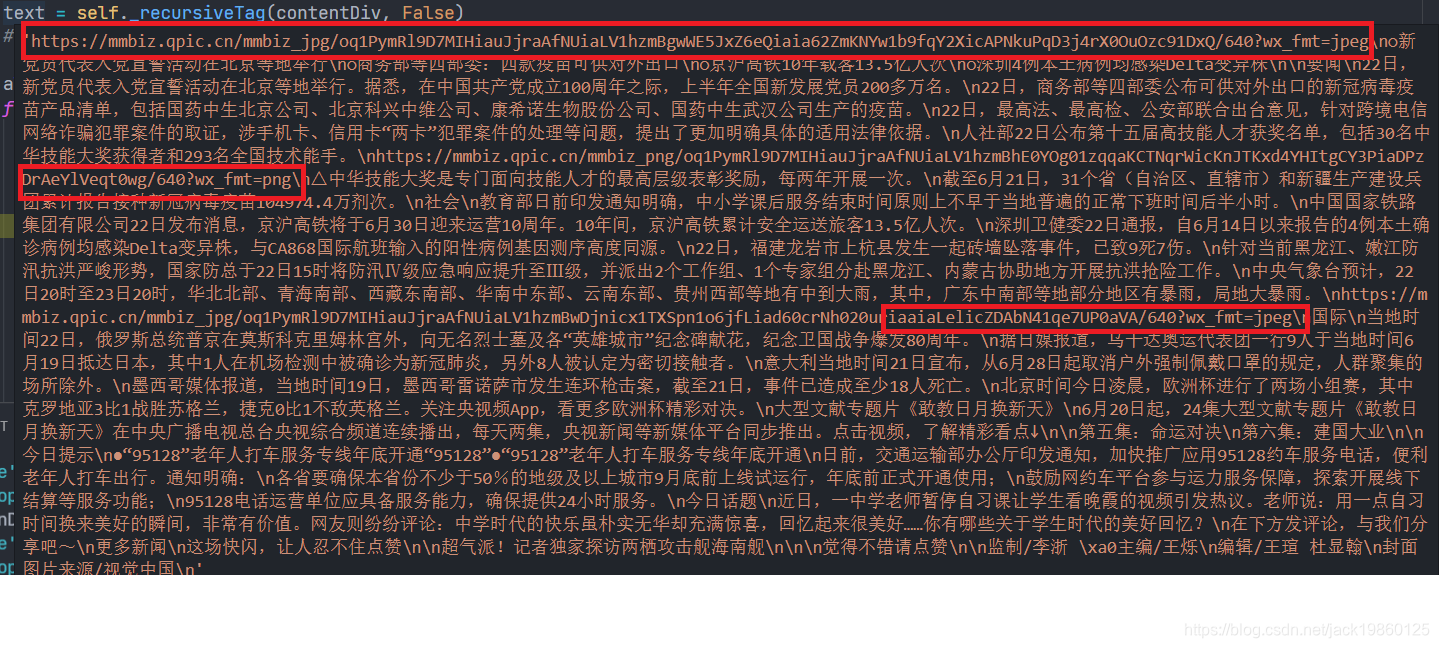
text = self._recursiveTag(contentDiv, False)
# 最终我们获取了一个完整的文本内容。内容见下图
print(text)
在输出内容后,会看到内容中包含了很多的图片内容,为了保证我们获取公众号内容的完整性,这部分内容通常我们需要下载对应的图片,并保存到word中。
3.3 下载图片
在上面的图片中,能看到图片完整的URL。我们使用requests包访问此url即可以获取图片对应的的内容然后保存到本地即可。
def _getPicExtension(self, url):
    try:
    	# 获取图片的格式。
    	# url: https://mmbiz.qpic.cn/mmbiz_jpg/oq1PymRl9D7Mxxxxxxxxx
    	# 使用正则表达式,获取得到jpg
        reFormat = '''http.*?mmbiz_(.*?)/.*'''
        extension = re.search(reFormat, url).group(1)
    except:
    	# 部分图片是特殊的格式,但是较少,此处不处理了,直接强制使用jpg。感兴趣的大家自己研究吧。
        print('image extension error:' + url)
        extension = 'jpg'
    return extension

def _downloadPic(self, url, tempName):
	# 发送图片URL访问请求,获取图片内容
    pic = requests.get(url, timeout=20)
    # 获取图片后缀
    picExtension = self._getPicExtension(url)
    folderName = self._document.fileName.split('\\')[-1].split('.')[0].replace('"','')
    currentDate = time.strftime("%Y%m%d", time.localtime())
    dirPath = os.path.abspath('.') + '\\content\\' + \
        currentDate + '\\' + folderName
    if not os.path.exists(dirPath):
        os.makedirs(dirPath)
    # 保存到本地指定目录下。
    path = dirPath + '\\' + str(tempName) + '.' + picExtension
    # 创建本地图片文件,写入requests返回的图片内容。
    fp = open(path, 'wb+')
    fp.write(pic.content)
    fp.close()

    return path
3.4 保存到word中
# coding:utf-8
import os
import time

import docx
from docx.enum.text import WD_LINE_SPACING # 段落的行距格式
from docx.oxml.ns import qn
from docx.shared import Pt #设置像素、缩进等

H1 = 1
H2 = 2
H3 = 3
H4 = 4
Normal = 5
Image = 6


class WordDocument(object):
    def __init__(self, fileName):
        self.currentDate = time.strftime("%Y%m%d", time.localtime())
        # 文档保存地址
        self._fileName = os.path.abspath('.') + '\\content\\' + self.currentDate + '\\' + fileName
        self._content = []
        self.url = ''

    @property
    def fileName(self):
        return self._fileName

    def updateFileName(self, fileName):
        self._fileName = os.path.abspath('.') + '\\content\\' + self.currentDate + '\\' + fileName + ".docx"

    def addNormalContent(self, lineObj):
    	# 增加正文
        self._content.append({'Type': Normal, 'Value': lineObj})

    def addTitleContent(self, titleStr):
    	# 增加H1标题
        self._content.append({'Type': H1, 'Value': titleStr})

    def addImageContent(self, imagePath):
    	# 增加图片
        self._content.append({'Type': Image, 'Value': imagePath})

    def save(self):
    	# 实例化word文档
        document = docx.Document()
        # 设置文档的字体
        document.styles['Normal'].font.name = '宋体'
        document.styles['Normal']._element.rPr.rFonts.set(qn('w:eastAsia'), '宋体')

        if self.url != '':
        	# 在word中增加一段
            p = document.add_paragraph()
            # 显示公众号链接
            run = p.add_run('公众号链接:' + self.url)
            # 指定行距:单行
            run.line_spacing_rule = WD_LINE_SPACING.SINGLE
            # 段前
            run.space_after = Pt(3)
            # 段后
            run.space_before = Pt(0)

        for i in range(0, len(self._content)):
            pa = self._content[i]
            if pa['Type'] == 1:
                p = document.add_paragraph()
                run = p.add_run(pa['Value'])  # 使用add_run添加文字
                # 字体大小设置,和word里面的字号相对应,小一
                run.font.size = Pt(26)
                # 字体加粗
                run.bold = True
            elif pa['Type'] == 6:
                try:
                    pic = document.add_picture(pa['Value'])
                    if pic.width > 14 * 360000:
                        pic.width = 14 * 360000
                except:
                    p = document.add_paragraph()
                    run = p.add_run('一个图片添加失败,请手动添加。' + pa['Value'])
                    # 字体大小设置,和word里面的字号相对应,小一
                    run.font.size = Pt(26)
                    run.bold = True  # 字体加粗
            elif pa['Type'] == 5:
                p = document.add_paragraph()
                run = p.add_run(pa['Value'])
                run.line_spacing_rule = WD_LINE_SPACING.SINGLE
                run.space_after = Pt(3)
                run.space_before = Pt(0)

        document.save(self._fileName)
上述过程写的比较简单,更多的细节操作,大家可以查看python-docx的文档,可以做出来一个非常标准的word。访问链接:python-docx文档.
3. 结束语
至此,就完成了本文的全部内容。文章介绍的比较比较简单,希望能够帮助大家,最后附上源码下载地址: 请点击.


 5724
5724

 被折叠的 条评论
为什么被折叠?
被折叠的 条评论
为什么被折叠?
 到【灌水乐园】发言


