


23、
22、Object.keys()
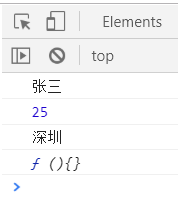
1、处理对象,返回可枚举的属性数组
let person = {name:"张三",age:25,address:"深圳",getName:function(){}};
console.log(Object.keys(person));
2、处理数组,返回索引值数组
let arr = [1,2,3,4,5,6];
console.log(Object.keys(arr));  //["0", "1", "2", "3", "4", "5"]
3、处理字符串,返回索引值数组
let str = "ikun你好";
console.log(Object.keys(str));  // ["0", "1", "2", "3", "4", "5"]
4、常用技巧
let person = {name:"张三",age:25,address:"深圳",getName:function(){}};
Object.keys(person).map((key)=>{
    console.log(person[key]);  // 获取到属性对应的值,做一些处理
})
21、
20、${tag}

19、let { searchValue } = this.data
18、input
			<input
				value="{{searchValue}}"
				placeholder="客户/门店/地址"
				placeholder-class="placeholder"
				bindfocus="handleInput"
				bindinput="handleSearch"
			/>
17、map
       data.markCustomers = customers.map(e => {
          return {
            customer: { id: e.customerId },
            store: { id: e.storeId || null }
          }
        })
16、findIndex
  customerChange(e) {
    const { item } = e.currentTarget.dataset
    const { customers } = this.data
    const index = customers.findIndex(e => e.cusName === item.cusName && e.storeName === item.storeName)
    if (index !== -1) { // 说明有值
      customers.splice(index, 1)
    } else {
      customers.push(item)
    }
    this.setData({
      customers
    })
  },
15、forEach
        customerClockList.forEach(item => {
          item.customers.forEach((item1, index1) => {
            item1.show = false
            if (imgType == 1 && index1 === customerIndex) {
              item1.show = true
            }
          })
        })
14、跳转第三方导航 wx.openLocation
    wx.openLocation({
      latitude: parseFloat(22.932915),
      longitude: parseFloat(113.396852),
      name: '综合市场',//定位名称
      address: '清河综合市场',//具体地址
      scale: 15
    })
13、request
    request({
      url: `/routePlanMark/getCustomer/${this.data.routerId}`,
      method: 'get',
      success: ({ data }) => {
        if (data.resCode === 200) {
         const customerList = data.body
        this.setData({
          customerList
        })
        }
      },
      fail: (err) => {
        $Message({
          content: '获取线路客户失败',
          type: 'error'
        });
      }
    })
12、页面加载
//index.js
//获取应用实例
const app = getApp()

Page({

  /**
   * 页面的初始数据
   */
  data: { },

  /**
   * 生命周期函数--监听页面加载
   */
  onLoad: function (options) { },

  /**
   * 生命周期函数--监听页面初次渲染完成
   */
  onReady: function () { },

  /**
   * 生命周期函数--监听页面显示
   */
  onShow: function () { },

  /**
   * 生命周期函数--监听页面隐藏
   */
  onHide: function () { },

  /**
   * 生命周期函数--监听页面卸载
   */
  onUnload: function () { },

  /**
   * 页面相关事件处理函数--监听用户下拉动作
   */
  onPullDownRefresh: function () { },

  /**
   * 页面上拉触底事件的处理函数
   */
  onReachBottom: function () { },

  /**
   * 用户点击右上角分享
   */
  onShareAppMessage: function () { }
})
11、双重循环获取父循环节点的下标
重点:父节点用wx:for-index=“childindex” (变量名可自己命名)
子节点用data-index="{{childindex}}"获取父节点下标
		<view class="list" wx:for="{{lineList}}" wx:key="indexs" wx:for-index='keys' wx:for-item="item">
			<view class="title">
				<text class="text_color">{{ item.rpName }}</text>
				<view class="imgList">
						<view wx:for="{{item.imgs}}" wx:key="index" wx:for-item="imgItem" class="icondle_images">
							<image src="{{imgItem.path}}" bindtap="previewImage" mode="aspectFill" class="UploadingImg" bindtap="previewImage" data-parentindex="{{keys}}" data-src="{{imgItem.path}}"></image>
							<i-icon type="close" size="10" class="icondle" bindtap="deleteImg" data-parentindex="{{keys}}" data-id="{{imgItem.id}}" data-index="{{index}}"/>
						</view>
						<image class="img" src="{{imgUrl}}/tms/c-camera.svg" bindtap="uploadingImg" data-index="{{keys}}" data-id="{{item.id}}"/>
				</view>

			</view>
			<view class="list-info" bindtap="edit" data-parent='{{keys}}' data-id="{{item.id}}" data-name="{{item.rpName}}">
					<view class="num"  wx:for="{{item.materials}}" wx:key="materIndex" wx:for-item="mater">
						<view>{{mater.typeName}}<text>{{mater.amount}}</text></view>
					</view>
					<image class="edit-icon" src="{{imgUrl}}/tms/m-edit.svg"/>
			</view>
		</view>
10、setData 赋值多层数据
Page({
  data: {
    // 普通:
    text1:1,
    // 对象的属性值:
    text2:{
      text2_1:2,
    },
    // 数组:
    text3:[3,3,3],
    // 数组和对象结合:
    text4:[
      {
        bool:false,
        num:4
      },
      {
        bool:true,
        num:44
      }
    ]
  },
  text1:function(){
    this.setData({
      text1:11111,
    });
  },
  text2: function () {
    var t2 = "text2.text2_1";
    this.setData({
      [t2]: 22222,
    });
  },
  text3: function () {
    var t3 = "text3["+0+"]";
    this.setData({
      [t3]: 33333,
    });
  },
  text4: function () {
    var t4 = "text4["+0+"].num";
    this.setData({
      [t4]: 44444,
    });
  }
})
9、wx.showModal
    if (!this.data.driver) {
      wx.showModal({
        title: '提示信息',
        content: '当前账号未与司机关联,请先关联再报销。',
        confirmText: '我知道了',
        showCancel: false
      })
      return
    }

8、wx.setStorageSync 本地缓存中指定的 key wx.getStorageSync
wx.setStorageSync('userDetail', this.data.userDetail)

  onReady: function () {
    this.setData({
      headImg: wx.getStorageSync('user').headImg || app.globalData.fileUrl + '/oafile/head/head.svg'
    })
  },
7、navigateTo redirectTo switchTab
wx.switchTab:跳转到 tabBar 页面,并关闭其他所有非 tabBar 页面
// app.json
{
  "tabBar": {
    "list": [{
      "pagePath": "index",
      "text": "首页"
    },{
      "pagePath": "other",
      "text": "其他"
    }]
  }
}
wx.switchTab({
  url: '/index'
})
wx.navigateTo:
保留当前页面,跳转到应用内的某个页面
// 注意:调用 navigateTo 跳转时,调用该方法的页面会被加入堆栈,而 redirectTo 方法则不会。见下方示例代码

// 此处是A页面
wx.navigateTo({
  url: '/pages/a/a?id=1'
})

// 此处是B页面
wx.navigateTo({
  url: '/pages/c/c?id=1'
})

// 此处是C页面
//navigateBack,将返回A页面
wx.navigateBack({
  delta: 2
})
wx.redirectTo:
关闭当前页面,跳转到另外一个页面(重定向)
  wx.redirectTo({
    url:"/pages/user/user"
 })
传参跳转
<navigator url="/pages/details/details?id={{item.id}}&is_back=ture">
    ...
</navigator>


或着使用js:

wx.navigateTo({
  url: "/pages/index/index" + ?id=121&is_back=ture
})
接收参数
Page({
  /**
   * 生命周期函数--监听页面加载
   */
  onLoad: function (options) {

    var id = options.id;
    var is_back = options.is_back;
    //.....
  },
})
6、提示 showModal
const showModal = function (msg) {
  wx.showModal({
    title: '提示',
    content: msg,
    showCancel: false
  })
}
showModal('当前设备未录入指纹,请先录入指纹')
5、加载 Loading
    wx.showLoading({
      title: '登录中',
      mask: true
    })
    wx.hideLoading();
4、setData 值到data
    this.setData({
      password: value
    })
3、用户点击右上角分享
  onShareAppMessage: function () {

  },
2、js正则实现数字每三位加逗号分隔符
data: {
    money: 1806.38,
},

onLoad: function (options) {
  this.setData({
    money: this.numFormat(this.data.money),
  })
},

  // 千分位分割
numFormat(num) {
  var c = num.toFixed(num.toString().split(".")[1].length).replace(/(\d)(?=(\d{3})+\.)/g, '$1,')
  return c;
}
1、微信标题更换
 wx.setNavigationBarTitle({
      title: this.data.type === 'create' ? '创建地址' : '编辑地址'
    })


 1063
1063


 被折叠的 条评论
为什么被折叠?
被折叠的 条评论
为什么被折叠?
 到【灌水乐园】发言


