


SpringAop底层运行原理分析
上篇文章分析了SpringAop中的核心关键类,其实那些关键类就是SpringAop启动期几乎所有的类了。搞懂那些类之间的关系基本上就搞懂了SpringAop代理的过程。本节将基于一个简单案例,以及在之前剖析的关键类基础上分析下一个类被SpringAop增强的完整流程。
本文将基于SpringAop的ProxyFactory原生使用方式剖析原理,搞懂ProxyFactory其他两种方式也就搞懂了。因为ProxyFactoryBean、AspectJProxyFactoty底层都是在ProxyFactory的基础上加了一些feature. 剖析原理肯定要搭配一个案例,本文就以一个到ATM上取钱的场景为例。场景如下 :
//定义银行接口
public interface BankService {
	void withdrawMoney(); //取钱
}

//定义银行实现 : ATM
public class ATMService implements BankService {
    @Override
    public void withdrawMoney() {
        System.out.println("ATMService : 取钱成功");
    }
}

//前置通知
public classpublic class ATMBeforeAdvice implements MethodBeforeAdvice {
    @Override
    public void before(Method method, Object[] args, Object target) throws Throwable {
        System.out.println("ATMBeforeAdvice : 欢迎光临");
    }
}

//环绕通知
public class ATMRoundAdvice implements MethodInterceptor {
    @Override
    public Object invoke(MethodInvocation invocation) throws Throwable {
        System.out.println("ATMRoundAdvice.before : 开始取钱");
        Object result = invocation.proceed();
        System.out.println("ATMRoundAdvice.after : 取钱成功");
        return result;
    }
}

//后置通知
public class ATMAfterReturningAdvice implements AfterReturningAdvice {
    @Override
    public void afterReturning(Object returnValue, Method method, Object[] args, Object target) throws Throwable {
        System.out.println("ATMAfterReturningAdvice : 欢迎下次光临");
    }
}

//处理异常通知
public class ATMThrowingAdvice implements ThrowsAdvice {
	//这边为什么使用afterThrowing方法名定义一级为什么使用Exception作为参数? 此处Mark一下,后面会剖析
    public void afterThrowing(Exception ex){
        System.out.println("afterThrowing....");
    }
}

//测试案例
public static void main(String[] args) {
	//创建代理入口ProxyFactory,并且指定要被代理的对象ATMService
	ProxyFactory proxyFactory = new ProxyFactory(new ATMService());
	//向代理入口中添加各个AOP通知
    proxyFactory.addAdvice(new ATMBeforeAdvice());
    proxyFactory.addAdvice(new ATMRoundAdvice());
    proxyFactory.addAdvice(new ATMAfterReturningAdvice());
    proxyFactory.addAdvice(new ATMThrowingAdvice());
    //生成代理对象
    BankService proxy = (BankService) proxyFactory.getProxy();
    //使用AOP生成的代理对象进行连接点调用
    proxy.withdrawMoney();
}

//打印结果
ATMBeforeAdvice : 欢迎光临
ATMRoundAdvice.before : 开始进行服务
ATMService : 取钱成功
ATMAfterReturningAdvice : 欢迎下次光临
ATMRoundAdvice.after : 服务结束
运行原理分析
public class ProxyFactory extends ProxyCreatorSupport {

	public ProxyFactory() {}

	public ProxyFactory(Object target) {
		setTarget(target);
		setInterfaces(ClassUtils.getAllInterfaces(target));
	}

	public ProxyFactory(Class<?>... proxyInterfaces) {
		setInterfaces(proxyInterfaces);
	}

	public ProxyFactory(Class<?> proxyInterface, Interceptor interceptor) {
		addInterface(proxyInterface);
		addAdvice(interceptor);
	}

	public ProxyFactory(Class<?> proxyInterface, TargetSource targetSource) {
		addInterface(proxyInterface);
		setTargetSource(targetSource);
	}


	public Object getProxy() {
		return createAopProxy().getProxy();
	}

	public Object getProxy(@Nullable ClassLoader classLoader) {
		return createAopProxy().getProxy(classLoader);
	}


	@SuppressWarnings("unchecked")
	public static <T> T getProxy(Class<T> proxyInterface, Interceptor interceptor) {
		return (T) new ProxyFactory(proxyInterface, interceptor).getProxy();
	}

	@SuppressWarnings("unchecked")
	public static <T> T getProxy(Class<T> proxyInterface, TargetSource targetSource) {
		return (T) new ProxyFactory(proxyInterface, targetSource).getProxy();
	}

	public static Object getProxy(TargetSource targetSource) {
		if (targetSource.getTargetClass() == null) {
			throw new IllegalArgumentException("Cannot create class proxy for TargetSource with null target class");
		}
		ProxyFactory proxyFactory = new ProxyFactory();
		proxyFactory.setTargetSource(targetSource);
		proxyFactory.setProxyTargetClass(true);
		return proxyFactory.getProxy();
	}

}
如上图所示,ProxyFactory提供了四个带参数的构造器,它们都是用来定义目标对象(被代理的类)、代理接口以及添加Advice的。案例第一行我们使用了ProxyFactory(Object target)这个构造器,用来指定目标类和代理接口。因为ATMService实现了BankService接口,所以会将BankService设置为代理接口。不论使用哪个构造器底层都是用来指定AdvisedSupport中的interfaces和targetSource属性的。
案例第一行创建好proxyFactory对象之后,紧接着向proxyFactory中添加了4个Advice. 添加的这些Advice最终会放在ProxyFactory的父类AdvisorSupport中的List<Advisor> advisors属性中。关于AdvisedSupport前面已经剖析过了,此处不再赘述。
添加好Advice之后就来到了最核心的逻辑 : 生成ATMService实例的代理对象。如上图ProxyFactory源码所示,它提供了getProxy多个重载方法,不论使用哪一个,最终都会委托到getProxy()这个发放上,所以案例中用了这个最纯粹的方法, 这个方法也是SpringAop最核心的方法 : 生成代理对象。我们重点来剖析下这个方法:
public Object getProxy() {
	return createAopProxy().getProxy();
}
首先createAopProxy()方法会调用ProxyCreatorSupport#createAopProxy()这个方法,该方法会根据相关代理配置返回一个AopProxy实例。结合上篇文章对DefaultAopProxyFactory的分析可以明确知道本案例会使用JDK动态代理方式生成代理,也就是会使用JdkDynamicAopProxy这个实现策略。其次getProxy()方法会调用AopProxy#getProxy()方法,即调用JdkDynamicAopProxy#getProxy().下面我们就来剖析下基于JDK代理生成代理对象的具体细节。
JdkDynamicAopProxy
final class JdkDynamicAopProxy implements AopProxy, InvocationHandler, Serializable {

	private final AdvisedSupport advised;

	private boolean equalsDefined;

	private boolean hashCodeDefined;

	public JdkDynamicAopProxy(AdvisedSupport config) throws AopConfigException {
		Assert.notNull(config, "AdvisedSupport must not be null");
		if (config.getAdvisors().length == 0 && config.getTargetSource() == AdvisedSupport.EMPTY_TARGET_SOURCE) {
			throw new AopConfigException("No advisors and no TargetSource specified");
		}
		this.advised = config;
	}

	//获取代理对象,将逻辑委托到下面的重载方法
	@Override
	public Object getProxy() {
		return getProxy(ClassUtils.getDefaultClassLoader());
	}

	//获取代理对象
	@Override
	public Object getProxy(@Nullable ClassLoader classLoader) {

		if (logger.isTraceEnabled()) {
			logger.trace("Creating JDK dynamic proxy: " + this.advised.getTargetSource());
		}

		//获取AdvisedSupport中设置的需要被代理的接口
		Class<?>[] proxiedInterfaces = AopProxyUtils.completeProxiedInterfaces(this.advised, true);
		//记录目标对象是否有定义equals和hashcode方法
		findDefinedEqualsAndHashCodeMethods(proxiedInterfaces);
		//使用动态代理生成代理对象
		return Proxy.newProxyInstance(classLoader, proxiedInterfaces, this);
	}

	private void findDefinedEqualsAndHashCodeMethods(Class<?>[] proxiedInterfaces) {
		for (Class<?> proxiedInterface : proxiedInterfaces) {
			Method[] methods = proxiedInterface.getDeclaredMethods();
			for (Method method : methods) {
				if (AopUtils.isEqualsMethod(method)) {
					this.equalsDefined = true;
				}
				if (AopUtils.isHashCodeMethod(method)) {
					this.hashCodeDefined = true;
				}
				if (this.equalsDefined && this.hashCodeDefined) {
					return;
				}
			}
		}
	}

	@Override
	@Nullable
	public Object invoke(Object proxy, Method method, Object[] args) throws Throwable {
		......
	}

	.......


	@Override
	public int hashCode() {
		return JdkDynamicAopProxy.class.hashCode() * 13 + this.advised.getTargetSource().hashCode();
	}

}
如上图所示可知,JdkDynamicAopProxy不仅实现了AopProxy接口,还实现了InvocationHandler接口,这说明生成的代理对象执行方法时会被JdkDynamicAopProxy#invoke方法拦截增强。首先我们看下getProxy(ClassLoader classLoader)这个方法,它只是调用了JDK的Proxy.newProxyInstance方法生成了一个代理对象。但是在生成之前有调用到AopProxyUtils.completeProxiedInterfaces(this.advised, true)这个方法确定需要被代理的接口,这个方法很重要。
AopProxyUtils#completeProxiedInterfaces
static Class<?>[] completeProxiedInterfaces(AdvisedSupport advised, boolean decoratingProxy) {

		//首先获取AdvisedSupport中定义的代理接口
		//案例中创建ProxyFactory时传入了一个ATMService实例,ProxyFactory会将ATMService实例的接口BankService设置到AdvisedSupport中,所以这边可以获取到的数组中有一个BankService接口
		Class<?>[] specifiedInterfaces = advised.getProxiedInterfaces();

		//如果没有获取到代理接口,则这边再次尝试获取目标对象的接口
		if (specifiedInterfaces.length == 0) {
			Class<?> targetClass = advised.getTargetClass();
			if (targetClass != null) {
				if (targetClass.isInterface()) {
					advised.setInterfaces(targetClass);
				}
				else if (Proxy.isProxyClass(targetClass)) {
					advised.setInterfaces(targetClass.getInterfaces());
				}
				specifiedInterfaces = advised.getProxiedInterfaces();
			}
		}

		//判断AdvisedSupport中的代理接口是否有SpringProxy类型的接口
		//本例中没有添加该类型的代理接口,所以addSpringProxy=true
		boolean addSpringProxy = !advised.isInterfaceProxied(SpringProxy.class);

		//判断AdvisedSupport中的代理接口是否有Advised类型的接口
		//本例中没有添加该类型的代理接口,所以addAdvised=true
		boolean addAdvised = !advised.isOpaque() && !advised.isInterfaceProxied(Advised.class);

		//判断AdvisedSupport中的代理接口是否有DecoratingProxy类型的接口
		//本例中没有添加该类型的代理接口,所以addDecoratingProxy=true
		boolean addDecoratingProxy = (decoratingProxy && !advised.isInterfaceProxied(DecoratingProxy.class));

		//记录上面代理接口不包含上面三个接口的数量,由于我们案例中没有指定上述三个接口所以此处nonUserIfcCount = 3
		int nonUserIfcCount = 0;
		if (addSpringProxy) {
			nonUserIfcCount++;
		}
		if (addAdvised) {
			nonUserIfcCount++;
		}
		if (addDecoratingProxy) {
			nonUserIfcCount++;
		}

		//创建空的接口数组,长度为我们定义的代理接口加上不包含上面接口的数量
		Class<?>[] proxiedInterfaces = new Class<?>[specifiedInterfaces.length + nonUserIfcCount];
		System.arraycopy(specifiedInterfaces, 0, proxiedInterfaces, 0, specifiedInterfaces.length);

		//如果我们指定的代理接口中不包含这些接口,这将这些接口添加到代理接口列表中
		int index = specifiedInterfaces.length;
		if (addSpringProxy) {
			proxiedInterfaces[index] = SpringProxy.class;
			index++;
		}
		if (addAdvised) {
			proxiedInterfaces[index] = Advised.class;
			index++;
		}
		if (addDecoratingProxy) {
			proxiedInterfaces[index] = DecoratingProxy.class;
		}
		return proxiedInterfaces;
	}
如上方法剖析可知,completeProxiedInterfaces方法主要用来返回生成代理对象需要实现的接口。除此之外该方法核心功能是将 SpringProxy、Advised、DecoratingProxy接口也添加到代理接口的列表中。加这些接口到代理接口列表中的目的就是使得代理对象可以转为这些类型,以便做一些处理。
上面分析了本案例中生成代理对象的过程,总的来说就是SpringAop额外为代理对象添加了几个被实现的代理接口,最后使用JDK的Proxy.newProxyInstance生成代理对象。至此可以知道案例中的 BankService proxy = (BankService) proxyFactory.getProxy();返回的是一个代理对象。
生成代理对象后,接下来案例中会使用代理对象调用方法 : proxy.withdrawMoney()。 由于proxy是一个代理对象,所以调用withdrawMoney方法时实际上调用的是JdkDynamicAopProxy#invoke方法。
JdkDynamicAopProxy#invoke
final class JdkDynamicAopProxy implements AopProxy, InvocationHandler, Serializable {


	......

	public Object invoke(Object proxy, Method method, Object[] args) throws Throwable {

		Object oldProxy = null;
		boolean setProxyContext = false;

		TargetSource targetSource = this.advised.targetSource;
		Object target = null;

		try {

			//处理代理对象的equals、hashcode方法
			if (!this.equalsDefined && AopUtils.isEqualsMethod(method)) {
				return equals(args[0]);
			}
			else if (!this.hashCodeDefined && AopUtils.isHashCodeMethod(method)) {
				return hashCode();
			}
			//处理SpringAop自动帮我们加的代理接口DecoratingProxy中的getDecoratedClass方法
			else if (method.getDeclaringClass() == DecoratingProxy.class) {
				return AopProxyUtils.ultimateTargetClass(this.advised);
			}
			//处理SpringAop自动帮我们加的代理接口DecoratingProxy中的getDecoratedClass方法
			else if (!this.advised.opaque && method.getDeclaringClass().isInterface() &&
					method.getDeclaringClass().isAssignableFrom(Advised.class)) {
				return AopUtils.invokeJoinpointUsingReflection(this.advised, method, args);
			}


			Object retVal;

			//如果ProxyConfig中的exposeProxy为true,也就是@EnableAspectJAutoProxy中的exposeProxy属性。则会将当前代理对象放到AopContext(ThreadLocal)中,以便在同一个请求中可以使用AopContext.currentProxy()直接获取代理对象。
			if (this.advised.exposeProxy) {
				oldProxy = AopContext.setCurrentProxy(proxy);
				setProxyContext = true;
			}

			//获取目标对象实例
			target = targetSource.getTarget();
			Class<?> targetClass = (target != null ? target.getClass() : null);

			//这边调用AdvisedSupport的getInterceptorsAndDynamicInterceptionAdvice方法获取拦截链,具体逻辑可以翻阅上篇文章中的分析。
			List<Object> chain = this.advised.getInterceptorsAndDynamicInterceptionAdvice(method, targetClass);

			//如果当前方法没有对应的拦截链,则直接调用目标对象返回结果
			//因为本案例中添加了Advice并且没有指定切点,所以相当于是全局拦截建议,会走到else逻辑
			if (chain.isEmpty()) {
				Object[] argsToUse = AopProxyUtils.adaptArgumentsIfNecessary(method, args);
				retVal = AopUtils.invokeJoinpointUsingReflection(target, method, argsToUse);
			} else { //包装拦截链,进行递归调用拦截器最后返回执行结果
				MethodInvocation invocation =
						new ReflectiveMethodInvocation(proxy, target, method, args, targetClass, chain);
				retVal = invocation.proceed();
			}


			//处理方法的返回结果,如果代理对象属于当前方法的返回类型则还是返回代理对象
			Class<?> returnType = method.getReturnType();
			if (retVal != null && retVal == target &&
					returnType != Object.class && returnType.isInstance(proxy) &&
					!RawTargetAccess.class.isAssignableFrom(method.getDeclaringClass())) {
				retVal = proxy;
			}
			else if (retVal == null && returnType != Void.TYPE && returnType.isPrimitive()) {
				throw new AopInvocationException(
						"Null return value from advice does not match primitive return type for: " + method);
			}
			return retVal; //返回执行结果
		}

		finally {
			//释放TargetSource,此处Mark一下后面文章会详细剖析
			if (target != null && !targetSource.isStatic()) {
				targetSource.releaseTarget(target);
			}
			if (setProxyContext) {
				AopContext.setCurrentProxy(oldProxy);
			}
		}
	}


	......
}
invoke方法的逻辑整体上可以分为3个部分:
- 第一个部分是做一些前置校验,像
equals、hashcode、方法或当前目标对象是DecoratingProxy、Advised类型时则直接调用返回结果,不再进行AOP增强处理。 - 第二部分是获取当前目标方法是否有对应的拦截链(是否需要被拦截执行,或者称是否需要被AOP进行增强),如果没有拦截链则直接调用方法否则进行增强处理,否则对拦截链进行包装执行。
- 第三部分是对执行结果的处理,如果目标方法返回类型属于当前代理对象的代理接口中的任一类型则将代理对象作为实例进行返回。这样做的目的是其他地方使用该方法的返回值时依然是基于代理对象去使用,会对某些方法进行增强处理。如果返回类型为其他类型则直接返回。
其中第一、三个部分比较好理解,我们重点分析下第二部分是如何获取到该方法对应的拦截的以及拦截链是如何执行的。也就是invoke方法中的这几行代码:
//获取当前方法对应的拦截链
List<Object> chain = this.advised.getInterceptorsAndDynamicInterceptionAdvice(method, targetClass);

//包装当前方法的拦截链
MethodInvocation invocation =
						new ReflectiveMethodInvocation(proxy, target, method, args, targetClass, chain);

//执行拦截链获取结果
retVal = invocation.proceed();
第一步获取当前方法的拦截链上篇文章已经剖析过了,底层是DefaultAdvisorChainFactory#getInterceptorsAndDynamicInterceptionAdvice方法主要逻辑是将AdvisedSupport中的List<Advisor> advisors属性中的所有Advisor包装为MethodInterceptor进行返回。所以第一步返回的 List<Object> chain对象实际上是一个List<MethodInterceptor>类型。MethodInterceptor本质上也是一个拦截器,所以称这条链为拦截链。
第二步是将当前方法和它的拦截链包装为MethodInvocation
MethodInvocation
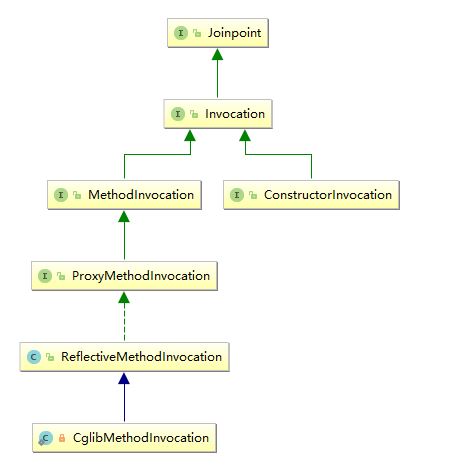
其中Joinpoint、Invocation、MethodInvocation、ConstructorInvocation接口都属于AOP联盟API包中的接口,这些接口是为了获取连接点(方法)的基本信息,比如Method、args、Constructor等。ProxyMethodInvocation是SpringAop对aop联盟连接点接口的扩展,增加了获取代理对象的方法。它的作用是获取当前的代理对象,这在方法返回本身类型时很有用。ReflectiveMethodInvocation则是对ProxyMethodInvocation接口的一个实现。
MethodInvocation invocation =
						new ReflectiveMethodInvocation(proxy, target, method, args, targetClass, chain);

retVal = invocation.proceed();
上面案例中的第二步中是先实例了ReflectiveMethodInvocation对象,紧接着调用了它的proceed()方法,该方法其实是Joinpoint中的。proceed()方法使用来执行连接点(目标方法),所以我们可以大胆猜想ReflectiveMethodInvocation在这个方法中对目标方法做了增强,下面重点剖析下proceed()方法 :
public class ReflectiveMethodInvocation implements ProxyMethodInvocation, Cloneable {

	//保存代理对象
	protected final Object proxy;

	//保存目标对象
	@Nullable
	protected final Object target;

	//当前目标方法元信息
	protected final Method method;

	//方法参数
	protected Object[] arguments;

	@Nullable
	private final Class<?> targetClass;

	@Nullable
	private Map<String, Object> userAttributes;

	//保存当前目标方法对应的拦截链
	protected final List<?> interceptorsAndDynamicMethodMatchers;

	/一个简单的下标
	private int currentInterceptorIndex = -1;


		protected ReflectiveMethodInvocation(
			Object proxy, @Nullable Object target, Method method, @Nullable Object[] arguments,
			@Nullable Class<?> targetClass, List<Object> interceptorsAndDynamicMethodMatchers) {

		this.proxy = proxy;
		this.target = target;
		this.targetClass = targetClass;
		this.method = BridgeMethodResolver.findBridgedMethod(method);
		this.arguments = AopProxyUtils.adaptArgumentsIfNecessary(method, arguments);
		this.interceptorsAndDynamicMethodMatchers = interceptorsAndDynamicMethodMatchers;
	}


	.......

	@Override
	@Nullable
	public Object proceed() throws Throwable {

		//如果当前下标等于拦截链中的数量减1说明拦截器已经执行完了
		//拦截器执行完后这边直接调用目标方法
		if (this.currentInterceptorIndex == this.interceptorsAndDynamicMethodMatchers.size() - 1) {
			return invokeJoinpoint(); //调用目标方法
		}

		//获取拦截链中第一个拦截器,在本案例中第一个拦截器是ATMBeforeAdvice
		//所以第一个拦截器对应的是MethodBeforeAdviceInterceptor
		Object interceptorOrInterceptionAdvice =
		this.interceptorsAndDynamicMethodMatchers.get(++this.currentInterceptorIndex);

		//本案例中我们定义的Advice最后都会转为MethodInterceptor
		//并不属于InterceptorAndDynamicMethodMatcher类型,所以会直接走到else逻辑
		if (interceptorOrInterceptionAdvice instanceof InterceptorAndDynamicMethodMatcher) {

			InterceptorAndDynamicMethodMatcher dm =
					(InterceptorAndDynamicMethodMatcher) interceptorOrInterceptionAdvice;
			Class<?> targetClass = (this.targetClass != null ? this.targetClass : this.method.getDeclaringClass());
			if (dm.methodMatcher.matches(this.method, targetClass, this.arguments)) {
				return dm.interceptor.invoke(this);
			}
			else {
				return proceed();
			}
		}
		else {
			//调用拦截器
			return ((MethodInterceptor) interceptorOrInterceptionAdvice).invoke(this);
		}
	}


	.......
}
如上源码分析可知: ReflectiveMethodInvocation#proceed()方法是SpringAop非常关键的一个方法,这个方法是SpringAop对目标方法增强的具体过程。
通过前面的分析可知AdvisedSuppprt#getInterceptorsAndDynamicInterceptionAdvice方法会将我们案例中设置的ATMBeforeAdvice、ATMRoundAdvice、ATMAfterReturningAdvice、ATMThrowingAdvice分别转为MethodBeforeAdviceInterceptor、MethodInterceptor、AfterReturningAdviceInterceptor、ThrowsAdviceInterceptor,也就是说ReflectiveMethodInvocation中interceptorsAndDynamicMethodMatchers拦截链的顺序就是这个。
前置通知打印
按照这个顺序执行的话,那么else逻辑中调用的第一个拦截器就是MethodBeforeAdviceInterceptor :
public class MethodBeforeAdviceInterceptor implements MethodInterceptor, BeforeAdvice, Serializable {

	//这个属性其实就是我们定义的ATMBeforeAdvice前置处理
	private final MethodBeforeAdvice advice;

	public MethodBeforeAdviceInterceptor(MethodBeforeAdvice advice) {
		Assert.notNull(advice, "Advice must not be null");
		this.advice = advice;
	}

	@Override
	public Object invoke(MethodInvocation mi) throws Throwable {
		this.advice.before(mi.getMethod(), mi.getArguments(), mi.getThis());
		return mi.proceed();
	}
}
proceed()方法调用了拦截器的invoke(this)方法,并且将自身作为参数传了过去。如上可以看到MethodBeforeAdviceInterceptor#invoke方法首先调用了ATMBeforeAdvice#before方法也就是我们定义的前置通知,所以会先打印出 :ATMBeforeAdvice : 欢迎光临.这边的mi实例是ReflectiveMethodInvocation, 所以mi.proceed()方法又会调用到上面的ReflectiveMethodInvocation#proceed()方法中, 这边相当于是一个递归调用。
环绕通知
前置通知执行后再次调用到ReflectiveMethodInvocation#proceed()方法中,该方法首先会执行++this.currentInterceptorIndex,执行后currentInterceptorIndex = 1, 也就是获取interceptorsAndDynamicMethodMatchers拦截链中的第二个拦截器 : MethodInterceptor , 它实际上就案例中添加的ATMRoundAdvice. 和前置通知一样这边还是走到else逻辑中调用invoke方法,这边实际上会调用到ATMRoundAdvice#invoke中 :
public class ATMRoundAdvice implements MethodInterceptor {

    @Override
    public Object invoke(MethodInvocation invocation) throws Throwable {
        System.out.println("ATMRoundAdvice.before : 开始进行服务");
        Object result = invocation.proceed();
        System.out.println("ATMRoundAdvice.after : 服务结束");
        return result;
    }
}
如上图所示,会先打印出环绕通知中的 : ATMRoundAdvice.before : 开始进行服务 . 这边的invocation实例指向的还是ReflectiveMethodInvocation, 所以调用invocation.proceed()还会递归到ReflectiveMethodInvocation#proceed()中 ,此时又会重复上面的逻辑++this.currentInterceptorIndex, 执行后 currentInterceptorIndex = 2, 也就是获取到拦截链中的第三个拦截器 : AfterReturningAdviceInterceptor :
public class AfterReturningAdviceInterceptor implements MethodInterceptor, AfterAdvice, Serializable {

	@Override
	public Object invoke(MethodInvocation mi) throws Throwable {
		Object retVal = mi.proceed();
		this.advice.afterReturning(retVal, mi.getMethod(), mi.getArguments(), mi.getThis());
		return retVal;
	}
}
它实际上是案例中添加的 ATMAfterReturningAdvice. :
public class ATMAfterReturningAdvice implements AfterReturningAdvice {

    @Override
    public void afterReturning(Object returnValue, Method method, Object[] args, Object target) throws Throwable {
        System.out.println("ATMAfterReturningAdvice : 欢迎下次光临");
    }
}
如上所示,AfterReturningAdviceInterceptor又会先递归调用 ReflectiveMethodInvocation#proceed()方法。需要注意的是此时 ATMAfterReturningAdvice#afterReturning还没调用到哦,也就是还没打印 : "ATMAfterReturningAdvice : 欢迎下次光临" .
这边递归调用和上面步骤一样,此时又会重复逻辑++this.currentInterceptorIndex逻辑, 执行后 currentInterceptorIndex = 3, 这次获取的是第四个拦截器 : ThrowsAdviceInterceptor :
public class ThrowsAdviceInterceptor implements MethodInterceptor, AfterAdvice {
	......

	@Override
	public Object invoke(MethodInvocation mi) throws Throwable {
		try {
			return mi.proceed();
		}
		catch (Throwable ex) {
			Method handlerMethod = getExceptionHandler(ex);
			if (handlerMethod != null) {
				invokeHandlerMethod(mi, ex, handlerMethod);
			}
			throw ex;
		}
	}
}
它实际上是案例中添加的 ATMThrowingAdvice :
public class ATMThrowingAdvice implements ThrowsAdvice {

    public void afterThrowing(Exception ex){
        System.out.println("afterThrowing....");
    }
}
从ThrowsAdviceInterceptor#invoke方法可以看出该拦截器实际上是对调用的目标方法做了try{}catch包装,该拦截器还是直接递归调用了ReflectiveMethodInvocation#proceed(), 需要注意这次递归和上面不一样了。这次递归此时currentInterceptorIndex = 3, 也就代表已经获取了4个拦截器。案例中一共也才添加了4个拦截器,所以这次调用会走到ReflectiveMethodInvocation#proceed()中的第一个if逻辑中 :
public Object proceed() throws Throwable {

		if (this.currentInterceptorIndex == this.interceptorsAndDynamicMethodMatchers.size() - 1) {
			return invokeJoinpoint();
		}

    .......
}
如上图所示,这次会直接调用invokeJoinpoint()方法也就是调用了目标方法,打印出 :ATMService : 取钱成功。成功调用目标方法后,会回到到上次递归入口 : ThrowsAdviceInterceptor中。如果调用目标方法抛出异常则会打印ATMThrowingAdvice中的afterThrowing.... , 很显然案例中没有抛出异常所以不会打印,直接返回上次的递归入口 :AfterReturningAdviceInterceptor,然后打印ATMAfterReturningAdvice中的 "ATMAfterReturningAdvice : 欢迎下次光临". 再次向上回调到了 MethodInterceptor 入口, 然后打印ATMRoundAdvice中的 ATMRoundAdvice.after : 服务结束 , 结束本次方法调用。
ReflectiveMethodInvocation#proceed方法小结
通过上面分析一个AOP增强后的方法完整调用流程可以知道 : ReflectiveMethodInvocation#proceed方法是通过递归调用实现对目标方法的增强的,本质上类似于责任链模式。

流程总结


 224
224


 被折叠的 条评论
为什么被折叠?
被折叠的 条评论
为什么被折叠?
 到【灌水乐园】发言


