开发和使用Web用户控件
dotnet | 30 三月, 2007 14:54
1.简介
2.创建 Web 用户控件
3.在 Web 窗体中使用 Web 用户控件
4.添加属性
5.添加方法
6.添加自定义事件
7.控件内客户端角本访问服务器控件的方法
8.代码下载
1.简介
当 ASP.NET 内置的 Web 服务器控件不能满足我们开发的需要时,通过我们会创建自己的控件。而在 ASP.NET 中有两个选择:
1)用户控件:用户控件是能够在其中放置标记和 Web 服务器控件的容器。然后,可以将用户控件作为一个单元对待,为其定义属性和方法。(这就是咱们这次要讲的啦)
2)自定义控件:自定义控件是编写的一个类,此类从 Control 或 WebControl 派生。(关于这个方面的技术,目前为止我只按MSDN的演练做了一个练习,后面有时间针对它的开发与使用再写一篇更详细一点的)
创建用户控件要比创建自定义控件方便很多,因为可以重用现有的控件,所以最适合创建具有复杂界面元素的控件。用户控件与 Web 窗体(.aspx)很相似,可以同时具有前台页面和后台代码,在前台可以向其中添加所需的标签和服务器控件,在后台可以针对这些对象进行逻辑操作。不过它们存在以下这些区别:
1)用户控件的文件扩展名为 .ascx,而 Web 窗体的扩展名为 .aspx;
2)用户控件使用 @Control 指令声明,而 Web 窗体使用 @Page 指令;
3)用户控件不能作为独立文件运行,而必须其它服务器控件一样,将它们添加到 Web 窗体中;
4)用户控件中不能包含 <html>、<body> 和 <body> 等标签。
2.创建 Web 用户控件
首先建立一个 ASP.NET 网站,如图所示:
在解决方案资源管理器里选中网站,点击右键菜单中的[添加新项],在弹出窗口选择 Web 用户控件,如图所示
点击[添加],在解决方案中可以看到一个新的 Web 用户控件做好了,如图所示:
什么?什么?这就做好了?呵呵,做是做好了,不过没什么功能,现在我们给它加点东西。
编辑TestWebUserControl.ascx,切换到[设计]视图,从工具箱拖动一个 TextBox、一个 Button 和一个 Label 控件到页面上,如图所示:
选中 Button 控件,双击,为其添加 Click 事件的响应代码:
Code highlighting produced by Actipro CodeHighlighter (freeware)
http://www.CodeHighlighter.com/
--> protected void Button1_Click( object sender, EventArgs e)
{
Label1.Text = TextBox1.Text;
}
OK!到此为止,一个简单的 Web 用户控件搞定了。
3.在 Web 窗体中使用 Web 用户控件
现在我们把做好的用户控件放到窗体上进行测试,选中 Default.aspx 切换到[设计]视图( 注意:一定要在设计视图里),在解决方案中拖动 TestWebUserControl.ascx 到页面上,如图所示:

现在我们运行程序,在文本框中填入“Hello World!”,点击 Button ,Label 就会显示相应内容了,如图所示:

停止程序,回到 Default.aspx 的[源]视图,我们来看看刚才的“一拖”,IDE到底为我们做了什么工作。可以发现在代码里增加了一行 @Register 指令,这就是对用户控件引用要做的声明,代码如下:
Code highlighting produced by Actipro CodeHighlighter (freeware)
http://www.CodeHighlighter.com/
--> <% @ Register Src = " TestWebUserControl.ascx " TagName = " TestWebUserControl " TagPrefix = " uc1 " %>
这个指令很简单,通过字面就可以看出各属性的含义了。现在我们为了使我们的控件前缀更有意义,而不是什么“uc1”之类的,对这条语句做点修改,代码如下:
Code highlighting produced by Actipro CodeHighlighter (freeware)
http://www.CodeHighlighter.com/
--> <% @ Register Src = " TestWebUserControl.ascx " TagName = " TestWebUserControl " TagPrefix = " Clark " %>
当然,相应的其它地方也要进行修改了,如下:
将
Code highlighting produced by Actipro CodeHighlighter (freeware)
http://www.CodeHighlighter.com/
--> < uc1:TestWebUserControl ID ="TestWebUserControl1" runat ="server" />
Code highlighting produced by Actipro CodeHighlighter (freeware)
http://www.CodeHighlighter.com/
--> < Clark:TestWebUserControl ID ="TestWebUserControl1" runat ="server" />
这样,以后我们再在 此页面使用 TestWebUserControl 控件时前缀自动就变成Clark了,如下所示,我又拖了一个控件到页面里,代码如下:
Code highlighting produced by Actipro CodeHighlighter (freeware)
http://www.CodeHighlighter.com/
--> <% @ Page Language = " C# " AutoEventWireup = " true " CodeFile = " Default.aspx.cs " Inherits = " _Default " %>
<% @ Register Src = " TestWebUserControl.ascx " TagName = " TestWebUserControl " TagPrefix = " Clark " %>
<! DOCTYPE html PUBLIC "-//W3C//DTD XHTML 1.0 Transitional//EN" "http://www.w3.org/TR/xhtml1/DTD/xhtml1-transitional.dtd" >
< html xmlns ="http://www.w3.org/1999/xhtml" > < head runat ="server" >
< title > 无标题页 </ title > </ head > < body >
< form id ="form1" runat ="server" >
< div >
< Clark:TestWebUserControl ID ="TestWebUserControl1" runat ="server" />
< br />
< Clark:TestWebUserControl ID ="TestWebUserControl2" runat ="server" />
</ div >
</ form > </ body > </ html >
当然,通过在 Web.Config 里进行配置也可以注册组件,并且是针对整个网站适用的,这里就不再述。
4.添加属性
下面我们来为做好的控件添加一个属性,添个什么好呢?(本人最大的弱点就是不会写例子。。。)随便来一个吧,编辑 TestWebUserControl.ascx.cs 添加如下代码:
Code highlighting produced by Actipro CodeHighlighter (freeware)
http://www.CodeHighlighter.com/
--> public string LabelContext
{
get { return Label1.Text; }
set { Label1.Text = value; }
}
这样一个可读写的文本属性就做好,太简单了。。。
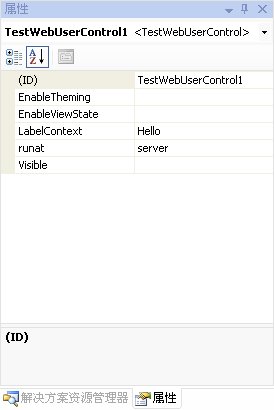
选中 Default.aspx 切换到[设计]视图,分别选中两个用户控件,在属性查看器里对 LabelContext 进行设置,如图所示:

为了测试该属性的实现,我们再在 Default.aspx 的页面上添加一个 Button 控件,对其 Click 事件添加响应代码,如下:
Code highlighting produced by Actipro CodeHighlighter (freeware)
http://www.CodeHighlighter.com/
--> protected void Button1_Click( object sender, EventArgs e)
{
Response.Write(TestWebUserControl1.LabelContext + " " + TestWebUserControl2.LabelContext);
}
运行程序,点击该按钮,效果如图所示:

5.添加方法
属性加好了,现在再添加一个方法,编辑 TestWebUserControl.ascx.cs ,添加如下代码:
Code highlighting produced by Actipro CodeHighlighter (freeware)
http://www.CodeHighlighter.com/
--> public void ChangeLabelContext( object sender, string value)
{
Label1.Text = value;
}
大家可能注意到,我这个方法有一个 sender ,这是干什么用的呢?别着急,在后面添加事件里会讲到的。
为了测试这个方法,选中 Default.aspx ,切换到[设计]视图,再添加一个按钮,为其 Click 事件添加如下的响应代码:
Code highlighting produced by Actipro CodeHighlighter (freeware)
http://www.CodeHighlighter.com/
--> protected void Button2_Click( object sender, EventArgs e)
{
TestWebUserControl1.ChangeLabelContext(sender, " Hi " );
TestWebUserControl2.ChangeLabelContext(sender, " cnblogs " );
}
现在运行程序,点击该按钮,效果如图所示:

6.添加自定义事件
属性和方法我们做好了,那么事件呢?
继续编辑 WebUserControlTest.ascx.cs ,首先定义一个代理,代码如下:
Code highlighting produced by Actipro CodeHighlighter (freeware)
http://www.CodeHighlighter.com/
--> public delegate void LabelContextChangedHandler( object sender, LabelContextChangedEventArgs e);
public class LabelContextChangedEventArgs : EventArgs
{
private string labelContext;
public LabelContextChangedEventArgs( string value)
{
labelContext = value;
}
public string LabelContext
{
get { return labelContext; }
}
}
再为 TestWebUserControl 这个类添加一个事件变量和事件触发函数,代码如下:
Code highlighting produced by Actipro CodeHighlighter (freeware)
http://www.CodeHighlighter.com/
--> public event LabelContextChangedHandler LabelContextChanged;
private void OnLabelContextChanged( object sender, LabelContextChangedEventArgs e)
{
if (LabelContextChanged != null )
{
LabelContextChanged(sender, e);
}
}
然后,在 ChangeLabelContext 函数里增加对事件的触发,需要修改原来的代码,如下:
将
Code highlighting produced by Actipro CodeHighlighter (freeware)
http://www.CodeHighlighter.com/
--> public void ChangeLabelContext( object sender, string value)
{
Label1.Text = value;
}
Code highlighting produced by Actipro CodeHighlighter (freeware)
http://www.CodeHighlighter.com/
--> public void ChangeLabelContext( object sender, string value)
{
Label1.Text = value;
OnLabelContextChanged(sender, new LabelContextChangedEventArgs(value));
}
OK!到此,我们就完成了对用户控件事件的定义并确定了在何时触发这个事件,下面我们来测试一下。
编辑Default.aspx.cs,先添加一个响应事件的函数,代码如下:
Code highlighting produced by Actipro CodeHighlighter (freeware)
http://www.CodeHighlighter.com/
--> private void TestWebUserControl_LabelContextChanged( object sender, LabelContextChangedEventArgs e)
{
Button tmpButton = (Button)sender;
if (tmpButton.Text == " Button " )
{
tmpButton.Text = e.LabelContext;
}
else
{
tmpButton.Text += " " + e.LabelContext;
}
}
现在,再在页面的 Page_Load 事件的响应代码里将两个用户近件的 LabelContextChanged 和 这个函数“连接”起来就OK啦!代码如下:
Code highlighting produced by Actipro CodeHighlighter (freeware)
http://www.CodeHighlighter.com/
--> protected void Page_Load( object sender, EventArgs e)
{
TestWebUserControl1.LabelContextChanged += new LabelContextChangedHandler(TestWebUserControl_LabelContextChanged);
TestWebUserControl2.LabelContextChanged += new LabelContextChangedHandler(TestWebUserControl_LabelContextChanged);
}
现在我们运行程序,点击页面第二个按钮,效果如图所示这:

7.控件内客户端角本访问服务器控件的方法
这个问题实际上并不属于 Web 用户控件开发的范畴,但实际开发中多多少少会碰到这个问题,所以本着我这“牵牛花”的脾气就把它“牵”进来了,哈哈。
有人要问了,为什么控件内客户端角本访问服务器控件会是一个问题呢,这主要是因为,ASP.NET在将页面解释成客户端浏览器使用的页面时,将用户控件内的服务器控件ID做了一定的改动。如在咱们开发的这个用户控件里有一个 TextBox 控件,ID本来是 TextBox1 ,但在解释后的页面里它变成了 TestWebUserControl1_TextBox1,我们通过在浏览器里查看源代码可以看到,如下所示:
Code highlighting produced by Actipro CodeHighlighter (freeware)
http://www.CodeHighlighter.com/
--> < input name = " TestWebUserControl1$TextBox1 " type = " text " id = " TestWebUserControl1_TextBox1 " />
也就是说,用户控件被解释成客户端页面后,其中的服务器控件的ID规则是 用户控件ID_服务器控件ID,知道这个规律我们就好办了。
编辑 TestWebUserControl.ascx ,切换到[设计]视图,从 HTML 面板拖一个 Input(Button) 控件(注意:这里要的是一个客户端控件)。再切换到[源视图]为其添加 onclick 属性,设成调用一个客户端函数 ShowTextBoxContext ,而这个函数要操作用户控件里的一个服务器控件,完整代码如下:
Code highlighting produced by Actipro CodeHighlighter (freeware)
http://www.CodeHighlighter.com/
--> <% @ Control Language = " C# " AutoEventWireup = " true " CodeFile = " TestWebUserControl.ascx.cs " Inherits = " TestWebUserControl " %> < asp:TextBox ID ="TextBox1" runat ="server" ></ asp:TextBox > < asp:Button ID ="Button1" runat ="server" OnClick ="Button1_Click" Text ="Button" /> < asp:Label ID ="Label1" runat ="server" Text ="Label" ></ asp:Label > < input id ="Button2" type ="button" value ="button" onclick ="ShowTextBoxContext(<%= TextBox1.ClientID%>)" />
< script type ="text/javascript" language ="javascript" >
function ShowTextBoxContext(obj)
{
alert(obj.value);
} </ script >
注意这里的 <%= TextBox1.ClientID%> ,为了获取客户端的对象,我们执行了一个服务端操作,“<%=”和 “%>”之间的代码将会在服务端运行,如此而己,是不是很简单?
现在我们运行程序,在第一个文本框里输入“开发和使用 Web 用户控件,OK!!!”,点击用户控件中刚添加的客户端 Button 按钮,将弹出一个对话框,显示我们填写的内容,效果如图所示:

另:如果使用的是外链角本而非这种内嵌的,那么这种访问方法并不能胜任。我的解决方案是将被访问的服务器控件放到一个 DIV 层里(它本来就是客户端组件),这样在客户端通过先查找到这个 DIV 层,再访问它的处Children 属性,就可以获取到相应的控件了。但由于在用户控件里使用这种外链角本将来在部署上多少有点麻烦,不建议使用,所以就没有列出详细的解决方案。
8.代码下载
下载地址: http://www.cnblogs.com/Files/reonlyrun/WebUserControlTaste.rar


 189
189

 被折叠的 条评论
为什么被折叠?


