


UITableView(表格视图)是iOS应用程序开发中应用最广泛的一个控件,几乎十有八九的应用程序中都会用到它,它是基于滚动视图的列表互动类。使用UITableView可以在屏幕上显示单元格的列表,每个单元格中还可以包含多项信息,iPhone上很多自带的程序其导航方式都是以表格为中心,最经典的就是"设置"。由于iPhone屏幕尺寸有限,因此用可以滚动的表格来展示信息是一种非常理想的方式;对于iPad可以将表格视图和展示细节的视图集成起来(UISplitViewController),提供更好的用户体验。在使用表格视图时,我们还可以将这些单元格划分为多个分区(section),以便将信息分为若干组,总而言之就是表格视图非常有用。下面几个应用都是使用了表格视图的。

事实上UITableView是UIKit框架中设计上最为复杂的控件之一,但是要使用它还是比较简单,通常的步骤就是创建UITableView的对象、绑定数据源和委托、获得数据模型、编写回调方法四个步骤。当然,我们可以通过继承或直接使用UITableViewController的方式来显示表格视图,但是我个人比较推荐的方式是根据需要直接创建UITableView的对象,通过委托及数据源对UITableView对象进行定制,再将定制好的UITableViewCell作为表格视图的单元格置于表格视图中。
UITableView入门
UITableView的设计严格遵循了MVC模式,通过数据源提供的模型来生成与表格内容有关的信息,数据源委托相当于控制器,当用户想要选择或编辑表格内容时,应用程序通过委托来响应这些变化,操作成功后还能够刷新数据模型以反映用户所做的修改。
创建UITableView
表格的样式:iPhone上的表格分为普通样式和分组样式。在默认情况下,普通样式的背景是白色,上面会有透明的单元格。如果希望改变表格样式,需要在初始化时进行指定,一旦初始化完毕是不能够更改表格样式的。
设置数据源:设置UITableView的dataSource属性,该属性对应的指针指向的对象必须遵循UITableViewDataSource协议,并实现协议中的相关方法。通过该数据源除了获得单元格的数据之外,还可以指定表格中的分区数,每个分区的单元格数量,分区的头尾的标题,分区的索引等内容。
指定单元格:可以通过NSIndexPath变量来确定一个单元格,NSIndexPath结构体有两个成员,一个是section,一个是row,分别表示单元格所在的分区和分区中的第几行。
注册单元格:创建表格视图时,应该及早注册表格中使用的单元格,注册之后应该尽可能复用注册好的单元格而不是重复创建新的单元格,这种复用对节省内存是极好的。在注册的时候可以使用一个字符串作为标识符,稍后可以通过这个标识符获得可复用单元格。
设置委托:可以通过UITableView对象的delegate属性来对用户操作做出响应,可以响应表格滚动,用户编辑或者选中某行等事件。该属性代表的指针会指向一个遵循UITableViewDelegate协议的对象,由该对象负责实现事件发生时的回调方法。
下面的例子演示了如何使用UITableView。
#import "AppDelegate.h"
#import "CDRootViewController.h"

@interface AppDelegate ()

@end

@implementation AppDelegate


- (BOOL)application:(UIApplication *)application didFinishLaunchingWithOptions:(NSDictionary *)launchOptions {
    // Override point for customization after application launch.

    _window = [[UIWindow alloc] initWithFrame:[UIScreen mainScreen].bounds];
    _window.backgroundColor = [UIColor whiteColor];
    [_window makeKeyAndVisible];


    CDRootViewController *rvc = [[CDRootViewController alloc] init];

    // 创建导航视图控制器
    UINavigationController *nav = [[UINavigationController alloc] initWithRootViewController:rvc];

    _window.rootViewController = nav;

    return YES;
}

@end
#import "CDRootViewController.h"
@interface CDRootViewController () <UITableViewDataSource, UITableViewDelegate> {
NSMutableArray *dataArray;
}
@end
@implementation CDRootViewController
- (void)viewDidLoad {
[super viewDidLoad];
// Do any additional setup after loading the view.
// 步骤1: 创建UITableView对象并指定样式(有两个可选项一个是普通样式,一个是分组样式)
UITableView *myTableView = [[UITableView alloc] initWithFrame:self.view.bounds style:UITableViewStylePlain];
// 步骤2: 为表格视图绑定数据源(模型)和委托
myTableView.dataSource = self;
myTableView.delegate = self;
// 设置行高度
myTableView.rowHeight = 80;
// 设置表格行间分隔线的样式
myTableView.separatorStyle = UITableViewCellSeparatorStyleNone;
// 步骤3: 创建数据模型
[self createDataModel];
[self.view addSubview:myTableView];
}
// 创建实验用的数据模型
- (void) createDataModel {
if (!dataArray) {
dataArray = [NSMutableArray array];
}
// 向数组中添加100条数据
for (int i = 1; i <= 100; i++) {
[dataArray addObject:[NSString stringWithFormat:@"第%d行", i]];
}
}
- (void)didReceiveMemoryWarning {
[super didReceiveMemoryWarning];
// Dispose of any resources that can be recreated.
}
// 步骤4: 编写数据源和委托的回调方法
#pragma mark UITableViewDataSource相关回调方法
// 确定表格的一个分区里面有多少行的回调方法
- (NSInteger)tableView:(UITableView *)tableView numberOfRowsInSection:(NSInteger)section {
return dataArray.count;
}
// 创建表格里面的一行(一个单元格)的回调方法
- (UITableViewCell *)tableView:(UITableView *)tableView cellForRowAtIndexPath:(NSIndexPath *)indexPath {
// 先尝试从UITableView中获取可重用的单元格(如果UITableView对象已经创建了足够显示的单元格就不再创建新的单元格而是一直重用已有的单元格)
UITableViewCell *cell = [tableView dequeueReusableCellWithIdentifier:@"A"];
// 如果没有获取到可重用单元格就自行创建UITableViewCell对象
if (!cell) {
cell = [[UITableViewCell alloc] initWithStyle:UITableViewCellStyleSubtitle reuseIdentifier:@"A"];
}
// 设置单元格的主标签
cell.textLabel.text = dataArray[indexPath.row];
// 设置单元格的副标题(在单元格样式不是默认样式时才能显示)
cell.detailTextLabel.text = @"Hello, world!";
// 为单元格定制图片
cell.imageView.image = [UIImage imageNamed:@"Dudu.jpg"];
// 设置右侧视图为自定义视图
UIButton *myButton = [UIButton buttonWithType:UIButtonTypeSystem];
myButton.frame = CGRectMake(0, 0, 50, 30);
[myButton setTitle:@"购买" forState:UIControlStateNormal];
[myButton setTitleColor:[UIColor orangeColor] forState:UIControlStateNormal];
cell.accessoryView = myButton;
return cell;
}
#pragma mark UITableViewDelegate相关回调方法
// 选中单元格的回调方法
- (void)tableView:(UITableView *)tableView didSelectRowAtIndexPath:(NSIndexPath *)indexPath {
self.title = dataArray[indexPath.row];
}
@end可以将表格的内容分为若干个分区,事实上保存表格数据模型的数组中的元素也是数组,那么每个数组就是一个分区,数组中的元素对应着分区中的行。可以为分区建立索引以方便的切换到分区,也可以对分区的头尾进行定制,这些也是通过表格视图的数据源和委托来实现的。下面的例子演示了如何创建有若干个分区的表格视图。
产生随机颜色的工具类。
#import <Foundation/Foundation.h>
#import <UIKit/UIKit.h>

@interface CDMyUtil : NSObject

+ (UIColor *) randomColorWithAlpha:(CGFloat) alpha;

@end
#import "CDMyUtil.h"
@implementation CDMyUtil
+ (UIColor *) randomColorWithAlpha:(CGFloat)alpha {
CGFloat red = arc4random() % 255 / 255.0;
CGFloat green = arc4random() % 255 / 255.0;
CGFloat blue = arc4random() % 255 / 255.0;
return [UIColor colorWithRed:red green:green blue:blue alpha:alpha];
}
@end表格视图中行对应的数据模型类。
#import <Foundation/Foundation.h>

@interface CDMyItem : NSObject

/**图片信息*/
@property (nonatomic, copy) NSString *imageInfo;
/**图片文件名*/
@property (nonatomic, copy) NSString *imageName;
/**是否允许编辑*/
@property (nonatomic, assign, getter=isEditable) BOOL editable;

- (instancetype) initWithInfo:(NSString *) imageInfo andName:(NSString *) imageName;

@end
#import "CDMyItem.h"
@implementation CDMyItem
- (instancetype)initWithInfo:(NSString *)imageInfo andName:(NSString *)imageName {
if (self = [super init]) {
_imageInfo = imageInfo;
_imageName = imageName;
_editable = YES;
}
return self;
}
- (void)setValue:(id)value forUndefinedKey:(NSString *)key {
// 如果使用KVC时没有属性跟字典中的键对应就调用此方法
// 所以此方法的实现是什么都不做
}
@end#import <Foundation/Foundation.h>
#import <UIKit/UIKit.h>
@class CDMyItem;
@interface CDMyGroup : NSObject
/**组名*/
@property (nonatomic, copy) NSString *name;
/**组的颜色*/
@property (nonatomic, strong) UIColor *color;
/**大小(组中有多少个条目)*/
@property (nonatomic, readonly) NSUInteger size;
/**是否折叠*/
@property (nonatomic, assign, getter=isFolded) BOOL folded;
/**所有条目*/
@property (nonatomic, strong) NSMutableArray *items;
/**添加条目*/
- (void) addItem:(CDMyItem *) item;
/**在指定的位置插入条目*/
- (void) insertItem:(CDMyItem *) item atIndex:(NSUInteger) index;
/**删除条目*/
- (void) removeItem:(CDMyItem *) item;
/**删除指定位置的条目*/
- (void) removeItemAtIndex:(NSUInteger) index;
- (instancetype) initWithName:(NSString *) name;
/**从文件中加载条目*/
- (void) loadItemsFromFile:(NSString *) filename;
@end用来管理数据模型的分组类。
#import "CDMyGroup.h"
#import "CDMyItem.h"
#import "CDMyUtil.h"

@implementation CDMyGroup

- (instancetype) initWithName:(NSString *) name {
    if (self = [super init]) {
        _name = name;
        _color = [CDMyUtil randomColorWithAlpha:0.6];
        _items = [NSMutableArray array];
    }
    return self;
}

- (void) loadItemsFromFile:(NSString *) filename {
    if (!_items) {
        _items = [NSMutableArray array];
    }
    else {
        [_items removeAllObjects];
    }

    NSString *filePath = [[NSBundle mainBundle] pathForResource:filename ofType:nil];
    // 从plist文件中加载的数组中装的是字典对象
    NSArray *tempArray = [NSArray arrayWithContentsOfFile:filePath];

    for (NSDictionary *dict in tempArray) {
        CDMyItem *tempItem = [[CDMyItem alloc] init];
        // 通过KVC将字典的键值对直接映射到对象属性上
        // 如果字典中有些键模型对象上没有对应的属性??
        [tempItem setValuesForKeysWithDictionary:dict];
        [_items addObject:tempItem];
    }
}

- (NSUInteger) size {
    return _folded? 0 : _items.count;
}

- (void) addItem:(CDMyItem *) item {
    if (_items) {
        [_items addObject:item];
    }
}

- (void) insertItem:(CDMyItem *) item atIndex:(NSUInteger) index {
    if (_items) {
        [_items insertObject:item atIndex:index];
    }
}

- (void) removeItem:(CDMyItem *) item {
    if (_items) {
        [_items removeObject:item];
    }
}

- (void) removeItemAtIndex:(NSUInteger) index {
    if (_items) {
        [_items removeObjectAtIndex:index];
    }
}

@end
视图控制器类。
#import "ViewController.h"
#import "CDMyGroup.h"
#import "CDMyItem.h"

#define WIDTH self.view.bounds.size.width
#define HEIGHT self.view.bounds.size.height

@interface ViewController () <UITableViewDataSource, UITableViewDelegate> {
    UITableView *myTableView;

    NSMutableArray *dataArray;
}

@end

@implementation ViewController

- (void)viewDidLoad {
    [super viewDidLoad];
    // Do any additional setup after loading the view, typically from a nib.

    myTableView = [[UITableView alloc] initWithFrame:CGRectMake(0, 0, WIDTH, HEIGHT) style:UITableViewStylePlain];

    myTableView.dataSource = self;
    myTableView.delegate = self;

    [self createDataModel];
    [self.view addSubview:myTableView];
}

- (void) createDataModel {
    if (!dataArray) {
        dataArray = [NSMutableArray array];
    }

    NSArray *names = @[@"圣斗士", @"海贼", @"火影忍者", @"美女"];
    for (int i = 0; i < names.count; i++) {
        CDMyGroup *group = [[CDMyGroup alloc] initWithName:names[i]];
        [group loadItemsFromFile:[NSString stringWithFormat:@"%@.plist", names[i]]];
        [dataArray addObject:group];
    }
}

#pragma mark UITableViewDataSource回调
// 获得表格视图中有多少个分组的回调方法
- (NSInteger) numberOfSectionsInTableView:(UITableView *)tableView {
    return dataArray.count;
}

// 获得每个分组中有多少行的回调方法
- (NSInteger) tableView:(UITableView *)tableView numberOfRowsInSection:(NSInteger)section {
    CDMyGroup *group = (id)dataArray[section];
    return group.size;
}

// 获得表格视图中单元格的回调方法
- (UITableViewCell *) tableView:(UITableView *)tableView cellForRowAtIndexPath:(NSIndexPath *)indexPath {
    UITableViewCell *cell = [tableView dequeueReusableCellWithIdentifier:@"CELL"];
    if (!cell) {
        cell = [[UITableViewCell alloc] initWithStyle:UITableViewCellStyleSubtitle reuseIdentifier:@"CELL"];
    }

    CDMyGroup *group = (id)dataArray[indexPath.section];
    CDMyItem *item = group.items[indexPath.row];

    NSString *filePath = [[NSBundle mainBundle] pathForResource:item.imageName ofType:nil];
    cell.textLabel.text = item.imageInfo;
    cell.detailTextLabel.text = item.imageName;
    cell.imageView.image = [UIImage imageWithContentsOfFile:filePath];
    cell.accessoryType = UITableViewCellAccessoryDisclosureIndicator;

    return cell;
}

// 获得分区标题的回调方法
- (NSString *) tableView:(UITableView *)tableView titleForHeaderInSection:(NSInteger)section {
    CDMyGroup *group = dataArray[section];
    return group.name;
}

#pragma mark UITableViewDelegate回调

// 获得行高的回调方法
- (CGFloat) tableView:(UITableView *)tableView heightForRowAtIndexPath:(NSIndexPath *)indexPath {
    return 150;
}

// 获得分区头部视图的回调方法
- (UIView *) tableView:(UITableView *)tableView viewForHeaderInSection:(NSInteger)section {
    CDMyGroup *group = (id)dataArray[section];

    UIButton *sectionHeaderButton = [UIButton buttonWithType:UIButtonTypeCustom];
    sectionHeaderButton.tag = 500 + section;
    [sectionHeaderButton setBackgroundColor:group.color];
    [sectionHeaderButton setTitle:group.name forState:UIControlStateNormal];
    [sectionHeaderButton addTarget:self action:@selector(sectionHeaderButtonClicked:) forControlEvents:UIControlEventTouchUpInside];

    return sectionHeaderButton;
}

#pragma mark 其他事件的回调方法

// 点击分区头部折叠或展示该分区的回调方法
- (void) sectionHeaderButtonClicked:(UIButton *) sender {
    CDMyGroup *group = (id)dataArray[sender.tag - 500];
    group.folded = !group.isFolded;
    [myTableView reloadSections:[NSIndexSet indexSetWithIndex:sender.tag - 500] withRowAnimation:UITableViewRowAnimationTop];
}

@end
运行效果如下图所示。

UITableViewCell
通过上面的例子,我们对UITableViewCell已经有了初步的认识。我们可以通过selectionStyle属性改变单元格的样貌,还可以通过selectedBackgroundView属性来定制所选单元格的背景视图,这样可以实现选中单元格的高亮效果。如果要给单元格加上选取标记,可以通过accessoryType进行指定。
UITableViewCell提供了四种基本样式,分别是:
- UITableViewCellStyleDefault:单元格具有一个左对齐的文本标签,而且可以指定一个图像,如果现实了图像,显示文本的空间会相对变小,标签出现在图像的右侧。
- UITableViewCellStyleValue1:该风格会将主标签(textLabel)以较大的黑子显示在单元格左侧,将细节标签(detailTextLabel)以较小的灰色文字显示在单元格右侧。
- UITableViewCellStyleValue2:该风格会以当前的tintColor作为文本的颜色,把主标签用较小的字显示在左侧,而细节标签会以黑色小字出现在标题的右侧,不支持图像。
- UITableViewCellStyleSubtitle:此风格会将主标签显示在稍微考上的位置,留出下方空间用来显示细节标签,这两个标签文本默认都是黑色的,可以设置图像。
UITableView编辑
UITableView有一个名为editing的属性,如果将其设置为YES,UITableView就会进入编辑模式。UITableView在编辑模式下,用户可以管理UITableView中的表格行,例如添加、删除和移动等操作,但是编辑模式没有修改行的功能。
切换编辑模式:setEditing:animated:
增加行:insertRowsAtIndexPaths:withRowAnimation:
删除行:deleteRowsAtIndexPaths:withRowAnimation:
移动行:moveRowAtIndexPath:toIndexPath:
开始/结束更新:beginUpdates/endUpdates
刷新表格数据:reloadData
刷新指定位置数据:reloadRowsAtIndexPaths:withRowAnimation:
刷新指定区段数据:reloadSections:withRowAnimation:
下面的例子演示了对UITableView的编辑。
#import "ViewController.h"
#import "CDMyGroup.h"
#import "CDMyItem.h"
#define WIDTH self.view.bounds.size.width
#define HEIGHT self.view.bounds.size.height
@interface ViewController () <UITableViewDataSource, UITableViewDelegate> {
UITableView *myTableView;
NSMutableArray *dataArray;
}
@end
@implementation ViewController
- (void)viewDidLoad {
[super viewDidLoad];
// Do any additional setup after loading the view, typically from a nib.
myTableView = [[UITableView alloc] initWithFrame:CGRectMake(0, 0, WIDTH, HEIGHT) style:UITableViewStylePlain];
myTableView.dataSource = self;
myTableView.delegate = self;
[self createNavigationBarItem];
[self createDataModel];
[self.view addSubview:myTableView];
}
- (void) createNavigationBarItem {
self.navigationItem.leftBarButtonItem = [[UIBarButtonItem alloc] initWithTitle:@"编辑" style:UIBarButtonItemStylePlain target:self action:@selector(doSomeEdit:)];
self.navigationItem.rightBarButtonItem = [[UIBarButtonItem alloc] initWithTitle:@"新增" style:UIBarButtonItemStylePlain target:self action:@selector(doSomeAdd:)];
}
- (void) createDataModel {
if (!dataArray) {
dataArray = [NSMutableArray array];
}
NSArray *names = @[@"圣斗士", @"海贼", @"火影忍者", @"美女"];
for (int i = 0; i < names.count; i++) {
CDMyGroup *group = [[CDMyGroup alloc] initWithName:names[i]];
[group loadItemsFromFile:[NSString stringWithFormat:@"%@.plist", names[i]]];
[dataArray addObject:group];
}
}
#pragma mark UITableViewDataSource回调
// 获得有多少个分区的回调方法
- (NSInteger) numberOfSectionsInTableView:(UITableView *)tableView {
return dataArray.count;
}
// 获得每个分区有多少行的回调方法
- (NSInteger) tableView:(UITableView *)tableView numberOfRowsInSection:(NSInteger)section {
CDMyGroup *group = (id)dataArray[section];
return group.size;
}
// 获得指定分区指定行的单元格的回调方法
- (UITableViewCell *) tableView:(UITableView *)tableView cellForRowAtIndexPath:(NSIndexPath *)indexPath {
UITableViewCell *cell = [tableView dequeueReusableCellWithIdentifier:@"CELL"];
if (!cell) {
cell = [[UITableViewCell alloc] initWithStyle:UITableViewCellStyleSubtitle reuseIdentifier:@"CELL"];
}
CDMyGroup *group = (id)dataArray[indexPath.section];
CDMyItem *item = group.items[indexPath.row];
NSString *filePath = [[NSBundle mainBundle] pathForResource:item.imageName ofType:nil];
cell.textLabel.text = item.imageInfo;
cell.detailTextLabel.text = item.imageName;
cell.imageView.image = [UIImage imageWithContentsOfFile:filePath];
return cell;
}
// 定制分段的段头
- (NSString *) tableView:(UITableView *)tableView titleForHeaderInSection:(NSInteger)section {
CDMyGroup *group = dataArray[section];
return group.name;
}
// 完成删除的回调方法
- (void)tableView:(UITableView *)tableView commitEditingStyle:(UITableViewCellEditingStyle)editingStyle forRowAtIndexPath:(NSIndexPath *)indexPath {
if (editingStyle == UITableViewCellEditingStyleDelete) {
CDMyGroup *group = (id) dataArray[indexPath.section];
[group removeItemAtIndex:indexPath.row];
[myTableView deleteRowsAtIndexPaths:@[indexPath] withRowAnimation:UITableViewRowAnimationLeft];
}
}
// 让表格视图支持移动行的回调方法
- (void)tableView:(UITableView *)tableView moveRowAtIndexPath:(NSIndexPath *)sourceIndexPath toIndexPath:(NSIndexPath *)destinationIndexPath {
// 当前项原来的组
CDMyGroup *srcGroup = dataArray[sourceIndexPath.section];
// 当前项要移动到的组
CDMyGroup *dstGroup = dataArray[destinationIndexPath.section];
if (srcGroup == dstGroup) { // 组内移动
if (sourceIndexPath.row != destinationIndexPath.row) {
[srcGroup exchangeItemAtIndex:sourceIndexPath.row toIndex:destinationIndexPath.row];
}
}
else { // 跨组移动
CDMyItem *tempItem = srcGroup.items[sourceIndexPath.row];
[srcGroup removeItem:tempItem];
[dstGroup insertItem:tempItem atIndex:destinationIndexPath.row];
}
}
#pragma mark UITableViewDelegate回调
// 定制单元格的高度
- (CGFloat) tableView:(UITableView *)tableView heightForRowAtIndexPath:(NSIndexPath *)indexPath {
return 150;
}
// 定制分段段头的视图
- (UIView *) tableView:(UITableView *)tableView viewForHeaderInSection:(NSInteger)section {
CDMyGroup *group = (id)dataArray[section];
UIButton *sectionHeaderButton = [UIButton buttonWithType:UIButtonTypeCustom];
sectionHeaderButton.tag = 500 + section;
[sectionHeaderButton setBackgroundColor:group.color];
[sectionHeaderButton setTitle:group.name forState:UIControlStateNormal];
[sectionHeaderButton addTarget:self action:@selector(sectionHeaderButtonClicked:) forControlEvents:UIControlEventTouchUpInside];
return sectionHeaderButton;
}
#pragma mark 其他事件的回调方法
// 点击段头折叠或展开分段
- (void) sectionHeaderButtonClicked:(UIButton *) sender {
CDMyGroup *group = (id)dataArray[sender.tag - 500];
group.folded = !group.isFolded;
[myTableView reloadSections:[NSIndexSet indexSetWithIndex:sender.tag - 500] withRowAnimation:UITableViewRowAnimationTop];
}
// 在编辑模式和非编辑模式间切换
- (void) doSomeEdit:(UIBarButtonItem *) sender {
if ([myTableView isEditing]) {
[sender setTitle:@"编辑"];
[myTableView setEditing:NO animated:YES];
}
else {
[sender setTitle:@"完成"];
[myTableView setEditing:YES animated:YES];
}
}
// 将新添加的行放置到展开的分组作为第一行
- (void) doAddItem:(UIBarButtonItem *) sender {
CDMyItem *item = [[CDMyItem alloc] init];
item.imageInfo = @"Test only!";
item.imageName = @"圣斗士09.jpg";
int section = 0;
for (CDMyGroup *tempGroup in dataArray) {
// 找到没有被折叠的分组将新建的项加入其中
if (!tempGroup.isFolded) {
[tempGroup insertItem:item atIndex:tempGroup.size];
NSIndexPath *indexPath = [NSIndexPath indexPathForRow:0 inSection:section];
[myTableView insertRowsAtIndexPaths:@[indexPath]withRowAnimation:UITableViewRowAnimationRight];
break;
}
section++;
}
}
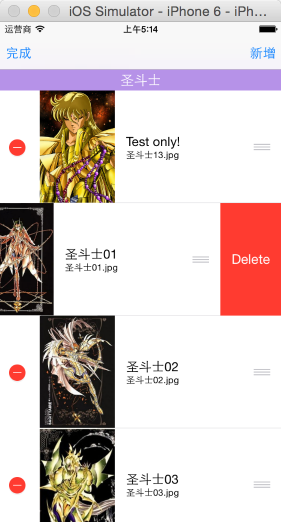
@end运行效果如下图所示。
除此之外,还可以通过UITableViewDelegate中的回调方法对编辑状态下视图进行定制,例如:
- (UITableViewCellEditingStyle)tableView:(UITableView *)tableView editingStyleForRowAtIndexPath:(NSIndexPath *)indexPath {
return indexPath.row % 3;
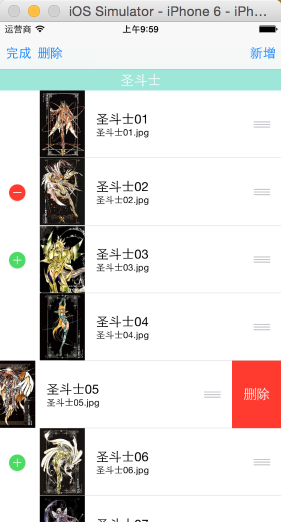
}运行效果如下图所示。如果不希望界面上出现英文的"Delete",可以通过将Info.plist文件中的"Localization native development region"修改为zh即可。
UITableView多选删除
对表格进行编辑是使用表格视图时的常见操作,这些操作主要包括添加新行、删除行和移动行,而在删除行时,可以支持多选删除,效果如下图所示。
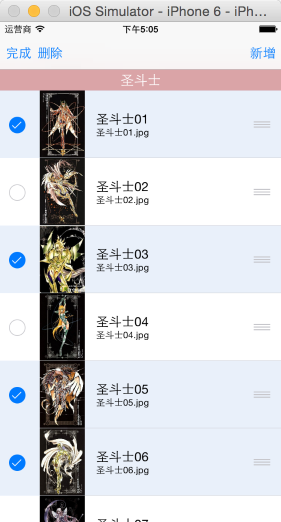
要实现表格的多选删除,首先要设置表格视图支持在编辑模式下进行多项选择。
myTableView.allowsMultipleSelectionDuringEditing = YES;编写删除多行的回调方法。
// 删除选中行的回调方法
- (void) doDeleteItems:(UIBarButtonItem *) sender {
    // 获得所有选中的行
    NSArray *indexPathsArray = [myTableView indexPathsForSelectedRows];

    // 将所有选中行按照分区和所在行排列成降序(从大到小)
    // 因为选中的行是按照选中的先后顺序排列的如果按照原始的顺序进行删除
    // 可能因为索引错乱导致删除错误甚至程序崩溃
    indexPathsArray = [indexPathsArray sortedArrayUsingComparator:^NSComparisonResult(id obj1, id obj2) {
        NSIndexPath *indexPath1 = obj1;
        NSIndexPath *indexPath2 = obj2;
        return indexPath1.section == indexPath2.section? indexPath1.row < indexPath2.row : indexPath1.section < indexPath2.section;
    }];

    // 通过循环逐行删除
    for (NSIndexPath *indexPath in indexPathsArray) {
        CDMyGroup *group = dataArray[indexPath.section];
        [group removeItemAtIndex:indexPath.row];
        [myTableView deleteRowsAtIndexPaths:@[indexPath] withRowAnimation:UITableViewRowAnimationRight];
    }
}
UITableView搜索
由于表格视图可以呈现大量的信息,因此对这些信息进行搜索是很常见的,可以为表格视图添加搜索条(UISearchBar),根据搜索结果来刷新表格视图。
@interface ViewController () <UITableViewDelegate, UITableViewDataSource, UISearchBarDelegate> {

    UITableView *myTableView;

    UISearchBar *mySearchBar;

    NSArray *currentArray;  // 指向当前正在使用的数据模型数组的指针

    NSMutableArray *dataArray;      // 保存固定数据的数组

    NSMutableArray *resultsArray;   // 装搜索结果的数组
}

@end

- (void) customizeSearchBar {
    mySearchBar = [[UISearchBar alloc] initWithFrame:CGRectMake(0, 0, 0, 40)];
    mySearchBar.placeholder = @"请输入要查找的名字";
    mySearchBar.showsCancelButton = YES;
    mySearchBar.showsBookmarkButton = YES;
    [mySearchBar setImage:[UIImage imageNamed:@"Dudu.jpg"] forSearchBarIcon:UISearchBarIconBookmark state:UIControlStateNormal];
    mySearchBar.delegate = self;
    [myTableView setTableHeaderView:mySearchBar];
}

#pragma mark UISearchBarDelegate回调方法
// 点击键盘上的搜索按钮
- (void)searchBarSearchButtonClicked:(UISearchBar *)searchBar {
    if (!resultsArray) {
        resultsArray = [NSMutableArray array];
    }
    else {
        [resultsArray removeAllObjects];
    }

    NSString *str = searchBar.text;

    for (CDPerson *tempPerson in dataArray) {
        NSRange range = [tempPerson.name rangeOfString:str];
        if (range.location != NSNotFound) {
            [resultsArray addObject:tempPerson];
        }
    }

    // 将搜索结果作为表格视图的模型
    currentArray = resultsArray;
    [myTableView reloadData];
}

// 点击搜索栏上的取消按钮的回调方法
- (void)searchBarCancelButtonClicked:(UISearchBar *)searchBar {
    // 使用原来的数据模型
    currentArray = dataArray;
    [myTableView reloadData];
}
语音搜索
在移动应用中使用语音识别功能后,原来需要键盘输入的地方可以直接使用语音进行输入,从而解放用户的双手提供更好的用户体验。目前,讯飞MSC在中文语音识别中用得较多,下面就以讯飞语音识别为例讲解如何实现语音搜索功能。
可以在讯飞开放平台的SDK下载中心下载讯飞提供的语音听写功能,当然需要注册账号并获得使用SDK的APPID,下载后的文件夹中包含了文档、库文件和样例程序,可以直接阅读文档或参考样例程序来实现自己的语音搜索功能。
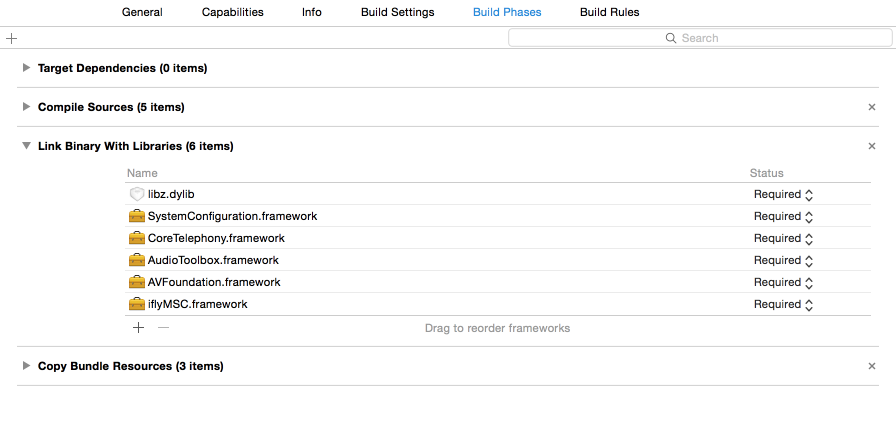
创建项目后,需要向项目中加入讯飞的库文件以及它依赖的其他库文件,可以在下图所示的位置进行添加,需要添加的库文件也如下图所示,其他的库文件可以通过Xcode的自动链接器自动加入。
可以对讯飞提供的SDK进行二次封装,使其变成更容易使用的API(只用一行代码就可以使用它的功能),代码如下所示。
#import <Foundation/Foundation.h>

@interface IATConfig : NSObject

+(IATConfig *)sharedInstance;


+(NSString *)mandarin;
+(NSString *)cantonese;
+(NSString *)henanese;
+(NSString *)chinese;
+(NSString *)english;
+(NSString *)lowSampleRate;
+(NSString *)highSampleRate;
+(NSString *)isDot;
+(NSString *)noDot;

@property (nonatomic, strong) NSString *speechTimeout;
@property (nonatomic, strong) NSString *vadEos;
@property (nonatomic, strong) NSString *vadBos;

@property (nonatomic, strong) NSString *language;
@property (nonatomic, strong) NSString *accent;

@property (nonatomic, strong) NSString *dot;
@property (nonatomic, strong) NSString *sampleRate;

@property (nonatomic, assign) BOOL haveView;
@property (nonatomic, strong) NSArray *accentIdentifer;
@property (nonatomic, strong) NSArray *accentNickName;


@end
#define PUTONGHUA @"mandarin"
#define YUEYU @"cantonese"
#define HENANHUA @"henanese"
#define ENGLISH @"en_us"
#define CHINESE @"zh_cn";
#import "IATConfig.h"
@implementation IATConfig
-(id)init {
self = [super init];
if (self) {
[self defaultSetting];
return self;
}
return nil;
}
+(IATConfig *)sharedInstance {
static IATConfig * instance = nil;
static dispatch_once_t predict;
dispatch_once(&predict, ^{
instance = [[IATConfig alloc] init];
});
return instance;
}
-(void)defaultSetting {
_speechTimeout = @"10000";
_vadEos = @"1000";
_vadBos = @"3000";
_dot = @"1";
_sampleRate = @"16000";
_language = CHINESE;
_accent = PUTONGHUA;
_haveView = NO;//默认是不dai界面的
_accentNickName = [[NSArray alloc] initWithObjects:@"粤语",@"普通话",@"河南话",@"英文", nil];
}
+(NSString *)mandarin {
return PUTONGHUA;
}
+(NSString *)cantonese {
return YUEYU;
}
+(NSString *)henanese {
return HENANHUA;
}
+(NSString *)chinese {
return CHINESE;
}
+(NSString *)english {
return ENGLISH;
}
+(NSString *)lowSampleRate {
return @"8000";
}
+(NSString *)highSampleRate {
return @"16000";
}
+(NSString *)isDot {
return @"1";
}
+(NSString *)noDot {
return @"0";
}
@end上面的代码在讯飞提供的样例程序中可以找到,无需自行编写,但是可以对其中的一些参数进行设置,例如language(语种)、vadEos(语音结束后的超时点)、vadBos(语音开始前的超时点)、speechTimeout(语音长度达到多少时间超时)等。
#import <Foundation/Foundation.h>
#import "iflyMSC/IFlyMSC.h"

typedef void(^CDVoiceHandler)(NSString *);

@interface CDVoice : NSObject <IFlyRecognizerViewDelegate> {
    IFlyRecognizerView *rView;
}

@property (nonatomic, copy) CDVoiceHandler voiceHandler;

+ (instancetype) sharedInstance;

- (void) voiceToTextString:(CDVoiceHandler) handler;

@end
#import "CDVoice.h"
#import "IATConfig.h"
#define LEFT_FOR_RV 50
#define TOP_FOR_RV 50
@implementation CDVoice
- (instancetype) init {
@throw [NSException exceptionWithName:@"CDVoiceException" reason:@"不允许使用初始化方法" userInfo:nil];
}
- (instancetype) initPrivate {
if (self = [super init]) {
// Do some initialization here!!!
}
return self;
}
+ (instancetype) sharedInstance {
static CDVoice *instance = nil;
if (!instance) {
instance = [[self alloc] initPrivate];
}
return instance;
}
- (void) voiceToTextString:(CDVoiceHandler) handler {
if (!rView) {
rView = [[IFlyRecognizerView alloc] initWithOrigin:CGPointMake(LEFT_FOR_RV, TOP_FOR_RV)];
[rView setParameter:@"" forKey:[IFlySpeechConstant PARAMS]];
//设置听写模式
[rView setParameter:@"iat" forKey:[IFlySpeechConstant IFLY_DOMAIN]];
rView.delegate = self;
IATConfig *instance = [IATConfig sharedInstance];
//设置最长录音时间
[rView setParameter:instance.speechTimeout forKey:[IFlySpeechConstant SPEECH_TIMEOUT]];
//设置后端点
[rView setParameter:instance.vadEos forKey:[IFlySpeechConstant VAD_EOS]];
//设置前端点
[rView setParameter:instance.vadBos forKey:[IFlySpeechConstant VAD_BOS]];
//设置采样率,推荐使用16K
[rView setParameter:instance.sampleRate forKey:[IFlySpeechConstant SAMPLE_RATE]];
if ([instance.language isEqualToString:[IATConfig chinese]]) {
//设置语言
[rView setParameter:instance.language forKey:[IFlySpeechConstant LANGUAGE]];
//设置方言
[rView setParameter:instance.accent forKey:[IFlySpeechConstant ACCENT]];
} else if ([instance.language isEqualToString:[IATConfig english]]) {
//设置语言
[rView setParameter:instance.language forKey:[IFlySpeechConstant LANGUAGE]];
}
//设置是否返回标点符号
[rView setParameter:instance.dot forKey:[IFlySpeechConstant ASR_PTT]];
}
// 绑定语音识别完成后做回调的Block
self.voiceHandler = handler;
[rView start];
}
// 语音识别完成的回调
- (void)onResult:(NSArray *)resultArray isLast:(BOOL) isLast {
NSMutableString *result = [[NSMutableString alloc] init];
NSMutableString * resultString = [[NSMutableString alloc]init];
NSDictionary *dic = resultArray[0];
for (NSString *key in dic) {
[result appendFormat:@"%@",key];
NSString * resultFromJson = [self stringFromABNFJson:result];
if (! [resultString isEqualToString:@" "]) {
[resultString appendString:resultFromJson];
}
}
if (!isLast && self.voiceHandler) {
self.voiceHandler(resultString);
}
}
// 语音识别出错的回调方法
- (void)onError: (IFlySpeechError *) error {
if (error.errorCode) {
NSLog(@"%@", error);
}
}
// 从JSON格式的数据中提取语音数据(该方法可以在官方Demo的代码中找到)
- (NSString *)stringFromABNFJson: (NSString *) params {
if (!params) {
return nil;
}
NSMutableString *tempStr = [[NSMutableString alloc] init];
NSDictionary *resultDic = [NSJSONSerialization JSONObjectWithData:[params dataUsingEncoding:NSUTF8StringEncoding] options:kNilOptions error:nil];
NSArray *wordArray = [resultDic objectForKey:@"ws"];
for (int i = 0; i < [wordArray count]; i++) {
NSDictionary *wsDic = [wordArray objectAtIndex: i];
NSArray *cwArray = [wsDic objectForKey:@"cw"];
for (int j = 0; j < [cwArray count]; j++) {
NSDictionary *wDic = [cwArray objectAtIndex:j];
NSString *str = [wDic objectForKey:@"w"];
[tempStr appendString: str];
}
}
return tempStr;
}
@end到此为止,我们已经封装好了自己的API,要使用它非常简单,代码如下所示。
#import "AppDelegate.h"
#import "iflyMSC/IFlyMSC.h"

@interface AppDelegate ()

@end

@implementation AppDelegate


- (BOOL)application:(UIApplication *)application didFinishLaunchingWithOptions:(NSDictionary *)launchOptions {
    // 将自己申请的APPID通过IFlySpeechUtility工具类进行注册
    [IFlySpeechUtility createUtility:@"appid=自己申请的APPID"];

    return YES;
}
@end
下面完成了一个非常简单的应用来使用我们封装好的语音识别功能。
#import "ViewController.h"
#import "CDVoice.h"
@interface ViewController () {
UITextField *myTextField;
}
@end
@implementation ViewController
- (void)viewDidLoad {
[super viewDidLoad];
UIButton *okButton = [UIButton buttonWithType:UIButtonTypeSystem];
okButton.frame = CGRectMake(50, 100, 100, 50);
[okButton setTitle:@"OK" forState:UIControlStateNormal];
[okButton addTarget:self action:@selector(okButtonClicked) forControlEvents:UIControlEventTouchUpInside];
myTextField = [[UITextField alloc] initWithFrame:CGRectMake(50, 200, 275, 50)];
myTextField.borderStyle = UITextBorderStyleRoundedRect;
[self.view addSubview:okButton];
[self.view addSubview:myTextField];
}
- (void) okButtonClicked {
[[CDVoice sharedInstance] voiceToTextString:^(NSString * str) {
myTextField.text = str;
}];
}
- (void)touchesBegan:(NSSet *)touches withEvent:(UIEvent *)event {
[myTextField resignFirstResponder];
}
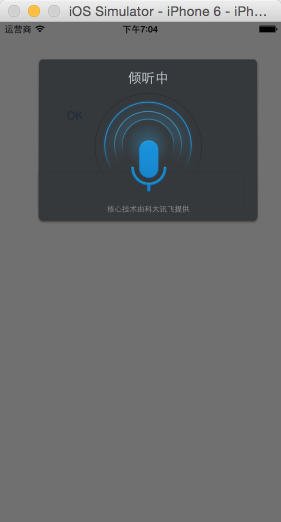
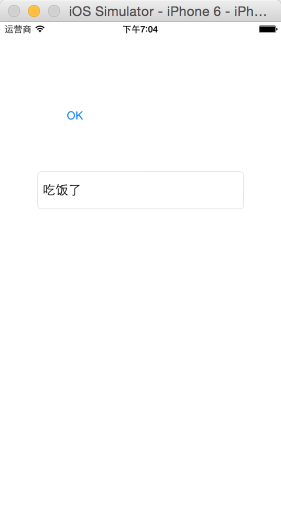
@end运行效果如下图所示,点击OK按钮开始进行语音识别,完成后将识别的内容输入文本框中。
我们可以对搜索栏中的书签按钮进行定制,在点击通过调用我们封装好的代码后产生语音识别的视图,然后将识别的结果填入搜索栏中。
- (void) customizeSearchBar {
    mySearchBar = [[UISearchBar alloc] initWithFrame:CGRectMake(0, 0, 0, 40)];
    mySearchBar.placeholder = @"请输入要查找的名字";
    mySearchBar.showsCancelButton = YES;
    mySearchBar.showsBookmarkButton = YES;
    [mySearchBar setImage:[UIImage imageNamed:@"Dudu.jpg"] forSearchBarIcon:UISearchBarIconBookmark state:UIControlStateNormal];
    mySearchBar.delegate = self;
    [myTableView setTableHeaderView:mySearchBar];
}

// 点击书签按钮的回调方法
- (void)searchBarBookmarkButtonClicked:(UISearchBar *)searchBar {
    [[CDVoice sharedInstance] voiceToTextString:^(NSString *str) {
        mySearchBar.text = str;
        [mySearchBar becomeFirstResponder];
    }];
}
定制分区(section)
可以通过UITableViewDataSource和UITableViewDelegate中的方法对分区进行定制,方法如下所示。由于这些内容在前面的代码中已经出现过,此处不再赘述。
- 定制分区头部的标题:- (NSString )tableView:(UITableView )tableView titleForHeaderInSection:(NSInteger)section;
- 定制分区尾部的标题:- (NSString )tableView:(UITableView )tableView titleForFooterInSection:(NSInteger)section;
- 定制分区索引的标题:- (NSArray )sectionIndexTitlesForTableView:(UITableView )tableView;
- 定制分区头部的视图:- (UIView )tableView:(UITableView )tableView viewForHeaderInSection:(NSInteger)section;
- 定制分区尾部的视图:- (UIView )tableView:(UITableView )tableView viewForFooterInSection:(NSInteger)section;
UITableViewCell定制
在开发应用程序时,我们一般都不会直接UITableViewCell属性并修改它的属性来实现对表格视图单元格的定制,因为UITableViewCell的属性本身就很少,而且也无法直接调整它的样式,所以往往不能满足我们的设计要求,因此通常情况下都要对UITableViewCell进行定制。
XIB定制
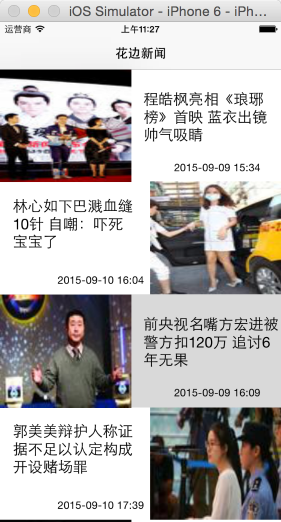
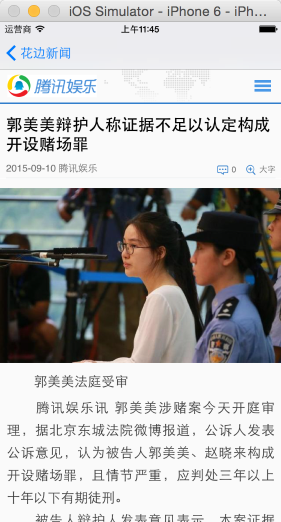
下面使用百度APIStore的接口实现一个"花边新闻"的应用,效果如下图所示。
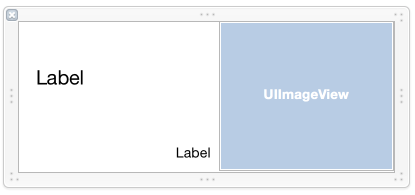
我们可以继承UITableViewCell来创建一个自定义的表格视图单元格,在创建的同时勾选创建XIB文件,这样就可以用XIB对单元格中的内容进行定制,如下图所示。
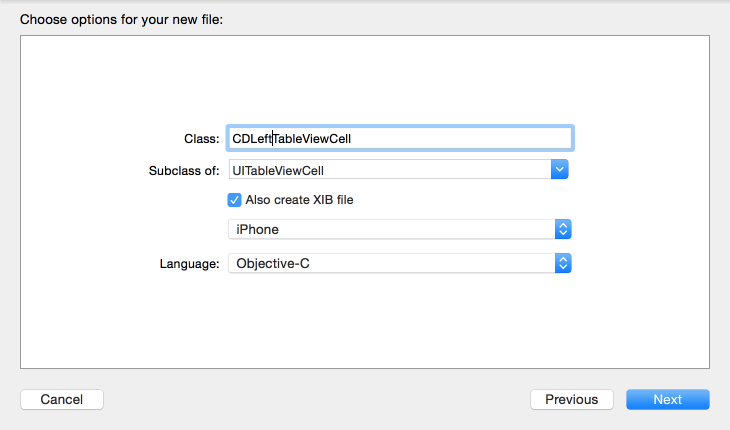
按照相同的方法可以定制图片放右侧的单元格,我们可以让图片在左和在右的两种单元格继承一个公共的父类CDMyTableViewCell,而CDMyTableViewCell的父类是UITableViewCell,代码如下所示。
#import <Foundation/Foundation.h>

@interface CDNews : NSObject

@property (nonatomic, copy) NSString *title;
@property (nonatomic, copy) NSString *time;
@property (nonatomic, copy) NSString *desc;
@property (nonatomic, copy) NSString *picUrl;
@property (nonatomic, copy) NSString *url;

@end
#import <UIKit/UIKit.h>
@class CDNews;
@interface CDMyTableViewCell : UITableViewCell
@property (nonatomic, strong) CDNews *model;
@end#import <UIKit/UIKit.h>
#import "CDMyTableViewCell.h"
@interface CDLeftTableViewCell : CDMyTableViewCell
@end#import "CDLeftTableViewCell.h"
#import "UIImageView+WebCache.h"
#import "CDNews.h"
@interface CDLeftTableViewCell ()
@property (weak, nonatomic) IBOutlet UIImageView *myImageView;
@property (weak, nonatomic) IBOutlet UILabel *titleLabel;
@property (weak, nonatomic) IBOutlet UILabel *timeLabel;
@end
@implementation CDLeftTableViewCell
- (void)setModel:(CDNews *)model {
// 调用父类方法设置模型对象
[super setModel:model];
// 通过绑定的插座变量修改用户界面
// 使用SDWebImage异步加载图片
[_myImageView sd_setImageWithURL:[NSURL URLWithString:model.picUrl]];
_titleLabel.text = model.title;
_timeLabel.text = model.time;
}
@end图片在右侧的单元格与图片在左侧的单元格雷同,此处不再赘述。
//
//  ViewController.m
//  day090203
//
//  Created by LUOHao on 15/9/2.
//  Copyright (c) 2015年 jackfrued. All rights reserved.
//

#import "ViewController.h"
#import "CDMyTableViewCell.h"
#import "CDNews.h"
#import "CDNewsDetailViewController.h"

#define MY_PAGE_SIZE 10

@interface ViewController () <UITableViewDataSource, UITableViewDelegate> {

    UITableView *myTableView;       // 表格视图

    UIRefreshControl *refControl;   // 下拉加载控件

    NSMutableArray *dataArray;      // 保存数据模型的数组

    int currentPage;                // 当前加载第几页花边新闻
}

@end

@implementation ViewController

- (void)viewDidLoad {
    [super viewDidLoad];

    self.title = @"花边新闻";

    currentPage = 1;

    // 初始化表格视图
    myTableView = [[UITableView alloc] initWithFrame:CGRectMake(0, 0, self.view.bounds.size.width, self.view.bounds.size.height) style:UITableViewStylePlain];

    myTableView.dataSource = self;
    myTableView.delegate = self;

    myTableView.rowHeight = 150;
    myTableView.separatorStyle = UITableViewCellSeparatorStyleNone;

    // 通过Nib文件注册可复用单元格
    [myTableView registerNib:[UINib nibWithNibName:@"CDLeftTableViewCell" bundle:[NSBundle mainBundle]] forCellReuseIdentifier:@"LEFT_CELL"];
    [myTableView registerNib:[UINib nibWithNibName:@"CDRightTableViewCell" bundle:[NSBundle mainBundle]] forCellReuseIdentifier:@"RIGHT_CELL"];

    // 初始化下拉刷新控件
    refControl = [[UIRefreshControl alloc] initWithFrame:CGRectZero];
    refControl.tintColor = [UIColor orangeColor];
    [refControl addTarget:self action:@selector(dragDownRefresh) forControlEvents:UIControlEventValueChanged];

    [myTableView addSubview:refControl];
    [self.view addSubview:myTableView];
}

// 加载数据模型
- (void) loadDataModel {
    if (!dataArray) {
        dataArray = [NSMutableArray array];
    }

    NSString *httpUrl = @"http://apis.baidu.com/txapi/huabian/newtop";
    // 设定页面大小和页码
    NSString *httpArg = [NSString stringWithFormat:@"num=%d&page=%d", MY_PAGE_SIZE, currentPage];
    [self request: httpUrl withHttpArg: httpArg];
}

// 下拉加载事件回调方法(将新一页的数据加载到数据模型中)
- (void) dragDownRefresh {
    currentPage += 1;
    [self loadDataModel];
}

// 请求服务器数据
-(void)request:(NSString *) httpUrl withHttpArg:(NSString *) httpArg  {
    NSString *urlStr = [[NSString alloc]initWithFormat: @"%@?%@", httpUrl, httpArg];
    NSURL *url = [NSURL URLWithString: urlStr];
    NSMutableURLRequest *request = [[NSMutableURLRequest alloc]initWithURL: url cachePolicy: NSURLRequestUseProtocolCachePolicy timeoutInterval: 10];
    [request setHTTPMethod: @"GET"];
    [request addValue: @"ae774eed68e97890749971a8a5a8e3e4" forHTTPHeaderField: @"apikey"];
    [NSURLConnection sendAsynchronousRequest: request
        queue: [NSOperationQueue mainQueue]
        completionHandler: ^(NSURLResponse *response, NSData *data, NSError *error){
           if (error) {
               NSLog(@"错误: %@", error.localizedDescription);
               // 如果没有加载到新一页的数据则将页码减1
               currentPage -= 1;
           } else {
               NSDictionary *dict = [NSJSONSerialization JSONObjectWithData:data options:0 error:nil];
               for (NSString *key in [dict allKeys]) {
                   if (![key isEqualToString:@"code"] && ![key isEqualToString:@"msg"]) {
                       // 通过键取到对应的值
                       // 这个值又是一个字典对象正好和CDNews对象对应
                       NSDictionary *objDict = dict[key];
                       CDNews *tempNews = [[CDNews alloc] init];
                       // 使用KVC给对象的属性赋值
                       [tempNews setValuesForKeysWithDictionary:objDict];
                       // 将创建好的对象放到保存数据模型的数组中
                       [dataArray insertObject:tempNews atIndex:0];
                   }
               }
               [myTableView reloadData];
            }
            [refControl endRefreshing];
        }
    ];
}

#pragma mark UITableViewDataSource回调方法

- (NSInteger) tableView:(UITableView *)tableView numberOfRowsInSection:(NSInteger)section {

    return dataArray.count;
}

- (UITableViewCell *) tableView:(UITableView *)tableView cellForRowAtIndexPath:(NSIndexPath *)indexPath {
    static NSString *reuseId = nil;
    // 根据奇偶行设置不同的可重用标识符
    reuseId = indexPath.row % 2? @"LEFT_CELL" : @"RIGHT_CELL";

    // 获得可重用单元格并绑定模型
    CDMyTableViewCell *cell = (id)[tableView dequeueReusableCellWithIdentifier:reuseId forIndexPath:indexPath];
    cell.model = (id)dataArray[indexPath.row];

    return cell;
}

#pragma mark UITableViewDelegate回调方法
// 选中单元格时导航到一个新的视图控制器用UIWebView显示新闻详情页面
- (void) tableView:(UITableView *)tableView didSelectRowAtIndexPath:(NSIndexPath *)indexPath {
    CDNewsDetailViewController *vc = [[CDNewsDetailViewController alloc] init];
    vc.url = ((CDNews *)dataArray[indexPath.row]).url;

    [self.navigationController pushViewController:vc animated:YES];
}

@end
#import <UIKit/UIKit.h>
@interface CDNewsDetailViewController : UIViewController
@property (nonatomic, copy) NSString *url;
@end#import "CDNewsDetailViewController.h"
@interface CDNewsDetailViewController () {
UIWebView *myWebView;
}
@end
@implementation CDNewsDetailViewController
- (void)viewDidLoad {
[super viewDidLoad];
myWebView = [[UIWebView alloc] initWithFrame:CGRectMake(0, 0, self.view.bounds.size.width, self.view.bounds.size.height)];
[self.view addSubview:myWebView];
}
- (void)viewWillAppear:(BOOL)animated {
[myWebView loadRequest:[NSURLRequest requestWithURL:[NSURL URLWithString:self.url]]];
}
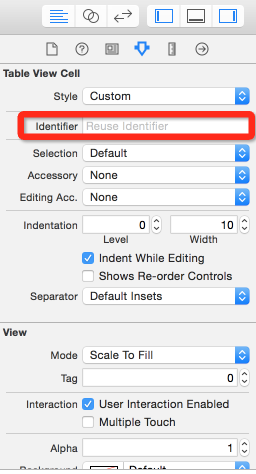
@end说明:在使用XIB定制UITableViewCell时,也可以指定该单元格的可重用标识符,这样就可以按照之前讲的通过NSBundle加载XIB的方式来获得单元格并实现对单元格的重用,Xcode中指定表格视图单元格可重用标识符的位置如下图所示。
代码定制
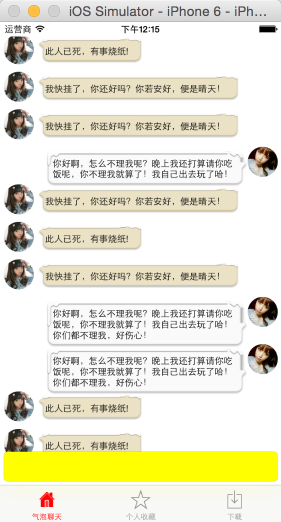
下图完成了一个气泡聊天的效果,用户的聊天记录会显示在UITableView的单元格中,为了添加用户头像和气泡效果,以及根据聊天的内容对单元格的高度进行自适应的调整,都需要我们对表格视图的单元格进行定制。
#import <Foundation/Foundation.h>

@interface CDMessage : NSObject

@property (nonatomic, copy) NSString *content;
@property (nonatomic, assign, getter=isOnLeft) BOOL onLeft;

@end
#import <UIKit/UIKit.h>
@class CDMessage;
@interface CDMessageTableViewCell : UITableViewCell {
UIImageView *headerImageView; // 显示头像的视图
UIImageView *bubbleImageView; // 显示气泡的视图
UILabel *contentLabel; // 显示聊天内容的标签
}
@property (nonatomic, strong) CDMessage *model;
@end#import "CDMessageTableViewCell.h"
#import "CDMessage.h"
#define WIDTH [UIScreen mainScreen].bounds.size.width
@implementation CDMessageTableViewCell
- (instancetype)init {
@throw [NSException exceptionWithName:@"" reason:@"不允许调用init方法创建自定义表格视图单元格" userInfo:nil];
}
- (instancetype)initWithStyle:(UITableViewCellStyle)style reuseIdentifier:(NSString *)reuseIdentifier {
if (self = [super initWithStyle:style reuseIdentifier:reuseIdentifier]) {
// 创建单元格上需要使用的子视图
[self createUI];
}
return self;
}
// 初始化头像、气泡对应的UIImageView以及显示聊天消息的标签并添加到UITableViewCell的contentView中
- (void) createUI {
headerImageView = [[UIImageView alloc] initWithFrame:CGRectMake(0, 0, 40, 40)];
headerImageView.layer.cornerRadius = 20;
headerImageView.layer.masksToBounds = YES;
[self.contentView addSubview:headerImageView];
bubbleImageView = [[UIImageView alloc] initWithFrame:CGRectZero];
[self.contentView addSubview:bubbleImageView];
contentLabel = [[UILabel alloc] initWithFrame:CGRectMake(10, 5, 0, 0)];
contentLabel.numberOfLines = 0;
contentLabel.lineBreakMode = NSLineBreakByCharWrapping;
contentLabel.font = [UIFont systemFontOfSize:12];
[bubbleImageView addSubview:contentLabel];
}
// 当设置单元格的数据模型时对视图进行定制
- (void)setModel:(CDMessage *)model {
_model = model;
// 根据模型对界面进行定制
NSString *str = model.content;
// 根据字符串的内容以及指定的最大宽度和字体大小计算出显示该字符串需要的尺寸
CGSize strSize = [str boundingRectWithSize:CGSizeMake(250, 0) options:1 attributes:@{NSFontAttributeName:[UIFont systemFontOfSize:12]} context:nil].size;
// 获得子视图原来的尺寸和位置
CGRect hRect = headerImageView.frame;
CGRect bRect = bubbleImageView.frame;
CGRect cRect = contentLabel.frame;
if (model.isOnLeft) { // 对方的消息(头像和消息在左侧)
hRect.origin.x = 5;
bRect.origin.x = 10 + hRect.size.width;
// 将左侧头像的图像进行水平镜像处理
headerImageView.image = [UIImage imageWithCGImage:[UIImage imageNamed:@"head2.jpg"].CGImage scale:1 orientation:UIImageOrientationUpMirrored];
UIImage *tempImage = [UIImage imageNamed:@"thy_bubble"];
// 设置气泡图片大小可以伸缩但保留左边的20点和上边的10点不被拉伸
tempImage = [tempImage stretchableImageWithLeftCapWidth:20 topCapHeight:10];
bubbleImageView.image = tempImage;
}
else { // 自己的消息(头像和消息在右侧)
hRect.origin.x = WIDTH - hRect.size.width - 5;
bRect.origin.x = WIDTH - hRect.size.width - strSize.width - 35;
headerImageView.image = [UIImage imageNamed:@"head1.jpg"];
UIImage *tempImage = [UIImage imageNamed:@"my_bubble"];
tempImage = [tempImage stretchableImageWithLeftCapWidth:20 topCapHeight:10];
bubbleImageView.image = tempImage;
}
// 根据消息的
bRect.origin.y = 5;
bRect.size.width = strSize.width + 30;
bRect.size.height = strSize.height + 20;
cRect.size.width = strSize.width + 10;
cRect.size.height = strSize.height + 10;
// 将修改后的尺寸和位置重新赋值给子视图
headerImageView.frame = hRect;
bubbleImageView.frame = bRect;
contentLabel.frame = cRect;
contentLabel.text = str;
}
@end单元格高度自适应的回调方法。
- (CGFloat)tableView:(UITableView *)tableView heightForRowAtIndexPath:(NSIndexPath *)indexPath {
    CDMessage *msg = dataArray[indexPath.row];
    NSString *str = msg.content;
    CGSize strSize = [str boundingRectWithSize:CGSizeMake(250, 0) options:1 attributes:@{NSFontAttributeName:[UIFont systemFontOfSize:12]} context:nil].size;
    // 最少保留50点的行高(头像的大小是40个点)
    return strSize.height + 20 > 50? strSize.height + 20 : 50;
}


 1770
1770

 被折叠的 条评论
为什么被折叠?
被折叠的 条评论
为什么被折叠?
 到【灌水乐园】发言


