


 本文详细介绍了如何在流程设计器中为转移增加拐点功能。通过修改转移模型,添加拐点列表属性,并实现增加、删除和移动拐点的方法。同时,通过安装TransitionBendpointEditPolicy策略,使得转移控制器能处理拐点操作。此外,文章还涵盖了命令模式在处理拐点操作中的应用,以及如何刷新视图以显示拐点效果。
这一节主要介绍如何在转移上增加拐点,要实现这功能,首先要修改转移的模型,增加一个列表属性,维护转移上所有的拐点,转移模型为实现拐点功能而增加的代码如下:
public static final String BENDPOINT_PROP = "Transition.BendPoint";
private List bendPoints = new ArrayList();//存放转移上的所有拐点的坐标
//向转移上增加拐点(拐点在转移上是有顺序的)
//index 拐点的顺序
//point 观点的坐标
public void addBendPoint(int index,Point point){
if(point == null){
throw new IllegalArgumentException();
}
bendPoints.add(index,point);
//通知转移控制器,转移的拐点属性变化了,让它刷新视图
firePropertyChange(BENDPOINT_PROP, null, point);
}
//从转移上删除指定位置的拐点
public void removeBendPoint(int index){
if(index<0){
throw new IllegalArgumentException();
}
bendPoints.remove(index);
//通知转移控制器,转移的拐点属性变化了,让它刷新视图
firePropertyChange(BENDPOINT_PROP, null, null);
}
//得到转移上的拐点列表
public List getBendPoints() {
return new ArrayList(bendPoints);
}
要让转移控制器能接受增加拐点的请求,应该在转移的控制器上安装相应的策略,代码如下:
//add or remove or move the BendPoint
installEditPolicy(EditPolicy.CONNECTION_BENDPOINTS_ROLE,new TransitionBendpointEditPolicy());
在这里安装了TransitionBendpointEditPolicy策略,这个策略使的转移控制器能接受增加,删除和移动拐点的请求,这个类的代码如下:
package com.example.workflow.policy;
import org.eclipse.draw2d.geometry.Point;
import org.eclipse.gef.commands.Command;
import org.eclipse.gef.editpolicies.BendpointEditPolicy;
import org.eclipse.gef.requests.BendpointRequest;
import com.example.workflow.commands.AbstractBendpointCommand;
import com.example.workflow.commands.CreateBendpointCommand;
import com.example.workflow.commands.DeleteBendpointCommand;
import com.example.workflow.commands.MoveBendpointCommand;
import com.example.workflow.model.Transition;
/**
* EditPolicy for the BendPoint used by this edit part.
*/
public class TransitionBendpointEditPolicy extends BendpointEditPolicy{
/**新建拐点 */
protected Command getCreateBendpointCommand(BendpointRequest request) {
Point point = request.getLocation(); //得到拐点的坐标
int index = request.getIndex(); //得到拐点的顺序
Transition tran = (Transition)getHost().getModel();//得到要增加拐点的转移
//创建一个增加拐点的命令,给这命令设置相应的参数
AbstractBendpointCommand cmd = new CreateBendpointCommand();
cmd.setIndex(index);
cmd.setPoint(point);
cmd.setTran(tran);
return cmd;
}
/**删除拐点 */
protected Command getDeleteBendpointCommand(BendpointRequest request) {
int index = request.getIndex();//得到拐点的顺序
Transition tran = (Transition)getHost().getModel();//得到要删除拐点的转移
//创建一个删除拐点的命令,给这命令设置相应的参数
AbstractBendpointCommand cmd = new DeleteBendpointCommand();
cmd.setIndex(index);
cmd.setTran(tran);
return cmd;
}
/**移动拐点 */
protected Command getMoveBendpointCommand(BendpointRequest request) {
int index = request.getIndex();//得到拐点的顺序
Point point = request.getLocation(); //得到拐点的坐标
Transition tran = (Transition)getHost().getModel();//得到要移动拐点的转移
//创建一个移动拐点的命令,给这命令设置相应的参数
AbstractBendpointCommand cmd = new MoveBendpointCommand();
cmd.setIndex(index);
cmd.setPoint(point);
cmd.setTran(tran);
return cmd;
}
}
在上面的策略类中,我们覆盖了父类的三个方法,在这三个方法中,我们分别新建了CreateBendpointCommand,DeleteBendpointCommand,MoveBendpointCommand命令,由于这三个类有一些公共属性和方法,因此我们进行了抽象,把公共属性和方法抽象到父类中,这几个命令的代码如下:
父类:
package com.example.workflow.commands;
import org.eclipse.draw2d.geometry.Point;
import org.eclipse.gef.commands.Command;
import com.example.workflow.model.Transition;
public class AbstractBendpointCommand extends Command{
protected int index;//拐点的次序
protected Transition tran;//转移对象
protected Point point;//拐点的绝对位置
//命令的重做方法
public void redo(){
execute();
}
public void setPoint(Point point) {
this.point = point;
}
public void setIndex(int index) {
this.index = index;
}
public void setTran(Transition tran) {
this.tran = tran;
}
}
新建拐点命令
package
com.example.workflow.commands;
/**create
a
bendpoint
for
the
transition*/
public
class
CreateBendpointCommand
extends
AbstractBendpointCommand{
//
如果转移对象或者拐点的坐标为空,不能执行这个命令
public
boolean
canExecute() {
return
(
tran
!=
null
) && (
point
!=
null
);
}
//
命令的执行方法,在转移维护的拐点列表中增加拐点信息,拐点位置作为索引,拐点坐标作
//
为值
public
void
execute() {
tran
.addBendPoint(
index
,
point
);
}
//
命令的撤销,从在转移维护的拐点列表中删除指定位置的拐点
public
void
undo() {
tran
.removeBendPoint(
index
);
}
//
标志执行命令的名称
public
String getLabel() {
return
"create bendpoint"
;
}
}
删除拐点的命令
package
com.example.workflow.commands;
import
org.eclipse.draw2d.geometry.Point;
/**delete
a
bendpoint
for
the
transition*/
public
class
DeleteBendpointCommand
extends
AbstractBendpointCommand{
//
如果转移对象为空,不能执行这个命令
public
boolean
canExecute() {
return
(
tran
!=
null
);
}
//
首先取出要删除拐点的坐标,以备撤销操作时使用,然后再从列表中删除指定位置的拐点
public
void
execute() {
point
= (Point)
tran
.getBendPoints().get(
index
);
tran
.removeBendPoint(
index
);
}
//
撤销操作,在列表的指定位置,增加刚才删除的拐点
public
void
undo() {
tran
.addBendPoint(
index
,
point
);
}
//
标志执行命令的名称
public
String getLabel() {
return
"delete bendpoint"
;
}
}
移动拐点的命令
package
com.example.workflow.commands;
import
org.eclipse.draw2d.geometry.Point;
/**delete
a
bendpoint
for
the
transition*/
public
class
MoveBendpointCommand
extends
AbstractBendpointCommand{
//
移动之前拐点的坐标
private
Point
oldPoint
=
null
;
//
如果转移对象或者拐点的坐标为空,不能执行这个命令
public
boolean
canExecute() {
return
(
tran
!=
null
) && (
point
!=
null
);
}
//
首先得到移动之前的拐点的坐标,以备撤销操作使用
//
然后再删除这个拐点
//
最后再增加新的拐点
public
void
execute() {
oldPoint
= (Point)
tran
.getBendPoints().get(
index
);
tran
.removeBendPoint(
index
);
tran
.addBendPoint(
index
,
point
);
}
//
撤销操作,首先删除新的拐点,然后再增加上原来拐点
public
void
undo() {
tran
.removeBendPoint(
index
);
tran
.addBendPoint(
index
,
oldPoint
);
}
//
标志执行命令的名称
public
String getLabel() {
return
"move bendpoint"
;
}
}
以前我们新建转移时,都不用刷新转移的
Figure
,现在在转移上增加了拐点,要想显示出拐点的效果,就必须覆盖转移控制器的
refreshVisuals
方法,代码如下:
//
因为在转移模型的
addBendPoint
和
removeBendPoint
方法中,都通知转移控制器
//
转移的
BENDPOINT_PROP
属性发生变化,所以在这儿我们当
//
变化属性的名称是
BENDPOINT_PROP,
我们刷新视图
public void propertyChange(PropertyChangeEvent evt) {
String prop = evt.getPropertyName();
if(Transition.BENDPOINT_PROP.equals(prop)){
refreshVisuals();
}
}
//
刷新转移对应的视图,首先得到转移模型中的拐点列表,然后把每个拐点的坐标
//
构造成
AbsoluteBendpoint
对象,放在一个新的列表中,然后设置转移图形的
//
路由
protected void refreshVisuals() {
List constraint = new ArrayList();
List list = getCastedModel().getBendPoints();
for(int i=0;i<list.size();i++){
constraint.add(new AbsoluteBendpoint((Point)list.get(i)));
}
getConnectionFigure().setRoutingConstraint(constraint);
}
要想使转移视图展示出拐点,我们还必须修改
createFigure
方法,修改如下:
protected IFigure createFigure() {
PolylineConnection connection = (PolylineConnection) super.createFigure();
connection.setTargetDecoration(new PolygonDecoration()); // arrow at target endpoint
connection.setConnectionRouter(new BendpointConnectionRouter());//
为了显示拐点,设置转移的路由
return connection;
}
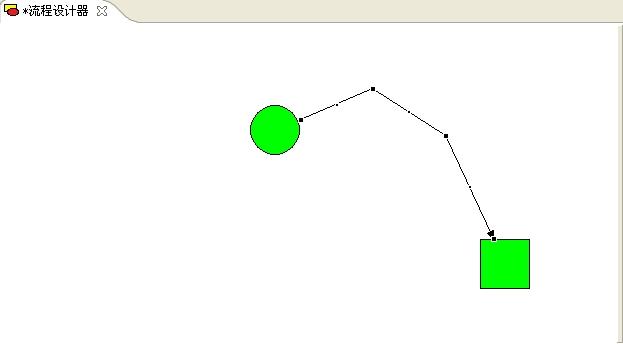
这样,我们运行程序,就能看到转移上增加拐点的效果了,如图:
至此,拐点有关的内容,我们就介绍完了,下面我们介绍如何在为编辑器增加大纲视图。


 1166
1166

 被折叠的 条评论
为什么被折叠?
被折叠的 条评论
为什么被折叠?
 到【灌水乐园】发言


