


Notification简介
Notification的数据结构封装为3个类,Notification,NotificationRecord和StatusBarNotification。
Notification是提供给App层创建Notification使用的数据结构。Notification包含title,icon,discription等内容。
NotificationRecord是NotificationManagerService用来管理所有Notification的数据结构。包含Notification数据结构,package,userid,id,tag,statusBarKey等内容,其中package,userid,id,tag可以用来唯一标识一个NotificationRecord,statusBarKey是可以唯一标识StatusBarManagerService中StatusBarNotification的。
StatusBarNotification是StatusBarManagerService中notification的数据结构,包含package,userid,id,tag和Notification数据结构等。
Notification关联最大的两个Service就是NotificationManagerService和StatusBarManagerService。其中NotificationManagerService是用于管理Notification并处理Notification相关事件的核心。事件包括新建,更新,删除Notification等
StatusBarManagerService是StatusBar的后台管理服务,处理StatusBar相关事件,例如显示Notification,Buttery/Signal Status,System Time等。同时也会处理Notification显示,消去,并且点击Notification时发送PendingIntent等也都需要通过这个Service。StatusBarManagerService也会跟NotificationManagerService交互,处理Notification相关的动作。
Notification相关最重要的APP是SystemUI,这个APP提供了StatusBar的界面,StatusBar拓展界面,Home画面等主要画面,并且为用户提供UI和Status进行交互。例如提示新到短信,未接来电,邮件提醒等。该app在如下路径中:
framework/base/packages/SystemUI/
Notification功能
1.App发出Notification,StatusBar进行显示
2.App更新已经发出的Notification
3.点击一条Notification发送intent启动activity
4.清除一条Notification
5.清除所有可以清除的Notification
6.部分Notification是不可清除的,需要StatusBar做对应处理
Notification结构
APP层的Notification
Notification类型
APP层Notification从显示上分为两种Normal和Big(Expanded) Notification
Normal Notification显示如图1:
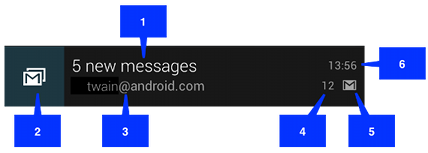
图1
包含如下6个内容
1.Content title
2. Large icon
3. Content text
4. Content info
5. Small icon
6. Time that the notification was issued.
其中Small icon,Content title和Content text是必须有的。其他的都是可选的。
Big(Expanded) Notification显示如图2:
Big(Expanded) Notification中只有7是独有的,其他1~6都是和Normal Notification基本一致的。Big(Expanded) Notification有3种风格。
Big picture style
The details area contains a bitmap up to 256 dp tall in its detail section.见图3右
Big text style
Displays a large text block in the details section.见图3左
Inbox style
Displays lines of text in the details section.见图2
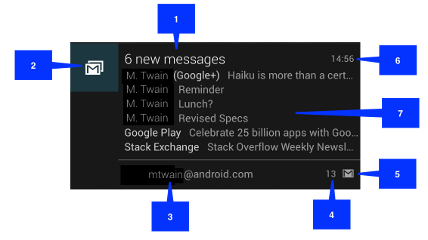
图2
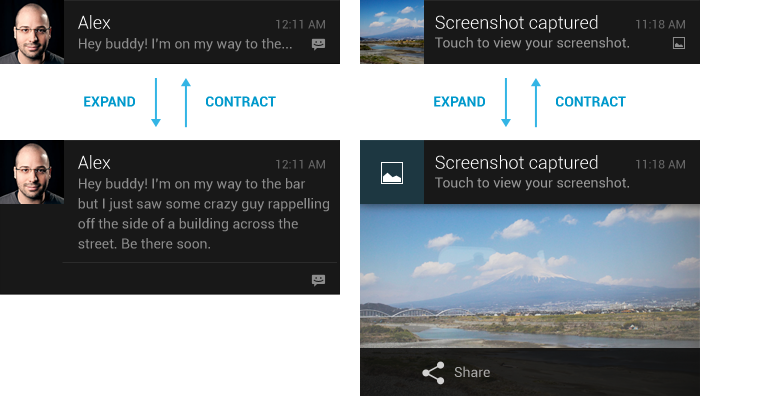
图3
Big(Expanded) Notification中包含两个独有的内容Big content title和Summary text,这两个内容Normal Notification中是不包含的,但是对于一个Notification来说,这两个值并不是必须的。
Notification还至少有一个Action,Action是以PendingIntent的形式关联到Notification中的,也可以通过NotificationCompat.Builder.addAction(int icon, CharSequence title, PendingIntent intent)函数设定其他的action。Action在UI中是以Button的形式体现的。Android4.1之前的版本actionbutton会被隐藏起来。一个Notification中最多可以有3个action。Action的形式如图4:
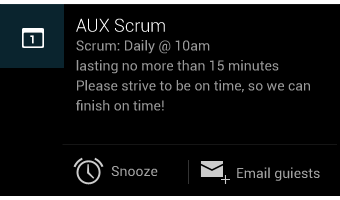
图4
为Notification添加第一个Action的方式是定义一个PendingIntent,代码如下:
Intent resultIntent = new Intent(this, ResultActivity.class);
...// Because clicking the notification opens a new ("special") activity, there's
// no need to create an artificial back stack.
PendingIntent resultPendingIntent =
PendingIntent.getActivity(
this,
0,
resultIntent,
PendingIntent.FLAG_UPDATE_CURRENT
);
带有ProgressBar的Notification
ProgressBar有两种,一种是固定进度的,比如0~100。如图5
另一种是非固定进度的。如图6

图5
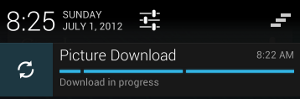
图6
固定进度ProgressBar例子代码
...
mNotifyManager =
(NotificationManager) getSystemService(Context.NOTIFICATION_SERVICE);
mBuilder = new NotificationCompat.Builder(this);
mBuilder.setContentTitle("Picture Download")
.setContentText("Download in progress")
.setSmallIcon(R.drawable.ic_notification);
// Start a lengthy operation in a background thread
new Thread(
new Runnable() {
@Override
public void run() {
int incr;
// Do the "lengthy" operation 20 times
for (incr = 0; incr <= 100; incr+=5) {
// Sets the progress indicator to a max value, the
// current completion percentage, and "determinate"
// state
mBuilder.setProgress(100, incr, false);
// Displays the progress bar for the first time.
mNotifyManager.notify(0, mBuilder.build());
// Sleeps the thread, simulating an operation
// that takes time
try {
// Sleep for 5 seconds
Thread.sleep(5*1000);
} catch (InterruptedException e) {
Log.d(TAG, "sleep failure");
}
}
// When the loop is finished, updates the notification
mBuilder.setContentText("Download complete")
// Removes the progress bar
.setProgress(0,0,false);
mNotifyManager.notify(ID, mBuilder.build());
}
}
// Starts the thread by calling the run() method in its Runnable
).start();
把上面的setProgress参数改为0,0,true,就可以显示为非固定进度Progress了
// Sets an activity indicator for an operation of indeterminate length
mBuilder.setProgress(0, 0, true);
// Issues the notification
mNotifyManager.notify(0, mBuilder.build());
具体的界面显示可以参考
http://developer.android.com/intl/zh-cn/design/patterns/notifications.html
APP中创建一个Notification的两种方式
方式一:
NotificationManager nm =
(NotificationManager)getSystemService(Context.NOTIFICATION_SERVICE);
Notification n = new Notification(R.drawable.chat,
"Hello,there!", System.currentTimeMillis());
n.flags = Notification.FLAG_AUTO_CANCEL;
Intent i = new Intent(arg0.getContext(), NotificationShow.class);
i.setFlags(Intent.FLAG_ACTIVITY_CLEAR_TOP|Intent.FLAG_ACTIVITY_NEW_TASK);
//PendingIntent
PendingIntent contentIntent = PendingIntent.getActivity(
arg0.getContext(),
R.string.app_name,
i,
PendingIntent.FLAG_UPDATE_CURRENT);
n.setLatestEventInfo(
arg0.getContext(),
"Hello,there!",
"Hello,there,I'm john.",
contentIntent);
nm.notify(R.string.app_name, n);
方式二:
mNotificationManager =
(NotificationManager) getSystemService(Context.NOTIFICATION_SERVICE);
// Sets an ID for the notification, so it can be updated
int notifyID = 1;
mNotifyBuilder = new NotificationCompat.Builder(this).
setContentTitle("New Message").
setContentText("You've received new messages.").
setSmallIcon(R.drawable.ic_notify_status)
numMessages = 0;// Start of a loop that processes data and then notifies the user...
mNotifyBuilder.setContentText(currentText).
setNumber(++numMessages);
// Because the ID remains unchanged, the existing notification is
// updated.
mNotificationManager.notify(
notifyID,
mNotifyBuilder.build());...
方式一针对android4.1以前的版本,方式二针对android4.1和以后的版本。
方式二中mNotifyBuilder.build()的返回值是个Notification类型的对象和方式一中new出来的Notification n是同一个类型的对象,是App层Notification的记录。
Frameworks/base/core/java/android/app/Notification.java
private Notification buildUnstyled() {
Notification n = new Notification();
n.when = mWhen;----notification发送的时间,默认是系统notify的时间
n.icon = mSmallIcon;----int型的icon id,小图标,新建时必须包含
n.iconLevel = mSmallIconLevel;
n.number = mNumber;----notification代表的事件数,比如收到2条email
n.contentView = makeContentView();----remoteView,扩展status bar之后显示的notification
n.contentIntent = mContentIntent;----点击notification需要触发的pendingintent,用于启动activity,必须有一个pendingIntent绑定到notification中
n.deleteIntent = mDeleteIntent;----notification被清除时触发的intent,用于启动activity
n.fullScreenIntent = mFullScreenIntent;
n.tickerText = mTickerText;
n.tickerView = makeTickerView();
n.largeIcon = mLargeIcon;----Bitmap型,大图标
n.sound = mSound;
n.audioStreamType = mAudioStreamType;
n.vibrate = mVibrate;----notification是否振动
n.ledARGB = mLedArgb;----notification屏幕提示颜色
n.ledOnMS = mLedOnMs;----notification屏幕闪烁亮的时长
n.ledOffMS = mLedOffMs;----notification屏幕闪烁灭的时长
n.defaults = mDefaults;----notification属性默认值
n.flags = mFlags;----标记notification类型,是否可以被清除等
Notification.java的内部类Builder中也有类似的数据如下:
public static class Builder {
private static final int MAX_ACTION_BUTTONS = 3;
private Context mContext;----上下文
private long mWhen;----notification发送的时间,默认是系统notify的时间
private int mSmallIcon;----int型的icon id,小图标,必须有
private int mSmallIconLevel;
private int mNumber;----notification表示的事件数量
private CharSequence mContentTitle;----notification的title
private CharSequence mContentText;----notification的说明
private CharSequence mContentInfo;----notification的info,截图1中No.4
private CharSequence mSubText;
private PendingIntent mContentIntent;----点击notification需要触发的intent,用于启动activity
private RemoteViews mContentView;----自定义layout的notification的内容部分
private PendingIntent mDeleteIntent;----notification被清除时触发的intent,用于启动activity,清除包括用户点击clear all button,
private PendingIntent mFullScreenIntent;
private CharSequence mTickerText;
private RemoteViews mTickerView;
private Bitmap mLargeIcon;----notification的大icon
private Uri mSound;
private int mAudioStreamType;
private long[] mVibrate;
private int mLedArgb;
private int mLedOnMs;
private int mLedOffMs;
private int mDefaults;
private int mFlags;
private int mProgressMax;
private int mProgress;
private boolean mProgressIndeterminate;
private ArrayList<String> mKindList = new ArrayList<String>(1);
private Bundle mExtras;
private int mPriority;
private ArrayList<Action> mActions = new ArrayList<Action>(MAX_ACTION_BUTTONS);
private boolean mUseChronometer;
private Style mStyle;
private boolean mShowWhen = true;
两种方式都是通过下面的方式发送Notification的
NotificationManager.notify(
notifyID,
mNotifyBuilder.build());
再来看一下NotificationManager.java的notify函数
public void notify(int id, Notification notification)
{
notify(null, id, notification);
}
public void notify(String tag, int id, Notification notification)
{
int[] idOut = new int[1];
INotificationManager service = getService();
String pkg = mContext.getPackageName();
if (notification.sound != null) {
notification.sound = notification.sound.getCanonicalUri();
}
if (localLOGV) Log.v(TAG, pkg + ": notify(" + id + ", " + notification + ")");
try {
service.enqueueNotificationWithTag(pkg, tag, id, notification, idOut,
UserHandle.myUserId());
if (id != idOut[0]) {
Log.w(TAG, "notify: id corrupted: sent " + id + ", got back " + idOut[0]);
}
} catch (RemoteException e) {
}
}
可见notify实际上是调用service中的enqueueNotificationWithTag函数处理App发送的Notification的。处理传入的参数pkg,id,notification,userid都不是空值,tag可以为null。
Service中的Notification
处理Notification的Service主要是
frameworks/base/services/java/com/android/service/NotificationManagerService.java
他是Notification的管理者。那么enqueueNotificationWithTag函数到底做了什么样的处理呢,且看下面代码。
public void enqueueNotificationWithTag(String pkg, String tag, int id, Notification notification,
int[] idOut, int userId)
{
enqueueNotificationInternal(pkg, Binder.getCallingUid(), Binder.getCallingPid(),
tag, id, notification, idOut, userId);
}
public void enqueueNotificationInternal(String pkg, int callingUid, int callingPid,
String tag, int id, Notification notification, int[] idOut, int userId)
{
... ...
// === Scoring === 计算Notification记录的score值
// 0. Sanitize inputs
notification.priority = clamp(notification.priority, Notification.PRIORITY_MIN, Notification.PRIORITY_MAX);
... ...
// 1. initial score: buckets of 10, around the app
int score = notification.priority * NOTIFICATION_PRIORITY_MULTIPLIER; //[-20..20]
... ...
//做成NotificationRecord,准备存储到List中
synchronized (mNotificationList) {
NotificationRecord r = new NotificationRecord(pkg, tag, id,
callingUid, callingPid, userId,
score,
notification);
NotificationRecord old = null;
int index = indexOfNotificationLocked(pkg, tag, id, userId);
if (index < 0) {
mNotificationList.add(r);
} else {
old = mNotificationList.remove(index);
mNotificationList.add(index, r);
// Make sure we don't lose the foreground service state.
if (old != null) {
notification.flags |=
old.notification.flags&Notification.FLAG_FOREGROUND_SERVICE;
}
}
... ...
//做成StatusBarNotification记录,准备传递给StatusBarService处理,mStatusBar.addNotification(n);会返回NotificationRecord的statusBarKey,作为StatusBarService中查找一个notification的键值。
if (notification.icon != 0) {
final StatusBarNotification n = new StatusBarNotification(
pkg, id, tag, r.uid, r.initialPid, score, notification, user);
if (old != null && old.statusBarKey != null) {
r.statusBarKey = old.statusBarKey;
long identity = Binder.clearCallingIdentity();
try {
mStatusBar.updateNotification(r.statusBarKey, n);
}
finally {
Binder.restoreCallingIdentity(identity);
}
} else {
long identity = Binder.clearCallingIdentity();
try {
r.statusBarKey = mStatusBar.addNotification(n);
if ((n.notification.flags & Notification.FLAG_SHOW_LIGHTS) != 0
&& canInterrupt) {
mAttentionLight.pulse();
}
}
finally {
Binder.restoreCallingIdentity(identity);
}
}
... ...
}
可见NotificationRecord就是NotificationManagerService用于记录一个Notification的存储结构,NotificationRecord在Service中以ArrayList形式存储。
private final ArrayList<NotificationRecord> mNotificationList =
new ArrayList<NotificationRecord>();
NotificationRecord用于记录和维护所有的Notification,就是一条记录,结构如下:
private static final class NotificationRecord
{
final String pkg; ----app的package,例如com.android.email
final String tag; ----pair(tag, id)必须是app内唯一的,tag可以是null
final int id; ----app内唯一识别一个notification的id
final int uid;----Binder.getCallingUid()
final int initialPid;----Binder.getCallingPid()
final int userId;----通过下面函数调用1获得
final Notification notification;----UI层app传递的icon,title,text等信息的记录
final int score;----通过下面函数调用2获得
IBinder statusBarKey;----status bar管理者中notification列表的唯一标识
... ...
函数调用1:
userId = ActivityManager.handleIncomingUser(callingPid,
callingUid, userId, true, false, "enqueueNotification", pkg);
函数调用2:
// 1. initial score: buckets of 10, around the app
int score = notification.priority * NOTIFICATION_PRIORITY_MULTIPLIER; //[-20..20]
StatusBarService中的Notification
NotificationManagerService中调用了 mStatusBar.addNotification或者mStatusBar.updateNotification将StatusBarNotification传递给了StatusBarService。其实mStatusBar是StatusBarManagerService 类的对象,所以这里提到的StatusBarService其实就是StatusBarManagerService。
private StatusBarManagerService mStatusBar;
mStatusBar调用的addNotification函数处理如下:
public IBinder addNotification(StatusBarNotification notification) {
synchronized (mNotifications) {
IBinder key = new Binder();
mNotifications.put(key, notification);
if (mBar != null) {
try {
mBar.addNotification(key, notification);
} catch (RemoteException ex) {
}
}
return key;
}
}
其中的mBar是IStatusBar的对象
volatile IStatusBar mBar;
framework/base/packages/SystemUI/src/com/android/systemui/statusbar/CommandQueue.java实现IStatusBar.java接口,
public void addNotification(IBinder key, StatusBarNotification notification) {
synchronized (mList) {
NotificationQueueEntry ne = new NotificationQueueEntry();
ne.key = key;
ne.notification = notification;
mHandler.obtainMessage(MSG_ADD_NOTIFICATION, 0, 0, ne).sendToTarget();
}
}
... ...
case MSG_ADD_NOTIFICATION: {
final NotificationQueueEntry ne = (NotificationQueueEntry)msg.obj;
mCallbacks.addNotification(ne.key, ne.notification);
break;
}
//CallBacks的定义
public interface Callbacks {
public void addIcon(String slot, int index, int viewIndex, StatusBarIcon icon);
public void updateIcon(String slot, int index, int viewIndex,
StatusBarIcon old, StatusBarIcon icon);
public void removeIcon(String slot, int index, int viewIndex);
public void addNotification(IBinder key, StatusBarNotification notification);
public void updateNotification(IBinder key, StatusBarNotification notification);
public void removeNotification(IBinder key);
framework/base/packages/SystemUI/src/com/android/systemui/statusbar/BaseStatusBar.java实现了CommandQueue.Callbacks,而
framework/base/packages/SystemUI/src/com/android/systemui/statusbar/tablet/TabletStatusBar.java
framework/base/packages/SystemUI/src/com/android/systemui/statusbar/phone/PhoneStatusBar.java
framework/base/packages/SystemUI/src/com/android/systemui/statusbar/tv/TvStatusBar.java
这3个类继承了BaseStatusBar,因此具体实现在这3个类中。以TabletStatusBar为例,addNotification函数的实现如下:
public void addNotification(IBinder key, StatusBarNotification notification) {
if (DEBUG) Slog.d(TAG, "addNotification(" + key + " -> " + notification + ")");
addNotificationViews(key, notification);
final boolean immersive = isImmersive();
if (false && immersive) {
// TODO: immersive mode popups for tablet
} else if (notification.notification.fullScreenIntent != null) {
// not immersive & a full-screen alert should be shown
Slog.w(TAG, "Notification has fullScreenIntent and activity is not immersive;"
+ " sending fullScreenIntent");
try {
notification.notification.fullScreenIntent.send();
} catch (PendingIntent.CanceledException e) {
}
} else {
tick(key, notification, true);
}
setAreThereNotifications();
}
其中addNotificationViews在BaseStatusBar中实现。
大致流程就是:调用StatusBarManagerService.java中的addNotification方法->(mBar不为空的话)执行mBar.addNotification(key, notification);->对应的是CommandQueue中的addNotification(IBinder key, StatusBarNotification notification)->CommandQueue中的mCallbacks.addNotification(ne.key, ne.notification);->TabletStatusBar中的addNotification。
再往回看看,StatusBarManagerService中维护的实际上是一个HashMap,用来存储Notification,而key实机上是IBinder类的对象,定义和结构如下:
HashMap<IBinder,StatusBarNotification> mNotifications
= new HashMap<IBinder,StatusBarNotification>();
StatusBarNotification 变量定义
public class StatusBarNotification implements Parcelable {
public final String pkg;
public final int id;
public final String tag;
public final int uid;
public final int initialPid;
// TODO: make this field private and move callers to an accessor that
// ensures sourceUser is applied.
public final Notification notification;
public final int score;
public final UserHandle user;
到此为止Notification的数据主要是由App层的Notification类,Service层的NotificationRecord和StatusBarNotification这三个类进行存储,NotificationManagerService管理NotificationRecord,是Notification管理的最基本数据。StatusBarManagerService也保存一份记录。
Notification流程
1.App发出Notification的流程可以参考“Notification结构”部分的分析
2.App更新已经发出的Notification
App层可以通过NotificationManager.notify(ID, notification)的形式发出更新,其中ID是App第一次发出Notification时通过notify传入的,其他流程也跟新发送Notification类似。
实际上在NotificationManagerService中是根据package,ID,tag,userId这4个值找到对应的NotificationRecord的。
int index = indexOfNotificationLocked(pkg, tag, id, userId);
而在StatusBarManagerService中则是通过statusBarKey找到对应的Notification的。
r.statusBarKey = mStatusBar.addNotification(n);
3.点击一条Notification发送intent启动activity
这个过程是在SystemUI初始化时设定的listener,用户触发click事件时通过PendingIntent.send()执行PendingIntent包含的Intent,就启动了对应的Activity
主要代码在
Frameworks/base/packages/SystemUI/src/com/android/systemui/statusbar/BaseStatusBar.java
启动过程会调用inflateViews函数初始化UI
protected boolean inflateViews(NotificationData.Entry entry, ViewGroup parent) {
... ...
workAroundBadLayerDrawableOpacity(row);
View vetoButton = updateNotificationVetoButton(row, sbn);
vetoButton.setContentDescription(mContext.getString(
R.string.accessibility_remove_notification));
... ...
// bind the click event to the content area
ViewGroup content = (ViewGroup)row.findViewById(R.id.content);
ViewGroup adaptive = (ViewGroup)row.findViewById(R.id.adaptive);
content.setDescendantFocusability(ViewGroup.FOCUS_BLOCK_DESCENDANTS);
PendingIntent contentIntent = sbn.notification.contentIntent;
if (contentIntent != null) {
final View.OnClickListener listener = new NotificationClicker(contentIntent,
sbn.pkg, sbn.tag, sbn.id);
content.setOnClickListener(listener);
} else {
content.setOnClickListener(null);
}
... ...
}
PendingIntent是在Notification创建时绑定的,具体可以参考“Notification创建的两种方式”一节。下面看一下NotificationClicker的处理过程。
private class NotificationClicker implements View.OnClickListener {
private PendingIntent mIntent;
private String mPkg;
private String mTag;
private int mId;
public void onClick(View v) {
try {
// The intent we are sending is for the application, which
// won't have permission to immediately start an activity after
// the user switches to home. We know it is safe to do at this
// point, so make sure new activity switches are now allowed.
ActivityManagerNative.getDefault().resumeAppSwitches();
// Also, notifications can be launched from the lock screen,
// so dismiss the lock screen when the activity starts.
ActivityManagerNative.getDefault().dismissKeyguardOnNextActivity();
} catch (RemoteException e) {
}
if (mIntent != null) {
int[] pos = new int[2];
v.getLocationOnScreen(pos);
Intent overlay = new Intent();
overlay.setSourceBounds(
new Rect(pos[0], pos[1], pos[0]+v.getWidth(), pos[1]+v.getHeight()));
try {
mIntent.send(mContext, 0, overlay);
} catch (PendingIntent.CanceledException e) {
// the stack trace isn't very helpful here. Just log the exception message.
Slog.w(TAG, "Sending contentIntent failed: " + e);
}
KeyguardManager kgm =
(KeyguardManager) mContext.getSystemService(Context.KEYGUARD_SERVICE);
if (kgm != null) kgm.exitKeyguardSecurely(null);
}
try {
mBarService.onNotificationClick(mPkg, mTag, mId);
} catch (RemoteException ex) {
// system process is dead if we're here.
}
// close the shade if it was open
animateCollapsePanels(CommandQueue.FLAG_EXCLUDE_NONE);
visibilityChanged(false);
}
其中的mIntent就是PendingIntent的一个实例,PendingIntent.send()的过程就不再详细调查了。
总结一下用户点击一个Notification的过程,其实就是SystemUI中处理一个onClick事件的过程,Click事件的listener在BaseStatusBar的inflateViews函数中设定,事件的处理本质上是一个PendingIntent.send()的过程。
4.清除一条Notification
清除一条Notification可以通过StatusBar扩展后的单条notification的清除button实现,也可以在StatusBar扩展后滑动一条notification实现。下面看一下具体代码是如何实现的。
inflateViews函数中标注绿色的vetoButton实际是删除一条Notification的处理Button,updateNotificationVetoButton函数提供了vetoButton click listener的设定
protected View updateNotificationVetoButton(View row, StatusBarNotification n) {
View vetoButton = row.findViewById(R.id.veto);
if (n.isClearable()) {
final String _pkg = n.pkg;
final String _tag = n.tag;
final int _id = n.id;
vetoButton.setOnClickListener(new View.OnClickListener() {
public void onClick(View v) {
// Accessibility feedback
v.announceForAccessibility(
mContext.getString(R.string.accessibility_notification_dismissed));
try {
mBarService.onNotificationClear(_pkg, _tag, _id);
} catch (RemoteException ex) {
// system process is dead if we're here.
}
}
});
vetoButton.setVisibility(View.VISIBLE);
} else {
vetoButton.setVisibility(View.GONE);
}
vetoButton.setImportantForAccessibility(View.IMPORTANT_FOR_ACCESSIBILITY_NO);
return vetoButton;
}
mBarService.onNotificationClear()会调用StatusBarManagerService的onNotificationClear()
public void onNotificationClear(String pkg, String tag, int id) {
enforceStatusBarService();
mNotificationCallbacks.onNotificationClear(pkg, tag, id);
}
public interface NotificationCallbacks {
void onSetDisabled(int status);
void onClearAll();
void onNotificationClick(String pkg, String tag, int id);
void onNotificationClear(String pkg, String tag, int id);
void onPanelRevealed();
void onNotificationError(String pkg, String tag, int id,
int uid, int initialPid, String message);
}
其中mNotificationCallbacks是一个interface,在NotificationManagerService中有对应的实现。
private StatusBarManagerService.NotificationCallbacks mNotificationCallbacks
= new StatusBarManagerService.NotificationCallbacks() {
... ...
public void onClearAll() {
// XXX to be totally correct, the caller should tell us which user
// this is for.
cancelAll(ActivityManager.getCurrentUser());
}
... ...
public void onNotificationClear(String pkg, String tag, int id) {
// XXX to be totally correct, the caller should tell us which user
// this is for.
cancelNotification(pkg, tag, id, 0,
Notification.FLAG_ONGOING_EVENT | Notification.FLAG_FOREGROUND_SERVICE,
true, ActivityManager.getCurrentUser());
}
... ...
cancelNotification的实现如下:
private void cancelNotification(String pkg, String tag, int id, int mustHaveFlags,
int mustNotHaveFlags, boolean sendDelete, int userId) {
EventLog.writeEvent(EventLogTags.NOTIFICATION_CANCEL, pkg, id, tag, userId,
mustHaveFlags, mustNotHaveFlags);
synchronized (mNotificationList) {
int index = indexOfNotificationLocked(pkg, tag, id, userId);
if (index >= 0) {
NotificationRecord r = mNotificationList.get(index);
if ((r.notification.flags & mustHaveFlags) != mustHaveFlags) {
return;
}
if ((r.notification.flags & mustNotHaveFlags) != 0) {
return;
}
mNotificationList.remove(index);
cancelNotificationLocked(r, sendDelete);
updateLightsLocked();
}
}
}
private void cancelNotificationLocked(NotificationRecord r, boolean sendDelete) {
// tell the app send delete pendingintent
... ...
// status bar
if (r.notification.icon != 0) {
long identity = Binder.clearCallingIdentity();
try {
mStatusBar.removeNotification(r.statusBarKey);
}
finally {
Binder.restoreCallingIdentity(identity);
}
r.statusBarKey = null;
}
// sound
... ...
// vibrate
... ...
// light
... ...
}
基本过程就是先将Notification从mNotification List中删掉,然后将其从StatusBarManagerService的notification hashmap中删掉,最后更新notification相关的提示音,振动提示,屏幕亮度及颜色提示清除等。
5.清除所有可以清除的Notification
这部分与4基本一致
Frameworks/base/packages/SystemUI/src/com/android/systemui/statusbar/PhoneStatusBar.java的函数makeStatusBarView中包含clearButton的初始化
protected PhoneStatusBarView makeStatusBarView() {
... ...
mClearButton = mStatusBarWindow.findViewById(R.id.clear_all_button);
mClearButton.setOnClickListener(mClearButtonListener);
... ...
}
private View.OnClickListener mClearButtonListener = new View.OnClickListener() {
try {
mPile.setViewRemoval(true);
mBarService.onClearAllNotifications();
} catch (Exception ex) { }
}
StatusBarManagerService中的onClearAllNotification处理清除请求,mNotificationCallbacks.onClearAll();就会调用NotificationManagerService中的onClearAll接口的实现,继而调用cancelAll函数处理清空Notification的请求。
public void onClearAllNotifications() {
enforceStatusBarService();
mNotificationCallbacks.onClearAll();
}
void cancelAll(int userId) {
synchronized (mNotificationList) {
final int N = mNotificationList.size();
for (int i=N-1; i>=0; i--) {
NotificationRecord r = mNotificationList.get(i);
if (!notificationMatchesUserId(r, userId)) {
continue;
}
if ((r.notification.flags & (Notification.FLAG_ONGOING_EVENT
| Notification.FLAG_NO_CLEAR)) == 0) {
mNotificationList.remove(i);
cancelNotificationLocked(r, true);
}
}
updateLightsLocked();
}
}
6.部分Notification是不可清除的,需要StatusBar做对应处理
protected View updateNotificationVetoButton(View row, StatusBarNotification n) {
View vetoButton = row.findViewById(R.id.veto);
if (n.isClearable()) {
final String _pkg = n.pkg;
final String _tag = n.tag;
final int _id = n.id;
vetoButton.setOnClickListener(new View.OnClickListener() {
public void onClick(View v) {
// Accessibility feedback
v.announceForAccessibility(
mContext.getString(R.string.accessibility_notification_dismissed));
try {
mBarService.onNotificationClear(_pkg, _tag, _id);
} catch (RemoteException ex) {
// system process is dead if we're here.
}
}
});
vetoButton.setVisibility(View.VISIBLE);
} else {
vetoButton.setVisibility(View.GONE);
}
vetoButton.setImportantForAccessibility(View.IMPORTANT_FOR_ACCESSIBILITY_NO);
return vetoButton;
}
StatusBarNotification.java中的isclearable函数如下
public boolean isClearable() {
return ((notification.flags & Notification.FLAG_ONGOING_EVENT) == 0)
&& ((notification.flags & Notification.FLAG_NO_CLEAR) == 0);
}
通过这种判断,获知一个Notification在StatusBar中是否可以被清除。如果notification设定为ONGOING或者NO_CLEAR的话就是不可被清除的,需要App发送cancel进行清除。
自动清除功能
自动清除功能是有Notification中flags变量记录的,同时FLAG_AUTO_CANCEL
常量和flags比较如果对应位置为1则表示设定为true。如果按照如下代码设定为true,点击一个Notification后,该notification会自动清除,设定为false则不会自动清除。
public Builder setAutoCancel(boolean autoCancel) {
setFlag(FLAG_AUTO_CANCEL, autoCancel);
return this;
}
private void setFlag(int mask, boolean value) {
if (value) {
mFlags |= mask;
} else {
mFlags &= ~mask;
}
}
如果设定了FLAG_NO_CLEAR,则点击Clear All Button时,对应的notification不会被清除。设定FLAG_ONGOING_EVENT则是指下载文件,播放歌曲等正在进行的程序的情况,设定FLAG_ONGOING_EVENT的notification也不会被清除,除非App自己cancel掉对应的notification。


 1万+
1万+

 被折叠的 条评论
为什么被折叠?
被折叠的 条评论
为什么被折叠?
 到【灌水乐园】发言


