


一、无锁队列原理
1、队列操作模型
队列是一种非常重要的数据结构,其特性是先进先出(FIFO),符合流水线业务流程。在进程间通信、网络通信间经常采用队列做缓存,缓解数据处理压力。
根据操作队列的场景分为:单生产者——单消费者、多生产者——单消费者、单生产者——多消费者、多生产者——多消费者四大模型。根据队列中数据分为:队列中的数据是定长的、队列中的数据是变长的。
(1)单生产者——单消费者

(2)多生产者——单消费者

(3)单生产者——多消费者
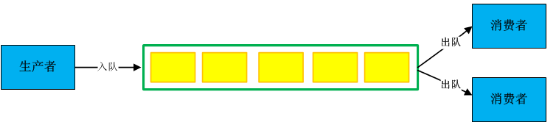
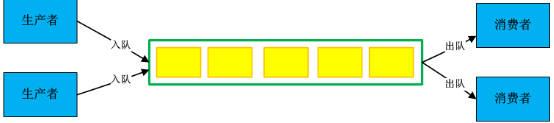
(4)多生产者——多消费者
(5)数据定长队列

(6)数据变长队列

2、 无锁队列
生产环境中广泛使用生产者和消费者模型,要求生产者在生产的同时,消费者可以进行消费,通常使用互斥锁保证数据同步。但线程互斥锁的开销仍然比较大,因此在要求高性能、低延时场景中,推荐使用无锁队列。
3、CAS操作
CAS即Compare and Swap,是所有CPU指令都支持CAS的原子操作(X86中CMPXCHG汇编指令),用于实现实现各种无锁(lock free)数据结构。
CAS操作的C语言实现如下:
bool compare_and_swap ( int *memory_location, int expected_value, int new_value)
{
    if (*memory_location == expected_value)
    {
        *memory_location = new_value;
        return true;
    }
    return false;
}
CAS用于检查一个内存位置是否包含预期值,如果包含,则把新值复赋值到内存位置。成功返回true,失败返回false。
(1)GCC对CAS支持
GCC4.1+版本中支持CAS原子操作。
bool __sync_bool_compare_and_swap (type *ptr, type oldval type newval, ...);
type __sync_val_compare_and_swap (type *ptr, type oldval type newval, ...);
(2)Windows对CAS支持
Windows中使用Windows API支持CAS。
LONG InterlockedCompareExchange(
  LONG volatile *Destination,
  LONG          ExChange,
  LONG          Comperand
);
(3)C11对CAS支持
C11 STL中atomic函数支持CAS并可以跨平台。
template< class T >
bool atomic_compare_exchange_weak( std::atomic* obj,T* expected, T desired );
template< class T >
bool atomic_compare_exchange_weak( volatile std::atomic* obj,T* expected, T desired );
其它原子操作如下:
Fetch-And-Add:一般用来对变量做+1的原子操作;
Test-and-set:写值到某个内存位置并传回其旧值;
二、无锁队列方案
1、boost方案
boost提供了三种无锁方案,分别适用不同使用场景。
boost::lockfree::queue是支持多个生产者和多个消费者线程的无锁队列。
boost::lockfree::stack是支持多个生产者和多个消费者线程的无锁栈。
boost::lockfree::spsc_queue是仅支持单个生产者和单个消费者线程的无锁队列,比boost::lockfree::queue性能更好。
Boost无锁数据结构的API通过轻量级原子锁实现lock-free,不是真正意义的无锁。
Boost提供的queue可以设置初始容量,添加新元素时如果容量不够,则总容量自动增长;但对于无锁数据结构,添加新元素时如果容量不够,总容量不会自动增长。
2、ConcurrentQueue
ConcurrentQueue是基于C实现的工业级无锁队列方案。
http://GitHub:https://github.com/cameron314/concurrentqueue
ReaderWriterQueue是基于C实现的单生产者单消费者场景的无锁队列方案。
http://GitHub:https://github.com/cameron314/readerwriterqueue
三、无锁队列实现
1、环形缓冲区
RingBuffer是生产者和消费者模型中常用的数据结构,生产者将数据追加到数组尾端,当达到数组的尾部时,生产者绕回到数组的头部;消费者从数组头端取走数据,当到达数组的尾部时,消费者绕回到数组头部。
如果只有一个生产者和一个消费者,环形缓冲区可以无锁访问,环形缓冲区的写入index只允许生产者访问并修改,只要生产者在更新index前将新的值保存到缓冲区中,则消费者将始终看到一致的数据结构;读取index也只允许消费者访问并修改,消费者只要在取走数据后更新读index,则生产者将始终看到一致的数据结构。
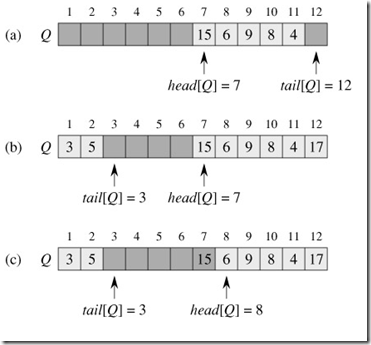
空队列时,front与rear相等;当有元素进队,则rear后移;有元素出队,则front后移。

空队列时,rear等于front;满队列时,队列尾部空一个位置,因此判断循环队列满时使用(rear-front+maxn)%maxn。
入队操作:
data[rear] = x;
 rear = (rear+1)%maxn;
出队操作:
x = data[front];
rear = (front+1)%maxn;
2、单生产者单消费者
对于单生产者和单消费者场景,由于read_index和write_index都只会有一个线程写,因此不需要加锁也不需要原子操作,直接修改即可,但读写数据时需要考虑遇到数组尾部的情况。
线程对write_index和read_index的读写操作如下:
(1)写操作。先判断队列时否为满,如果队列未满,则先写数据,写完数据后再修改write_index。
(2)读操作。先判断队列是否为空,如果队列不为空,则先读数据,读完再修改read_index。
3、多生产者单消费者
多生产者和单消费者场景中,由于多个生产者都会修改write_index,所以在不加锁的情况下必须使用原子操作。
四、无锁队列使用
1、ConcurrentQueue无锁队列
实现demo如下:
lock_free_queue_impl.h
#pragma once
#include<iostream>
#include<string>
#include<memory>
#include<thread>
#include"concurrentqueue.h"

class Response
{
public:
	~Response()
	{
		std::cout << "~Response()" << std::endl;
	}

	int status_code;
	int content;
};

class LockFreeImpl
{
public:
	LockFreeImpl() {}
	~LockFreeImpl() {}

	static LockFreeImpl& GetRef();
	void Init();
	void DoJob();
	void OnMessage(std::shared_ptr<Response> response);
	void HandleMsg(std::shared_ptr<Response> response);

	void Release();

private:
	volatile bool inited_ = false;

	std::thread work_thread_;
	moodycamel::ConcurrentQueue<std::shared_ptr<Response>>* worker_queue_;

};
lock_free_queue_impl.cpp
#include"lock_free_queue_impl.h"
#include<Windows.h>
LockFreeImpl& LockFreeImpl::GetRef()
{
static LockFreeImpl impl;
return impl;
}
void LockFreeImpl::Init()
{
inited_ = true;
worker_queue_ = new moodycamel::ConcurrentQueue<std::shared_ptr<Response>>(81920, 1, 1);
work_thread_ = std::thread(std::bind(&LockFreeImpl::DoJob, this));
std::cout << "LockFreeImpl init successfully!" << std::endl;
}
void LockFreeImpl::DoJob()
{
std::cout << "worker thread, worker thread start!" << std::endl;
std::shared_ptr<Response> item = nullptr;
while (inited_)
{
if (worker_queue_->try_dequeue(item) == false)
{
Sleep(10);
continue;
}
if (item == nullptr)
std::cout << "item == nullptr" << std::endl;
else
{
HandleMsg(item);
}
}
std::cout << "worker thread, worker thread exit successfully!" << std::endl;
}
void LockFreeImpl::OnMessage(std::shared_ptr<Response> response)
{
try
{
worker_queue_->try_enqueue(response);
}
catch (const std::exception& e)
{
std::cout << "the error is: " << e.what() << std::endl;
}
}
void LockFreeImpl::HandleMsg(std::shared_ptr<Response> response)
{
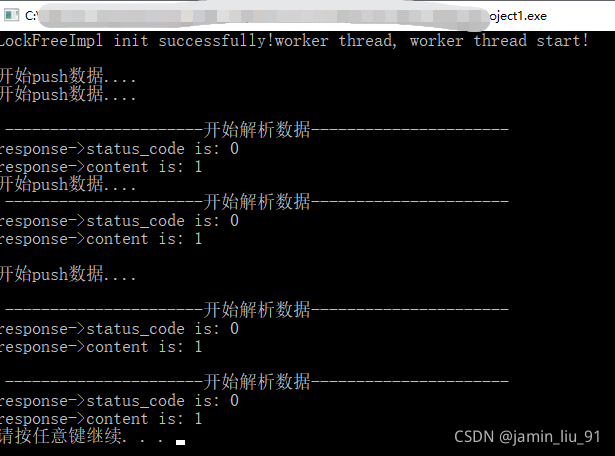
std::cout << "\n ----------------------开始解析数据----------------------" << std::endl;
std::cout << "response->status_code is: " << response->status_code << std::endl;
std::cout << "response->content is: " << response->content << std::endl;
}
void LockFreeImpl::Release()
{
if (inited_)
inited_ = false;
if (work_thread_.joinable())
work_thread_.join();
delete worker_queue_;
std::cout << "LockFreeImpl release,release exit successfully!" << std::endl;
}main.cpp
#include<iostream>
#include<Windows.h>
#include"lock_free_queue_impl.h"

using namespace std;

int main()
{
	LockFreeImpl lock_free_impl;
	lock_free_impl.Init();
	std::shared_ptr<Response> response(new Response());
	response->status_code = 0;
	response->content = 1;

	for (int i = 0; i < 4; ++i)
	{

		std::cout << "开始push数据...." << std::endl;
		Sleep(1000);
		lock_free_impl.OnMessage(response);
	}

	system("pause");
	lock_free_impl.Release();
	return 0;
}
结果如下:
concurrentqueue.h 文件下载上文链接
参考链接:


 1054
1054

 被折叠的 条评论
为什么被折叠?
被折叠的 条评论
为什么被折叠?
 到【灌水乐园】发言


