


Let's Encrypt官网:https://letsencrypt.org/
Certbot官网:https://certbot.eff.org/
1、域名控制台添加域名,如test.example.com
2、在服务器添加nginx配置,test.example.com.conf文件内容如下
# test.example.com.conf配置

server {
    listen       80;
    server_name  test.example.com;

    location / {
        root   html/example;
        index  index.html index.htm;
    }
}
3、重启nginx
nginx -s reload4、curl访问
curl test.example.com5、访问入门指南 - Let's Encrypt - 免费的SSL/TLS证书,我们发现可以使用Certbot工具进行操作
在Certbot页面填写HTTP website的运行环境,如Certbot Instructions | Certbot
根据上面的步骤,依次安装snapd、Certbot
# 安装snapd,见https://snapcraft.io/docs/installing-snap-on-centos
yum install snapd
systemctl enable --now snapd.socket
ln -s /var/lib/snapd/snap /snap


# 安装Certbot
snap install --classic certbot
ln -s /snap/bin/certbot /usr/bin/certbot
6、申请证书
certbot certonly -a manual -i nginx -d test.example.com


# 1、说明
# 详见:https://eff-certbot.readthedocs.io/en/latest/using.html#nginx
#
# certonly:只生成证书,后续自行配置
# -a 或 --authenticator:
# -i 或 --installer:
# -d 或 --domains:域名
# --nginx-server-root 可以指定nginx配置文件路径,默认: /etc/nginx 或 /usr/local/etc/nginx
# --webroot-path,简写-w,项目目录


# 2、补充
# 执行上述命令可能需要填写邮箱地址
返回结果
Saving debug log to /var/log/letsencrypt/letsencrypt.log
Requesting a certificate for test.example.com

- - - - - - - - - - - - - - - - - - - - - - - - - - - - - - - - - - - - - - - -
Create a file containing just this data:

zi4-Q2V2Kbr31z1DkmeqlAqFvdaBoKkc0fRI_hMak6A.a8QL3dhhRI6nKqWSrmSGWWYjRocjtI6ew0Xh1rVkRoA

And make it available on your web server at this URL:

http://test.example.com/.well-known/acme-challenge/zi4-Q2V2Kbr31z1DkmeqlAqFvdaBoKkc0fRI_hMak6A

- - - - - - - - - - - - - - - - - - - - - - - - - - - - - - - - - - - - - - - -
Press Enter to Continue
根据返回的结果,需要在项目所在的路径创建.well-known/acme-challenge/zi4-Q2V2Kbr31z1DkmeqlAqFvdaBoKkc0fRI_hMak6A这个文件,内容为zi4-Q2V2Kbr31z1DkmeqlAqFvdaBoKkc0fRI_hMak6A.a8QL3dhhRI6nKqWSrmSGWWYjRocjtI6ew0Xh1rVkRoA
# 进入项目目录
cd html/example

# 创建目录、文件
mkdir -p .well-known/acme-challenge
touch .well-known/acme-challenge/zi4-Q2V2Kbr31z1DkmeqlAqFvdaBoKkc0fRI_hMak6A

# zi4-Q2V2Kbr31z1DkmeqlAqFvdaBoKkc0fRI_hMak6A文件内容
# zi4-Q2V2Kbr31z1DkmeqlAqFvdaBoKkc0fRI_hMak6A.a8QL3dhhRI6nKqWSrmSGWWYjRocjtI6ew0Xh1rVkRoA
然后按任意键(Press Enter to Continue)
返回结果
Successfully received certificate.
Certificate is saved at: /etc/letsencrypt/live/test.example.com/fullchain.pem
Key is saved at:         /etc/letsencrypt/live/test.example.com/privkey.pem
This certificate expires on 2024-03-12.
These files will be updated when the certificate renews.

NEXT STEPS:
- This certificate will not be renewed automatically. Autorenewal of --manual certificates requires the use of an authentication hook script (--manual-auth-hook) but one was not provided. To renew this certificate, repeat this same certbot command before the certificate's expiry date.

- - - - - - - - - - - - - - - - - - - - - - - - - - - - - - - - - - - - - - - -
If you like Certbot, please consider supporting our work by:
 * Donating to ISRG / Let's Encrypt:   https://letsencrypt.org/donate
 * Donating to EFF:                    https://eff.org/donate-le
- - - - - - - - - - - - - - - - - - - - - - - - - - - - - - - - - - - - - - - -
到此,证书申请成功
7、nginx配置ssl证书
# test.example.com.conf配置

server {
    listen       80;
    server_name  test.example.com;

    # 监听443端口
    listen 443 ssl;

    # 配置ssl证书
    # nginx的ssl证书配置参考:https://cloud.tencent.com/document/product/400/35244
    ssl_certificate /etc/letsencrypt/live/test.example.com/fullchain.pem;
    ssl_certificate_key /etc/letsencrypt/live/test.example.com/privkey.pem;

    ssl_session_timeout 5m;
    ssl_protocols TLSv1.2 TLSv1.3;
    ssl_ciphers ECDHE-RSA-AES128-GCM-SHA256:HIGH:!aNULL:!MD5:!RC4:!DHE;
    ssl_prefer_server_ciphers on;


    location / {
        root   html/example;
        index  index.html index.htm;
    }
}
8、重启nginx
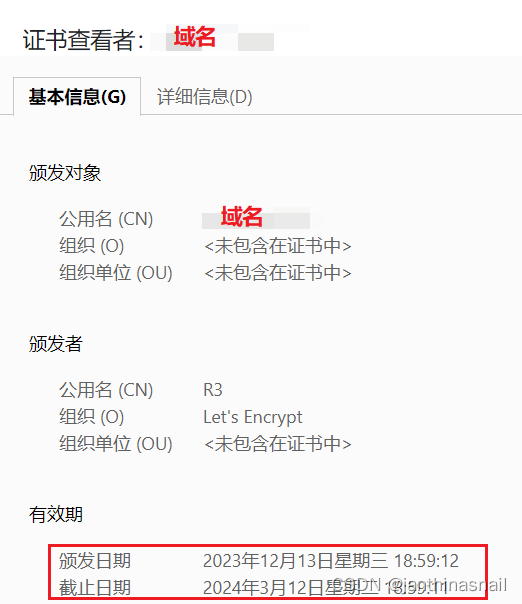
nginx -s reload9、浏览器访问https://test.example.com,并查看证书信息
10、有效期有限,添加定时任务更新,定时任务执行命令:certbot renew --dry-run
11、申请letsencrypt通配符证书
参考:
Welcome to the Certbot documentation! — Certbot 2.7.0.dev0 documentation
手把手教你搭建基于 Let’s Encrypt 的免费 HTTPS 证书 - 简书


 859
859


 被折叠的 条评论
为什么被折叠?
被折叠的 条评论
为什么被折叠?
 到【灌水乐园】发言


