


文章目录
主要内容
vite,eslint,prettierrc,husky,commitlint,lint-staget,stylelint,vuex,vue-router,axios,pinia
环境:win11,node 18.17.0 ,pnpm 8.12.0
一、vite脚手架工具初始化项目
vite官网:初始化项目:https://cn.vitejs.dev/guide/,本文以pnpm创建项目
# npm 7+, extra double-dash is needed:
npm create vite@latest vue3_project_template --template vue-ts

# yarn
yarn create vite vue3_project_template --template vue-ts

# pnpm
pnpm create vite vue3_project_template --template vue-ts

# bun
bunx create-vite vue3_project_template --template vue-ts
- 创建好项目
- 根据创建项目提示输入命令
  cd vue3_project_template
  pnpm install
  pnpm run dev
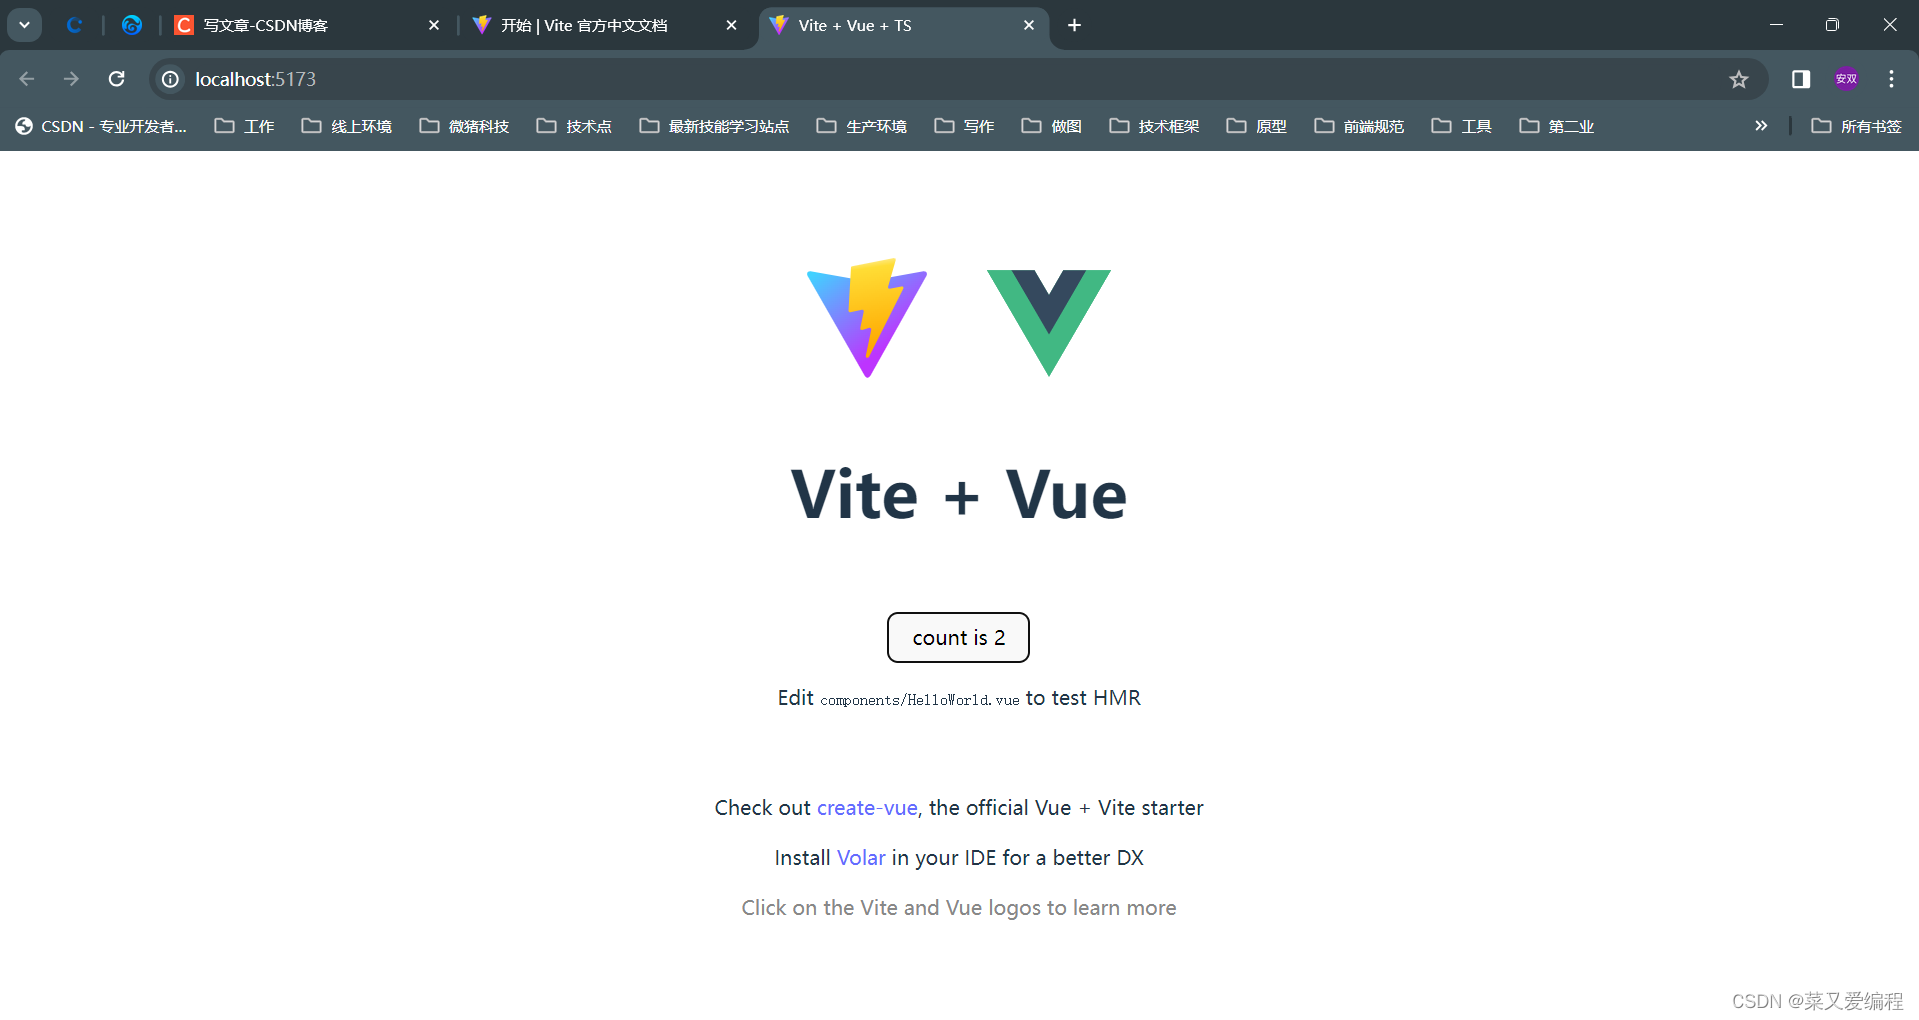
- 运行结果如下
二、项目代码加入eslint校验和自动格式化
node工具eslint官网
eslint 运行代码前就可以发现一些语法错误和潜在bug,保证团队代码的一直性
prettier格式化官网
prettier 是代码格式化工具,用于检查代码中的格式问题
区别联系:eslint保证代码质量,prettier保证代码风格,eslint有小部分格式化功能,通常和prettier结合使用
2.1安装对应依赖插件
eslint: ESLint的核心代码库
prettier:prettier格式化代码的核心库
eslint-config-airbnb-base: airbnb的代码规范 (依赖plugin-import)
eslint-config-prettier:eslint结合prettier的格式化
eslint-plugin-vue:eslint在vue里的代码规范
eslint-plugin-import:项目里面支持eslint
eslint-plugin-prettier:将prettier结合进入eslint的插件
pnpm install eslint eslint-plugin-vue eslint-config-prettier prettier eslint-plugin-import eslint-plugin-prettier eslint-config-airbnb-base -D
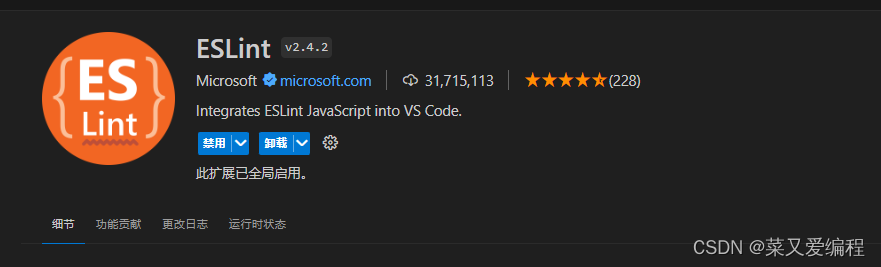
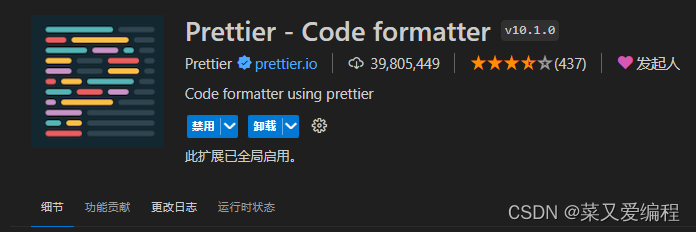
vscode 安装两个插件
2.2 配置script脚本,项目安装eslint配置
- 在package.json文件scripts加入命令
"lint:create":"eslint --init"
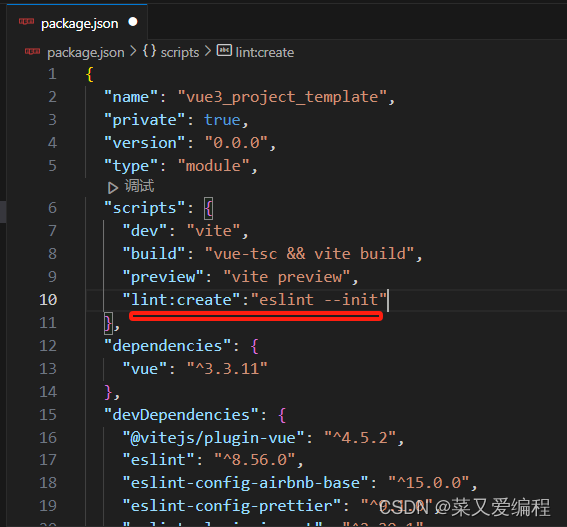
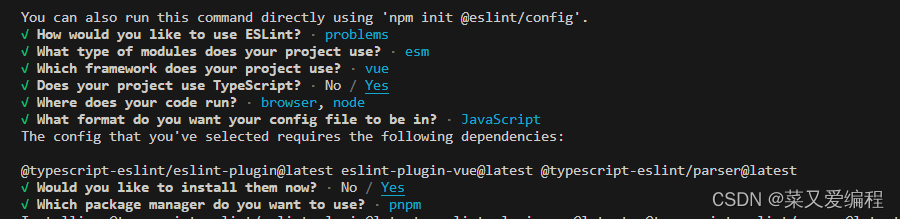
- 执行npm run lint:create
npm run lint:create
- 执行之后会自动创建.eslintrc.cjs文件
2.3 安装完成后,后面启动项目还缺少一些依赖,提前按需安装好
@typescript-esTint/parser: ESLint的解析器,用于解析typescript,从而检查和规范Typescript代码;
@typescript-eslint/eslint-plugin: 这是一个ESLint插件,包含了各类定义好的检测Typescript代码的规范
eslint-import-resolver-alias 让我们可以import的时候使用 @ 别名
pnpm install typescript @typescript-eslint/parser @typescript-eslint/eslint-plugin eslint-import-resolver-alias @types/eslint @types/node -D
三,修改eslintrc.cjs文件
- eslintrc.cjs主要内容如下
module.exports = {
    // 环境 浏览器,最新ES语法,node环境
    "env": {
        "browser": true,
        "es2021": true,
        "node": true
    },
    /**
     * 扩展的eslint规范语法,可以被继承的规则,字符串数组,每个配置继承它之前的配置
     * 分别是eslint-config-vue 提供的
     * eslint-config-airbnb-base 提供的
     * eslint-config-prettier 提供的
     * eslint-config- 前缀可以简写
     */
    "extends": [
        "eslint:recommended",
        "plugin:@typescript-eslint/recommended",
        "plugin:vue/vue3-essential",
        "airbnb-base",
        "prettier"
    ],
    // eslint 会对代码进行校验,parser是将代码转换为ESTree(AST),ESlint会对ESTree校验
    "parser": "vue-eslint-parser",
    // 解析器的配置项
    "parserOptions": {
        // eslint的版本号,或者年份都可以
        "ecmaVersion": "latest",
        "parser": "@typescript-eslint/parser",
        "sourceType": "module",
        // 额外的语言类型
        "ecmaFeatures": {
            "jsx": true,
            "tsx": true
        }
    },
    // 全局自定义宏,这样在源文件中使用全局变量不会报错或警告
    "globals": {
        "defineProps": 'readonly',
        "defineEmits": 'readonly',
        "defineExpose": 'readonly',
        "withDefaults": 'readonly'
    },
    /**
     * 插件
     * eslint-plugin- 前缀可以简写
     * vue官方提供了一个eslint插件eslint-plugin-vue,它提供了parser和rules。
     * parser为vue-eslint-parser,放在前面的parser字段里,rules放在extends字段里
     */
    "plugins": [
        "@typescript-eslint",
        "vue"
    ],
    "settings": {
        // 设置项目内的别名
        "import/resolver": {
            "alias": {
                "map": [['@','./src']]
            }
        },
        "import/extensions": ['.js','.jsx','.tsx','.ts','.mjs','.cjs']
    },
    /**
     * rules: 自定义规则,覆盖extends继承的规则,对规则进行灵活配置
     *
     * "off" 或 0    ==>  关闭规则
     * "warn" 或 1   ==>  打开的规则作为警告(不影响代码执行)
     * "error" 或 2  ==>  规则作为一个错误(代码不能执行,界面报错)
     */
    "rules": {
        // eslint(https://eslint.bootcss.com/docs/rules/)
        'no-var': 'error', // 要求使用 let 或 const 而不是 var
        'no-multiple-empty-lines': ['warn', { max: 2 }], // 不允许多个空行
        'no-console': process.env.NODE_ENV === 'production' ? 'error' : 'off',
        'no-debugger': process.env.NODE_ENV === 'production' ? 'error' : 'off',
        'no-unexpected-multiline': 'error', // 禁止空余的多行
        'no-useless-escape': 'off', // 禁止不必要的转义字符
        'import/no-unresolved': 'off',
        'import/extensions': 'off',
        'import/no-absolute-path': 'off',
        'import/no-extraneous-dependencies': 'off',
        'import/prefer-default-export': 'off',

        // typeScript (https://typescript-eslint.io/rules)
        '@typescript-eslint/no-unused-vars': 'error', // 禁止定义未使用的变量
        '@typescript-eslint/prefer-ts-expect-error': 'error', // 禁止使用 @ts-ignore
        '@typescript-eslint/no-explicit-any': 'off', // 禁止使用 any 类型
        '@typescript-eslint/no-non-null-assertion': 'off',
        '@typescript-eslint/no-namespace': 'off', // 禁止使用自定义 TypeScript 模块和命名空间。
        '@typescript-eslint/semi': 'off',

        // eslint-plugin-vue (https://eslint.vuejs.org/rules/)
        'vue/multi-word-component-names': 'off', // 要求组件名称始终为 “-” 链接的单词
        'vue/script-setup-uses-vars': 'error', // 防止<script setup>使用的变量<template>被标记为未使用
        'vue/no-mutating-props': 'off', // 不允许组件 prop的改变
        'vue/attribute-hyphenation': 'off', // 对模板中的自定义组件强制执行属性命名样式
    },
}
- 修改package.json文件,添加如下命令
"lint": "eslint \"src/**/*.{js,ts,vue}\" --fix"
四、修改vue.config.ts文件
pnpm install vite-plugin-eslint -D vite的一个插件,让项目可以方便的得到eslint支持,完成eslint配置后,可以快速的将其集成进vite中,便于在代码不符合eslint规范的第一时间看到提示
pnpm install vite-plugin-eslint -D
import eslintPlugin from “vite-plugin-eslint”
plugins: [vue(),eslintPlugin()],
五、修改添加常见配置
项目根目录创建以下配置文件
.eslintrcignore 忽略校验文件
.prettierrc.cjs 配置格式化规则
.prettierignore 忽略格式化文件
- .eslintrcignore
# .eslintrcignore

*.sh
node_modules
*.md
*.woff
*.ttf
dist
/pubilc
/docs
.husky
/bin
.eslintrc.js
perttier.config.js
/src/mock/*

# Logs
logs
*.log
npm-debug.log*
yarn-debug.log*
pnpm-debug.log*
lerna-debug.log*

.DS_Store
dist-ssr
*.local

/cypress/videos/
/cypress/screenshots/


# Editor directories and files
.vscode
!.vscode/extensions.json
.idea
*.suo
*.ntvs*
*.njsproj
*.sln
*.sw?

components.d.ts
- .prettierrc.cjs
module.exports = {
    printWidth: 80, // 一行最多100字符
    tabWidth: 2, // 使用2个空格缩进
    useTabs: false, // 不适用缩进符,使用空格
    semi: false, // 行尾是否要有分号
    singleQuote: true, // 使用单引号
    quoteProps: 'as-needed', // 对象的key,仅仅在必要时使用引号
    jsxSingleQuote: false, // jsx是否使用双引号
    trailingComma: 'es5', // 尾随逗号
    bracketSpacing: true, // 大括号内的首尾需要有空格
    arrowParens: 'always', // 箭头函数,是有一个参数的时候,也需要小括号
    rangeStart: 0, // 文件格式化的范围是全部内容
    rangeEnd: Infinity,
    requirePragma: false, // 不需要写文件开头的 @prettier
    insertPragma: false, // 不需要在文件开头插入 @prettier
    proseWrap: 'always', // 使用默认执行标准
    htmlWhitespaceSensitivity: 'css', // 根据显示样式决定html是否执行
    endOfLine: 'lf' // 换行符是有lf
}
- .prettierignore
# prettierignore
/dist/*
.local
.output.js
/node_modules/**
src/.DS_Store

**/*.svg
**/*.sh
/pubilc/*
components.d.ts
- 在package.json添加格式化命令
"prettier-format": "prettier --config .prettierrc.cjs \"src/**/*.{js,ts,vue}\" --write"
六、Husky、lint-staged、commitlint功能添加
husky是一个我git客户端增加hook钩子的工具,在一些git操作前自动触发的函数;https://ty.picode.github.io/husky/#/;如果我们希望在检测错误的同事,自动修复eslint语法错误,就可以通过后面的钩子实现
lint-staged过滤出Git代码暂存区文件(被git add的文件)的工具,将所有暂存文件的列表传递给任务
commitlint是对我们git commit提交的注释进行校验的工具
- 可以让我们在如git commit,git push执行前,预先处理我们指定的任务
pnpm install lint-staged husky -D
配置package.json文件
(新项目需要先git init 一下)
"prepare":"husky install"
执行命令:
npm run prepare
- 后面就开始添加各种git hook钩子
pre-commit钩子一般添加的是lint-stage 去对git暂存区的代码做一些格式化操作
npx husky add .husky/pre-commit "npx lint-staged"
add —> 追加
set —> 直接覆盖
- lint-staged对add之后,暂存区里面的文件进行格式化修复等工作
pnpm install lint-staged -D
packge.json文件中添加
"lint-staged": {
	"src/**/*.{js,ts,vue}": [
		"prettier --write",
		"eslint --fix",
		"git add"
	]
},
或者放入脚本命令:
"lint-staged": {
	"*.{js,ts,vue,tsx,jsx}": [
		"npm run lint",
		"npm run prettier-format"
	]
}
或者
"*.{ts,js,vue}": [
	"eslint --fix"
],
"*.{html,scss,css,vue}": [
	"prettier --write",
	"stylelint --fix"
]
packge.json文件里面, 添加有两个脚本命令
"lint": "eslint \"src/**/*.{js,ts,vue}\" --fix", 既可以检查又可以修复部分语法问题
"prettier-format": "prettier --config .prettierrc.cjs \"src/**/*.{js,ts,vue}\" --write", 利用prettier手动格式化一些样式问题
- git commit提交时说明清楚更新内容
pnpm install @commitlint/config-conventional @commitlint/cli -D安装两个库,然后新建一个代码提交配置文件config
添加到git钩子
npx husky add .husky/commit-msg "npx --no -- commitlint --edit ${1}"通过一个命令添加钩子
使用git commit -m “提交说明” ,进行提交,提交说明尽量清晰明了,说明本次提交的目的,推荐使用angular规范,这是目前使用最广泛的写法
项目根目录添加commitlint.config.cjs文件
// commitlint.config.cjs

module.exports = {
    extends: ['@commitlint/config-conventional'],
    rules: {
        'type-enum': [
            2,
            'always',
            [
                'build', // 编译相关的修改,例如发布版本,对项目构建或者依赖的改动
                'feat', // 新功能
                'fix', // 修复bug
                'upd', // 更新某个功能
                'refactor', // 重构
                'docs', // 文档
                'chore', // 构建过程或辅助工具的变动,比如增加依赖库
                'style', // 格式(不影响代码运行的变动)
                'revert', // 撤销commit,回滚到上一个版本
                'perf', // 性能优化
                'test', // 测试(单元,集成测试)
            ],
        ],
        'type-case': [0],
        'type-empty': [0],
        'scope-empty': [0],
        'scope-case': [0],
        'subject-full-stop': [0,'never'],
        'subject-case': [0,'never'],
        'header-max-length': [0,'always',72],

    },
};
常用的git hooks
pre-commit:由git commit 调用,在commit之前执行
commit-msg:由git commit或git merge调用
pre-merge-commit:由git merge 调用, 在merge之前执行
pre-push:被git push 调用,在git push 前执行,防止进行推送
七、stylelint钩子,校验css
css 代码检查器(linter),帮助规避css代码中错误并保持一致的编码风格
-
安装 vscode插件,stylelint插件
-
修改setting.json,添加下面几行代码
{
	"editor.codeActionsOnSave": {
		"source.fixAll.stylelint": true
	},
	"stylelint.validate": [ "css", "scss", "less", "vue"]
}
- 安装依赖
pnpm install --save-dev stylelint stylelint-config-standard - 根目录创建 .stylelintrc.cjs
// @see https://stylelint.bootcss.com/

module.exports = {
    extends: [
        'stylelint-config-standard', // 配置stylelint拓展插件
        'stylelint-config-html/vue', // 配置 vue 中 template 样式格式化
        'stylelint-config-standard-scss', // 配置stylelint scss插件
        'stylelint-config-recommended-vue/scss', // 配置 vue 中 scss 样式格式化
        'stylelint-config-recess-order', // 配置stylelint css属性书写顺序插件,
        'stylelint-config-prettier', // 配置stylelint和prettier兼容
    ],
    overrides: [
        {
            files: ['**/*.(scss|css|vue|html)'],
            customSyntax: 'postcss-scss',
        },
        {
            files: ['**/*.(html|vue)'],
            customSyntax: 'postcss-html',
        },
    ],
    ignoreFiles: [
        '**/*.js',
        '**/*.jsx',
        '**/*.tsx',
        '**/*.ts',
        '**/*.json',
        '**/*.md',
        '**/*.yaml',
    ],
    /**
     * null  => 关闭该规则
     * always => 必须
     */
    rules: {
        'value-keyword-case': null, // 在 css 中使用 v-bind,不报错
        'no-descending-specificity': null, // 禁止在具有较高优先级的选择器后出现被其覆盖的较低优先级的选择器
        'function-url-quotes': 'always', // 要求或禁止 URL 的引号 "always(必须加上引号)"|"never(没有引号)"
        'no-empty-source': null, // 关闭禁止空源码
        'selector-class-pattern': null, // 关闭强制选择器类名的格式
        'property-no-unknown': null, // 禁止未知的属性(true 为不允许)
        'block-opening-brace-space-before': 'always', //大括号之前必须有一个空格或不能有空白符
        'value-no-vendor-prefix': null, // 关闭 属性值前缀 --webkit-box
        'property-no-vendor-prefix': null, // 关闭 属性前缀 -webkit-mask
        'selector-pseudo-class-no-unknown': [
            // 不允许未知的选择器
            true,
            {
                ignorePseudoClasses: ['global', 'v-deep', 'deep'], // 忽略属性,修改element默认样式的时候能使用到
            },
        ],
    },
}
这是一个标准样式库,也可自动加一下样式规则在.stylelintrc.cjs文件里面
-
执行命令
npx stylelint "**/*.css"
发现项目里面的style.css全局样式报错,具体到对应文件,安ctrl+s就回执行,自动格式化,我们在setting.json里面添加的json语句
修改错误的颜色值之后,执行npx stylelint "**/*.css"会告诉我们颜色错误 -
增加对vue里面的样式校验(附带less和sass的支持)
pnpm install stylelint-less stylelint-config-recommended-less -D对less的支持
pnpm install stylelint-scss stylelint-config-recommended-scss postcss -D对sass的支持
pnpm install postcss-html stylelint-config-standard-scss stylelint-config-recommended-vue postcss -D对vue里面的样式支持(vue样式需要依赖这个库)
vite 也同时提供了对.scss,.sass,.less,.style和.stylus文件的内置支持,不需要在安装特定插件和预处理器
extends: [
	"stylelint-config-standard",
	"stylelint-config-recommended-less",
	"stylelint-config-recommended-scss",
	"stylelint-config-recommended-vue"
sass的extends
"extends": [
	"stylelint-config-standard-scss",
	"stylelint-config-recommended-vue/scss",
]
- 新建.stylelintignore文件
.stylelintignore: 忽略文件校验
/node_modules/*
/dist/*
/html/*
/public/*
-
修改package.json文件
"lint:css": "stylelint src/**/*.{css,scss,sass,less,html,vue} --cache --fix" -
给vite添加插件
pnpm install vite-plugin-stylelint -D
添加完成依赖,然后修改vite.config.js
import StylelintPlugin from 'vite-plugin-stylelint'
plugin:[... StylelintPlugin({fix:true}) -
添加到lint-staged,在暂存区自动对文件进行格式化
"lint-staged": {
    "*.{js,ts,vue,tsx,jsx}": [
      "npm run lint",
      "npm run prettier-format"
    ],
    "*.{vue,less,scss,sass,html}": [
      "npm run lint:css"
    ]
  }
添加完成后,在进行代码commit的时候就会执行npm run lint:css命令校验我们的css代码了
八、环境配置(开发,预发,生产环境)
开发环境:开发人员开发的环境
测试环境:测试人员测试的环境
预发环境:准备上线的环境,也可叫内测环境
生产环境:正式线上环境,投入生产的环境
这里我们配置两个环境,一个测试环境和生产环境,
开发人员和测试人员使用测试环境,修改package.json文件,添加两个命令
"build:dev": "vue-tsc --noEmit && vite build --mode development",
"build:pro": "vue-tsc --noEmit && vite build --mode production",
- 新建两个配置文件
.env.development:开发测试环境
.env.production:生产环境
# .env.development
# 变量必须以 VITE_ 为前缀才能暴露给外部读取
NODE_ENV = 'development'
VITE_APP_TITLE = '项目模版'
VITE_APP_BASE_API = '/dev_api'
# .env.production
# 变量必须以 VITE_ 为前缀才能暴露给外部读取
NODE_ENV = 'production'
VITE_APP_TITLE = '项目模版'
VITE_APP_BASE_API = '/pro_api'
九、vite.config.js配置
/* eslint-disable import/no-extraneous-dependencies */
import { defineConfig, loadEnv } from 'vite'
import path from 'path'
import vue from '@vitejs/plugin-vue'
import eslintPlugin from 'vite-plugin-eslint'
import StylelintPlugin from 'vite-plugin-stylelint'

// https://vitejs.dev/config/
export default defineConfig(({ mode })=>{
  const env = loadEnv(mode, process.cwd());
  return {
    plugins: [vue(), eslintPlugin(), StylelintPlugin({ fix: true })],
    base: "./", // 在生产中服务时的基本公共路径
    publicDir: "public",  // 静态资源服务的文件夹, 默认"public"
    resolve: {
      alias: {
        "@": path.resolve("./src") // 相对路径别名配置,使用 @ 代替 src
      }
    },
    // 本地运行配置
    server: {
      host: "0.0.0.0", // 指定服务器主机名  0.0.0.0 可以看见network 通过ip访问
      port: 3000, // 指定服务器端口
      open: true, // 在服务器启动时自动在浏览器中打开应用程序
      strictPort: false, // 设置为false时,若端口被占用会尝试下一个可用端口, 而不是直接退出
      https: false, // 是否开启 https
      cors: true, // 为开发服务器配置 CORS, 默认启用并允许任何源
      proxy: { // 为开发服务器配置自定义代理规则
        [env.VITE_APP_BASE_API]: {
          target: "http://192.168.xxx.xxx:xxxx", // 代理接口
          changeOrigin: true,
          rewrite: (_path) => _path.replace(/^\/api/, ""),
        }
      }
    },
    // 打包配置
    build: {
      target: "modules", // 设置最终构建的浏览器兼容目标。modules:支持原生 ES 模块的浏览器
      outDir: "dist", // 指定输出路径
      assetsDir: "assets", // 指定生成静态资源的存放路径
      assetsInlineLimit: "4096", // 小于此阈值的导入或引用资源将内联为base64编码,设置为0可禁用此项。默认4096(4kb)
      cssCodeSplit: true, // 启用/禁用CSS代码拆分,如果禁用,整个项目的所有CSS将被提取到一个CSS文件中,默认true
      sourcemap: false, // 构建后是否生成 source map 文件
      minify: "terser", // 混淆器,terser构建后文件体积更小
      write: true, // 设置为 false 来禁用将构建后的文件写入磁盘
      emptyOutDir: true,  // 默认情况下,若 outDir 在 root 目录下,则 Vite 会在构建时清空该目录。
      chunkSizeWarningLimit: 500,  // chunk 大小警告的限制
      terserOptions: {
        compress: {
          drop_console: true,
          drop_debugger: true,
        }
      }, // 去除 console debugger
    },
  }
})
十、添加路由
pnpm install vue-router安装路由依赖;- 在src目录下新建router文件夹index.ts文件
// index.ts
// 通过vue-router插件实现模板路由配置
import { createRouter, createWebHistory } from 'vue-router'
import { constantRoute } from './routes'
// 创建路由器
const router = createRouter({
    // 路由模式hash
    history: createWebHistory(),
    routes: constantRoute,
    // 滚动行为
    scrollBehavior() {
        return {
            left: 0,
            top: 0
        }
    }
});
export default router;
- 新建routers.ts文件
export const constantRoute = [
    {
        // 首页
        path: '/',
        name: 'home',
        component: () => import('@/views/home/Home.vue'),
        meta: {
            title: '首页',
        }
    },
    {
        // 404
        path: '/404',
        component: () => import('@/views/404/index.vue'),
        name: '404',
        meta: {
            title: '404',
        }
    },
    {
        // 任意路由
        path: '/:pathMatch(.*)*',
        redirect: '/404',
        name: 'Any',
        meta: {
            title: '任意路由'
        }
    }
]
- 修改main.ts文件
import { createApp } from 'vue'
import './style.css'
import App from './App.vue'
// 引入路由
import router from './router'

const app = createApp(App)
app.use(router)
app.mount('#app')
- 修改App.vue文件
<template>
  <div>
    <router-view></router-view>
  </div>
</template>
<script setup lang="ts">
</script>
<style scoped></style>
十一、添加api,封装请求(axios)
- 安装依赖
pnpm install axios --save - 新建api文件夹,utils文件夹,及创建request.ts文件
// 进行axios二次封装:使用请求与响应拦截器
import axios from "axios";
// 第一步:利用axios对象的create方法,去创建axios实例(其他的配置:基础路径、超时的时间)
const request = axios.create({
     // 基础路径
     baseURL: import.meta.env.VITE_APP_BASE_API,// 基础路径上会携带/api
     timeout: 5000// 超时的时间的设置
});

// 第二步:request实例添加请求与响应拦截器
request.interceptors.request.use((config) =>
    // config配置对象,headers属性请求头,经常给服务器端携带公共参数,例如token
    // 返回配置对象
    config
);

// 第三步:响应拦截器
request.interceptors.response.use((response) =>
     // 成功回调
     // 简化数据
      response.data
, (error) => {
     // 失败回调:处理http网络错误的
     // 定义一个变量:存储网络错误信息
     let message = '';
     // http状态码
     const {status} = error.response;
     switch (status) {
          case 401:
               message = "TOKEN过期"
               break;
          case 403:
               message = "无权访问"
               break;
          case 404:
               message = "请求地址错误";
               break;
          case 500:
               message = "服务器出现问题"
               break;
          default:
               message = "网络出现问题";
               break;
     }
     return Promise.reject(message);
});
// 对外暴露
export default request;
- api文件夹创建testApi.ts文件,文件中引入request.ts
import request from "@/utils/request";

// post接口请求方式
export const testPostApi = (data:any) => request.post('/api/postUrl',data)

// get接口请求方式
export const testGetApi = (data:string) => request.post(`/api/getUrl?id=${data}`)
- 在页面中调用接口
<script setup lang="ts">
import { ref, reactive, onMounted } from "vue"
import { testPostApi, testGetApi } from '../../api/testApi'

const postApiData = () => {
    testPostApi({ username: 'admin', password: '123456' }).then(res => {
        console.log(res)
    })
}

const getApiData = () => {
    testGetApi('SKU12345678').then(res => {
        console.log(res)
    })
}

// 调用接口
onMounted(() => {
    postApiData()
    getApiData()
})
const count = ref(0)
const list = reactive(['你好', '你好世界'])
</script>
调用结果


十二、pinia状态管理器
- 安装依赖:
pnpm install pinia --save - 在src目录下新建文件夹store,在store文件下新建文件index.ts和modules文件夹
// store/index.ts
// 大仓库
import { createPinia } from 'pinia';
// 创建大仓库
const pinia = createPinia();
// 对外暴露:入口文件需要安装仓库
export default pinia;
- 在modules文件下新建test.ts文件
// store/modules/test.ts
// 小仓库
import { defineStore } from "pinia";

// 选项式API写法
const useTestStore = defineStore('test', {
    state: () => ({
            count: 100,
            list: [1, 2, 3, 4, 5]
        }),
    actions: {
        updateCount() {
            this.count += 100
        }
    },
    getters: {
        total() {
            const num: any = this.list.reduce((prev, next) => prev + next, 0)
            return num
        }
    }
})
export default useTestStore
- main.ts内引入store
// 引入store
import store from './stores'
app.use(store)
- 再页面中使用
<template>
    <div class="">
        <h1>欢迎使用项目模板</h1>
        <div class="content">
            <p>store_count:{{ storeCount }}</p>
            <button @click="count++">count:{{ count }}</button>
            <div class="list">
                <ul>
                    <li v-for="item in list" :key="item">{{ item }}</li>
                </ul>
            </div>
        </div>
    </div>
</template>
<script setup lang="ts">
import { ref, reactive, onMounted } from "vue"
import useTestStore from '../../store/modules/test'
import { testPostApi, testGetApi } from '../../api/testApi'

const storeCount = ref(0)
const userTestStoreData = useTestStore()
storeCount.value = userTestStoreData.count

const postApiData = () => {
    testPostApi({ username: 'admin', password: '123456' }).then(res => {
        console.log(res)
    })
}

const getApiData = () => {
    testGetApi('SKU12345678').then(res => {
        console.log(res)
    })
}

// 调用接口
onMounted(() => {
    postApiData()
    getApiData()
})
const count = ref(0)
const list = reactive(['你好', '你好世界'])
</script>

<style scoped lang="scss"></style>
项目搭建到这里就结束了,引入项目UI框架看需求引入再引入对应框架
文章参考:【vue3企业级项目骨架搭建,涉及vite、eslint、prettierrc、husky、commitlint、lint-staged、stylelint】


 686
686


 被折叠的 条评论
为什么被折叠?
被折叠的 条评论
为什么被折叠?
 到【灌水乐园】发言


