


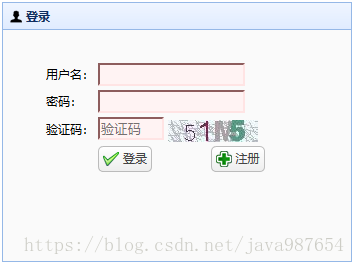
想要实现以下效果:
首先jsp前台页面
<body style="margin:150px 0 0 600px">
<!-- Panel面板
	data-options   英文为:属性
	iconCls : string 设置一个16x16图标的CSS类ID显示在面板左上角。

 -->
<div id="p" class="easyui-panel" title="登录"
        style="width:350px;height:260px;padding:10px;background:#fafafa;"
        data-options="iconCls:'icon-man'">
<!--
		Form表单
		validatebox(验证框)
		required boolean 定义为必填字段。

 -->
   <form id="loginform" method="post">
	   	<table style="padding: 20px 0 10px 30px">
	   		<tr>
	   			<td>用户名:</td>
	   			<td><input class="easyui-validatebox" type="text" name="user_name" data-options="required:true" /></td>
	   		</tr>
	   		<tr>
	   			<td>密码:</td>
	   			<td><input class="easyui-validatebox" type="text" name="password" data-options="required:true" /></td>
	   		</tr>
	   		<tr>
	   			<td>验证码:</td>
	   			<td><input type="text" class="easyui-validatebox" id="code" name="code" placeholder="验证码" maxlength="4" value="" style="width: 60px" data-options="required:true" tipPosition="top"/>
	   				 <img src="${ctx}/user/getCode.action" title="看不清,点击刷新" οnclick="reloadValidCode()"
						style="vertical-align: middle;" id="imgcode"/></td>
	   		</tr>

	   		<tr>
	   			<td></td>
	   			<td>
	   			<a id="btn" href="#" οnclick="login()" class="easyui-linkbutton c7" data-options="iconCls:'icon-ok'">登录</a>
	   			<a id="btn" href="#" οnclick="regisger()" class="easyui-linkbutton" data-options="iconCls:'icon-add'" style="margin-left: 55px">注册</a>
	   			</td>
	   		</tr>

	   	</table>
	</form>

</div>
<!-- easyui-dialog对话窗口
	modal boolean 定义是否将窗体显示为模式化窗口。
	resizable boolean 定义是否可以改变对话框窗口大小。
	closed boolean 定义是否可以关闭窗口。
	buttons array,selector 对话框窗口底部按钮,可用值有
	easyui-combobox 下拉列表框
	editable boolean 定义用户是否可以直接输入文本到字段中。
	multiple boolean 定义是否支持多选。
	required="true"   ValidateBox(验证框)属性
 -->
<div id="user_dialog" class="easyui-dialog" title="My Dialog" style="width:400px;height:auto;"
        data-options="iconCls:'icon-save',resizable:true,modal:true,closed:true,buttons:'#user_dialog_bottons'">
    <form id="user_form" method="post">
    	<input type="hidden" name="id">
    	<table>
			   	<tr>
	    			<td>用户名:</td>
	    			<td><input class="easyui-validatebox" type="text" name="user_name" data-options="required:true"/></td>
	    		</tr>
			   	<tr>
	    			<td>密码:</td>
	    			<td><input class="easyui-validatebox" type="text" name="password" data-options="required:true"/></td>
	    		</tr>
			   	<tr>
	    			<td>真实姓名:</td>
	    			<td><input class="easyui-validatebox" type="text" name="name" data-options="required:true"/></td>
	    		</tr>
	    		<tr>
		   			<td>角色:</td>
		   			<td><input class="easyui-combobox" id="roles" name="roles" url='${ctx}/role/getAllList.action'
				data-options="valueField:'id', textField:'role_name',editable:false,multiple:true,panelHeight:'auto'" required="true"></td>
		   		</tr>
			   	<tr>
	    			<td>手机号:</td>
	    			<td><input class="easyui-validatebox" type="text" name="phone" data-options="required:true"/></td>
	    		</tr>
    			<tr>
	    			<td>出生日期:</td>
	    			<td><input type="text" class="easyui-datebox" name="birthday" data-options="required:true"/></td>
	    		</tr>
    			<tr>
	    			<td>创建日期:</td>
	    			<td><input type="text" class="easyui-datebox" name="create_time" data-options="required:true"/></td>
	    		</tr>
			   	<tr>
	    			<td>创建人:</td>
	    			<td><input class="easyui-validatebox" type="text" name="create_user" data-options="required:true"/></td>
	    		</tr>
    			<tr>
	    			<td>最后修改时间:</td>
	    			<td><input type="text" class="easyui-datebox" name="update_time" data-options="required:true"/></td>
	    		</tr>
			   	<tr>
	    			<td>最后修改人:</td>
	    			<td><input class="easyui-validatebox" type="text" name="update_user" data-options="required:true"/></td>
	    		</tr>
			   	<tr>
	   			<td>性别:</td>
	   			<td  id="sextd">
		   				<input type="radio" name="sex" id="sex1" value="1" style="width:50px;" checked="checked">男</input>
						<input type="radio" name="sex" id="sex2" value="2" style="width:50px;">女</input>
		   			</td>
		   		</tr>
			   	<tr>
	    			<td>工资:</td>
	    			<td><input class="easyui-validatebox" type="text" name="salary" data-options="required:true"/></td>
	    		</tr>
			   	<tr>
	    			<td>履历:</td>
	    			<td><input class="easyui-validatebox" type="text" name="content" data-options="required:true"/></td>
	    		</tr>
    	</table>

<!--	      单选  <input type="radio" name="sex" value="0" checked="checked"/>男 <input type="radio" name="sex" value="1"/>女
	   下拉<input id="hobby_combobox" class="easyui-combobox" name="hobby" data-options="required:true,valueField:'code',textField:'name',url:'${ctx}/dict/geByPid.action?pid=1',multiple:true" />
-->
</form>
</div>
<div id="user_dialog_bottons">
<a href="javascript:;" class="easyui-linkbutton" data-options="iconCls:'icon-save'" οnclick="save()">保存</a>
<a href="javascript:$('#user_dialog').dialog('close');" class="easyui-linkbutton" data-options="iconCls:'icon-cancel'">取消</a>
</div>
<script type="text/javascript">
function keyEnter(){
	if (event.keyCode == 13) {
		login();
	}
}
document.onkeydown =keyEnter;
function reloadValidCode() {
	$("#imgcode").prop('src',"${ctx}/user/getCode.action?timed="+ new Date().getMilliseconds());
}
function login(){
	$('#loginform').form('submit', {
	    url:"${ctx}/user/login.action",
	    onSubmit: function(){
	    	//gettips("code","验证码错误","top");
			var isValid = $(this).form('validate');
			return isValid;	// 返回false终止表单提交
		},
	    success:function(data){
	    	var data = eval('(' + data + ')');
	        if(data.success){
	        	window.location.href="${ctx}/user/main.action";
	        }else{
	        	$.messager.alert('警告',data.msg,'error',function(){
	        		reloadValidCode();
	        	});
	        }
	    }
	});
}
function regisger(){

		$("#user_dialog").dialog("open").dialog("setTitle","注册");
		$("#hobby_combobox").combobox("clear");
		$("#user_form").form("clear");

}
//注册
 function save(){
	debugger;
	$('#user_form').form('submit', {
		url:"${ctx}/user/save.action",
	    onSubmit: function(){
	    	return $(this).form('validate');
	    },
	    success:function(data){
	    	var data = eval("("+data+")");
	        if(data.success){
	        	$('#user_dialog').dialog('close');
	        	$("#user_datagrid").datagrid("reload");
	        }
	    }
	});
}
</script>

</body>
在controller层编写
        @RequestMapping("login")//登录
	@ResponseBody
	public ResJson login(HttpServletRequest request , String user_name , String password , String code , HttpSession session){
		ResJson resJson = new ResJson();
		String codeValue = (String) request.getSession().getAttribute(Const.SESSION_CODE);
		if (code.equalsIgnoreCase(codeValue)) {
			User user = userService.getUserName(user_name);
			System.out.println(user);
			if (user==null) {
				resJson.setSuccess(false);
				resJson.setMsg("用户名密码错误");
			}else {
				password=Encoding.md5Encoding(password);
				System.out.println("--------------"+password.toString());
				if (password.equals(user.getPassword())) {
					request.getSession().setAttribute(Const.SESSION_USER, user);
					request.getSession().setAttribute(Const.SESSION_USER_NAME, user.getUser_name());
					resJson.setSuccess(true);
					session.setAttribute("user", user);
				}else {
					resJson.setMsg("用户名密码错误");
				}
			}
		}else {
			resJson.setMsg("验证码错误");
		}
		System.out.println(resJson);
		return resJson;
	}
	@RequestMapping("logout")//退出登录,调回登录页面
	public ModelAndView logout(HttpServletRequest request){
		HttpSession session = request.getSession();
		Object object = session.getAttribute(Const.SESSION_USER);
		if (object!=null) {
			session.invalidate();
		}
		return new ModelAndView("login/login");
	}
	/**
	 * 获取验证码
	 */
	@RequestMapping("getCode")
	@ResponseBody
	public String getCode(HttpServletRequest request , HttpServletResponse response){
		try {
			ValidCodeUtils.getImage(request, response);
		} catch (Exception e) {
			// TODO: handle exception
			e.printStackTrace();
		}
		return null;
	}
在dao.xml文件中编写
<!--登录-->
  <select id="login" parameterType="com.model.user.User" resultType="com.model.user.User">
  	select
			   a.user_name,
			   a.password
		from
				ztl_user a
		where a.user_name=#{user_name}
  </select>
在spring-mvc.xml配置文件中加入拦截器地址
<!-- 拦截器  -->
        <mvc:interceptors>
               <bean class="//SystemInterceptor配置文件的地址" />
        </mvc:interceptors>
配置SystemInterceptor拦截器
import javax.servlet.http.HttpServletRequest;
import javax.servlet.http.HttpServletResponse;

import org.springframework.web.servlet.HandlerInterceptor;
import org.springframework.web.servlet.ModelAndView;

public class Systemlnterceptor implements HandlerInterceptor{

	@Override
	public void afterCompletion(HttpServletRequest request, HttpServletResponse response, Object arg2, Exception arg3)
			throws Exception {
		// TODO Auto-generated method stub

	}

	@Override
	public void postHandle(HttpServletRequest request, HttpServletResponse response, Object arg2, ModelAndView arg3)
			throws Exception {
		// TODO Auto-generated method stub

	}

	@Override
	public boolean preHandle(HttpServletRequest request, HttpServletResponse response, Object arg2) throws Exception {
		// TODO Auto-generated method stub
		//获取请求地址
		String requestURI = request.getRequestURI();
		//不需要拦截的请求
		String No=".*/((tologin)|(loginOpt)).*";
		//判断请求
		if (requestURI.matches(No)) {
			return true;
		}
		String id=(String)request.getSession().getAttribute("id");
		if (id!=null) {
			return true;
		}
		request.getRequestDispatcher("/WEB-INF/login.jsp").forward(request, response);
		return false;
	}

}


 500
500


 被折叠的 条评论
为什么被折叠?
被折叠的 条评论
为什么被折叠?
 到【灌水乐园】发言


