


一 spring 官网生成基本代码框架
1 生成并下载框架代码
Spring | Quickstart https://start.spring.io/

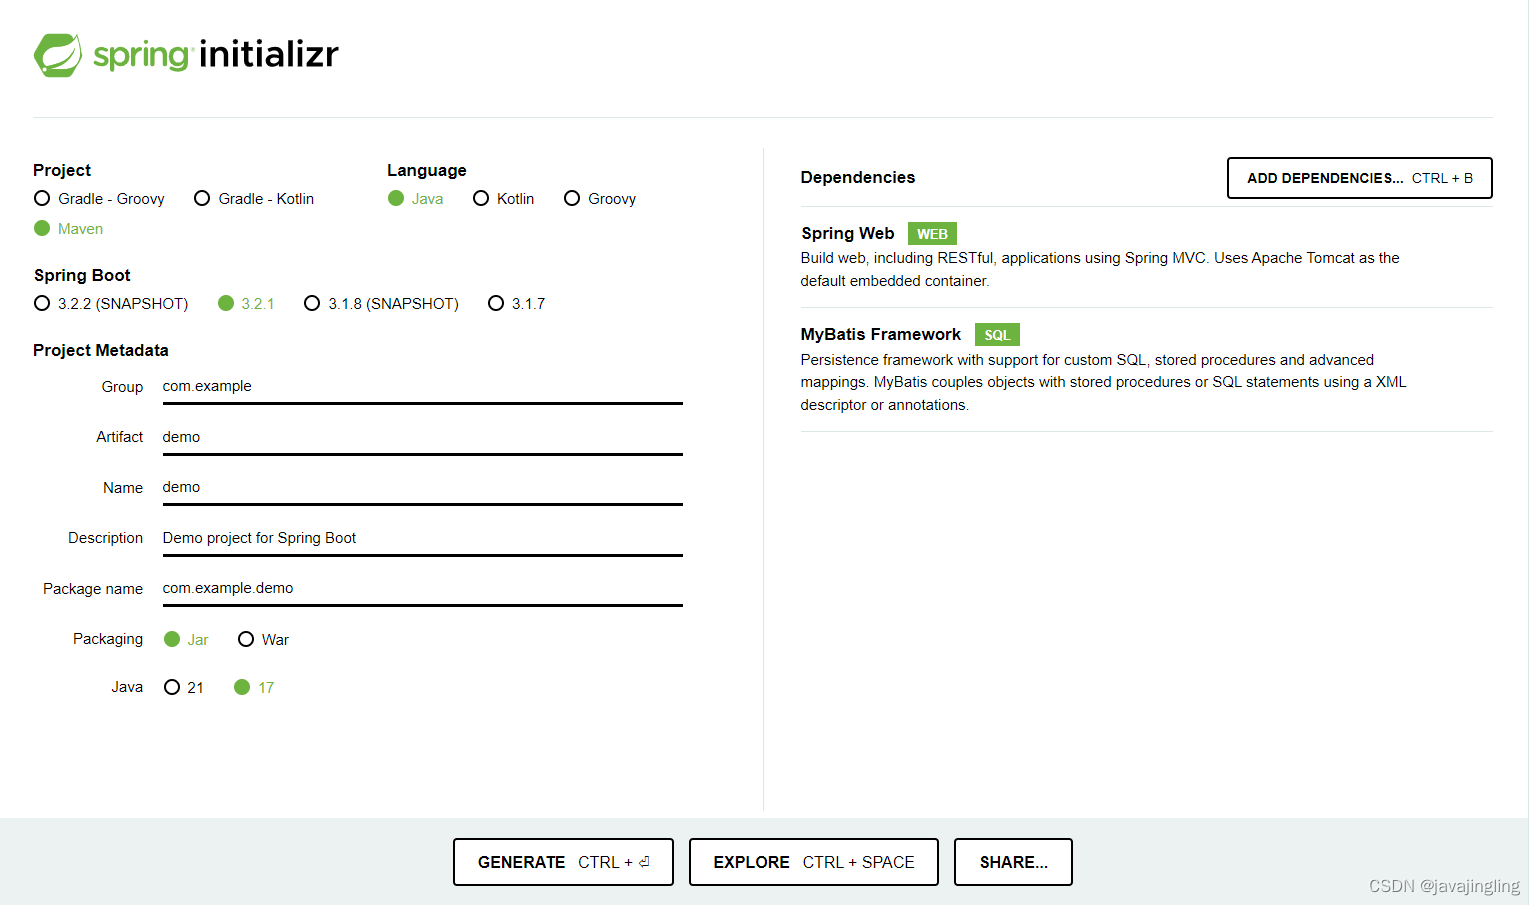
Project: 项目构建工具熟练哪个选哪个,这里选择Maven。
Language: 开发使用的语言,熟练哪个选哪个,这里选择Java。
SpringBoot: spring boot 的版本,选3.2.1。一般使用最新稳定版。
Project Metadata:根据自己项目信息填写。Packaging一般选Jar,后续部署比较方便,如不需要灵活配置web容器的选择War。Java版本选择了17。
Dependencies: 选择了基本的Spring Web和MyBatis Framework。
参数填写完后,点下方EXPLORE按钮。在下发界面点击DOWNLOAD按钮,下载代码。
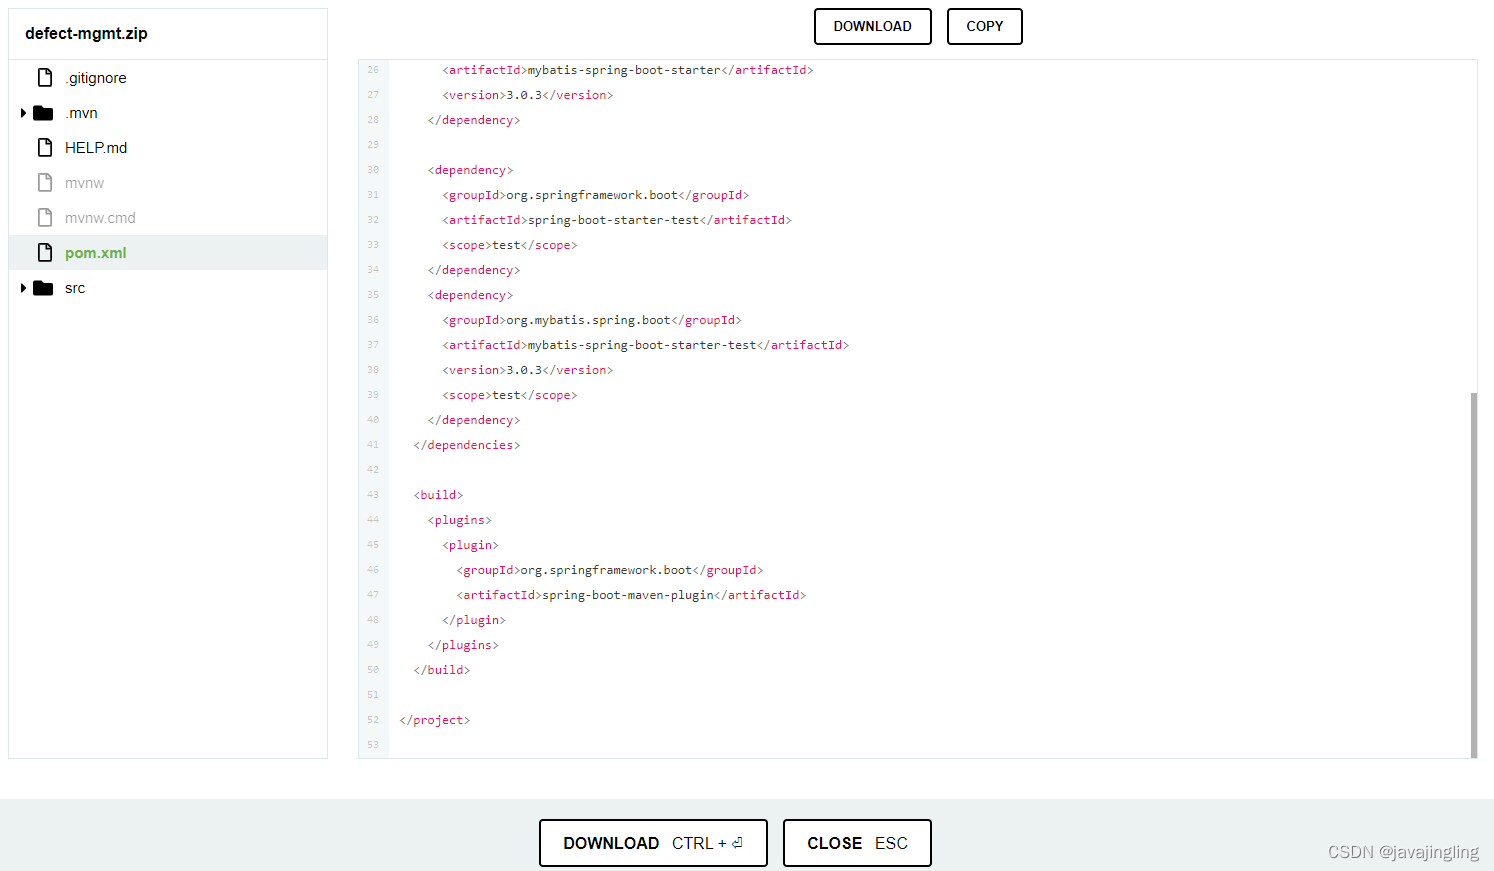
2 关于spring-boot-starter-parent。
自动生成的项目是作为spring-boot-starter-parent的子模块定义的,在pom.xml中有如下定义:
	<parent>
		<groupId>org.springframework.boot</groupId>
		<artifactId>spring-boot-starter-parent</artifactId>
		<version>3.2.1</version>
		<relativePath/> <!-- lookup parent from repository -->
	</parent>
在parent中定义了各种jar包版本和构建工具版本和配置。
如果不想使用spring-boot-starter-parent中定义的相关版本,可以在自动生成的项目中去除parent(spring-boot-starter-parent),之后自己重新定义需要的版本,或者在子模块中直接重新定义新版本覆盖掉父模块中的定义。
该模块中的pom.xml具体内容可以去maven的仓库中下载jar包查看。或者查看该链接spring自动生成框架代码依赖父模块的pom.xml内容
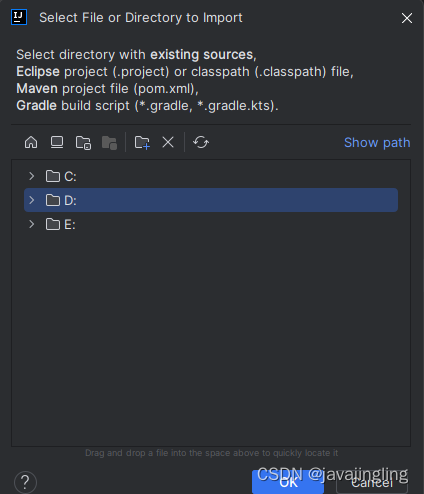
二 将项目导入到Intellij IEDA
1 导入下载的代码。

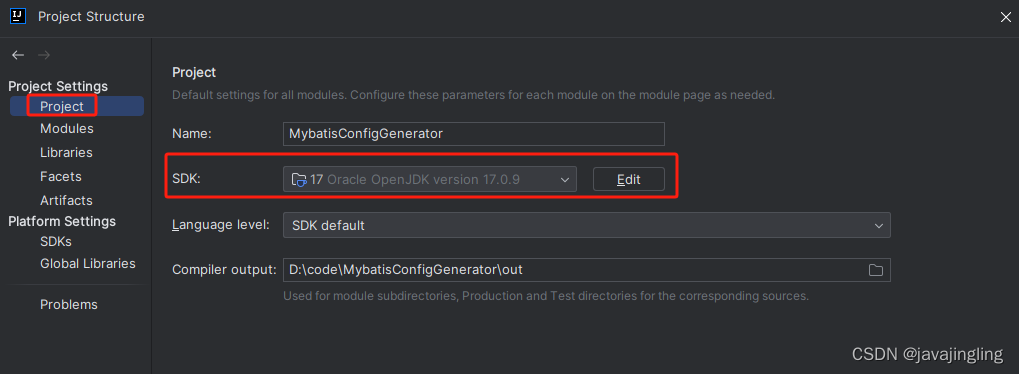
2 设置项目JDK
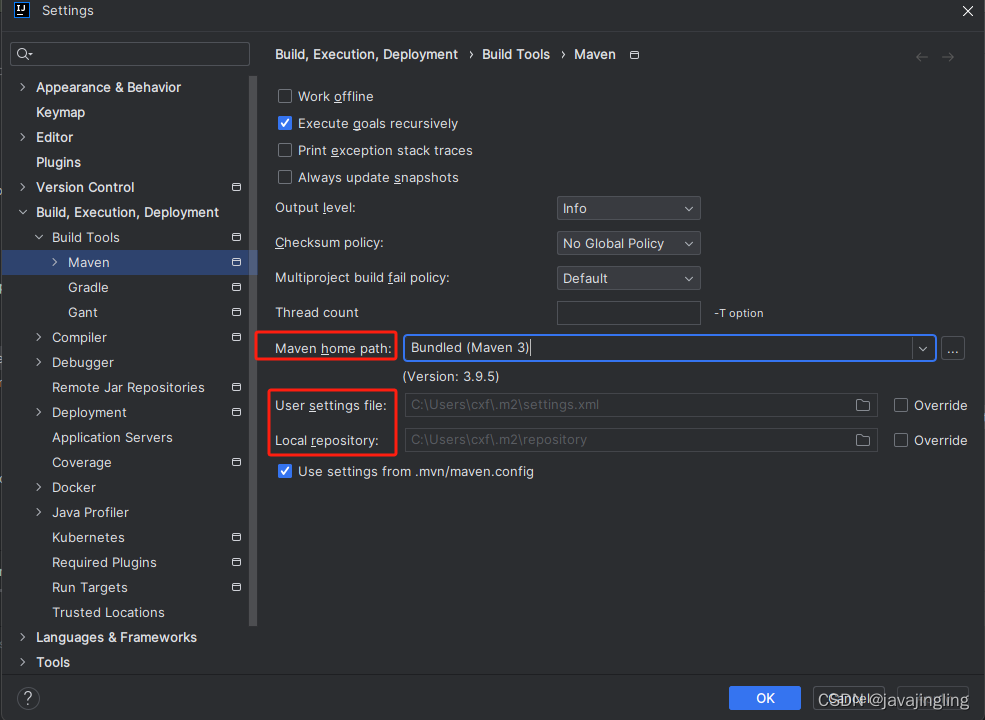
IDEA中项目设置的快捷键ctrl+shfit+alt+s
3 maven配置
三 集成Mybatis + SQLite
1 添加sqlite-jdbc
<dependency>
    <groupId>org.xerial</groupId>
    <artifactId>sqlite-jdbc</artifactId>
    <version>3.44.1.0</version>
</dependency>
2 application.yml添加如下配置
spring:
  datasource:
    url: jdbc:sqlite:E:/sqlite-test.db
    driver-class-name: org.sqlite.JDBC
    username:
    password:
mybatis:
  mapper-locations: classpath*:mapper/*Mapper.xml
  type-aliases-package: com.xxx.xxx.api
3 启动类增加注解
@MapperScan("com.xxx.xxx.api.db.mapper")
import org.mybatis.spring.annotation.MapperScan;
import org.springframework.boot.SpringApplication;
import org.springframework.boot.autoconfigure.SpringBootApplication;
@SpringBootApplication
@MapperScan("com.xxx.xxx.api.db.mapper")
public class XXXXApiApplication {
public static void main(String[] args) {
SpringApplication.run(XXXXApiApplication.class, args);
}
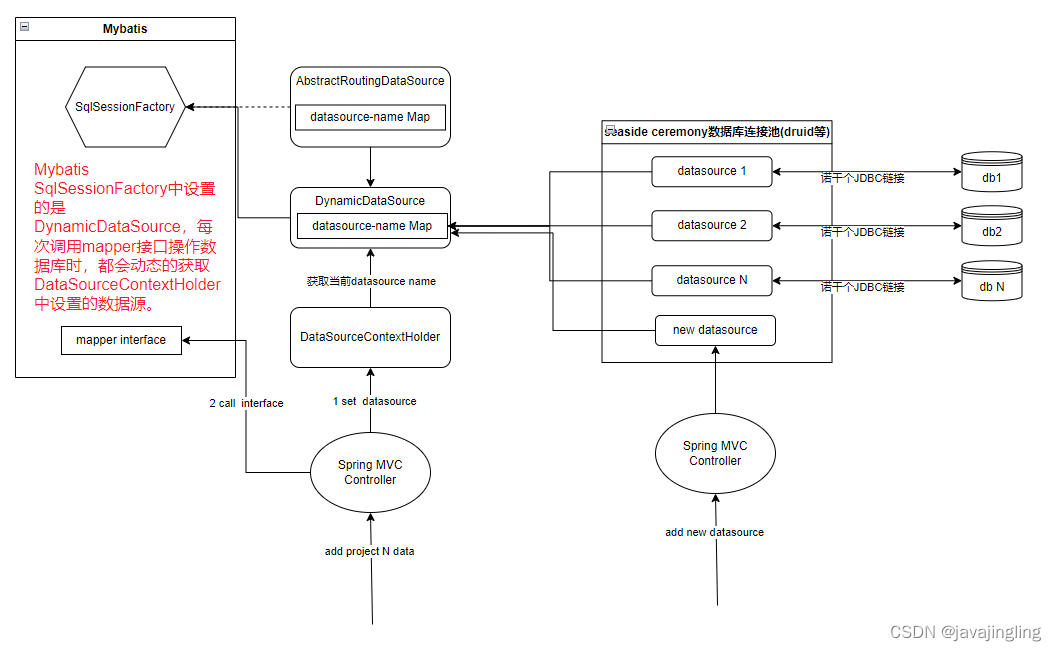
}四 配置动态数据源
动态数据源实现界面没新建一个分析项目,后端需要对应新增一个数据库,并且以后该分析项目的数据都要在新数据库中操作。即一个分析项目对应一个数据库,分析项目在运行时动态增加,还有一个默认数据库放所有分析项目通用数据。
配置的总体结构
相关文件
application.yml
spring:
  datasource:
    druid:
      default:
        url: jdbc:sqlite:E:/sqlite-test.db
        driver-class-name: org.sqlite.JDBC
        username:
        password:
        validation-query: "select 1"
mybatis:
  mapper-locations: classpath*:mapper/*Mapper.xml
  type-aliases-package: com.xx.xxx.xx.api
DataSourceConfig.java
import com.alibaba.druid.spring.boot.autoconfigure.DruidDataSourceBuilder;
import org.apache.ibatis.session.SqlSessionFactory;
import org.mybatis.spring.SqlSessionFactoryBean;
import org.mybatis.spring.SqlSessionTemplate;
import org.springframework.beans.factory.annotation.Qualifier;
import org.springframework.beans.factory.annotation.Value;
import org.springframework.boot.context.properties.ConfigurationProperties;
import org.springframework.context.annotation.Bean;
import org.springframework.context.annotation.Configuration;
import org.springframework.context.annotation.Primary;
import org.springframework.core.io.support.PathMatchingResourcePatternResolver;

import javax.sql.DataSource;

@Configuration
public class DataSourceConfig {

    @Value("${mybatis.mapper-locations}")
    private String mapperXmlLocationPattern;
    @Value("${mybatis.type-aliases-package}")
    private String typeAliasesPackage;

    /**
     * 生成spring datasource bean
     * 根据spring配置文件生成默认datasource
     * @return default datasource
     */
    @Primary
    @Bean
    @ConfigurationProperties("spring.datasource.druid.default")
    public DataSource dataSource() {
        return DruidDataSourceBuilder.create().build();
    }

    /**
     * 配置spring  dynamicDataSource bean
     * @param dataSource 默认数据源
     * @return dynamicDataSource
     */
    @Bean(name = "dynamicDataSource")
    public DynamicDataSource dynamicDataSource(DataSource dataSource) {
        DynamicDataSource dynamicDataSource = DynamicDataSource.getInstance();
        dynamicDataSource.addDataSource("default",dataSource);
        dynamicDataSource.setDefaultTargetDataSource(dataSource);
        return dynamicDataSource;
    }

    /**
     * 配置mybatis 的sqlSessionFactory bean。
     * 如果没有手动配置,mybatis-spring-boot-starter中会自动配置,所有一般没有使用动态数据源都不会配置该bean。
     * @param dynamicDataSource 自己实现的动态数据源
     * @return 的sqlSessionFactory
     * @throws Exception exception
     */
    @Primary
    @Bean(name="sqlSessionFactory")
    public SqlSessionFactory sqlSessionFactory(
            @Qualifier("dynamicDataSource") DataSource dynamicDataSource)
            throws Exception {
        SqlSessionFactoryBean factory = new SqlSessionFactoryBean();
        factory.setDataSource(dynamicDataSource);
        factory.setTypeAliasesPackage(typeAliasesPackage);
        factory.setMapperLocations(new PathMatchingResourcePatternResolver()
                .getResources(mapperXmlLocationPattern));
        return factory.getObject();
    }

    /**
     * mybatis 需要的sqlSessionTemplate bean
     * sqlSessionFactory bean类似,没有手动配置时,mybatis-spring-boot-starter中会自动配置。
     * @param sqlSessionFactory
     * @return
     */
    @Primary
    @Bean(name = "sqlSessionTemplate")
    public SqlSessionTemplate sqlSessionTemplate(
            @Qualifier("sqlSessionFactory") SqlSessionFactory sqlSessionFactory) {
        return new SqlSessionTemplate(sqlSessionFactory);
    }
}
附加mybatis-spring-boot-autoconfigure 中关于 sqlSessionFactory自动配置的代码段
@Bean
  @ConditionalOnMissingBean
  public SqlSessionFactory sqlSessionFactory(DataSource dataSource) throws Exception {
    SqlSessionFactoryBean factory = new SqlSessionFactoryBean();
    factory.setDataSource(dataSource);
    if (properties.getConfiguration() == null || properties.getConfiguration().getVfsImpl() == null) {
      factory.setVfs(SpringBootVFS.class);
    }
    if (StringUtils.hasText(this.properties.getConfigLocation())) {
      factory.setConfigLocation(this.resourceLoader.getResource(this.properties.getConfigLocation()));
    }
    applyConfiguration(factory);
    if (this.properties.getConfigurationProperties() != null) {
      factory.setConfigurationProperties(this.properties.getConfigurationProperties());
    }
    if (!ObjectUtils.isEmpty(this.interceptors)) {
      factory.setPlugins(this.interceptors);
    }
    if (this.databaseIdProvider != null) {
      factory.setDatabaseIdProvider(this.databaseIdProvider);
    }
    if (StringUtils.hasLength(this.properties.getTypeAliasesPackage())) {
      factory.setTypeAliasesPackage(this.properties.getTypeAliasesPackage());
    }
    if (this.properties.getTypeAliasesSuperType() != null) {
      factory.setTypeAliasesSuperType(this.properties.getTypeAliasesSuperType());
    }
    if (StringUtils.hasLength(this.properties.getTypeHandlersPackage())) {
      factory.setTypeHandlersPackage(this.properties.getTypeHandlersPackage());
    }
    if (!ObjectUtils.isEmpty(this.typeHandlers)) {
      factory.setTypeHandlers(this.typeHandlers);
    }
    Resource[] mapperLocations = this.properties.resolveMapperLocations();
    if (!ObjectUtils.isEmpty(mapperLocations)) {
      factory.setMapperLocations(mapperLocations);
    }
    Set<String> factoryPropertyNames = Stream
        .of(new BeanWrapperImpl(SqlSessionFactoryBean.class).getPropertyDescriptors()).map(PropertyDescriptor::getName)
        .collect(Collectors.toSet());
    Class<? extends LanguageDriver> defaultLanguageDriver = this.properties.getDefaultScriptingLanguageDriver();
    if (factoryPropertyNames.contains("scriptingLanguageDrivers") && !ObjectUtils.isEmpty(this.languageDrivers)) {
      // Need to mybatis-spring 2.0.2+
      factory.setScriptingLanguageDrivers(this.languageDrivers);
      if (defaultLanguageDriver == null && this.languageDrivers.length == 1) {
        defaultLanguageDriver = this.languageDrivers[0].getClass();
      }
    }
    if (factoryPropertyNames.contains("defaultScriptingLanguageDriver")) {
      // Need to mybatis-spring 2.0.2+
      factory.setDefaultScriptingLanguageDriver(defaultLanguageDriver);
    }
    applySqlSessionFactoryBeanCustomizers(factory);
    return factory.getObject();
  }
DataSourceContextHolder.java
/**
 * 保存当前线程中,需要使用的datasource名称。
 */
public class DataSourceContextHolder {
    private static final ThreadLocal<String> contextHolder = new ThreadLocal<String>();

    public static synchronized void setDataSourceName(String dataSourceName) {
        contextHolder.set(dataSourceName);
    }

    public static String getDataSourceName() {
        return contextHolder.get();
    }

    public static void clearDataSourceName() {
        contextHolder.remove();
    }
}
DynamicDataSource.java
import org.springframework.jdbc.datasource.lookup.AbstractRoutingDataSource;

import javax.sql.DataSource;
import java.util.HashMap;
import java.util.Map;

public class DynamicDataSource extends AbstractRoutingDataSource {
    /**
     * 可用数据源集合
     */
    private static final Map<Object, Object> dataSourceMap = new HashMap<>();

    /**
     * 单例
     */
    private DynamicDataSource(){
        super.setTargetDataSources(dataSourceMap);
    }
    private static final class InstanceHolder {
        private static final DynamicDataSource instance = new DynamicDataSource();
    }
    public static synchronized DynamicDataSource getInstance() {
        return InstanceHolder.instance;
    }

    /**
     * 新增一个数据源
     * @param dsName 数据源名称
     * @param dataSource 数据源
     */
    public void addDataSource(String dsName,DataSource dataSource) {
        dataSourceMap.put(dsName,dataSource);
        super.afterPropertiesSet();// 必须添加该句,否则新添加数据源无法识别到
    }

    /**
     * 判断dsName是否已经存在
     * @param dsName
     * @return
     */
    public boolean existDataSource(String dsName) {
        return dataSourceMap.get(dsName) != null;
    }

    /**
     * 数据源长时间不使用,可以删除
     * @param dsName 数据源名称
     */
    public void removeDataSource(String dsName) {
        dataSourceMap.remove(dsName);
        super.afterPropertiesSet();// 必须添加该句,否则删除无效
    }

    /**
     * 必须实现其方法
     * 根据该方法返回值,确定使用哪个数据源
     */
    protected Object determineCurrentLookupKey() {
        return DataSourceContextHolder.getDataSourceName();
    }
}
TestController.java
import com.alibaba.druid.pool.DruidDataSource;
import com.sourcefides.sourceye.defectmgmt.api.db.DataSourceContextHolder;
import com.sourcefides.sourceye.defectmgmt.api.db.DynamicDataSource;
import com.sourcefides.sourceye.defectmgmt.api.db.entity.TestTable;
import com.sourcefides.sourceye.defectmgmt.api.db.mapper.TestTableMapper;
import com.sourcefides.sourceye.defectmgmt.api.entity.out.BaseOutParam;
import io.swagger.v3.oas.annotations.Parameter;
import org.springframework.beans.factory.annotation.Autowired;
import org.springframework.web.bind.annotation.GetMapping;
import org.springframework.web.bind.annotation.RequestMapping;
import org.springframework.web.bind.annotation.RestController;

@RestController
@RequestMapping(value = "/api/v1/test")
public class TestController {

    @Autowired
    TestTableMapper testTableMapper;

    @GetMapping(value = "/name")
    public BaseOutParam searchOrderForm(@Parameter String dbName) {
        if (dbName != null) {
            DataSourceContextHolder.setDataSourceName(dbName);
        }
        BaseOutParam outParam = new BaseOutParam();
        TestTable testTable = testTableMapper.selectByPrimaryKey(1);
        outParam.setCode(200);
        outParam.setMessage("success");
        outParam.setData(testTable.getName());
        return outParam;
    }
    @GetMapping(value = "/changeDB")
    public BaseOutParam changeDB(@Parameter String dbName) {
        DynamicDataSource dynamicDataSource = DynamicDataSource.getInstance();
        if (!dynamicDataSource.existDataSource(dbName)) {
            DruidDataSource dDataSource = new DruidDataSource();
            dDataSource.setUrl("jdbc:sqlite:E:/sqlite-test3.db");
            dDataSource.setDriverClassName("org.sqlite.JDBC");
            dDataSource.setUsername("");
            dDataSource.setPassword("");
            dynamicDataSource.addDataSource(dbName,dDataSource);
        }
        DataSourceContextHolder.setDataSourceName(dbName);
        TestTable testTable = testTableMapper.selectByPrimaryKey(1);
        BaseOutParam outParam = new BaseOutParam();
        outParam.setCode(200);
        outParam.setMessage("success");
        outParam.setData(testTable.getName());
        return outParam;
    }
}
TestTableMapper.java
import com.xxx.xxx.xxx.api.db.entity.TestTable;

public interface TestTableMapper {
    int deleteByPrimaryKey(Integer id);

    int insert(TestTable record);

    int insertSelective(TestTable record);

    TestTable selectByPrimaryKey(Integer id);

    int updateByPrimaryKeySelective(TestTable record);

    int updateByPrimaryKey(TestTable record);
}
TestTable.java
public class TestTable {
    private Integer id;

    private String name;

    public Integer getId() {
        return id;
    }

    public void setId(Integer id) {
        this.id = id;
    }

    public String getName() {
        return name;
    }

    public void setName(String name) {
        this.name = name == null ? null : name.trim();
    }
}
TestTableMapper.xml
<?xml version="1.0" encoding="UTF-8"?>
<!DOCTYPE mapper PUBLIC "-//mybatis.org//DTD Mapper 3.0//EN" "http://mybatis.org/dtd/mybatis-3-mapper.dtd">
<mapper namespace="com.xxx.xxx.xxx.api.db.mapper.TestTableMapper">
  <resultMap id="BaseResultMap" type="com.xxx.xxx.xxx.api.db.entity.TestTable">
    <id column="ID" jdbcType="INTEGER" property="id" />
    <result column="NAME" jdbcType="VARCHAR" property="name" />
  </resultMap>
  <sql id="Base_Column_List">
    ID, NAME
  </sql>
  <select id="selectByPrimaryKey" parameterType="java.lang.Integer" resultMap="BaseResultMap">
    select
    <include refid="Base_Column_List" />
    from TEST_TABLE
    where ID = #{id,jdbcType=INTEGER}
  </select>
  <delete id="deleteByPrimaryKey" parameterType="java.lang.Integer">
    delete from TEST_TABLE
    where ID = #{id,jdbcType=INTEGER}
  </delete>
  <insert id="insert" parameterType="com.xxx.xxx.xxx.api.db.entity.TestTable">
    insert into TEST_TABLE (ID, NAME)
    values (#{id,jdbcType=INTEGER}, #{name,jdbcType=VARCHAR})
  </insert>
  <insert id="insertSelective" parameterType="com.xxx.xxx.xxx.api.db.entity.TestTable">
    insert into TEST_TABLE
    <trim prefix="(" suffix=")" suffixOverrides=",">
      <if test="id != null">
        ID,
      </if>
      <if test="name != null">
        NAME,
      </if>
    </trim>
    <trim prefix="values (" suffix=")" suffixOverrides=",">
      <if test="id != null">
        #{id,jdbcType=INTEGER},
      </if>
      <if test="name != null">
        #{name,jdbcType=VARCHAR},
      </if>
    </trim>
  </insert>
  <update id="updateByPrimaryKeySelective" parameterType="com.xxx.xxx.xxx.api.db.entity.TestTable">
    update TEST_TABLE
    <set>
      <if test="name != null">
        NAME = #{name,jdbcType=VARCHAR},
      </if>
    </set>
    where ID = #{id,jdbcType=INTEGER}
  </update>
  <update id="updateByPrimaryKey" parameterType="com.xxx.xxx.xxx.api.db.entity.TestTable">
    update TEST_TABLE
    set NAME = #{name,jdbcType=VARCHAR}
    where ID = #{id,jdbcType=INTEGER}
  </update>
</mapper>
五 利用mybatis-generator生成mybatis的配置文件
1 generatorConfig.xml
mybatis-generator配置文件内容如下,需要修改jdbc驱动包位置、数据库信息、生成文件位置(有3处)以及mybatis-generator生成策略的一些配置。
<?xml version="1.0" encoding="UTF-8"?>
<!DOCTYPE generatorConfiguration
        PUBLIC "-//mybatis.org//DTD MyBatis Generator Configuration 1.0//EN"
        "http://mybatis.org/dtd/mybatis-generator-config_1_0.dtd">

<generatorConfiguration>

    <!--指定特定数据库的jdbc驱动jar包的位置-->
    <classPathEntry location="xxx.jar"/>

    <context id="default" targetRuntime="MyBatis3">

        <!-- optional,旨在创建class时,对注释进行控制 -->
        <commentGenerator>
            <property name="suppressDate" value="true"/>
            <property name="suppressAllComments" value="true"/>
        </commentGenerator>

        <!--jdbc的数据库连接 -->
        <jdbcConnection
                driverClass="com.mysql.cj.jdbc.Driver"
                connectionURL="jdbc:mysql://111.111.2.111:3306/111?useUnicode=true;characterEncoding=utf-8;serverTimezone=UTC"
                userId="1111"
                password="1111">
        </jdbcConnection>


        <!-- 非必需,类型处理器,在数据库类型和java类型之间的转换控制-->
        <javaTypeResolver>
            <property name="forceBigDecimals" value="false"/>
        </javaTypeResolver>


        <!-- Model模型生成器,用来生成含有主键key的类,记录类 以及查询Example类
            targetPackage     指定生成的model生成所在的包名
            targetProject     指定在该项目下所在的路径
        -->
        <javaModelGenerator targetPackage="com.xxx.db.entity"
                            targetProject="src/main/java">

            <!-- 是否允许子包,即targetPackage.schemaName.tableName -->
            <property name="enableSubPackages" value="false"/>
            <!-- 是否对model添加 构造函数 -->
            <property name="constructorBased" value="true"/>
            <!-- 是否对类CHAR类型的列的数据进行trim操作 -->
            <property name="trimStrings" value="true"/>
            <!-- 建立的Model对象是否 不可改变  即生成的Model对象不会有 setter方法,只有构造方法 -->
            <property name="immutable" value="false"/>
        </javaModelGenerator>

        <!--Mapper映射文件生成所在的目录 为每一个数据库的表生成对应的SqlMap文件 -->
        <sqlMapGenerator targetPackage="mapper"
                         targetProject="src/main/resources">
            <property name="enableSubPackages" value="false"/>
        </sqlMapGenerator>

        <!-- 客户端代码,生成易于使用的针对Model对象和XML配置文件 的代码
                type="ANNOTATEDMAPPER",生成Java Model 和基于注解的Mapper对象
                type="MIXEDMAPPER",生成基于注解的Java Model 和相应的Mapper对 象
                type="XMLMAPPER",生成SQLMap XML文件和独立的Mapper接口
        -->
        <javaClientGenerator targetPackage="com.xxx.db.mapper"
                             targetProject="src/main/java" type="XMLMAPPER">
            <property name="enableSubPackages" value="true"/>
        </javaClientGenerator>

        <!--配置要生成的表名和实体类名称-->
        <table tableName="A_TEST" domainObjectName="Test"
               enableCountByExample="false"
               enableUpdateByExample="false"
               enableDeleteByExample="false"
               enableSelectByExample="false"
               selectByExampleQueryId="false"
               enableSelectByPrimaryKey="true"
               enableUpdateByPrimaryKey="true"
               enableDeleteByPrimaryKey="true">
        </table>
    </context>
</generatorConfiguration>
如果要覆盖数据库定义的字段类型,可以使用以下配置:
        <table tableName="tableName" domainObjectName="domainName"
               enableCountByExample="false"
               enableUpdateByExample="false"
               enableDeleteByExample="false"
               enableSelectByExample="false"
               selectByExampleQueryId="false"
               enableSelectByPrimaryKey="true"
               enableUpdateByPrimaryKey="true"
               enableDeleteByPrimaryKey="true">
            <!-- 将Integer字段的javaType设置为Long -->
            <columnOverride javaType="java.lang.Long" column="id"/>
        </table>
2 新建一个空的maven项目
新建一个空的maven项目,在pom.xml中加入mybatis-generator的jar包依赖
        <dependency>
            <groupId>org.mybatis.generator</groupId>
            <artifactId>mybatis-generator-core</artifactId>
            <version>1.4.2</version>
        </dependency>
3 运行生成
mybatis-generator其实是mave的一个插件,可以直接命令行运行插件命令,也可以在IntelliJ IDEA中配置一个Run Configurations。
IntelliJ IDEA Run/Debug Configurations
菜单路径:Run>Edit Configurations
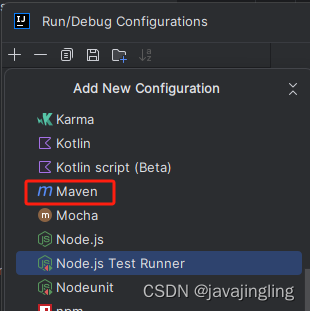
在弹出界面配置增加一个Maven配置项。
Name输入:MybatisConfigGenerator
Run输入: mybatis-generator:generate -e
Working directory: 选择当前项目即可
直接用mvn命令执行
        mvn mybatis-generator:generate -e

        mybatis-generator使用注意事项:

        1 如果表没有设置组件,mapper中只能生成insert方法。

        2 此参数设置为false,数据类不生成构造函数。 <property name="constructorBased" value="false"/>

        3 该命令要在项目的根目录下执行,因为这个mavne命令需要依赖pom.xml。
生成成功后,将文件copy到需要使用的项目中。
4 IDEA插件加持
使用MyBatisX和Database Tools and SQL(默认安装) 和更加方便的编写数据库操作部分代码。
六 配置日志
1 logback-boot.xml
日志使用logback。在项目的resources目录下增加一个logback-boot.xml文件
<configuration>
    <!-- %m输出的信息,%p日志级别,%t线程名,%d日期,%c类的全名,%i索引【从数字0开始递增】 -->
    <!-- 级别依次为【从高到低】:FATAL > ERROR > WARN > INFO > DEBUG > TRACE  -->
    <appender name="STDOUT" class="ch.qos.logback.core.ConsoleAppender">
        <encoder>
            <pattern>%d %p (%file:%line\)- %m%n</pattern>
            <charset>UTF-8</charset>
        </encoder>
    </appender>
    <!-- RollingFileAppender:滚动记录文件,先将日志记录到指定文件,当符合某个条件时,将日志记录到其他文件 -->
    <!-- 以下的大概意思是:1.先按日期存日志,日期变了,将前一天的日志文件名重命名为XXX%日期%索引,新的日志仍然是sys.log -->
    <!--             2.如果日期没有发生变化,但是当前日志的文件大小超过1KB时,对当前日志进行分割 重命名-->
    <appender name="syslog"
              class="ch.qos.logback.core.rolling.RollingFileAppender">
        <File>xxx.log</File>
        <!-- rollingPolicy:当发生滚动时,决定 RollingFileAppender 的行为,涉及文件移动和重命名。 -->
        <!-- TimeBasedRollingPolicy: 最常用的滚动策略,它根据时间来制定滚动策略,既负责滚动也负责出发滚动 -->
        <rollingPolicy class="ch.qos.logback.core.rolling.TimeBasedRollingPolicy">
            <!-- 活动文件的名字会根据fileNamePattern的值,每隔一段时间改变一次 -->
            <fileNamePattern>xxx.%d.%i.log</fileNamePattern>
            <!-- 每产生一个日志文件,该日志文件的保存期限为30天 -->
            <maxHistory>30</maxHistory>
            <timeBasedFileNamingAndTriggeringPolicy  class="ch.qos.logback.core.rolling.SizeAndTimeBasedFNATP">
                <maxFileSize>10MB</maxFileSize>
            </timeBasedFileNamingAndTriggeringPolicy>
        </rollingPolicy>
        <encoder>
            <pattern>%d %p (%file:%line\)- %m%n</pattern>
            <charset>UTF-8</charset>
        </encoder>
    </appender>

    <root level="info">
        <appender-ref ref="STDOUT" />
    </root>
    <logger name="com.xxx.xxx" level="DEBUG">
        <appender-ref ref="syslog" />
    </logger>
</configuration>
2 spring配置
logging:
  config: classpath:logback-boot.xml
3 使用
import org.slf4j.Logger;
import org.slf4j.LoggerFactory;
Logger logger = LoggerFactory.getLogger(Xxx.class);七 根据openapi定义文件生成接口定义代码
1 OpenAPI Generator
openapi定义和维护的工具很多,例如swaggerEditor
swagger-editor![]() https://editor-next.swagger.io/IDEA插件 OpenAPI Generator
https://editor-next.swagger.io/IDEA插件 OpenAPI Generator![]() https://plugins.jetbrains.com/plugin/8433-openapi-generatorapifox
https://plugins.jetbrains.com/plugin/8433-openapi-generatorapifox![]() https://apifox.com/ 后面2个工具生成代码引擎都是用的OpenAPI Generator。
https://apifox.com/ 后面2个工具生成代码引擎都是用的OpenAPI Generator。
这里介绍OpenAPI Generator进行服务端spring代码生成。
在OpenAPI Generator源代码中可以明显看出,这个工具可以多端运行,命令行、gradle插件、maven插件、在线生成。
这里介绍maven插件方式生成两种情况下的代码。
1.1 完整的springboot项目代码
pom.xml增加如下插件配置:
    <build>
        <plugins>
            <plugin>
                <groupId>org.openapitools</groupId>
                <artifactId>openapi-generator-maven-plugin</artifactId>
                <!-- RELEASE_VERSION -->
                <version>7.2.0</version>
                <!-- /RELEASE_VERSION -->
                <executions>
                    <execution>
                        <goals>
                            <goal>generate</goal>
                        </goals>
                        <configuration>
                            <inputSpec>${project.basedir}/src/main/resources/api.yaml</inputSpec>
                            <generatorName>spring</generatorName>
                            <library>spring-boot</library>
                            <configOptions>
                                <sourceFolder>src/gen/java/main</sourceFolder>
                            </configOptions>
                            <output>${project.basedir}/target/codegen</output>
                        </configuration>
                    </execution>
                </executions>
            </plugin>
        </plugins>
    </build>
生成代码如下:
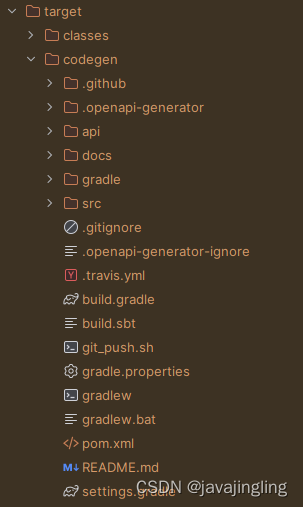
其中包含项目的构建文件(gradle、mavne),api文档、api定义文件、api的springboot代码。api代码如下:
其中包括服务端和客户端代码,启动类测试类等。 一般项目开发中不会使用这种方式生成,自己项目中只需要api定义controller和数据实体部分代码。
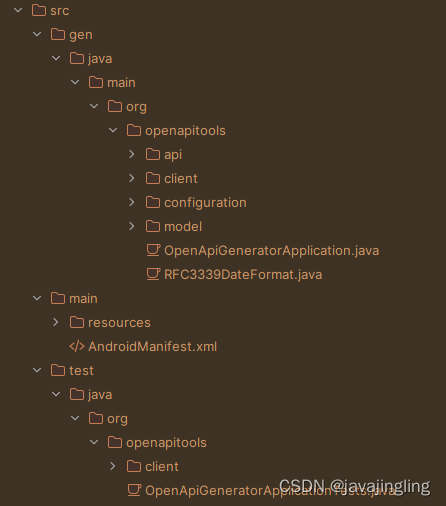
1.2 只有spring controller api和数据实体类代码
pom.xml中增加如下配置:
    <build>
        <plugins>
            <plugin>
                <groupId>org.openapitools</groupId>
                <artifactId>openapi-generator-maven-plugin</artifactId>
                <!-- RELEASE_VERSION -->
                <version>7.2.0</version>
                <!-- /RELEASE_VERSION -->
                <executions>
                    <execution>
                        <goals>
                            <goal>generate</goal>
                        </goals>
                        <configuration>
                            <inputSpec>${project.basedir}/src/main/resources/api.yaml</inputSpec>
                            <generatorName>spring</generatorName>
                            <library>spring-boot</library>
                            <apiPackage>com.xxx.api.define</apiPackage>
                            <modelPackage>com.xxx.api.define.model</modelPackage>
                            <generateApis>true</generateApis>
                            <generateModels>true</generateModels>
                            <generateSupportingFiles>false</generateSupportingFiles><!--此处设置为true,会生成完整的spring boot项目-->
                            <generateApiDocumentation>false</generateApiDocumentation>
                            <generateApiTests>false</generateApiTests>
                            <generateModelTests>false</generateModelTests>
                            <skip>false</skip>
                            <addCompileSourceRoot>false</addCompileSourceRoot>
                            <output>${project.basedir}</output>
                            <skipValidateSpec>true</skipValidateSpec>
                            <skipIfSpecIsUnchanged>true</skipIfSpecIsUnchanged>
                            <configOptions>
                                <dateLibrary>java17</dateLibrary>
                                <useJakartaEe>true</useJakartaEe>
                                <interfaceOnly>true</interfaceOnly>
                                <skipDefaultInterface>true</skipDefaultInterface>
                                <returnSuccessCode>true</returnSuccessCode>
                                <useResponseEntity>false</useResponseEntity>
<!--                                <delegatePattern>true</delegatePattern>-->
                            </configOptions>
                        </configuration>
                    </execution>
                </executions>
            </plugin>
        </plugins>
    </build>
skipIfSpecIsUnchanged:设置为true,在接口定义文件修改后,才重新生成接口代码。避免每次编译都重新生成。
hideGenerationTimestamp: 设置为true,生成文件不带时间戳,避免未修改的接口在生成文件时,文件发生变动。生成文件带生成时间,每次生成都会造成文件的变动,对于代码同步十分不友好 。
生成代码如下:
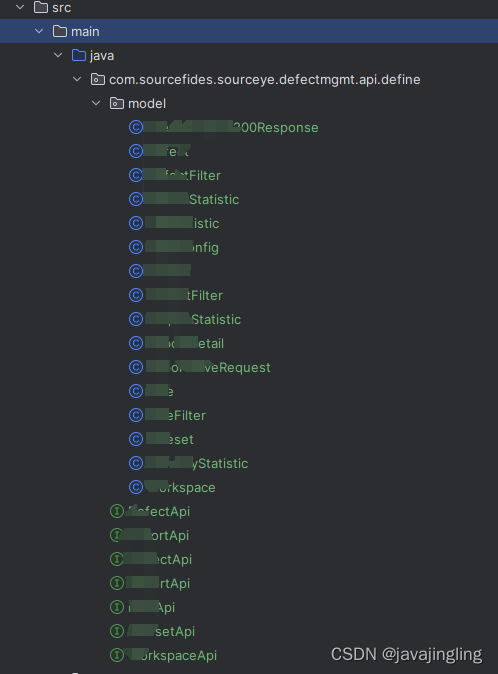
生成的代码可以放在单独的模块。在具体实现接口的模块,引用该模块,实现相应接口即可。
例如:
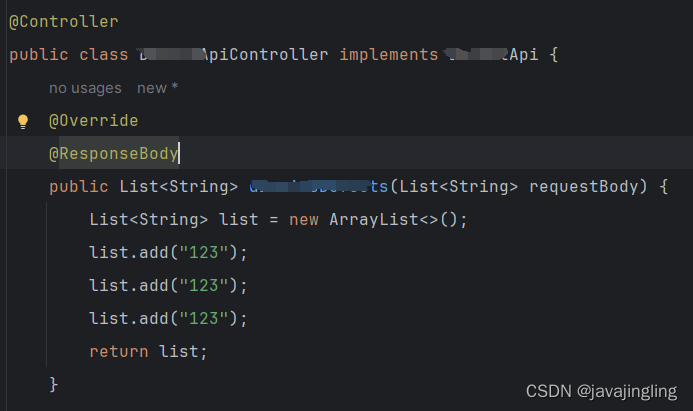
在后续接口变更之后,重新编译接口定义模块。如果接口发生了变化,例如接口参数变化,新增了接口等,实现接口的模块一般都无法编译通过,这就一定程度上确保了代码和接口定义文件的一致性。
2 apifox生成代码按钮位置


八 jsonschema 转 pojo
idea配置 run configuration
pom.xml增加配置
    <build>
        <plugins>
            <plugin>
                <groupId>org.jsonschema2pojo</groupId>
                <artifactId>jsonschema2pojo-maven-plugin</artifactId>
                <version>1.2.1</version>
                <configuration>
                    <sourceDirectory>${basedir}/src/main/resources/schema</sourceDirectory>
                    <targetProject>${basedir}/src/main/java</targetProject>
                    <targetPackage>com.example.types</targetPackage>
                </configuration>
            </plugin>
        </plugins>
</build> 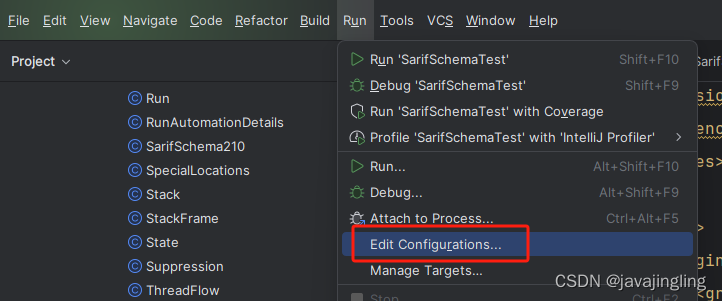
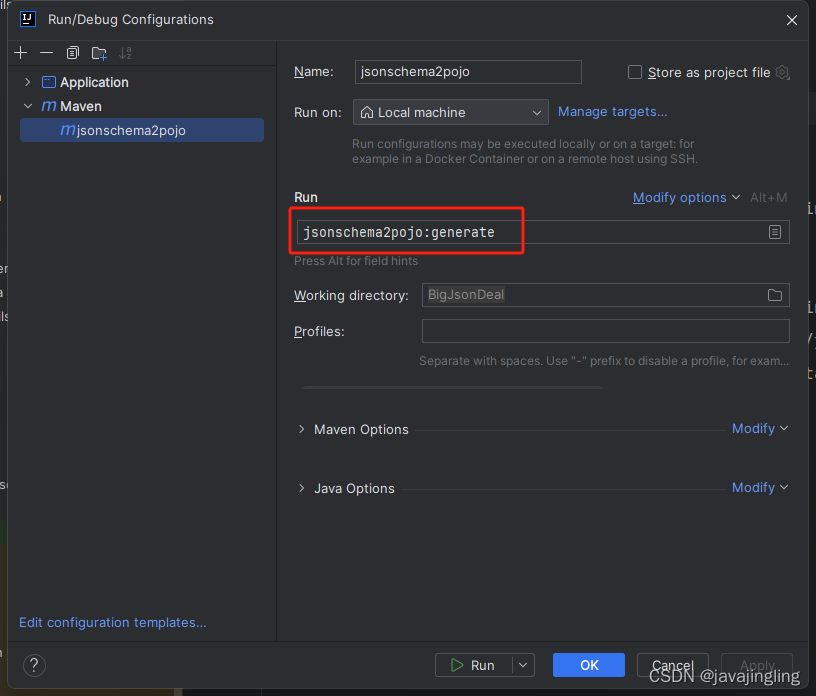
配置后,双击下面图标即可生成pojo类,生成的文件在target目录下,需要copy到需要的位置。
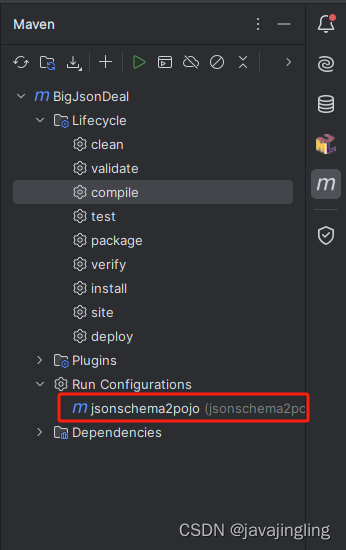
也可以直接在命令行运行命令: mvn jsonschema2pojo:generate


 2603
2603


 被折叠的 条评论
为什么被折叠?
被折叠的 条评论
为什么被折叠?
 到【灌水乐园】发言


