


Java安全-01
文章目录
前置基础
基于SpringBoot框架展开开发,首先要了解一下整个项目的分层结构
从上到下:
- 客户端界面:表现层 UI层 界面层
- 服务层/业务层:直接为客户端提供的服务或功能
- 领域层:系统内的领域活动
- DAO层:数据访问对象,通过领域实体对象操作数据库
实战代码结构:
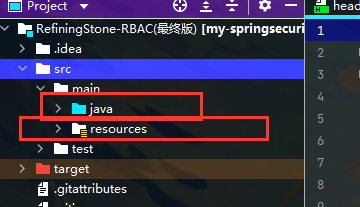
其实最外层主要分为两块:
- java目录:主要存放Java代码
- resources目录:主要存放静态资源文件,如html、js、css等
进入到内层:
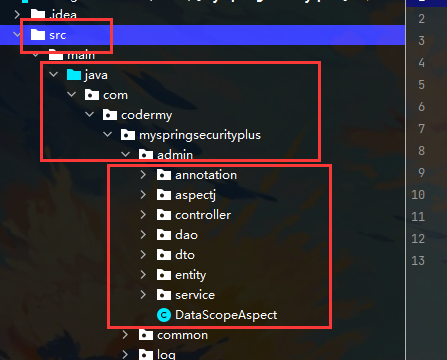
- Java下:
- annotation:放置项目自定义注解
- Controller:存放控制器,接收从前端传来的参数,负责对访问控制进行转发,各类基本参数校验,或者不复用的业务简单处理
- dao层:数据访问层,与数据库进行交互,负责数据库操作,在Mybites框架中存放自定义的Mapper接口
- entity:存放实体类
- interceptor:拦截器
- service:存放服务类,负责业务模块逻辑处理,其中包含两层:一是Service,用来声明接口;二是ServiceImpl,作为实现类实现接口中的方法
- utils:存放工具类
- dto:存放数据传输对象(Data Transfer Object), 如请求参数和返回结果
- vo:视图对象(View Object)用于封装客户端请求的数据,防止部分数据泄露,保证数据安全
- constant:存放常量
- filter:存放过滤器
- resources目录下
- mapper:存放Mybites的mapper.xml文件
- static:静态资源文件目录(JavaScript、CSS、图片),在这个目录中所有文件可以被直接访问
- template:存放模板文件
- application.properties:Spring Boot默认配置文件

这里的API层 就相当于Controller层
- 解释一下Controller和Service之间的区别
Controller层只会从前端接收数据,然后进行数据转发到Service层,不做具体的操作
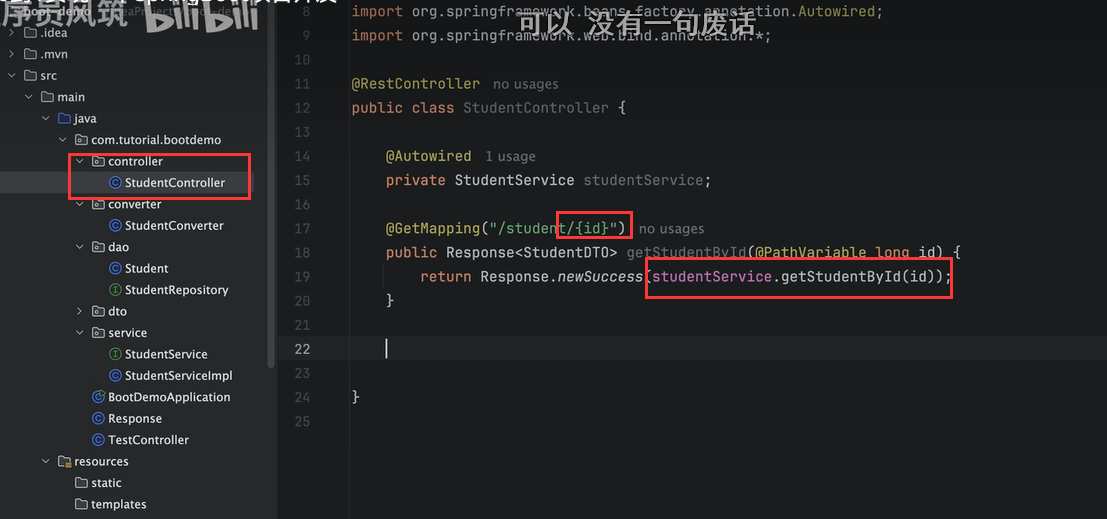
一些参数的判断验证,在Controller层进行验证,比如想上传文件的话,可以先在Controller层验证文件名后缀
小demo开发记录
文件上传
为了方便整个系统的开发,我们要规范化文件上传的接口,放在Service层中,保证可以在任何界面都可以去调用并进行上传
首先是Controller层
package com.example.thymeleaf.controller;

import com.example.thymeleaf.service.UploadService;
import org.springframework.beans.factory.annotation.Autowired;
import org.springframework.web.bind.annotation.*;
import org.springframework.web.multipart.MultipartFile;
import java.io.IOException;
import org.springframework.web.servlet.mvc.support.RedirectAttributes;

@RestController
@RequestMapping("/upload")
public class UploadController {
    //解释一下自动装配的功能:使得控制器类能够使用服务类的方法而无需手动创建服务类的实例
    @Autowired
    private UploadService service;

    @GetMapping
    public String showUploadForm() {
        return "<!DOCTYPE html>"
                + "<html><head><title>File Upload</title></head>"
                + "<body><h1>Upload a File</h1>"
                + "<form method=\"POST\" enctype=\"multipart/form-data\" action=\"/upload\">"
                + "<input type=\"file\" name=\"file\" />"
                + "<button type=\"submit\">Upload</button>"
                + "</form></body></html>";
    }

    @PostMapping
    public String handleFileUpload(@RequestParam("file") MultipartFile file,
                                   RedirectAttributes redirectAttributes) {

        try {
            String fileName = service.uploadFile(file);
            return "You successfully uploaded '" + fileName + "'";

        } catch (IOException e) {
            e.printStackTrace();
            return "Failed to upload '" + file.getOriginalFilename() + "'";
        }
    }
}
路径是/upload 直接访问是get请求 会展示表单
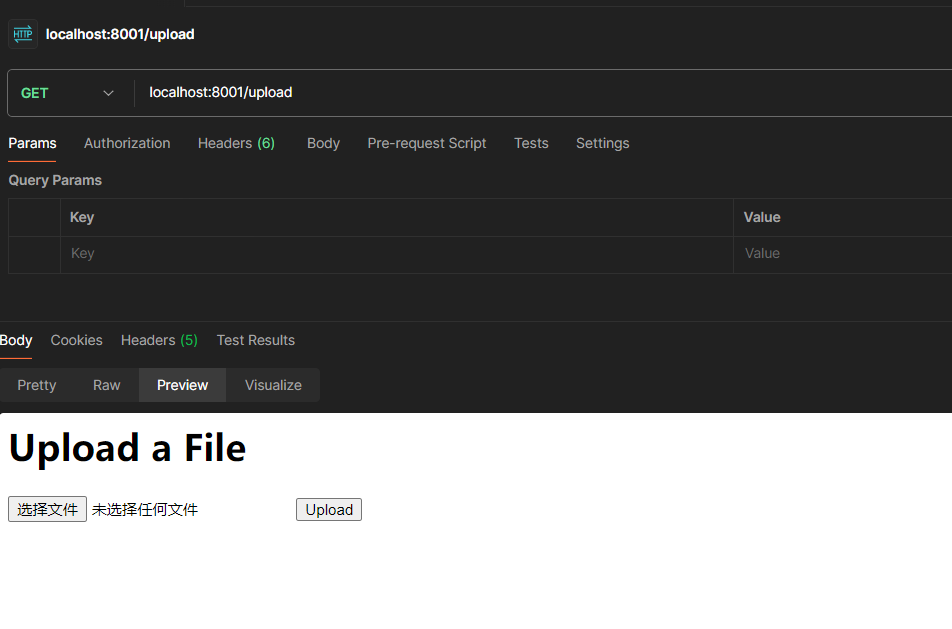
点击upload上传文件,是post请求 会上传文件
Service层:
package com.example.thymeleaf.service;

import org.springframework.web.multipart.MultipartFile;

import java.io.IOException;

public interface UploadService {

    String uploadFile(MultipartFile file) throws IOException;

}
具体方法实现:
package com.example.thymeleaf.service.impl;

import com.example.thymeleaf.service.UploadService;
import org.springframework.beans.factory.annotation.Value;
import org.springframework.stereotype.Service;
import org.springframework.web.multipart.MultipartFile;

import java.io.File;
import java.io.IOException;

@Service
public class UploadServiceImpl implements UploadService {
    @Value("${file.upload-dir}")
    private String uploadDir;

    @Override
    public String uploadFile(MultipartFile file) throws IOException{
        if(file.isEmpty()){
            throw new IOException("Failed to upload empty file.");
        }
        File dest = new File(uploadDir + "/" + file.getOriginalFilename());
        file.transferTo(dest); //将上传的文件保存到指定的目标文件。

        return file.getOriginalFilename();
    }

}
其中记得在配置文件中指定一下目录

课程学习记录
初始配置阶段
学习守则:学一个东西前,先自己列一个学习路线,有目标有方向一步一步来
0x00 微服务阶段历史
all in one:所有功能
微服务架构:把功能进行分区存储,对某个功能
了解Spring家族:
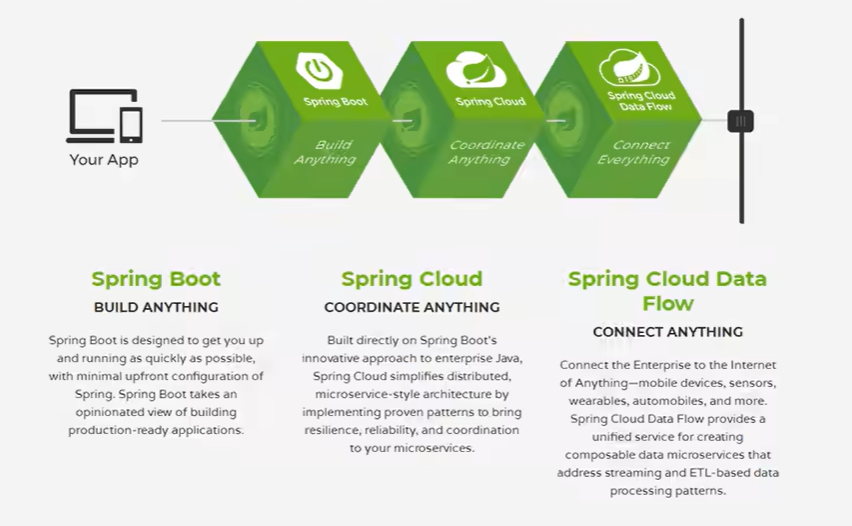
Spring Boot:构建一切
Spring Cloud:协调一切
Spring Cloud Data Flow:连接一切
0x01 第一个SpringBoot程序
玩一下,修改banner
https://www.bootschool.net/ascii-art/search
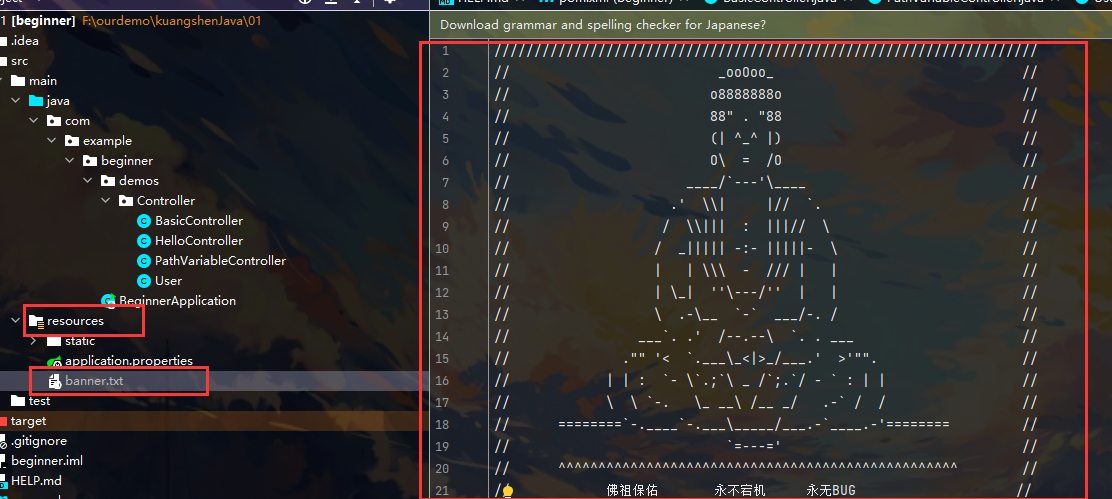
在source目录下 创建banner.txt文件即可
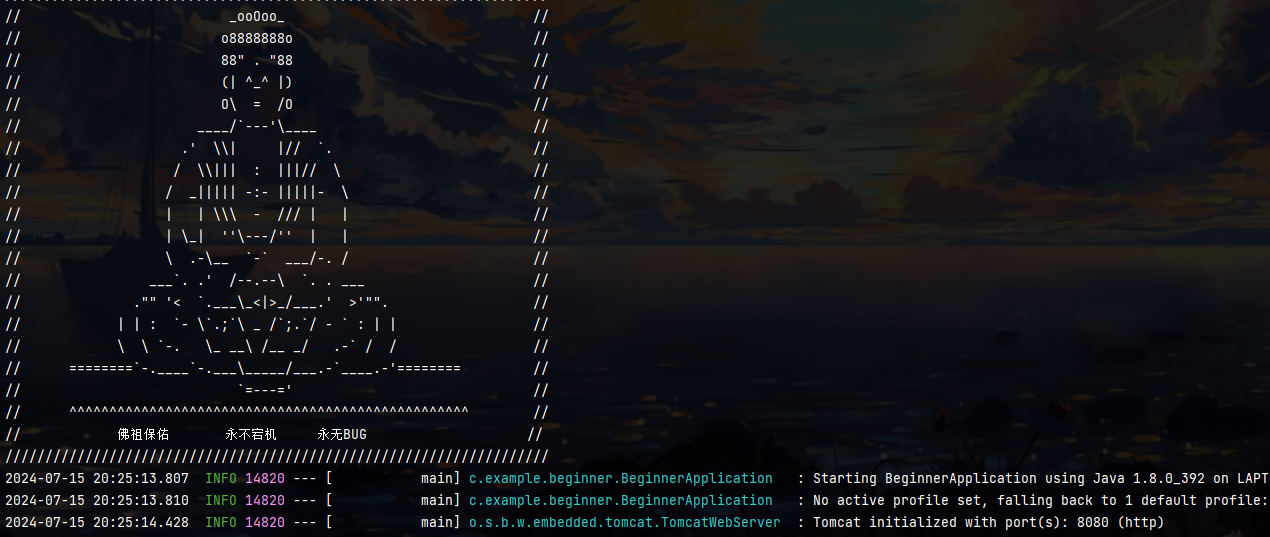
6 成功了
0x02 原理初探
自动配置:
pom.xml:
- Spring-boot-dependencies:核心依赖在父工程中
- 在引入Springboot依赖 不需要指定版本 因为有些版本仓库
启动器:
-
<dependency>
    <groupId>org.springframework.boot</groupId>
    <artifactId>spring-boot-starter-web</artifactId>
</dependency>
starter后面指定场景,上面这个就会棒我们自动导入web环境所有的依赖
主程序:
//@SpringBootApplication : 解释一下这个注解 这个是标注这个是Springboot的一个应用  如果没有 直接整个崩掉
// 作用就是:启动类下的所有资源被导入
@SpringBootApplication
public class BeginnerApplication {

    public static void main(String[] args) {
        //将Springboot启动
        SpringApplication.run(BeginnerApplication.class, args);
    }

}
解释一下其中的注解,点进去读源码
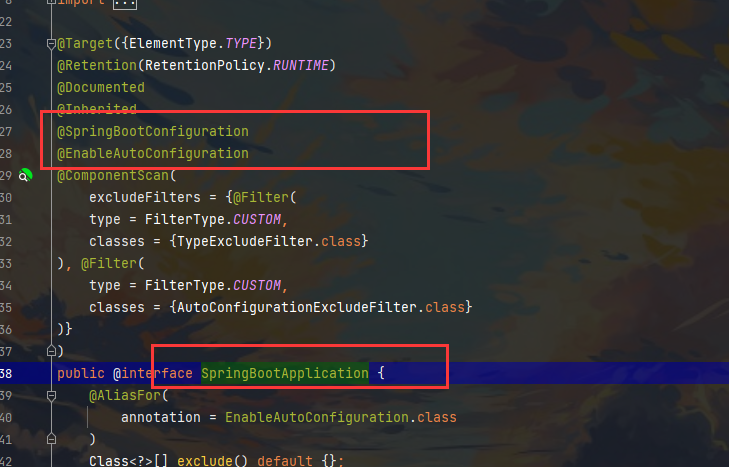
- 注解
@SpringBootConfiguration : Springboot的配置
		@Configuration:  spring配置类
		@Component : 说明这是一个spring的组件

@EnableAutoConfiguration : 自动配置
		@AutoConfigurationPackage : 自动配置包
			@Import({Registrar.class}) : 导入选择器   注册
		@Import({AutoConfigurationImportSelector.class})
0x03 SpringBoot配置文件
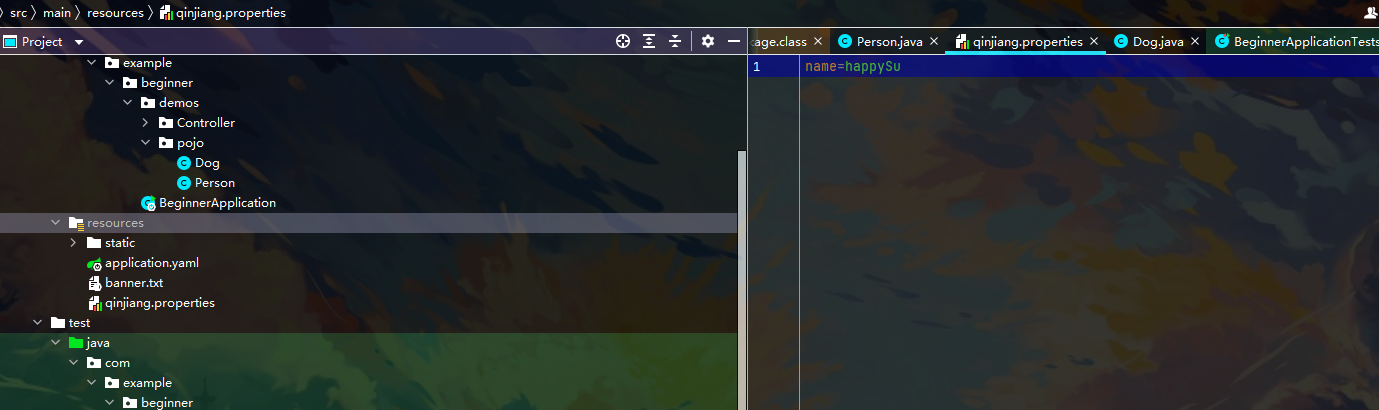
一般操作 首先删除自动生成的application.properties
然后新建一个配置文件application.yaml 修改下后缀 名字不需要改变
介绍一下两者的区别:
- application.properties
- 语法结构:key=value
- application.yaml
- 语法结构:key: value (注意这个地方在冒号后面有一个空格)
yaml基础语法:
#普通的key-value
name: qinjing


#对象
student:
	name: qinjiang
	age: 3

#行内写法
student: {name: qinjiang,age: 3}

#数组  两个空格
pets:
  - cat
  - dog
  - pig

pets: [cat, dog, pig]
之所以使用yaml 是因为可以给实体类赋值
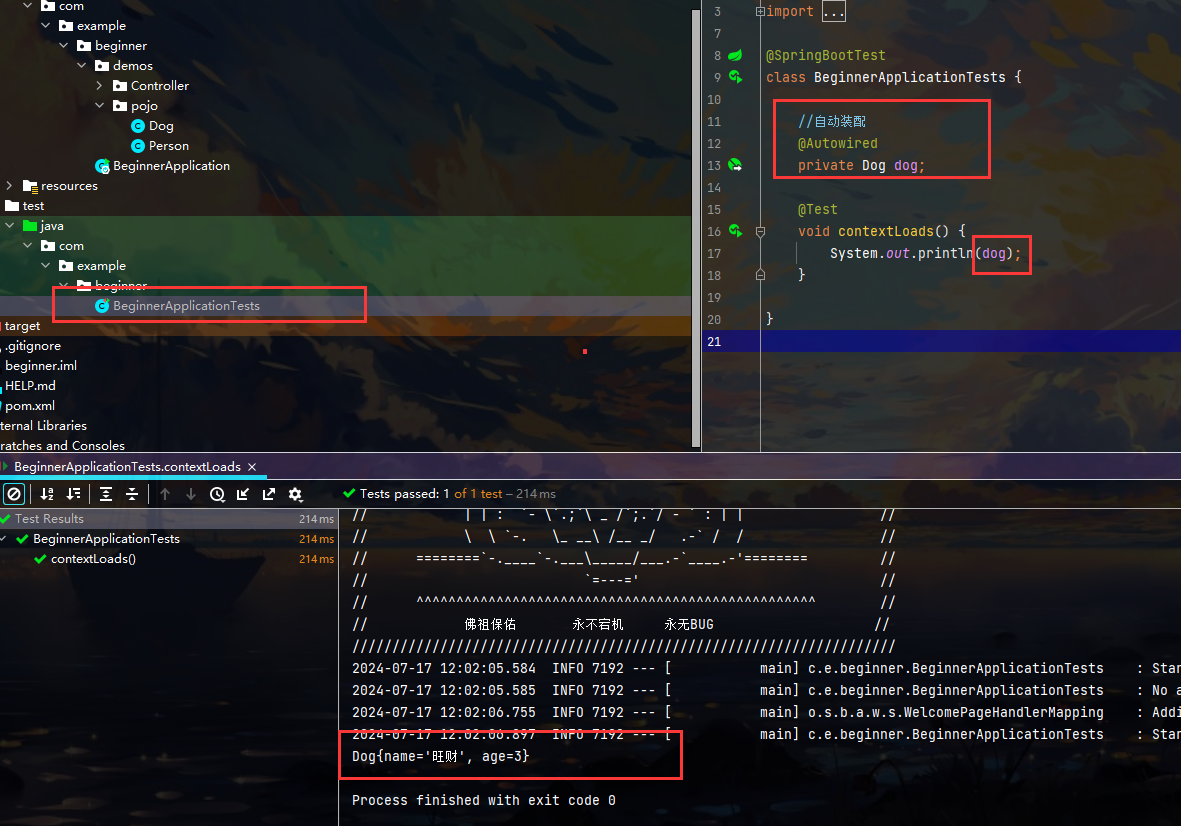
0x04 给属性赋值的几种方法
首先可以使用注解
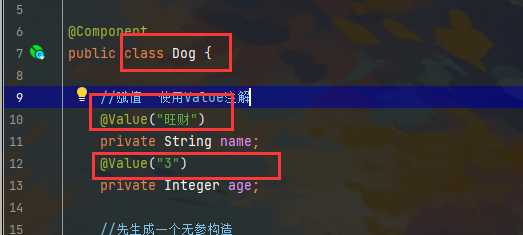
来test里面测试一下
第二种方法:在yaml配置文件中赋值 核心
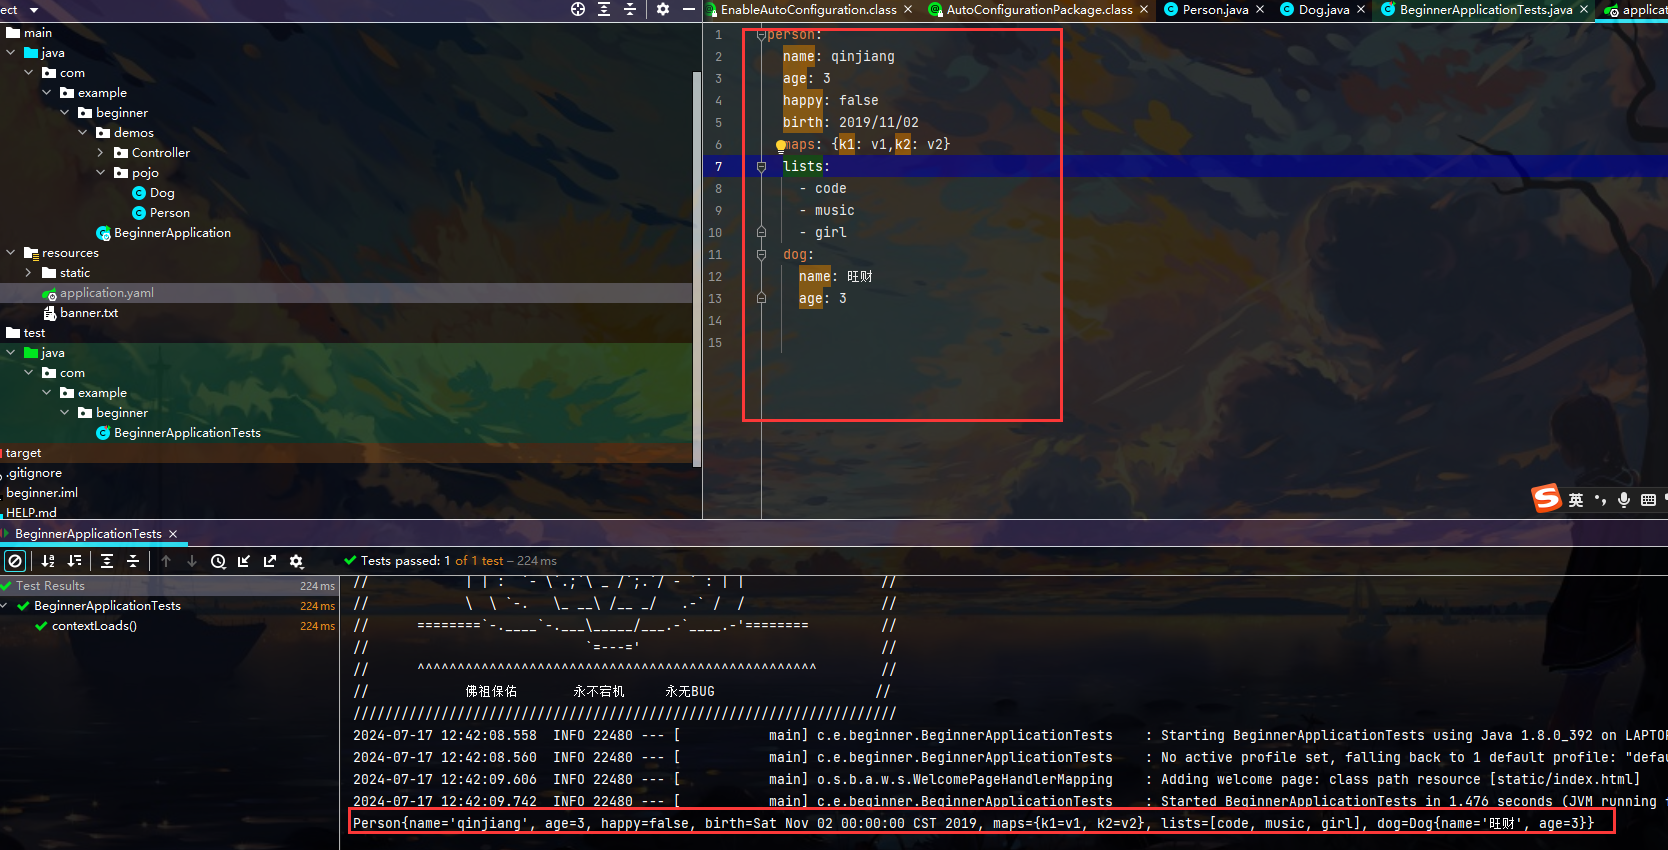
注意之所以能注入成功,还需要设置一些配置
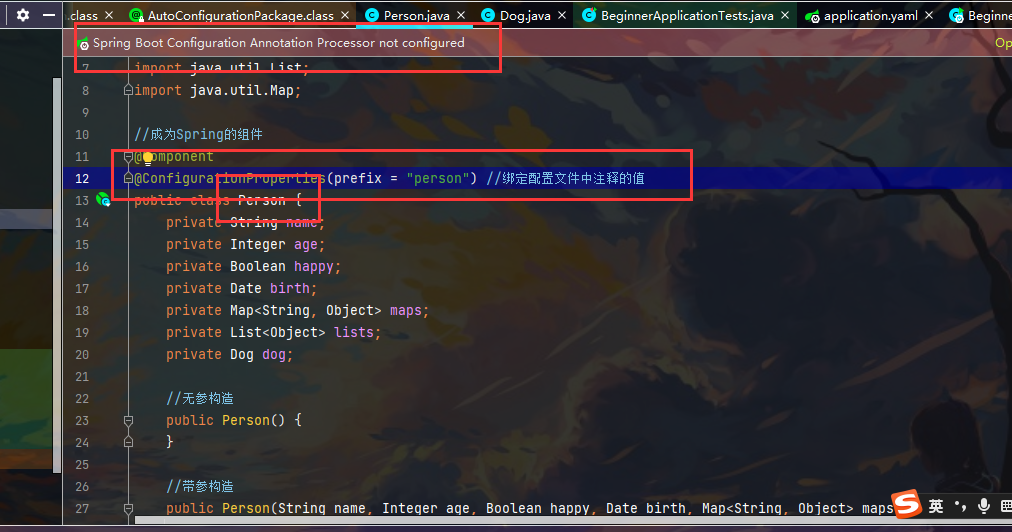
上面爆红 不影响工作 这是去yaml中找person 去注入数据
可玩性:直接写一些占位符


表达式
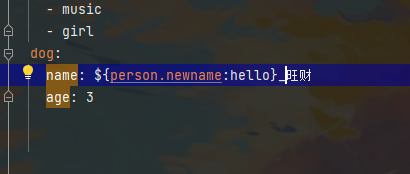
如果前面这个参数存在 则读取参数 否则直接是hello
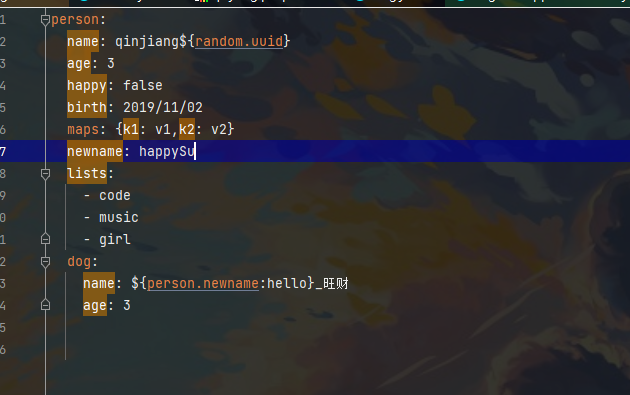

松散绑定:

注意一下就好 以后看yaml文件 如果看到横杠分隔 知道怎么个事就好
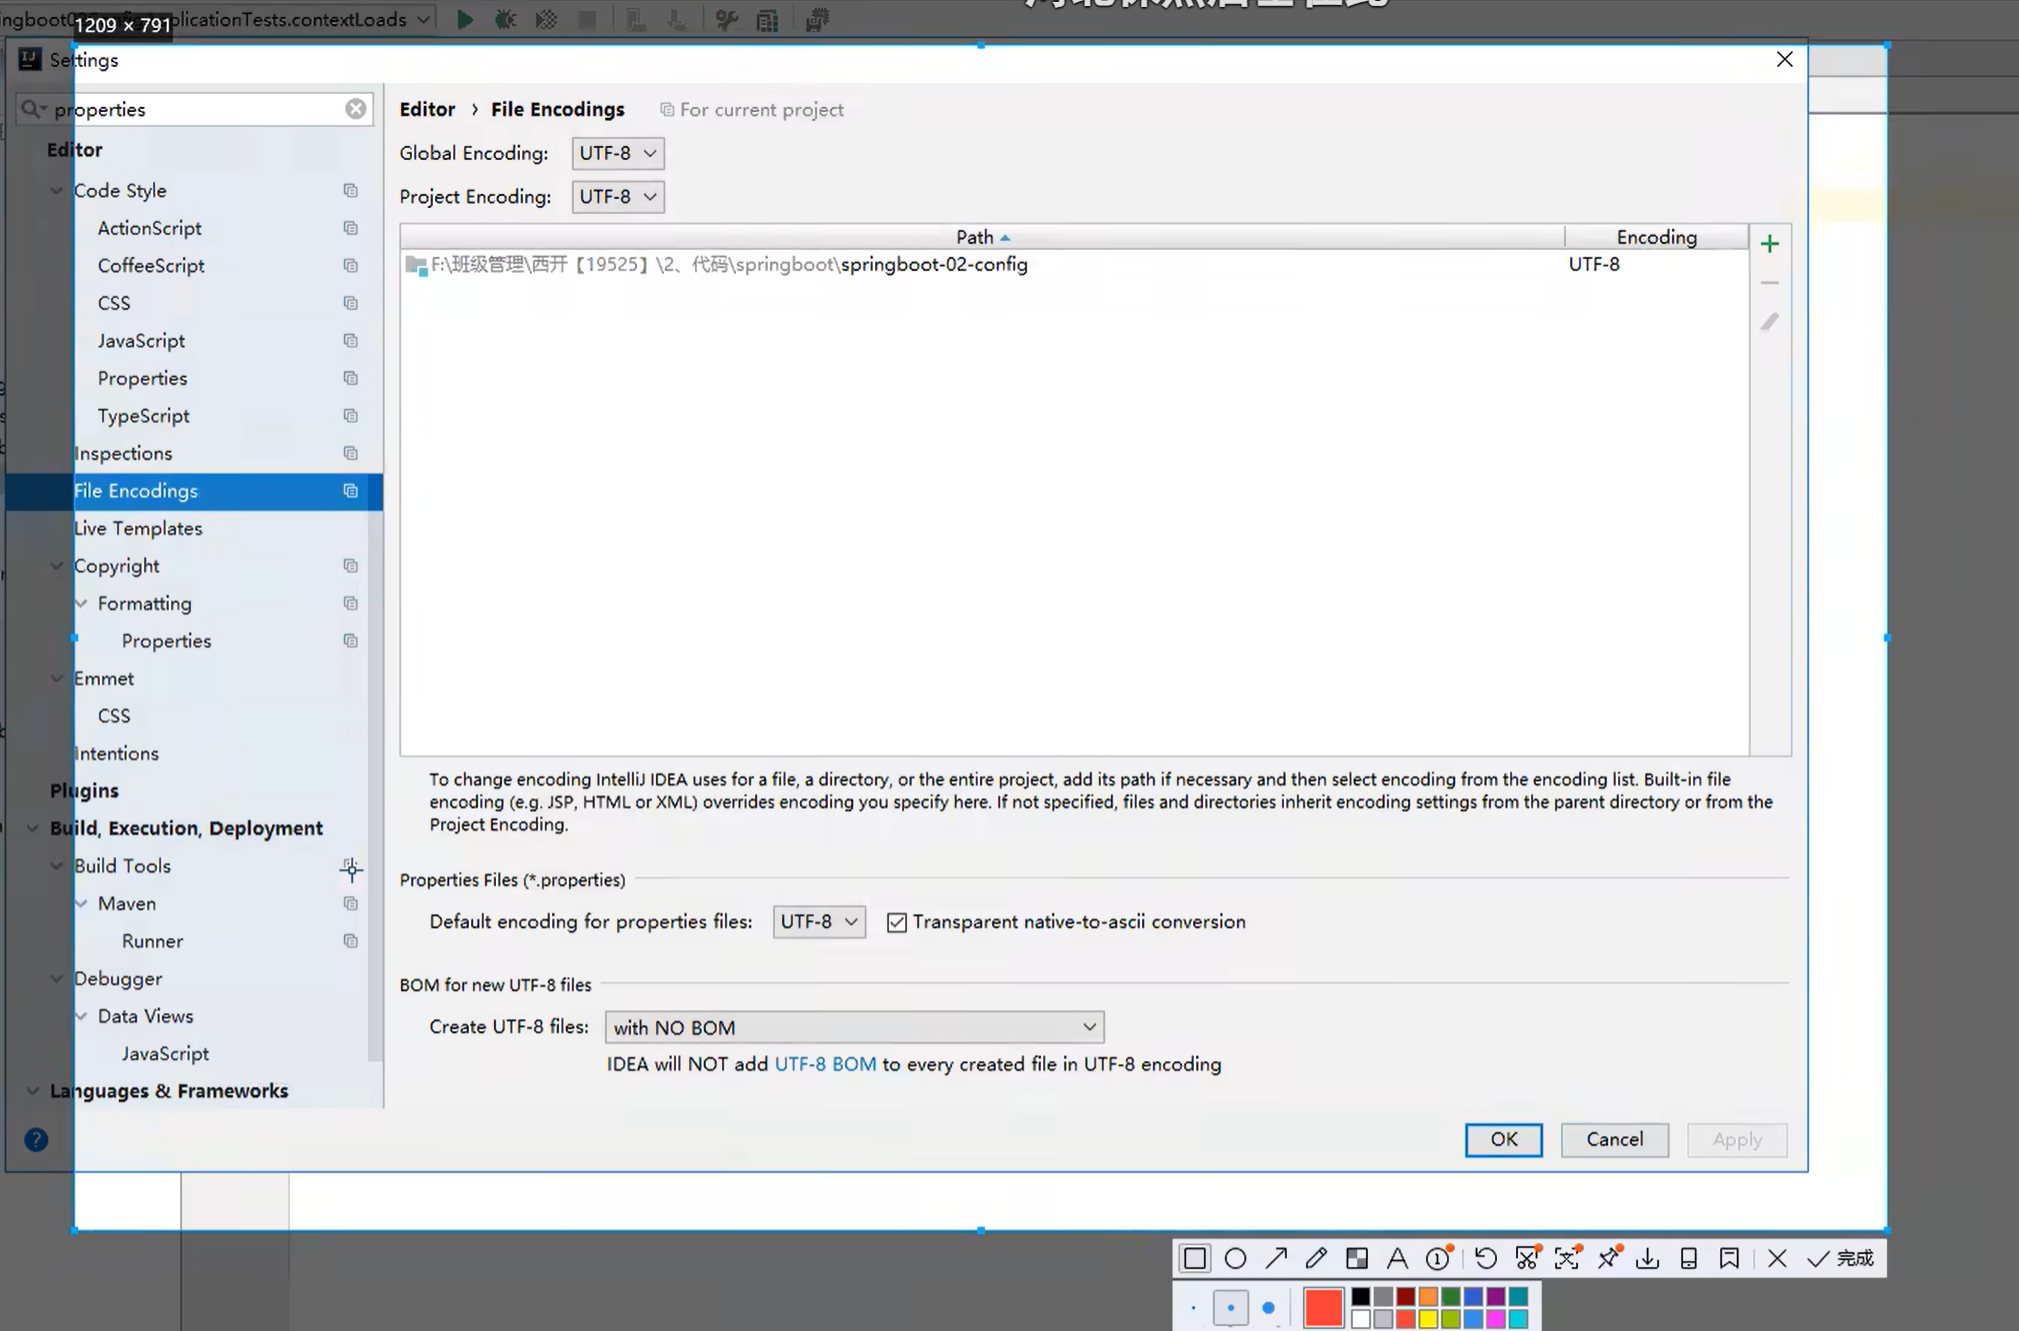
第三种方法 配置properties
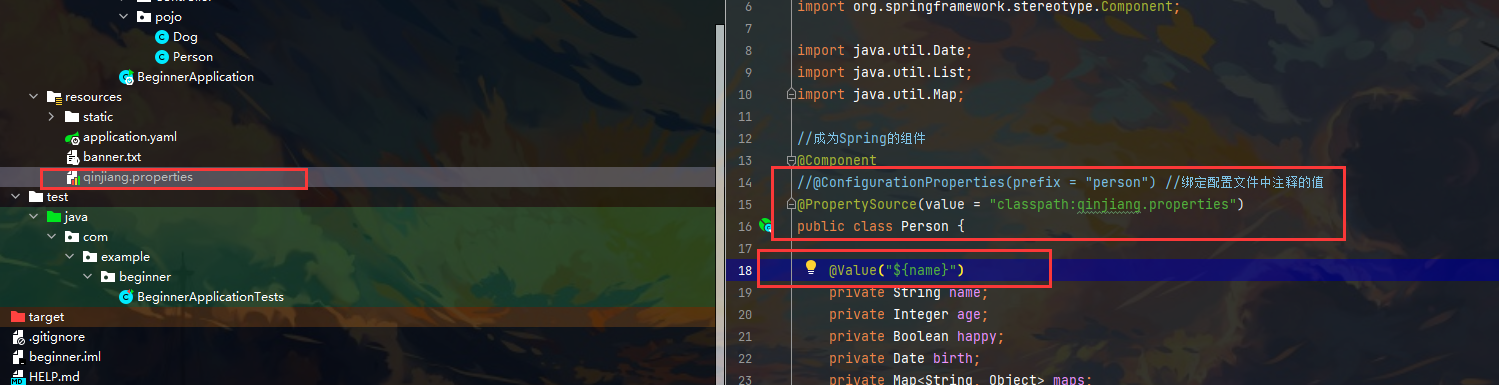
嘿嘿 成功

properties防止乱码小技巧:
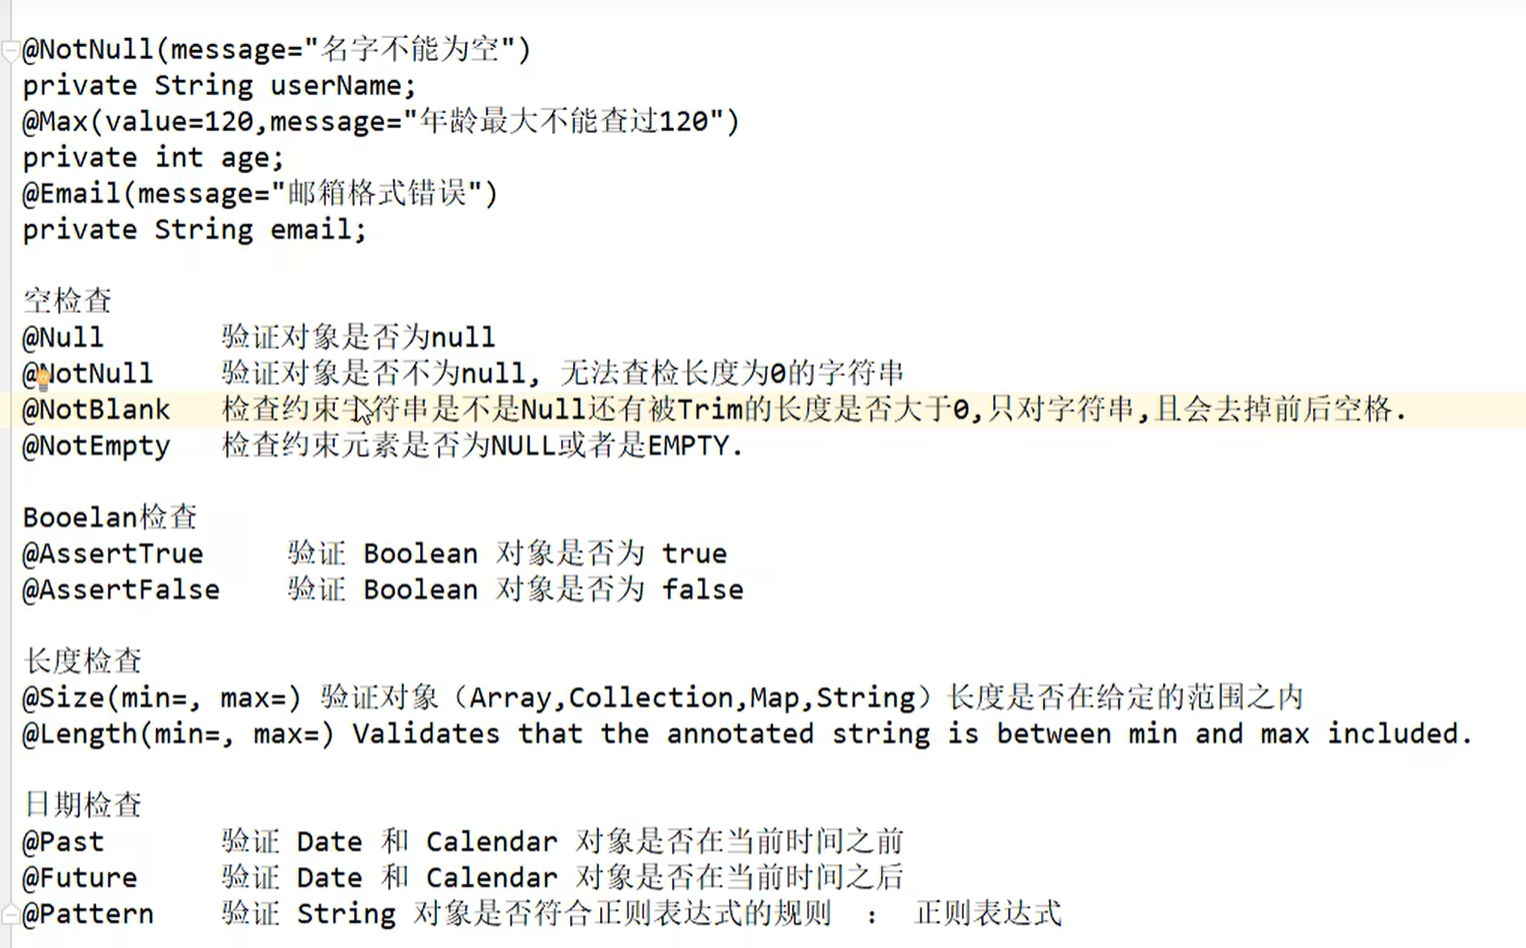
0x05 JSR303校验
在字段加一层过滤器验证,保证数据的合法性
使用方法
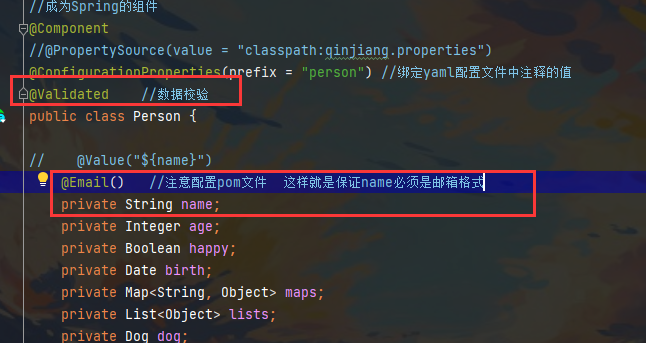
注意一定要在pom文件中配置
<!--验证数据的依赖-->
<dependency>
    <groupId>org.springframework.boot</groupId>
    <artifactId>spring-boot-starter-validation</artifactId>
</dependency>
可以修改默认报错语句

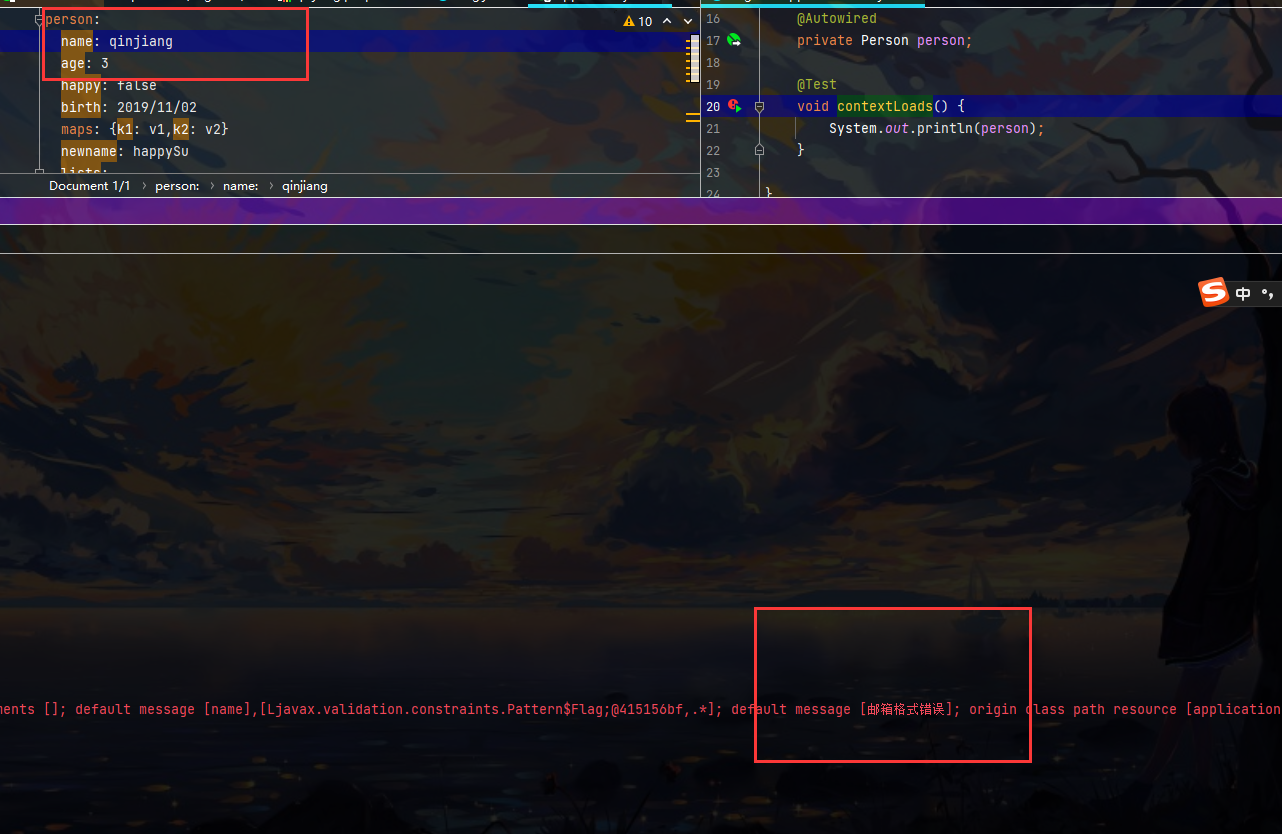
jsr303 校验语句
0x06 多环境配置
在配置application.properties时 有默认环境 测试环境 上线环境 但是逐个修改很麻烦 可以直接进行多环境配置
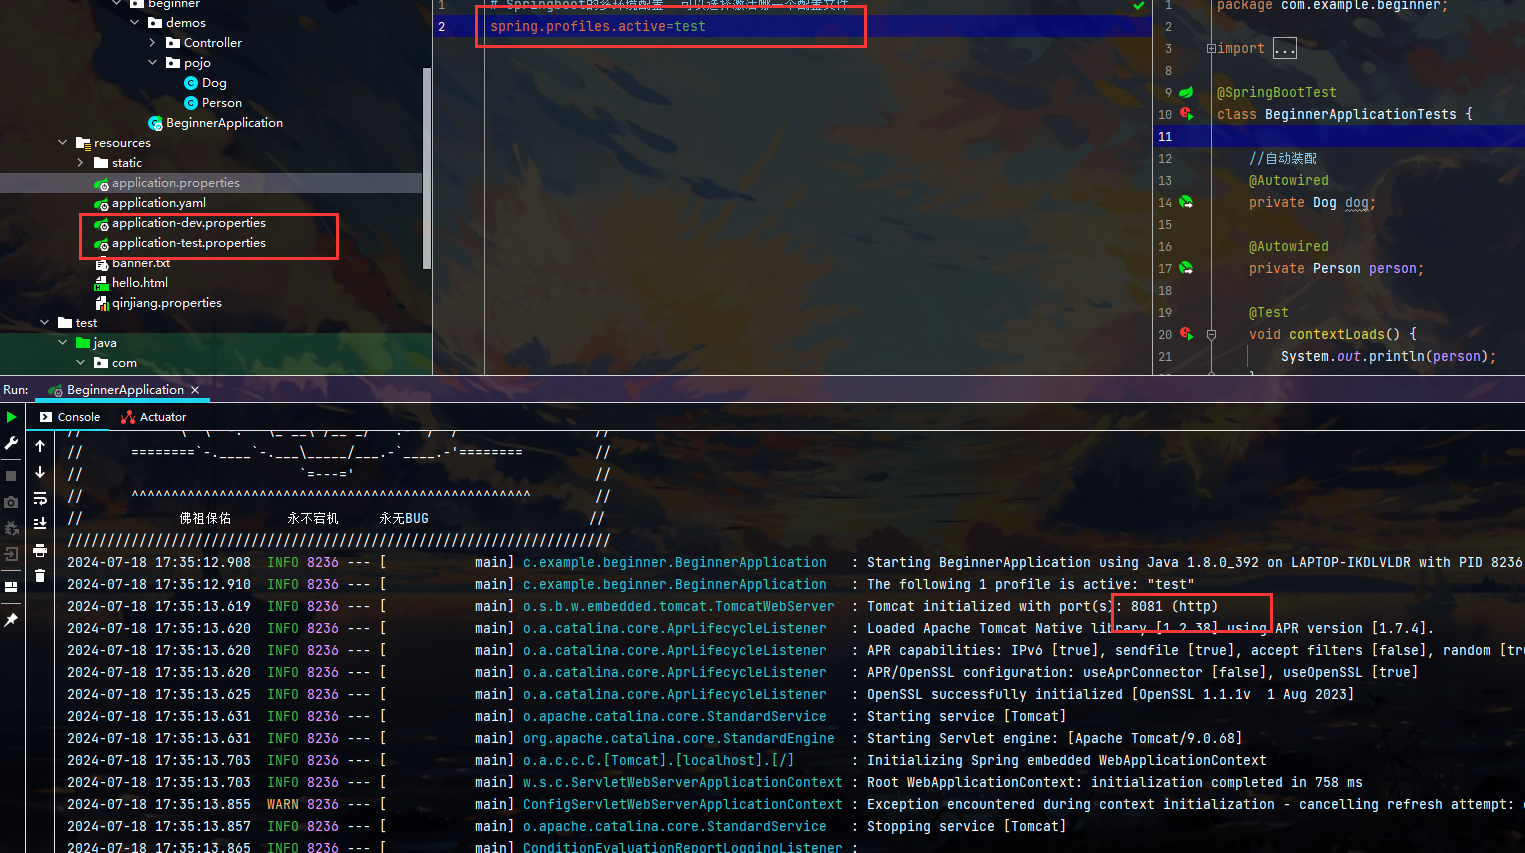
下面凸显yaml的多文档模式的便捷
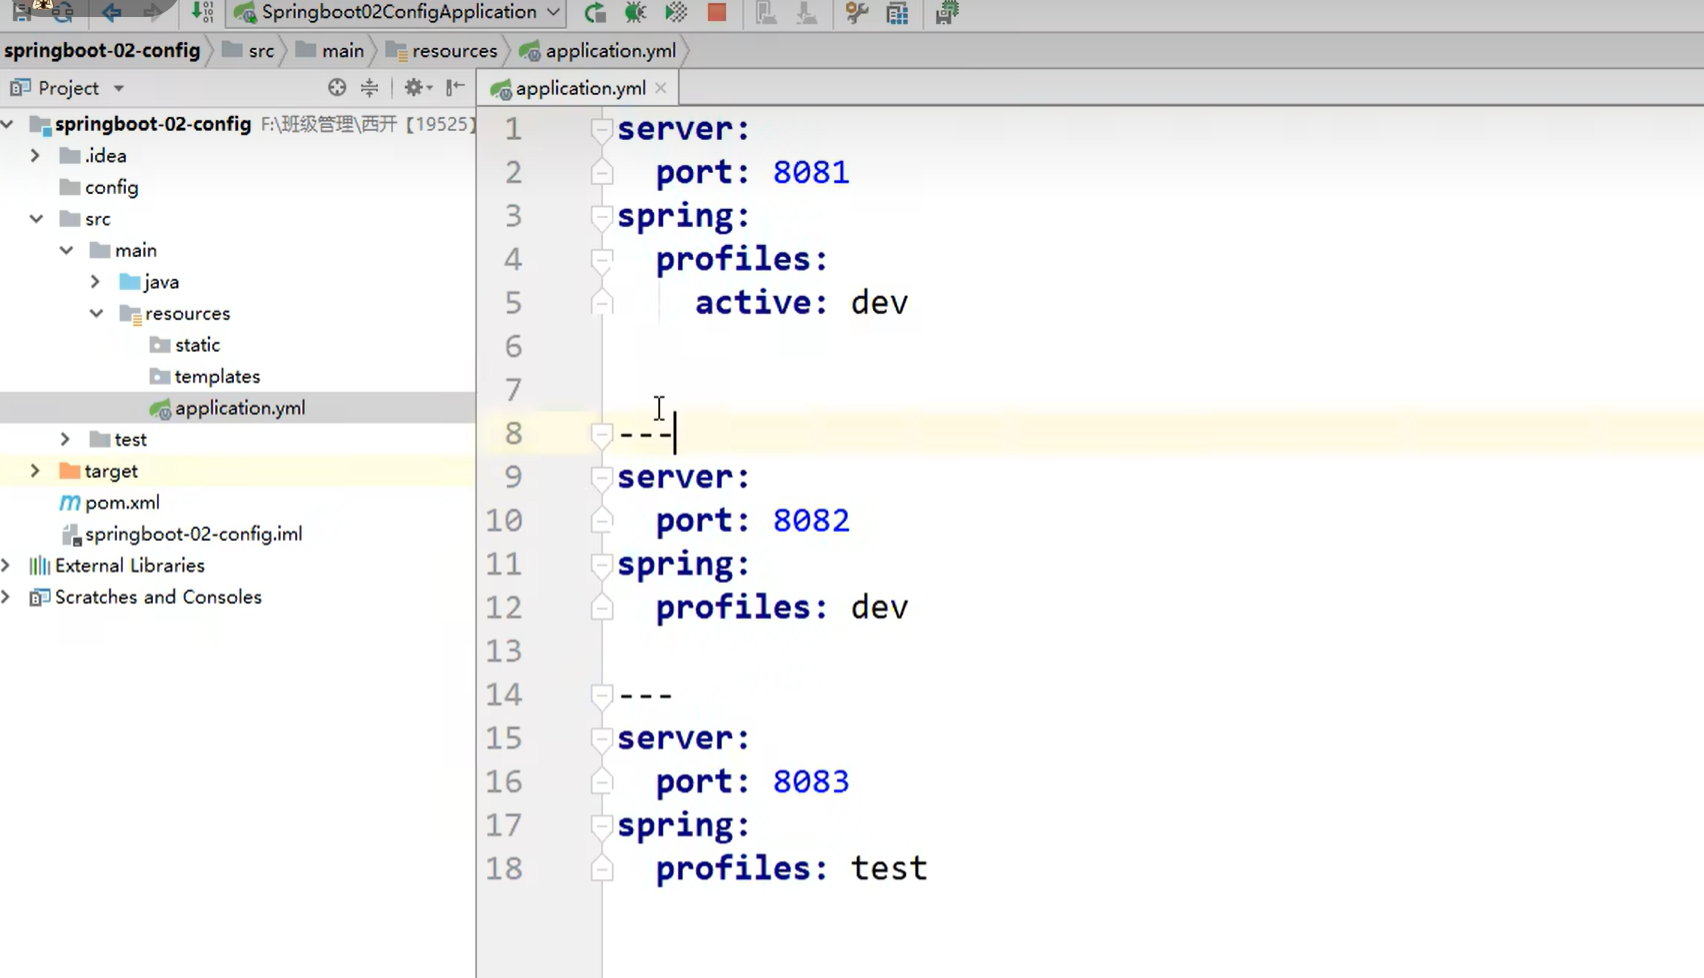
分割线就是划分文件
0x07 再探自动配置原理
学这个的目的 是让我们更会写内容 在思考中写配置 而不是看文档背
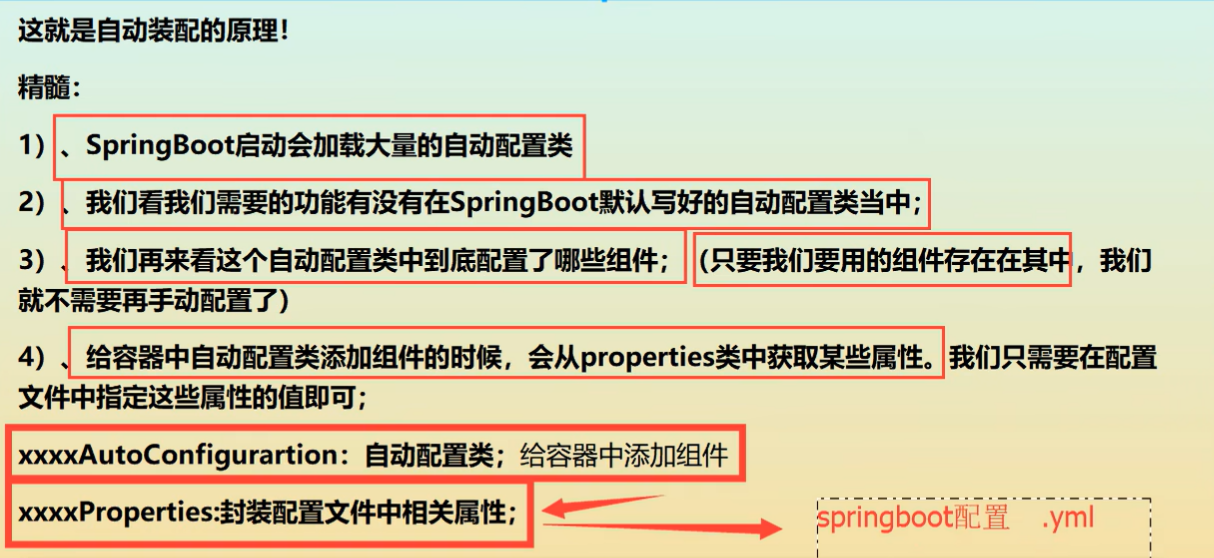
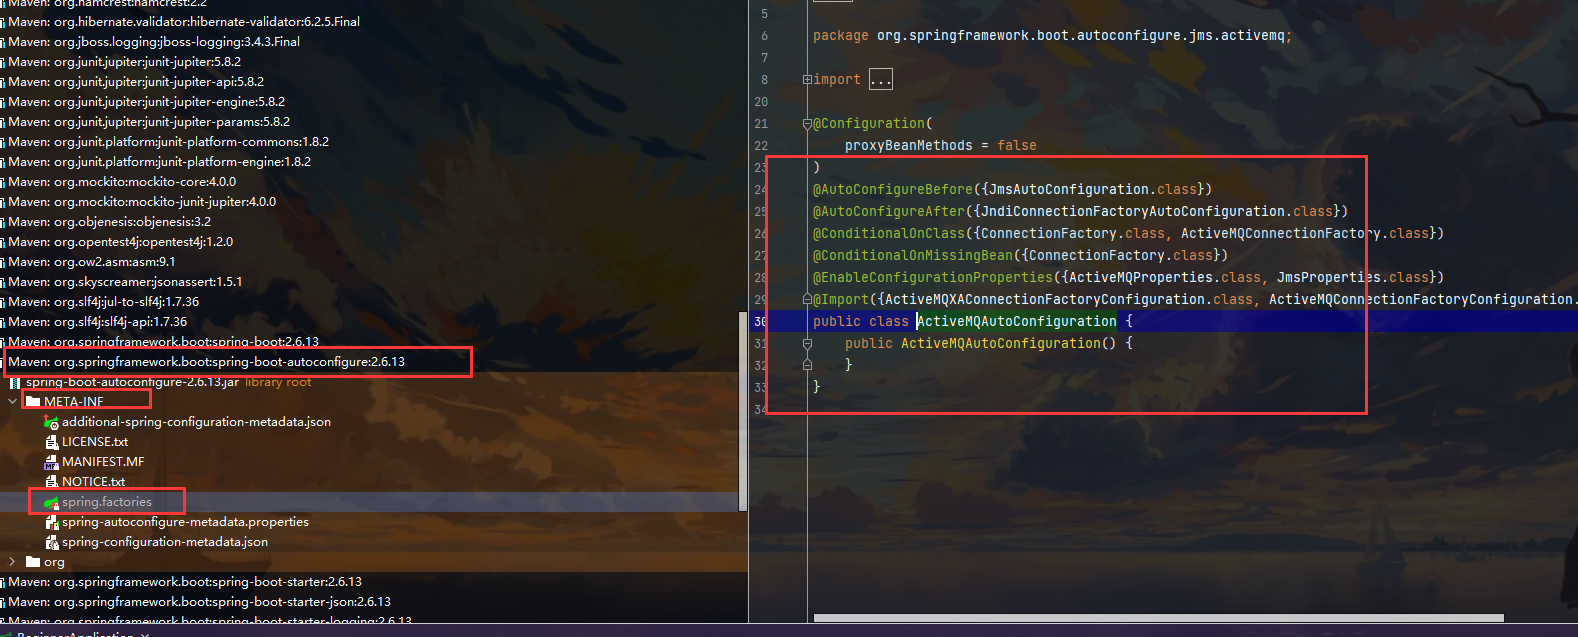
遇到什么 看什么 配置就是在pom中加一个starter启动即可
开发阶段
0x00 SpringBoot Web开发
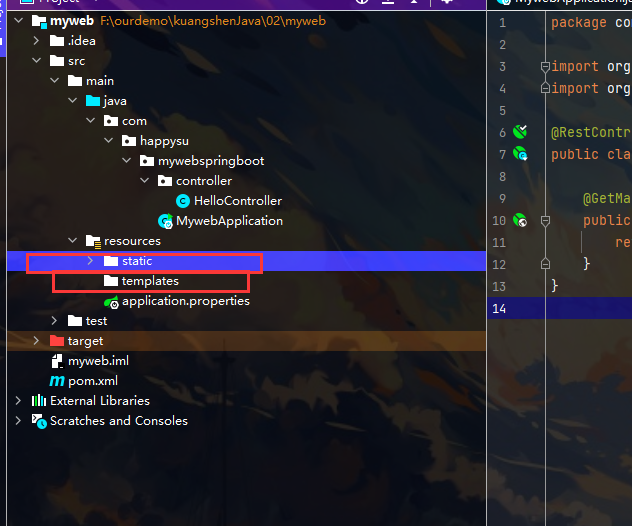
目录结构:
在resources中 static放静态资源 templates放模版
导入静态资源
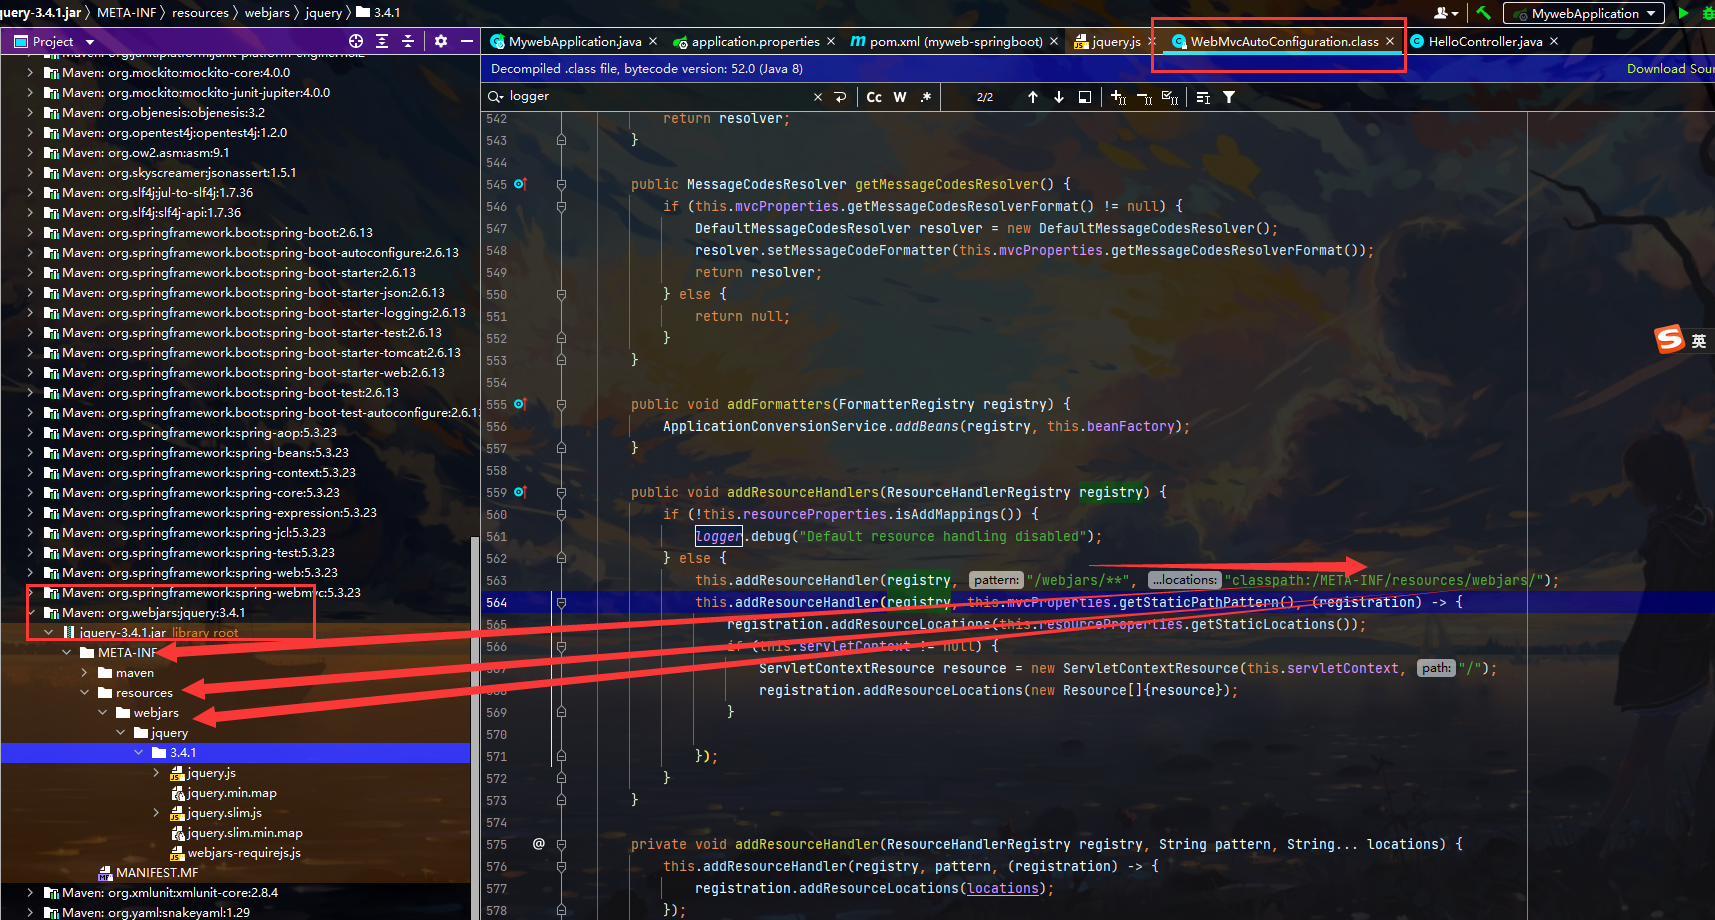
前提引入maven
<dependency>
    <groupId>org.webjars</groupId>
    <artifactId>jquery</artifactId>
    <version>3.4.1</version>
</dependency>
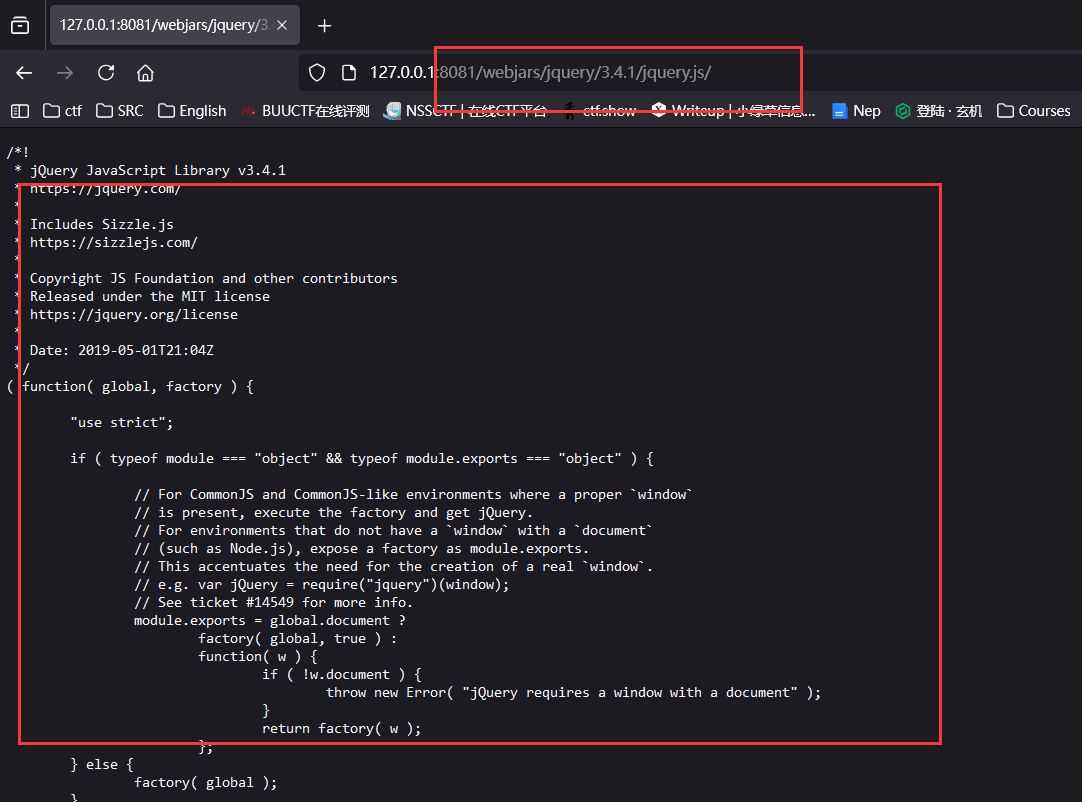
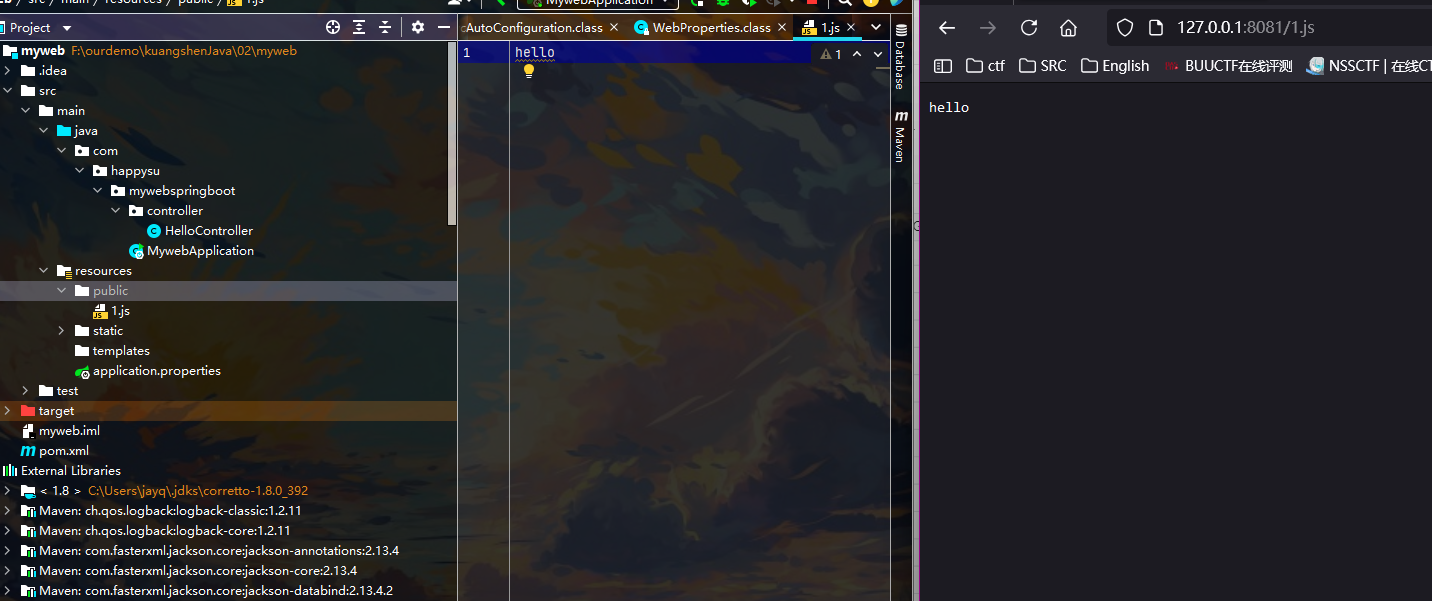
访问成功拿下
- 探索哪些可以直接被访问到
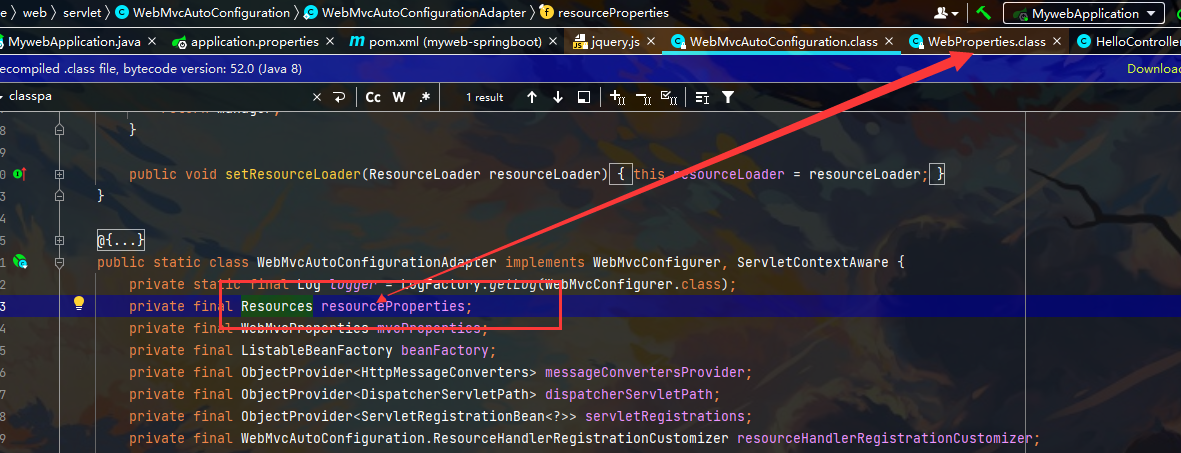
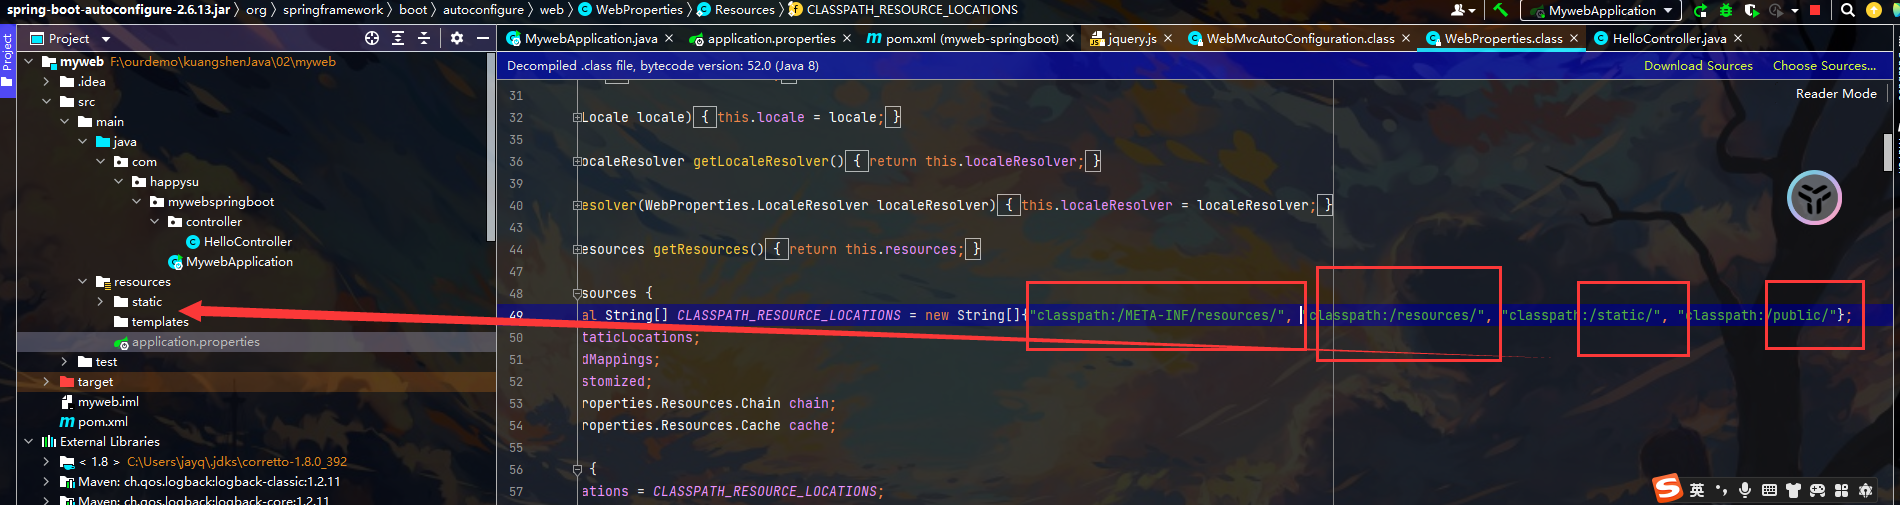
成功访问public文件夹下的内容 注意: 优先级 按这个顺序 第一个就是在当前目录下 第二个指还可以创建一个resources文件夹
一般习惯:
- public:大家公共访问的资源
- resources:upload大家上传的资源
- static:index.html首页 + 静态资源 比如图片之类的
- templates:所有该目录下的文件 只能通过Controller来
总结:
- 在Springboot,我们可以使用以下方式处理静态资源
- webjars localhost:8081/webjars/ 这个方式不推荐
- public static /** resources localhost:8081/
- 要学会读源码 因为技术在不断更新 不能全靠老师 上面的文件目录就来自于源码的读取
首页和图标定制
首页 index.html
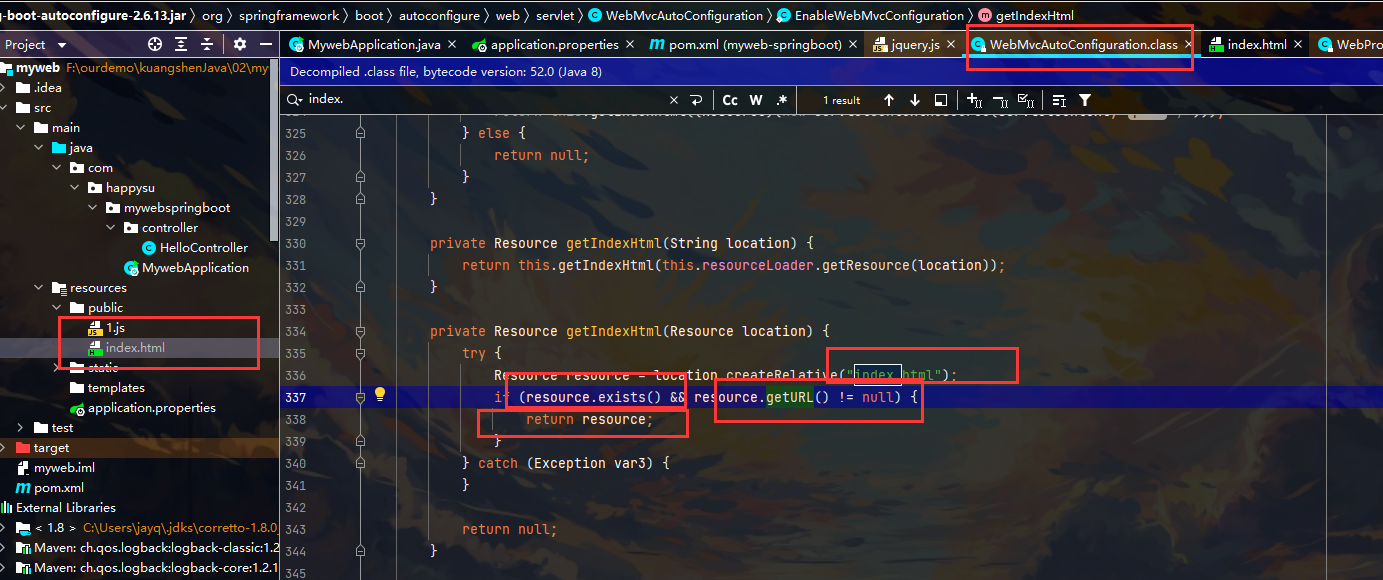
直接访问 非常完美
0x01 模版引擎
- 概念
先解释一下这个东西的作用
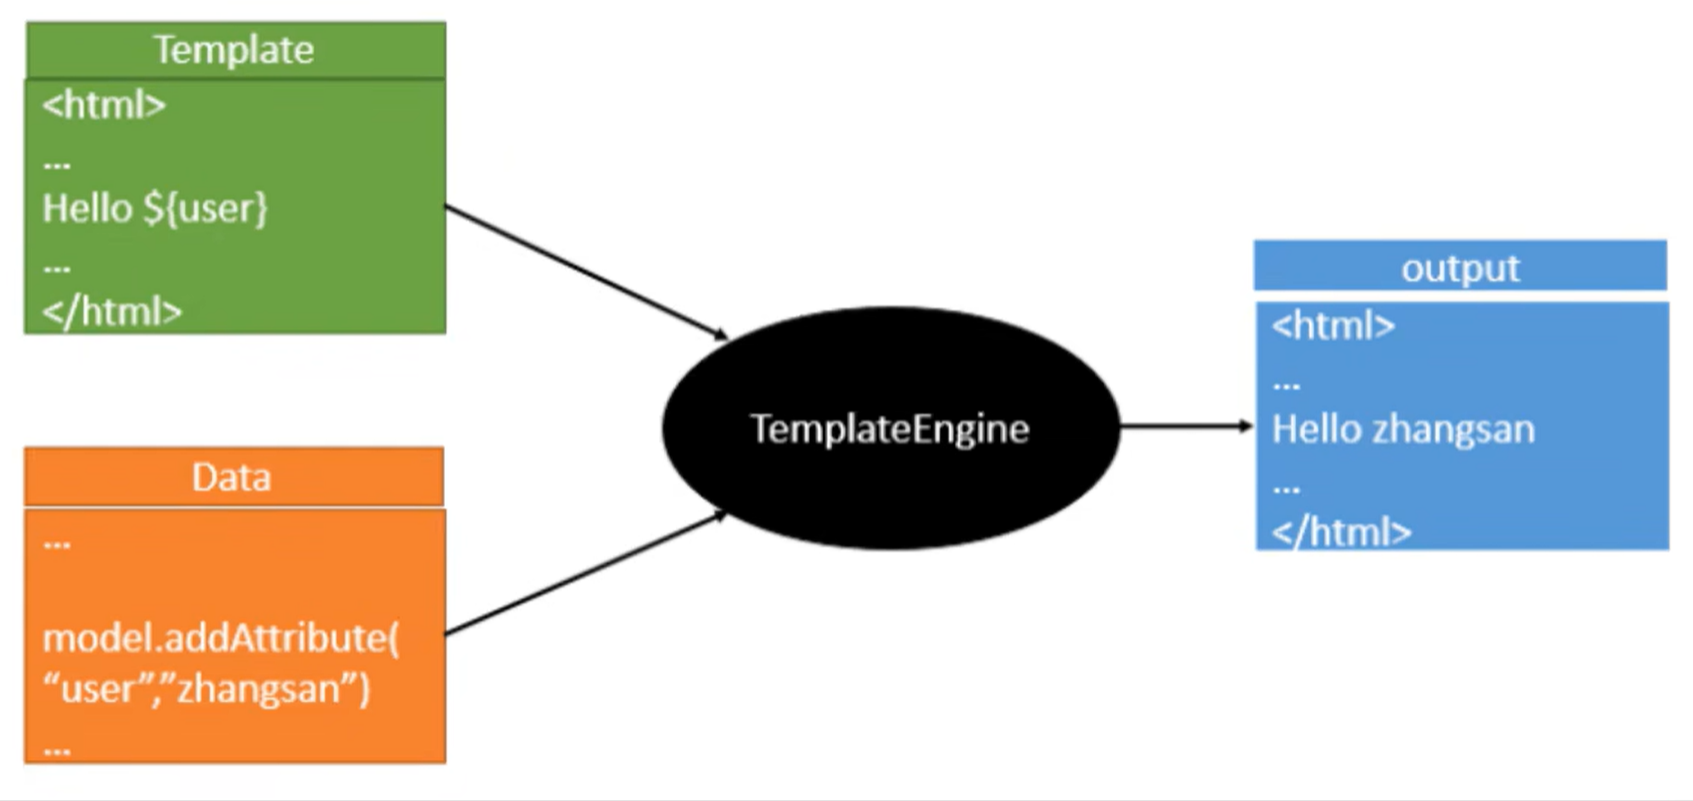
简单来说就是在前端界面预留位置 然后结合后端的数据 进行渲染 生成最终呈现给用户的界面
- 常见引擎
jsp
freemarker
Thymeleaf
- 常用Thymeleaf使用
导入依赖
<!-- Thymelead  基于3.x开发-->
<dependency>
    <groupId>org.thymeleaf</groupId>
    <artifactId>thymeleaf-spring5</artifactId>
</dependency>
<dependency>
    <groupId>org.thymeleaf.extras</groupId>
    <artifactId>thymeleaf-extras-java8time</artifactId>
</dependency>
默认放在templates目录下 后缀名是html
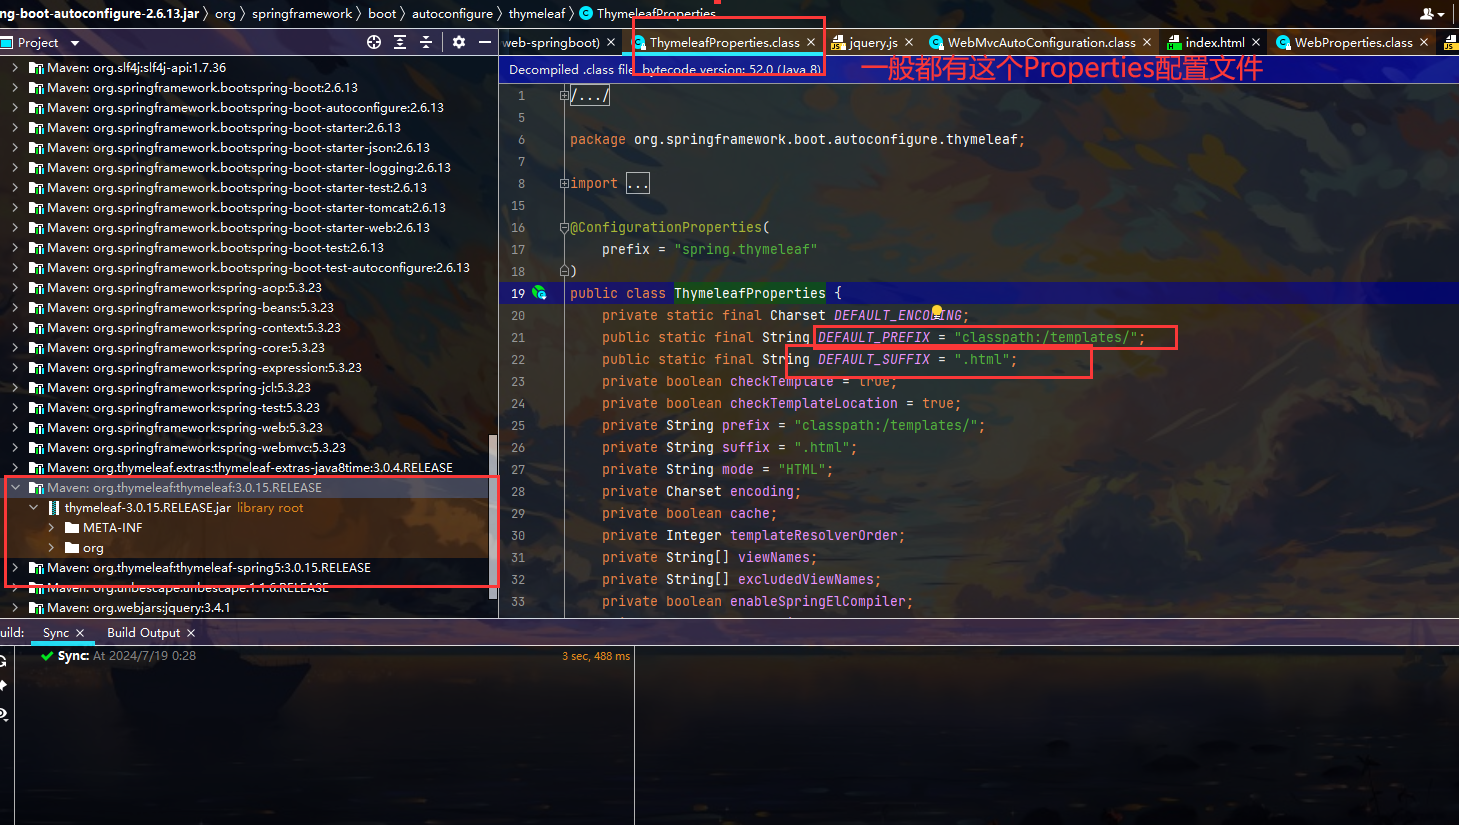
结论:
只要需要使用thymeleaf 只需要导入对应的依赖就可以
我们将html放在templates目录下即可
使用方法如下:在Controller层引过去
@RestController
public class HelloController {

    @GetMapping("/hello")
    public String hello(){
        return "hello, world!";
    }
}
此外一定要掌握钻研 读源码的本领 要不然就会被直接公司招新人 你就被淘汰
声明命名空间 在html文件中 添加后面这一句xm…
<html lang="en" xmlns:th="http://www.thymeleaf.org">
所有的html元素都可以被thymeleaf接管: 即th:元素名
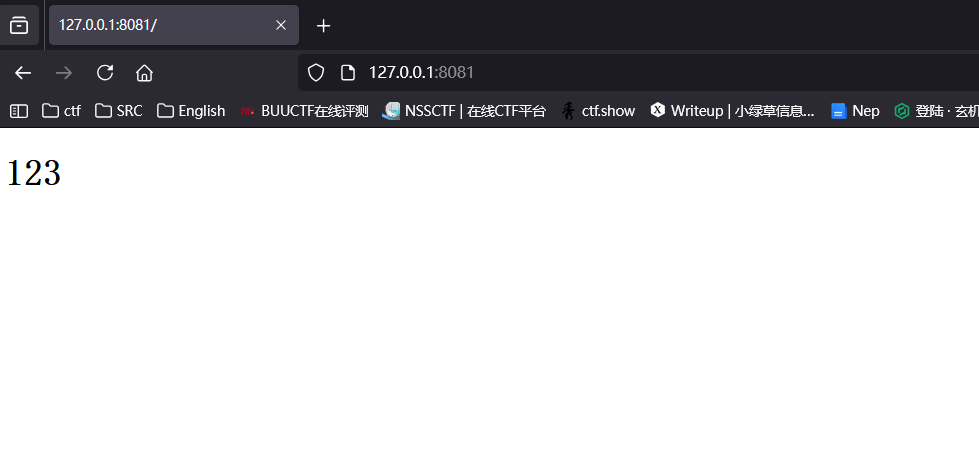
小demo:
Controller层:
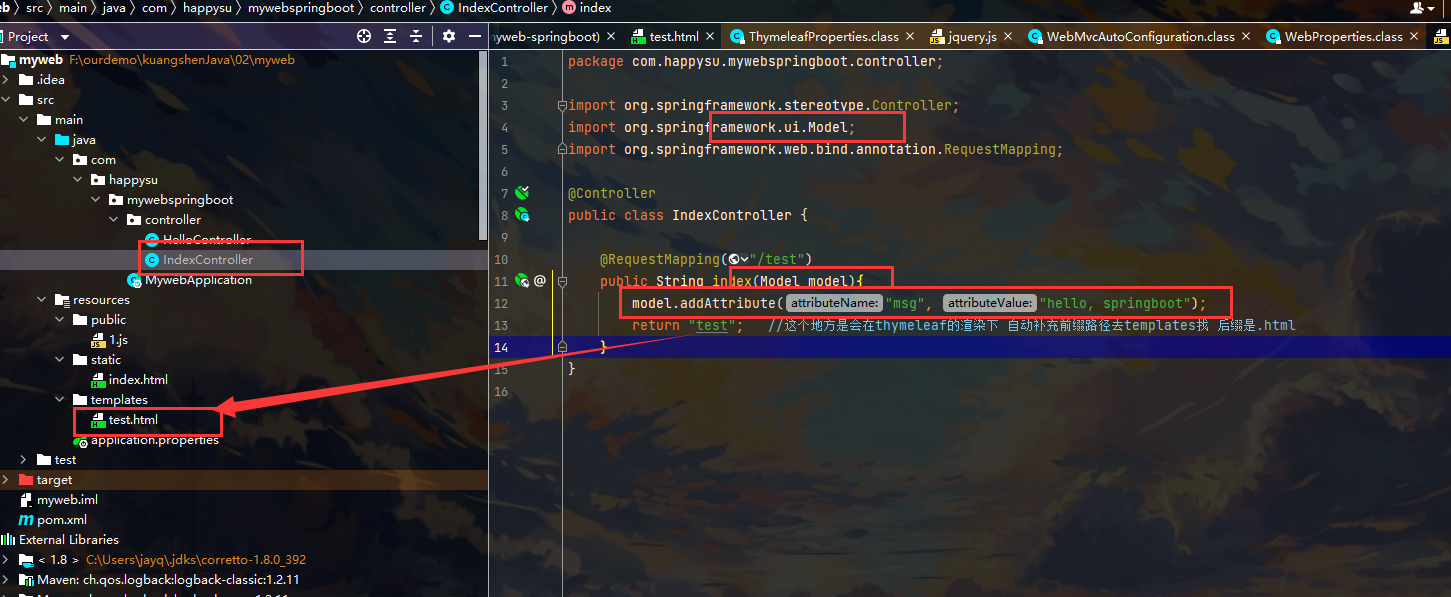
html:
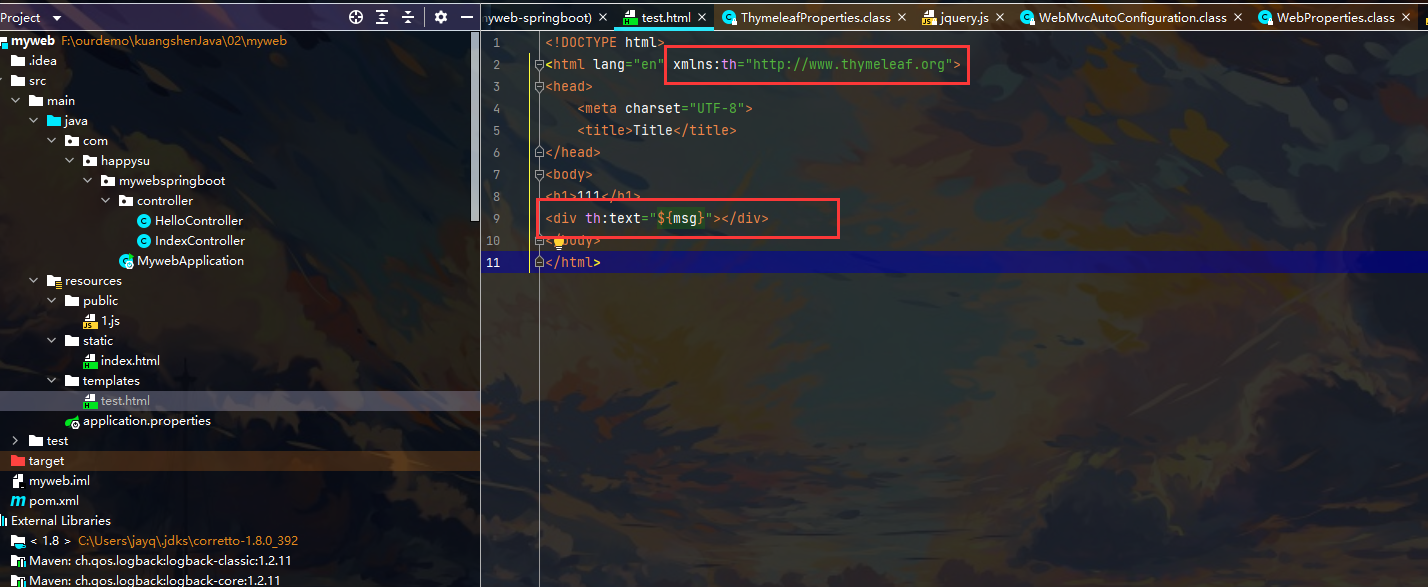
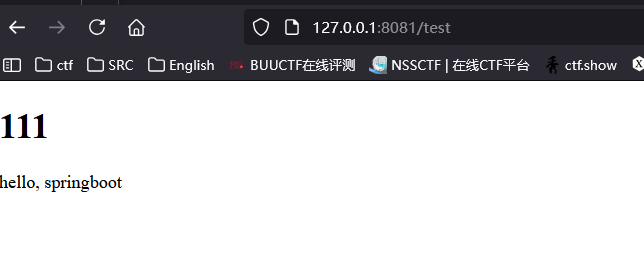
效果:
0x02 Thymeleaf语法
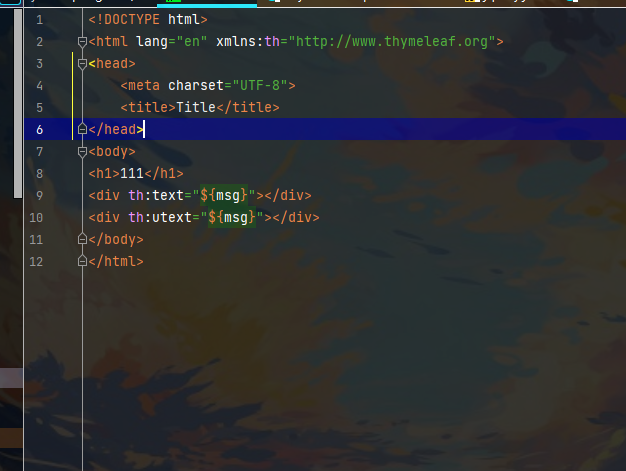
取变量:${…}
取URL:@{…}
文本转义:text
不转义:utext
demo:
效果:
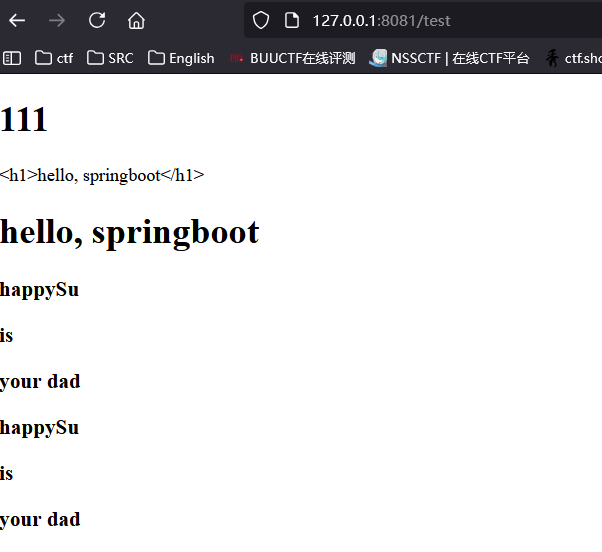
检查一下网页代码 可以发现尖括号被转义了 这也就提供了防范xss的思路
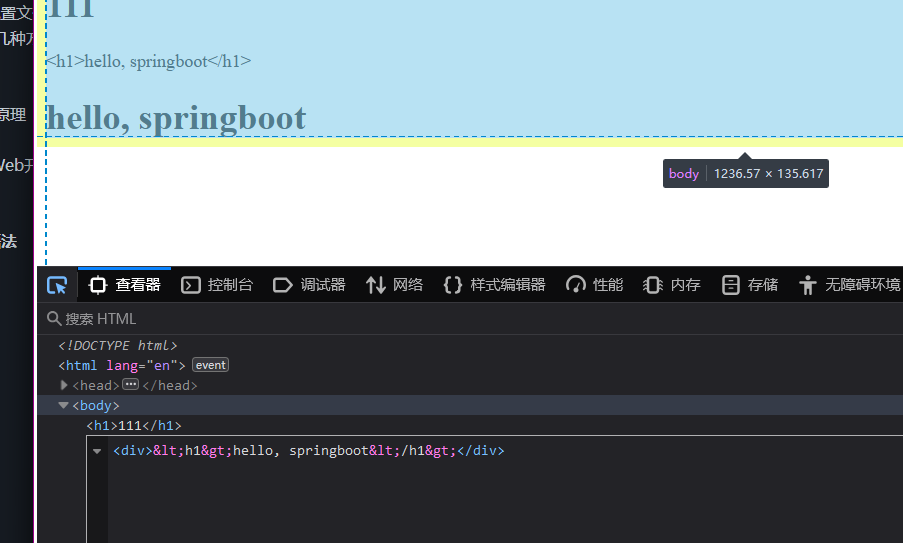
- 遍历
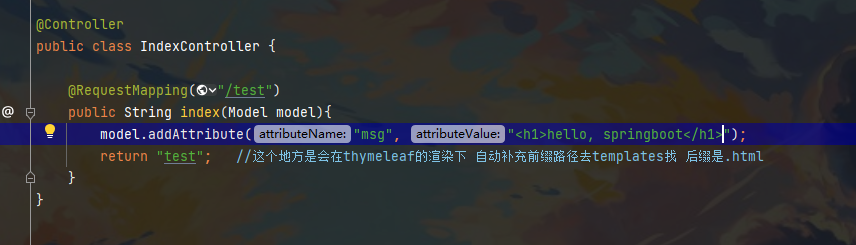
首先在Controller层中写个数组
model.addAttribute("users", Arrays.asList("happySu", "is", "your dad"));
然后再html中修改一下 提供两种赋值方法
<!DOCTYPE html>
<html lang="en" xmlns:th="http://www.thymeleaf.org">
<head>
    <meta charset="UTF-8">
    <title>Title</title>
</head>
<body>
<h1>111</h1>
<div th:text="${msg}"></div>
<div th:utext="${msg}"></div>

<!--方法一: ${}都是在取变量的值  这是循环遍历users变量 赋值给user  先遍历出来  然后后面text取值 取刚刚遍历出来的变量user的值进行输出-->
<h3 th:each="user:${users}" th:text="${user}"></h3>

<!--方法二: 行内输出  两个中括号包裹起来就行-->
<h3 th:each="user:${users}">[[ ${user} ]]</h3>
</body>
</html>
效果
0x03 SpringMVC配置原理
@Configuration注解:表示是一个配置类
总结:在Springboot中,有非常多的xxxConfiguration帮助我们进行扩展配置 看到后要注意嗷
学完基础的一点内容,后面展开一个项目的整体开发,期待吧~


 825
825


 被折叠的 条评论
为什么被折叠?
被折叠的 条评论
为什么被折叠?
 到【灌水乐园】发言


