 Ubuntu下CUDA与OpenCV安装


 本文详细介绍了如何在Ubuntu 16.04系统中安装CUDA、cuDNN及OpenCV的过程,并提供了解决安装过程中可能遇到的问题的方法。
需要实现下载文件:
1 U 盘安装 ubuntu 16.04(ultra + iso )
2 系统进入之后,进入setting -> 软件和更新 附加驱动 安装nvidia驱动
3 修改gcc4.9 ( 非必须, 下一步 加override 就行 )
sudo apt-get install g++-4.9
sudo update-alternatives --install /usr/bin/gcc gcc /usr/bin/gcc-4.9 20
sudo update-alternatives --install /usr/bin/gcc gcc /usr/bin/gcc-5 10
sudo update-alternatives --install /usr/bin/g++ g++ /usr/bin/g++-4.9 20
sudo update-alternatives --install /usr/bin/g++ g++ /usr/bin/g++-5 10
sudo update-alternatives --install /usr/bin/cc cc /usr/bin/gcc 30
sudo update-alternatives --set cc /usr/bin/gcc
sudo update-alternatives --install /usr/bin/c++ c++ /usr/bin/g++ 30
4 安装cuda ./NVIDIA-linux-XX-XX .run (加 --override!!!) 不要安装驱动 (驱动处输入n)!!!!!!!!!!
5 reboot
6 nvidia-settings 选择Nvidia
7 reboot
8 sudo apt-get install mesa-common-dev
sudo apt-get install freeglut3-dev
9 sudo gedit ~/.bashrc
export PATH=/usr/local/cuda-7.5/bin${PATH:+:${PATH}}export LD_LIBRARY_PATH=/usr/local/cuda-7.5/lib64${LD_LIBRARY_PATH:+:${LD_LIBRARY_PATH}}
10 test :
结果如下所示:
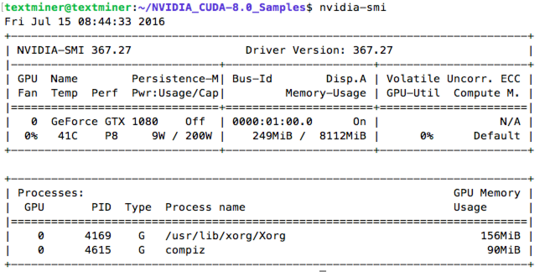
11
cd /usr/local/cuda/samples
sudo make all -j8
。。。。。。
试几个CUDA例子:
cd /usr/local/cuda/samples/1_Utilities/deviceQuery
./deviceQuery
--------------------------------------------
12 安装 cudnn
sudo tar -zxvf cudnn-7.5-linux-x64-v5.0-ga.tgz
sudo cp cuda/include/cudnn.h /usr/local/cuda/include/

sudo cp cuda/lib64/libcudnn* /usr/local/cuda/lib64/

sudo chmod a+r /usr/local/cuda/include/cudnn.h

sudo chmod a+r /usr/local/cuda/lib64/libcudnn*
---------------------------------------------
13 安装opencv
Github上有人已经写好了完整的安装脚本:https://github.com/jayrambhia/Install-OpenCV
下载该脚本,进入Ubuntu/2.4 目录, 给所有shell脚本加上可执行权限
chmod +x *.sh
然后安装最新版本 (当前为2.4.9)
sudo ./opencv2_4_9.sh
脚本会自动安装依赖项,下载安装包,编译并安装OpenCV。整个过程大概半小时左右。
注意,中途可能会报错
opencv-2.4.9/modules/gpu/src/nvidia/core/NCVPixelOperations.hpp(51): error: a storage class is not allowed in an explicit specialization
///////////////////////////////////////
自己撰写::
cd OpenCV
# unzip OpenCV-2.4.9.zip
cd opencv-2.4.9
mkdir build
cd build
#cmake -D CMAKE_BUILD_TYPE=Release -D CMAKE_INSTALL_PREFIX=/usr/local -D BUILD_TIFF=ON -D BUILD_EXAMPLES=ON -D CUDA_GENERATION=Auto -D BUILD_NEW_PYTHON_SUPPORT=ON ..
cmake -D CMAKE_BUILD_TYPE=RELEASE -D CMAKE_INSTALL_PREFIX=/usr/local -D WITH_TBB=ON -D BUILD_NEW_PYTHON_SUPPORT=ON -D WITH_V4L=ON -DINSTALL_C_EXAMPLES=ON -D INSTALL_PYTHON_EXAMPLES=ON -DBUILD_EXAMPLES=ON -D WITH_QT=ON -D WITH_OPENGL=ON -DCUDA_GENERATION=Kepler
..
#cmake -D CMAKE_BUILD_TYPE=RELEASE -D CMAKE_INSTALL_PREFIX=/usr/local -D WITH_TBB=ON -D BUILD_NEW_PYTHON_SUPPORT=ON -D WITH_V4L=ON -DINSTALL_C_EXAMPLES=ON -D INSTALL_PYTHON_EXAMPLES=ON -DBUILD_EXAMPLES=ON -D WITH_QT=ON -D WITH_OPENGL=ON -DCUDA_GENERATION=Kepler
..
#cmake -D CMAKE_BUILD_TYPE=RELEASE -D CMAKE_INSTALL_PREFIX=/usr/local -D WITH_TBB=ON -D BUILD_NEW_PYTHON_SUPPORT=ON -D WITH_V4L=ON -D INSTALL_C_EXAMPLES=ON -D //INSTALL_PYTHON_EXAMPLES=ON -D BUILD_EXAMPLES=ON -D WITH_QT=ON -D WITH_OPENGL=ON CUDA_GENERATION=Kepler
..
sudo make -j8
sudo make install
sudo sh -c 'echo "/usr/local/lib" > /etc/ld.so.conf.d/opencv.conf'
sudo ldconfig
cd ../../..
echo "OpenCV 2.4.9 ready to be used"
///////////////////////////////
需要在Cmakelist 添加
set(CMAKE_CXX_FLAGS "${CMAKE_CXX_FLAGS} -D_FORCE_INLINES")
//////////////////////////////////////
replace NCVPixelOperations.hpp
/////////////////////
------------------------------------------------
14 安装 python
sudo apt-get install python-dev python-pip ----------------------- 15 安装其他-------------------------------------------------sudo apt-get install libprotobuf-dev libleveldb-dev libsnappy-dev libopencv-dev libboost-all-dev libhdf5-serial-dev libgflags-dev libgoogle-glog-dev liblmdb-dev protobuf-compiler
15 安装MKL
--------------------------------------------------
//////////////////
1\
许多未定义
重新使用GCC5编译protobuf glog lbd lbboost opencv
未成功
2\
使用初始Makefile 重新开始 , 然后修改 hdf5.h:INCLUDE_DIRS:=$(PYTHON_INCLUDE) /usr/local/include/ usr/include/hdf5/serial/
- 编译过程中可能会遇到错误,比如./include/caffe/util/cudnn.hpp:8:34: fatal error: caffe/proto/caffe.pb.h: No such file or director,这是因为protobuf和pillow没有安装,或者是通过apt-get安装的。使用pip重新安装一遍即可解决问题。删除caffe-mast(提前保存Makefile.config和Makefile),解压,解压重新编译。
<code class="hljs avrasm has-numbering">pip install protobuf --upgrade -i http://pypi<span class="hljs-preprocessor">.douban</span><span class="hljs-preprocessor">.com</span>/simple
pip install pillow --upgrade -i http://pypi<span class="hljs-preprocessor">.douban</span><span class="hljs-preprocessor">.com</span>/simple


</code>
3\
You could try to pass an argument (CXX_FLAGS) to the compiler -D_FORCE_INLINES by editing the CMAKE files (for example: set(CMAKE_CXX_FLAGS "${CMAKE_CXX_FLAGS} -D_FORCE_INLINES")) or makefiles.
So, Open the Makefile and changing the line
NVCCFLAGS += -ccbin=$(CXX) -Xcompiler -fPIC $(COMMON_FLAGS)
into
NVCCFLAGS += -D_FORCE_INLINES -ccbin=$(CXX) -Xcompiler -fPIC $(COMMON_FLAGS)
For me this was on line 406
真正解决看另一篇文章: caffe 未定义的引用问题
解决之后:
make all -j4
make test
make runtest


 1024
1024

 被折叠的 条评论
为什么被折叠?
被折叠的 条评论
为什么被折叠?
 到【灌水乐园】发言


