


使用Python实现链表
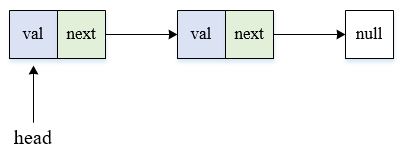
链表的基本结构
PS:本文代码均为朴素实现方式,基于空间限制或者时间限制的优化代码将在后序学习过程中完成。
创建
1. 为每个结点构建Node类
class Node(object):
    def __init__(self, val=None):
        self.val = val
        self.next = None
2. 创建链表类Tree
# 这里的类名个人用了Tree,换成Link对理解会更好一些
class Tree(object):
    def __init__(self, node=None):
    	# 初始化链表为空
        if not node:
            self.head = None
            print("Attention! No value is set while initializing the tree!")
        # 如果node已经是一个结点,那么就不用再次将其结点化
        elif str(type(node)) == "<class '__main__.Node'>":
            self.head = node
        else:
            self.head = Node(node)  # 结点化
3. 测试
t_none = Tree()  # 空参初始化
t_int = Tree(1)  # 整型初始化
t_str = Tree('a')  # 字符型初始化
na = Node(3)
t_node = Tree(na)  # 结点型初始化

t_list = [t_none, t_int, t_str, t_node]
t_list_name = [list(dict(t_none=t_none).keys())[0], list(dict(t_int=t_int).keys())[0],
               list(dict(t_str=t_str).keys())[0], list(dict(t_node=t_node).keys())[0]]

for i in range(len(t_list)):
    if t_list[i].head is not None:
        print("Build Tree with ", t_list_name[i], " and the val of head is: ", t_list[i].head.val)
4. 运行结果
Attention! No value is set while initializing the tree!
Build Tree with t_int and the val of head is: 1
Build Tree with t_str and the val of head is: a
Build Tree with t_node and the val of head is: 3
基本操作
1. 计算表长
class Tree(object):
	def __init__(self):...

	@property  # 修饰器,将lens作为Tree类的一个属性
    def lens(self):
        return self.__len__()

    def __len__(self):
        t = self.head  # 无论什么操作,一定要预先保存好head结点,预防其被更改
        length = 0
        while t:
            length += 1
            t = t.next
        return length
2. 左侧添加
    def add_left(self, node):
        t = self.head
        if str(type(node)) == "<class '__main__.Node'>":
            if self.head is None:
                self.head = node
            else:
                node.next = self.head
                self.head = node
        else:
            if self.head is None:
                self.head = Node(node)
            else:
                n = Node(node)
                n.next = self.head
                self.head = n
3. 右侧添加
    def add_right(self, node):
        t = self.head
        while t:
            if t.next is not None:
                t = t.next
            else:
                break
        if str(type(node)) == "<class '__main__.Node'>":
            if self.head is None:
                self.head = node
            else:
                t.next = node
        else:
            if self.head is None:
                self.head = Node(node)
            else:
                t.next = Node(node)
4. 指定位置插入
    def insert(self, pos: int, val):
        if pos <= 1:
            self.add_left(val)
        elif pos > self.lens:
            self.add_right(val)
        else:
            t = self.head
            count = 1
            while count < pos - 1:
                count += 1
                t = t.next
            new = Node(val)
            new.next = t.next
            t.next = new
5. 删除
    def delete(self, pos):
        t = self.head
        count = 1
        if pos == 1:
            self.head = self.head.next
        else:
            while t and count < pos - 1:
                t = t.next
            t.next = t.next.next
6. 反转链表
    def reverse(self):
        t = Tree()
        tmp = self.head
        while tmp:
            t.add_left(tmp.val)
            tmp = tmp.next
        self.head = t.head
7. 打印所有元素
    def travel(self):
        print("\n----->")
        t = self.head
        while t:
            print(t.val, end="")
            if t.next:
                print(" ===> ", end="")
            t = t.next
        print("\n<-----\n")
8. 测试
t_none.add_right(3)
t_none.add_left(1)
t_none.insert(2, 2)
t_none.travel()
t_none.reverse()
t_none.travel()
9. 运行结果
----->
1 ===> 2 ===> 3
<-----
Attention! No value is set while initializing the tree!
----->
3 ===> 2 ===> 1
<-----
Tips:
- 本文的添加元素函数
add存在不足,添加元素的结果和加入的元素类型有关,若是数值或单个结点,则原有链表长度+1;若是另一个链表,则原链表长度不一定+1。举例说明:将t_none.add_right(3)修改为t_none.add_right(t_int),此时相当于将t_int接在t_none后面- 反转链表时本文新建了一个空链表,最后赋值时应该是
self.head = t.head,而不是self.head = t,否则原始列表的头指针将指向链表t的首地址,而不是链表t中第一个元素的地址。


 5402
5402


 被折叠的 条评论
为什么被折叠?
被折叠的 条评论
为什么被折叠?
 到【灌水乐园】发言


