


单点登陆的选择:
有三种方案:
- CAS
- Oauth
- SAML
参考: CAS、Oauth2还是SAML,单点登录SSO方案该怎么选? - 知乎 (zhihu.com)
最流行的解决方案是 Oauth 基于授权码的方式,目前微信,钉钉都支持这种方式.
但是是Oauth2有一个风险,那就是第一步获取code的时候容易被拦截,而对于本地小程序 app_secret也有办法通过逆向工程获取到, 这样的话攻击方拿到code和app_secret就可以向服务器请求获取token,为了避免这种安全风险,在2015年, oauth2 发布了一个扩展协议PKCE 全称是 Proof Key for Code Exchange
关于PKCE,具体参考:
OAuth 2.0 扩展协议之 PKCE https://zhuanlan.zhihu.com/p/433472843
使用这个协议,要求provider和resource双方都要支持.
目前的情况是微信登陆是不支持的.其他的应用估计也不支持.
Django 作为Oauth Provider
主要使用了两个包:
- django-oauth-toolkit
- DjangoRestFramework
1 django-oauth-toolkit==2.2.0
最新版本:
文档:https://django-oauth-toolkit.readthedocs.io/en/latest/
支持OAuth 2.0 扩展协议之 PKCE 协议
参考资料 (30条消息) DjangoRestFramework 使用 django-oauth-toolkit 使网站成为 OAuth Provider(提供方)_PFFFei的博客-CSDN博客
2 django-oauth-toolkit==1.2.0
不支持OAuth 2.0 扩展协议之 PKCE 协议
应该可以使用国内大部分场景
这里我们用1.2.0作为演示,因为我发现微信的单点登陆接口也没有使用PKCE. 为了降低难度(偷懒),那就用1.2.0做演示吧.
一 创建工程auth2_provider,作为oauth2的认证中心
1 搭建环境
用pycharm创建好django工程auth2_provider,会自动安装最新版的django
(venv) PS D:\BaiduSyncdisk\7_浩信\django-oauth-toolkit12\djangoProject> pip show django
Name: Django
Version: 4.2.1
这个版本跟django-oauth-toolkit1.2.0有冲突,我们换成3.2
(venv) PS D:\BaiduSyncdisk\7_浩信\django-oauth-toolkit12\oauth_provider> pip install -U django==3.2
(venv) PS D:\BaiduSyncdisk\7_浩信\django-oauth-toolkit12\oauth_provider> pip show django
Name: Django
Version: 3.2

pip install django-oauth-toolkit==1.2.0
pip install djangorestframework
#创建users应用
python manage.py startapp users
在users/views.py 写入以下代码
# users/views.py
from django.contrib.auth.models import User
from oauth2_provider.contrib.rest_framework import TokenHasReadWriteScope
from rest_framework import generics, permissions, serializers


class UserSerializer(serializers.ModelSerializer):
    class Meta:
        model = User
        fields = ('username', 'email', "first_name", "last_name")


class UserList(generics.ListCreateAPIView):
    permission_classes = [permissions.IsAuthenticated, TokenHasReadWriteScope]
    queryset = User.objects.all()
    serializer_class = UserSerializer
    required_scopes = ['test']


class UserDetails(generics.RetrieveAPIView):
    permission_classes = [permissions.IsAuthenticated, TokenHasReadWriteScope]
    queryset = User.objects.all()
    serializer_class = UserSerializer
    required_scopes = ['test']


from oauth2_provider.signals import app_authorized


def handle_app_authorized(sender, request, token, **kwargs):
    print('App {} was authorized'.format(token.application.name))
app_authorized.connect(handle_app_authorized)
修改setting文件,增加下列内容
INSTALLED_APPS = [
	...
    'oauth2_provider',  # add
    'users',  # add
    'rest_framework',
]

LOGIN_URL = '/admin/login/'

# 即为可供资源拥有者(Django User)选择的 当第三方网站调用该网站资源时获取的权限范围。
OAUTH2_PROVIDER = {
    'SCOPES': {
        'read': 'Read scope',
        'write': 'Write scope',
        'test': 'test api',
        'music:write': 'Write music',
        'music': 'Test music',
    }
}

REST_FRAMEWORK = {
    'DEFAULT_AUTHENTICATION_CLASSES': (
        'oauth2_provider.contrib.rest_framework.OAuth2Authentication',  # 使用OAuth登录认证
    )
}
修改路由url.py
urlpatterns = [
    path('admin/', admin.site.urls),
    path('auth/', include('oauth2_provider.urls', namespace='oauth2_provider')),
    path('users/', UserList.as_view()),  # add
    path('users/<pk>/', UserDetails.as_view()),  # add

]
数据迁移,创建超级用户
python manage.py makemigrations
python manage.py migrate
python manage.py createsuperuser
admin/admin
打开http://127.0.0.1:8000/admin/ 可以正常登陆
这样环境就搭建好了.
2 创建第三方应用
打开下面这个网址
http://127.0.0.1:8000/auth/applications/register/
新建一个应用,唯一注意的是回调url,后面会用到这个地址.
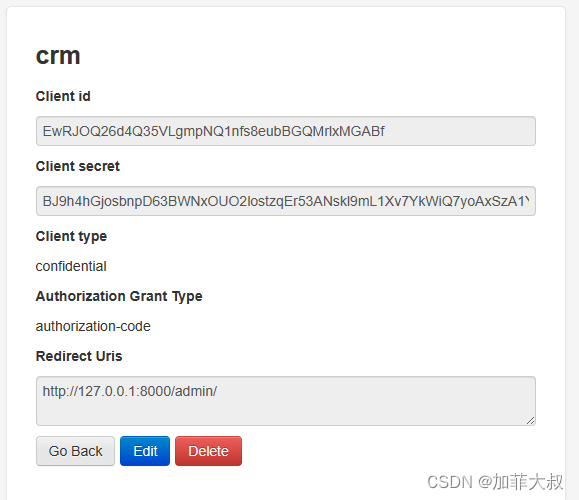
在浏览器输入下面的地址:
http://127.0.0.1:8000/auth/authorize/?response_type=code&client_id=EwRJOQ26d4Q35VLgmpNQ1nfs8eubBGQMrlxMGABf&redirect_uri=http://127.0.0.1:8000/admin/
注意: redirect_uri 一定要和应用界面配置的redirect_uri 一模一样才行,这个地方我吃了很多次亏.
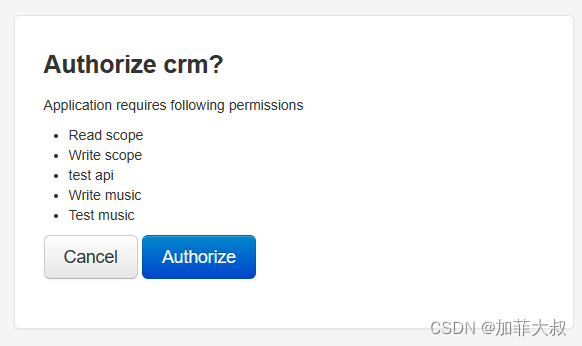
点击Authorize,页面会跳转到
http://127.0.0.1:8000/admin/?code=WETz1koClOXKSb595pLIxCwigxmBBP
成功获取到code,provider 告一段落.
二 配置第三方应用
创建工程oauth_resource
并且建立一个应用users
python .\manage.py startapp users
路由增加下面内容
path('users/auth_login/', AuthLogin.as_view()), # add
INSTALLED_APPS = [
	...
    'users'
]
# Create your views here.
# users/views.py
from django.http import HttpResponse
import requests
from django.views import View


class AuthLogin(View):
    def get(self, request):
        code = request.GET.get('code')
        print('code:', code)
        # 第一步 provider回调这个地址传给code
        # 第二步 ,根据code 获取 token
        if code:
            url = 'http://127.0.0.1:8000/auth/token/'
            data = {
                'client_id': 'CpHhgwqdbWkThWIdJDeohqUoJw58iY9UD9zK4AZJ',
                'client_secret': 'O3CeOEe9w9Fb3Ko6DsWFezNsXeq7bW63Zzk3KFju2y84dNeSZmTkj5rXPk7nODykboiqZD0vzoYqiXvIArVok06Bn7rU8fzH1IzMIORD7FnOdRydVWsFmTwA1c4fbUMx',
                'code': code,
                #'redirect_uri': 'http://127.0.0.1:8001/users/getcode/',

                'grant_type': 'authorization_code',
            }
            headers = {
                'Content-Type': 'application/x-www-form-urlencoded',
            }
            res = requests.post(url, data=data, headers=headers)
            print('res:', res.json())

            # 第三步,根据token获取用户信息
            access_token = res.json().get('access_token')
            token_type = res.json().get('token_type')
            token_header = {
                'Authorization': '{} {}'.format(token_type, access_token)
            }
            res = requests.get('http://127.0.0.1:8000/users/1/', headers=token_header)
            print('res:', res.text)

            # 第四步,根据获取到的用户信息(openid)
            # 跟本系统用户做绑定,实现用户登陆
            # 略

            return HttpResponse(res.text)
数据迁移,创建超级用户
python manage.py makemigrations
python manage.py migrate
python manage.py createsuperuser
admin2/admin2
打开http://127.0.0.1:8001/admin/ 可以正常登陆
这样环境就搭建好了.
三 单点登陆测试
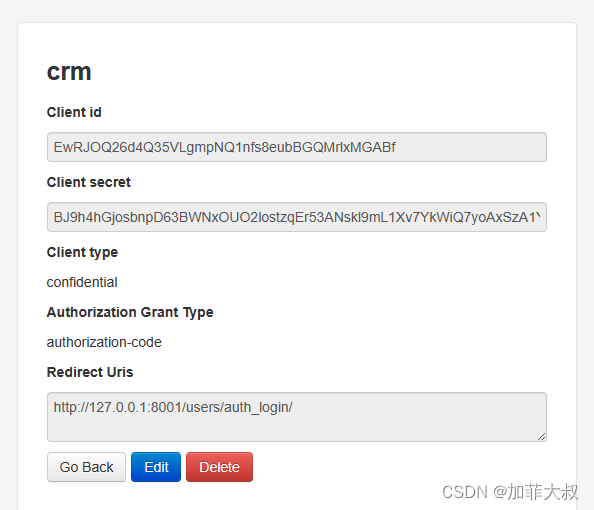
1 先修改第三方应用的回调地址
path('users/auth_login/', AuthLogin.as_view()),  # add
根据这个路由,地址应该是
http://127.0.0.1:8001/users/auth_login/
开始测试:
打开浏览器,地址栏输入:
http://127.0.0.1:8000/auth/authorize/?response_type=code&client_id=EwRJOQ26d4Q35VLgmpNQ1nfs8eubBGQMrlxMGABf&redirect_uri=http://127.0.0.1:8001/users/auth_login/
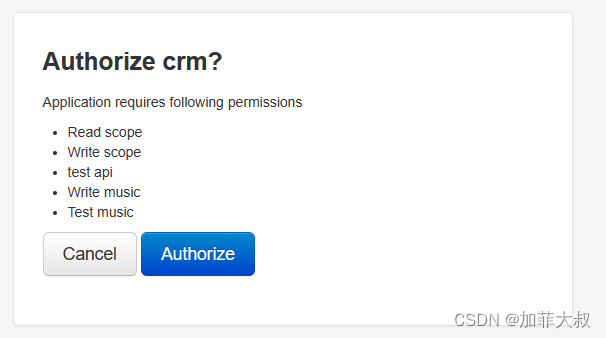
点击Authorize
得到用户信息:
{"username":"admin","email":"156277468@qq.com","first_name":"","last_name":""}
这里可以返回一个openid,然后和第三方系统的用户做绑定. 直接登陆系统.


 3577
3577


 被折叠的 条评论
为什么被折叠?
被折叠的 条评论
为什么被折叠?
 到【灌水乐园】发言


