


建议使用centos7、不建议centos8,centos7到2024年,contos8到2021年停止更新
禁止Swap分区
sed -i '/swap/s/^/#/' /etc/fstab
swapoff -a
关闭防火墙
systemctl stop firewalld
systemctl disable firewalld
centos7 关闭network manager
systemctl stop NetworkManager #临时关闭
systemctl disable NetworkManager #永久关闭网络管理命令
关闭selinux
sed -i 's/enforcing/disabled/' /etc/selinux/config
setenforce 0
优化limit
ulimit -SHn 65535
#单用户可以打开的最大文件数量,可以设置为官方推荐的65536或更大些
echo "* - nofile 655360" >> /etc/security/limits.conf
#单用户线程数调大
echo "* - nproc 131072" >> /etc/security/limits.conf
echo "* - memlock unlimited" >> /etc/security/limits.conf
#单进程可以使用的最大map内存区域数量
echo "vm.max_map_count = 655360" >> /etc/sysctl.conf
参数修改立即生效
sysctl -p
查看主机名
hostname
如果主机名不正确,修改主机名
hostnamectl set-hostname node1
hostnamectl set-hostname node2
hostnamectl set-hostname node3
hostnamectl set-hostname node4
hostnamectl set-hostname node5
#hostnamectl set-hostname node6
如果以前配置的/etc/hosts,不符合要求,清理
sed -i '/172/d' /etc/hosts
配置/etc/host
echo '
172.16.108.24 node1
172.16.108.25 node2
172.16.108.26 node3
172.16.108.27 node4
172.16.108.28 node5
'>>/etc/hosts
date 时间同步
#ntpdate
#rpm -ivh https://mirrors.wlnmp.com/centos/wlnmp-release-centos.noarch.rpm
#yum install wntp -y
yum install ntpdate -y
ntpdate time2.aliyun.com
#确认时区
ll /etc/localtime
## /etc/localtime -> ../usr/share/zoneinfo/Asia/Shanghai
#mv /etc/localtime /etc/localtime.bak
#ln -s /usr/share/zoneinfo/Asia/Shanghai  /etc/localtime

# 加入crontab ,5分钟一次
crontab -l
crontab -e
*/5 * * * * ntpdate time2.aliyun.com
升级系统
yum update -y --exclude=kernel* && reboot
升级内核,centos7内核升级到4.18以上(也可先下载内核包,本地安装)
#国内内核镜像https://mirrors.tuna.tsinghua.edu.cn/elrepo/kernel/el7/x86_64/RPMS/
#也可以下载离线安装devel也需要安装下
#有些太老的服务器可能不支持最新的内核
#查看内核
#Linux node5 3.10.0-1160.el7.x86_64 #1 SMP Mon Oct 19 16:18:59 UTC 2020 x86_64 x86_64 x86_64 GNU/Linux
#centos内核是3.10
rpm --import https://www.elrepo.org/RPM-GPG-KEY-elrepo.org#导入该源的秘钥
rpm -Uvh http://www.elrepo.org/elrepo-release-7.0-2.el7.elrepo.noarch.rpm#启用该源仓库
yum --disablerepo="*" --enablerepo="elrepo-kernel" list available#查看有哪些内核版本可供安装
yum --enablerepo=elrepo-kernel install kernel-lt -y #安装的长期稳定版本,稳定可靠,默认当前最新的kernel-lt 5.4.210-1.el7.elrepo
#设置 GRUB 默认的内核版本
打开并编辑 /etc/default/grub 并设置 GRUB_DEFAULT=0。意思是 GRUB 初始化页面的第一个内核将作为默认内核。
cat /etc/default/grub 复制一份并修改
cp /etc/default/grub /etc/default/grub.bak
cat >/etc/default/grub  <<EOF
GRUB_TIMEOUT=5
GRUB_DISTRIBUTOR="$(sed 's, release .*$,,g' /etc/system-release)"
GRUB_DEFAULT=0
GRUB_DISABLE_SUBMENU=true
GRUB_TERMINAL_OUTPUT="console"
GRUB_CMDLINE_LINUX="crashkernel=auto spectre_v2=retpoline rd.lvm.lv=centos/root rd.lvm.lv=centos/swap rhgb quiet"
GRUB_DISABLE_RECOVERY="true"
EOF

#式修改生效
grub2-mkconfig  -o /boot/grub2/grub.cfg
#错误处理
#vi修改/etc/default/grub后
#grub2-mkconfig  -o /boot/grub2/grub.cfg
#reboot  重启机器后使得设备的参数生效
#开机按e键,发现启动参数还是没有改变?
#这就要看看电脑的启动模式了,
#LEGACY启动模式的文件是这个,/boot/grub2/grub.cfg
#UEFI启动模式的文件是这个,/boot/efi/EFI/centos/grub.cfg
#so,上面的重新生成配置文件命令改成
#grub2-mkconfig  -o /boot/efi/EFI/centos/grub.cfg
reboot
将桥接的IPV4流量传递到iptables的链,不推荐
cat <<EOF | sudo tee /etc/modules-load.d/k8s.conf
overlay
br_netfilter
EOF

sudo modprobe overlay
sudo modprobe br_netfilter

# sysctl params required by setup, params persist across reboots
cat <<EOF | sudo tee /etc/sysctl.d/k8s.conf
net.bridge.bridge-nf-call-iptables  = 1
net.bridge.bridge-nf-call-ip6tables = 1
net.ipv4.ip_forward                 = 1
EOF

# Apply sysctl params without reboot
sudo sysctl --system
应用规则
sysctl --system
安装ipvsadm ,推荐
yum install ipvsadm ipset sysstat conntrack libseccomp -y
#确保 ipvs已经加载内核模块, ip_vs、ip_vs_rr、ip_vs_wrr、ip_vs_sh、
#nf_conntrack_ipv4(4.18+为nf_conntrack)。如果这些内核模块不加载,当kube-proxy启动后,会退回到iptables模式。
cat >/etc/modules-load.d/ipvs.conf<<EOF
ip_vs
ip_vs_lc
ip_vs_wlc
ip_vs_rr
ip_vs_wrr
ip_vs_lblc
ip_vs_lblcr
ip_vs_dh
ip_vs_sh
ip_vs_fo
ip_vs_nq
ip_vs_sed
ip_vs_ftp
ip_vs_sh
nf_conntrack
ip_tables
ip_set
xt_set
ipt_set
ipt_rpfilter
ipt_REJECT
ipip
EOF

systemctl enable --now systemd-modules-load.service
内核参数,可以根据自己情况调整
cat >/etc/sysctl.d/k8s.conf<<EOF
net.ipv4.tcp_keepalive_time=600
net.ipv4.tcp_keepalive_intvl=30
net.ipv4.tcp_keepalive_probes=10
net.ipv6.conf.all.disable_ipv6=1
net.ipv6.conf.default.disable_ipv6=1
net.ipv6.conf.lo.disable_ipv6=1
net.ipv4.neigh.default.gc_stale_time=120
net.ipv4.conf.all.rp_filter=0
net.ipv4.conf.default.rp_filter=0
net.ipv4.conf.default.arp_announce=2
net.ipv4.conf.lo.arp_announce=2
net.ipv4.conf.all.arp_announce=2
net.ipv4.ip_local_port_range= 45001 65000
net.ipv4.ip_forward=1
net.ipv4.tcp_max_tw_buckets=6000
net.ipv4.tcp_syncookies=1
net.ipv4.tcp_synack_retries=2
net.bridge.bridge-nf-call-ip6tables=1
net.bridge.bridge-nf-call-iptables=1
net.netfilter.nf_conntrack_max=2310720
net.ipv6.neigh.default.gc_thresh1=8192
net.ipv6.neigh.default.gc_thresh2=32768
net.ipv6.neigh.default.gc_thresh3=65536
net.core.netdev_max_backlog=16384
net.core.rmem_max = 16777216
net.core.wmem_max = 16777216
net.ipv4.tcp_max_syn_backlog = 8096
net.core.somaxconn = 32768
fs.inotify.max_user_instances=8192
fs.inotify.max_user_watches=524288
fs.file-max=52706963
fs.nr_open=52706963
kernel.pid_max = 4194303
net.bridge.bridge-nf-call-arptables=1
vm.swappiness=0
vm.overcommit_memory=1
vm.panic_on_oom=0
vm.max_map_count = 262144
EOF

sysctl --system
内核参数解释
net.ipv4.tcp_keepalive_time=600 #此参数表示TCP发送keepalive探测消息的间隔时间(秒)
net.ipv4.tcp_keepalive_intvl=30 #tcp检查间隔时间(keepalive探测包的发送间隔)
net.ipv4.tcp_keepalive_probes=10  #tcp检查次数(如果对方不予应答,探测包的发送次数)
net.ipv6.conf.all.disable_ipv6=1 #禁用IPv6,修为0为启用IPv6
net.ipv6.conf.default.disable_ipv6=1 #禁用IPv6,修为0为启用IPv6
net.ipv6.conf.lo.disable_ipv6=1 #禁用IPv6,修为0为启用IPv6
net.ipv4.neigh.default.gc_stale_time=120 #ARP缓存条目超时
net.ipv4.conf.all.rp_filter=0  #默认为1,系统会严格校验数据包的反向路径,可能导致丢包
net.ipv4.conf.default.rp_filter=0 #不开启源地址校验
net.ipv4.conf.default.arp_announce=2 #始终使用与目的IP地址对应的最佳本地IP地址作为ARP请求的源IP地址
net.ipv4.conf.lo.arp_announce=2 #始终使用与目的IP地址对应的最佳本地IP地址作为ARP请求的源IP地址
net.ipv4.conf.all.arp_announce=2 #始终使用与目的IP地址对应的最佳本地IP地址作为ARP请求的源IP地址
net.ipv4.ip_local_port_range= 45001 65000 # 定义网络连接可用作其源(本地)端口的最小和最大端口的限制,同时适用于TCP和UDP连接。
net.ipv4.ip_forward=1 # 其值为0,说明禁止进行IP转发;如果是1,则说明IP转发功能已经打开。
net.ipv4.tcp_max_tw_buckets=6000 #配置服务器 TIME_WAIT 数量
net.ipv4.tcp_syncookies=1 #此参数应该设置为1,防止SYN Flood
net.ipv4.tcp_synack_retries=2 #表示回应第二个握手包(SYN+ACK包)给客户端IP后,如果收不到第三次握手包(ACK包),进行重试的次数(默认为5)
net.bridge.bridge-nf-call-ip6tables=1 # 是否在ip6tables链中过滤IPv6包
net.bridge.bridge-nf-call-iptables=1 # 二层的网桥在转发包时也会被iptables的FORWARD规则所过滤,这样有时会出现L3层的iptables rules去过滤L2的帧的问题
net.netfilter.nf_conntrack_max=2310720 #连接跟踪表的大小,建议根据内存计算该值CONNTRACK_MAX = RAMSIZE (in bytes) / 16384 / (x / 32),并满足nf_conntrack_max=4*nf_conntrack_buckets,默认262144


net.ipv6.neigh.default.gc_thresh1=8192
net.ipv6.neigh.default.gc_thresh2=32768
net.ipv6.neigh.default.gc_thresh3=65536


#gc_thresh3 是表大小的绝对限制
#gc_thresh2 设置为等于系统的最大预期邻居条目数的值
#在这种情况下,gc_thresh3 应该设置为一个比 gc_thresh2 值高的值,例如,比 gc_thresh2 高 25%-50%,将其视为浪涌容量。
#gc_thresh1 提高到较大的值;此设置的作用是,如果表包含的条目少于 gc_thresh1,内核将永远不会删除(超时)过时的条目。


net.core.netdev_max_backlog=16384 # 每CPU网络设备积压队列长度
net.core.rmem_max = 16777216 # 所有协议类型读写的缓存区大小
net.core.wmem_max = 16777216 # 最大的TCP数据发送窗口大小
net.ipv4.tcp_max_syn_backlog = 8096 # 第一个积压队列长度
net.core.somaxconn = 32768 # 第二个积压队列长度
fs.inotify.max_user_instances=8192 # 表示每一个real user ID可创建的inotify instatnces的数量上限,默认128.
fs.inotify.max_user_watches=524288 # 同一用户同时可以添加的watch数目,默认8192。
fs.file-max=52706963 # 文件描述符的最大值
fs.nr_open=52706963 #设置最大微博号打开数
kernel.pid_max = 4194303 #最大进程数
net.bridge.bridge-nf-call-arptables=1 #是否在arptables的FORWARD中过滤网桥的ARP包
vm.swappiness=0 # 禁止使用 swap 空间,只有当系统 OOM 时才允许使用它
vm.overcommit_memory=1 # 不检查物理内存是否够用
vm.panic_on_oom=0 # 开启 OOM
vm.max_map_count = 262144
至此系统升级和内核配置完成,重启机器
reboot
lsmod | grep nf_conntrack
k8s组件安装
查看docker版本
yum list docker-ce --showduplicates| sort -r
从此处查看适合你的版本依赖
https://github.com/kubernetes/kubernetes/tree/master/CHANGELOG
安装docker,参考
https://blog.csdn.net/jiakai82/article/details/117811004
kubelet建议使用systemd
mkdir /etc/docker
cat >/etc/docker/daemon.json<<EOF
{
"exec-opts":["native.cgroupdriver=systemd"],
"live-restore": true
}
EOF
systemctl enable --now docker
# docker info有warn时需要处理下再继续
docker info
当前安装的docker版本为Docker version 20.10.17
配置镜像加速、非必需
sudo mkdir -p /etc/docker
sudo tee /etc/docker/daemon.json <<-'EOF'
{
  "registry-mirrors": ["https://ke9h1pt4.mirror.aliyuncs.com"]
}
EOF
sudo systemctl daemon-reload
sudo systemctl restart docker
至此安装环境已经准备好,进入安装环节,推荐二进制安装k8s,见另一篇文章
下方是使用kubeadm安装,最为了解
安装kubeadm,kubelet和kubectl
yum list|grep kube
所有机器上安装kubelet kubeadm kubectl,官方google可能不能访问,aliyun的同步慢包可能不是最新的
1、https://kubernetes.io/docs/setup/production-environment/tools/kubeadm/install-kubeadm/
2、https://developer.aliyun.com/mirror/kubernetes
aliyun推荐
# aliyun
cat <<EOF > /etc/yum.repos.d/kubernetes.repo
[kubernetes]
name=Kubernetes
baseurl=https://mirrors.aliyun.com/kubernetes/yum/repos/kubernetes-el7-x86_64/
enabled=1
gpgcheck=1
repo_gpgcheck=1
gpgkey=https://mirrors.aliyun.com/kubernetes/yum/doc/yum-key.gpg https://mirrors.aliyun.com/kubernetes/yum/doc/rpm-package-key.gpg
EOF
setenforce 0
#yum install -y kubelet kubeadm kubectl
#ps: 由于官网未开放同步方式, 可能会有索引gpg检查失败的情况, 这时请用如下安装
yum install -y --nogpgcheck kubelet kubeadm kubectl
#另一种错误处理方法:
#repomd.xml signature could not be verified for kubernetes
#使用aliyun镜像导致
#修改上面repo_gpgcheck=0
#禁用了GPG key的验证机制
#
#开机启动
systemctl enable kubelet && systemctl start kubelet
#下面需要执行、不操作kubeadm init 会出错
#首次安装 mv /etc/containerd/config.toml /tmp
#centos7安装docker-ce会自动安装containerd,centos8目前不会
#systemctl restart containerd
#systemctl status containerd
systemctl enable --now containerd
官方、可能无法访问
cat <<EOF | sudo tee /etc/yum.repos.d/kubernetes.repo
[kubernetes]
name=Kubernetes
baseurl=https://packages.cloud.google.com/yum/repos/kubernetes-el7-\$basearch
enabled=1
gpgcheck=1
gpgkey=https://packages.cloud.google.com/yum/doc/yum-key.gpg https://packages.cloud.google.com/yum/doc/rpm-package-key.gpg
exclude=kubelet kubeadm kubectl
EOF

# Set SELinux in permissive mode (effectively disabling it)
sudo setenforce 0
sudo sed -i 's/^SELINUX=enforcing$/SELINUX=permissive/' /etc/selinux/config

sudo yum install -y kubelet kubeadm kubectl --disableexcludes=kubernetes

sudo systemctl enable --now kubelet
Cgroups设置,不推荐cgroup
DOCKER_CGROUP=$(docker info | grep 'Cgroup Driver'| cut -d' ' -f4)
echo $DOCKER_CGROUP
cat >/etc/sysconfig/kubelet<<EOF
KUBELET_EXTRA_ARGS="--cgroup-driver=$DOCKER_CGROUP"  --pod-infra-container-image=registry.cn-hangzhou.aliyuncs.com/google_containers/pause:3.1
EOF
systemctl restart kubelet
back
cat >/etc/sysconfig/kubelet<<EOF
KUBELET_EXTRA_ARGS="--cgroup-driver=$DOCKER_CGROUP"  --network-plugin=cni --pod-infra-container-image=registry.cn-hangzhou.aliyuncs.com/google_containers/pause:3.1
EOF
查看kubelet的状态:
systemctl status kubelet
#kubelet现在每隔几秒钟重新启动一次,因为它在崩溃循环中等待kubeadm告诉它该怎么做。
查看kubelet版本:
kubelet --version
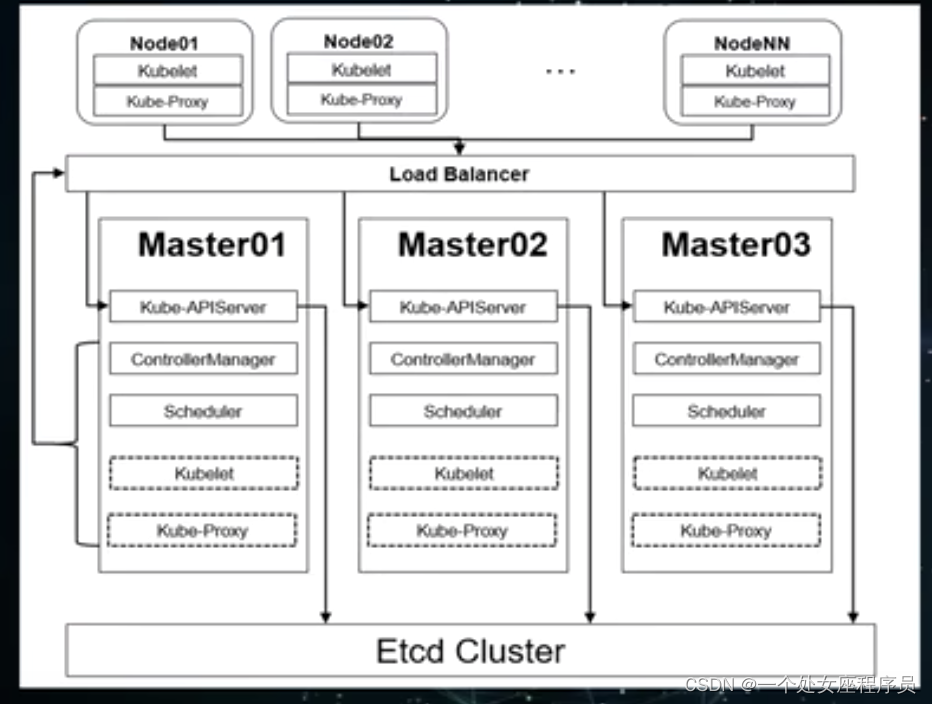
master主节点高可用组件安装,非必需,f5、slb都可以
yum install keepalived haproxy -y
keepalived haproxy 配置不在此详述
免密登录:在一台机器上ssh-copy-id到其他机器
高可用架构图:对于大规模集群etcd可单独部署、一般情况etcd可和master部署到同一机器上
loadbalancer(f5/keepalive+haproxy+vip)
初始化高可用集群
https://kubernetes.io/docs/setup/production-environment/tools/kubeadm/create-cluster-kubeadm/
#kubeadm config images list
#提前拉取提速
#kubeadm config images pull
kubeadm init \
--pod-network-cidr=10.244.0.0/16 \
--control-plane-endpoint "k8s-api:6443" \
--kubernetes-version v1.24.3 \
--image-repository=registry.aliyuncs.com/google_containers

#--upload-certs
#This error is likely caused by:
#        - The kubelet is not running
#        - The kubelet is unhealthy due to a misconfiguration of the node in some way (required cgroups disabled)
journalctl -xeu kubelet | grep Failed
#发现是k8s-api找不到的原因

#如果失败重置
kubeadm reset
token过期或新加master节点
#生成node节点添加信息
kubeadm token create --print-join-command
#生成master节点--certificate-key
kubeadm init phase upload-certs --upload-certs
calico安装
在这里插入代码片
官方文档
https://kubernetes.io/docs/setup/production-environment/tools/kubeadm/install-kubeadm/
添加manager节点
在这里插入代码片
添加node节点
在这里插入代码片
metrics磁盘内存网络https://github.com/kubernetes-sigs/metrics-server/
cd metrics-dir
kebectl create -f .
dashboard github项目https://github.com/kubernetes/dashboard
kubectl apply -f https://raw.githubusercontent.com/kubernetes/dashboard/v2.6.1/aio/deploy/recommended.yaml
#ClustIP修改成NodePort 可以外部访问
#chrome启动添加--test-type --ignore-certificate-errors
kuboard替代dashboard
https://www.kubord.cn
验证集群
kubectl get po --all-namespaces
kubectl top po -n kube-system
kubectl get svc
kubectl get svc -n kube-system
kubectl get po --all-namespaces -owide
#测试服务器间是否通pod->pod ,node->node
ping x.x.x


 740
740


 被折叠的 条评论
为什么被折叠?
被折叠的 条评论
为什么被折叠?
 到【灌水乐园】发言


