


创建第一个iOS程序
一、准备工作
1. 综合使用基础知识:类 对象 属性 数组 字典 字符 协议 代理 block
2.逻辑思维
3.搭建界面:系统提供的UIKit 自己定义拥有自己风格的控件
1️⃣UILable UITextField UITextView
2️⃣UIImageView UIView UIButton UILabel
3️⃣UITableView UIScrollView UICollectionView
4. 数据获取和存储
1️⃣多线程
2️⃣网络
3️⃣数据库
5. 自主思考和学习
二、如何创建一个iOS程序
1.使用系统的模板来创建程序:
xcode->ios模块-> single view app
2.模拟器的快捷键
commond + shift + h 回到主界面
commond + shift + hh 打开后台运行的所有程序
commond + shift + k 切换键盘
commond + 左右键 切换横竖屏
commond + 上下键 调节音量
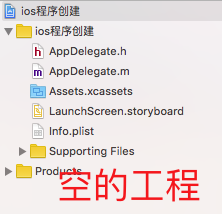
3.默认创建的程序提供的文件介绍
Assets.xcassets: 存放图片资源
Main.storyboard: 故事版,提供快速搭建界面的方式-拖控件,以及界面切换关系
LaunchScreen.storyboard: 几秒种后自动消失
info.plist :app的配置文件,配置app的名称,配置启动
AppDelegate .h.m 程序的代理,系统负责加载程序的硬件需求,但是程序会将这个app具体如何显示界面或者某些事件发生了到底要怎么处理的相关事情代理给AppDelegate类
注意:1️⃣一个应用程序有且只有一个程序代理
2️⃣AppDelegate用于配置程序的启动界面
3️⃣监听系统的事件
退到后台 applic!tionDidEnterBackground
恢复运行 applic!tionDidBecomeActive
程序跳转 openURL
程序被打断applicationWillTerminate
远程消息 didRegisterForRemoteNotificationsWithDeviceToken
系统内存吃紧 applicationDidReceiveMemoryWarning
4️⃣ViewController: UIViewController看不见 控制器 控制每个界面的显示
4.使用DidFinishLaunchingWithOptions 方法来配置程序加载
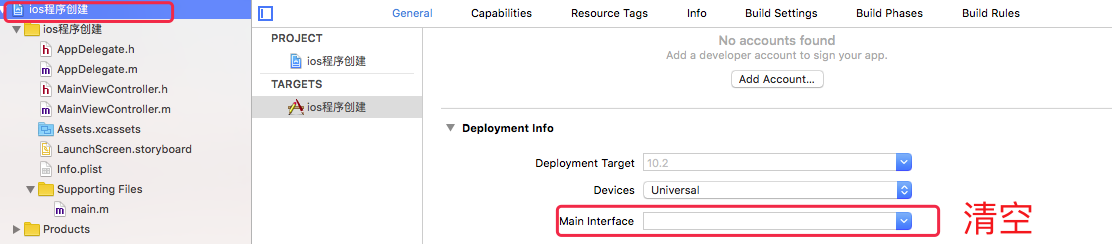
取消系统默认的配置(默认加载main.storyboard)

三、界面是什么东西-控制器
1.UIViewController 视图控制器,一个控制器管理一个界面
2.在界面里面添加的内容都是视图 子控件
3.控制器看不见 ,控制器默认提供一个UIView view,用于管理或者显示这个界面的子视图,因此向个界面添加子视图,实际上就是在这个界面的view上添加子视图
4.界面的执行流程&界面的生命周期
-init 创建并初始化这个界面对象:有界面对象了
-loadView 加载默认的view 1. 这个界面没有view 2.有了但是不想用系统默认的(一般不用)
-viewDidLoad 加载界面默认提供的视图 界面布局(一般代码在这里写)
-viewWillAppear 界面将显示
-viewDidAppear 界面已经显示出来
-viewWillDisappear 界面即将消失
-viewDidDisappear 界面已经消失
5.UIView属性和方法
-视图 - 看的到的控件都是视图, 所有的UIKit都是直接或者间接继承于UIView -视图就是一个矩形区域 渲染 GPU
-frame: 相对于父视图来说的 置控件的x y width height window.frame = [UIScreen mainSreen] .bounds
removeFromSuperview 将某个视图从父视图中删除
exchangeSubviewAtIndex:withSubviewAtIndex:交换两个视图的位置层级关系
addSubview添加一个子视图 最外层
bringSubviewToFront 将某一个子视图移动到最前
sendSubviewToBack 将一个子视图移动到最后
– bounds 相对于自己的坐标位置(0 ,0, width, heigth) CGRect
– center 中心点坐标 CGPoint
– backgroundColor [UIColor whiteColor]
– clipsToBounds 将超出自己区域的裁减掉
– layer.cornerRadius 将视图变成圆形
– tag 标签 用于查找子视图 [self.view viewWithTag:2]
–接收触摸事件
touchesBegan
touchesMoved
touchesEnd
touchesCancel 例如程序被电话打断
– UITouch 触摸对象
– locationInView :查找touch对象在某个视图里面的触摸点坐标
– previousLocationInView:上一个触摸点坐标
四、一个简单的创建视图程序
1.在AppDelegate.m中创建并显示窗口,否则程序是黑屏
#import "AppDelegate.h"
#import "MainViewController.h"
@interface AppDelegate ()
@end
@implementation AppDelegate
- (BOOL)application:(UIApplication *)application didFinishLaunchingWithOptions:(NSDictionary *)launchOptions {
//创建窗口,满屏
self.window = [[UIWindow alloc] initWithFrame:[UIScreen mainScreen].bounds];
//为窗口提供一个启动起来之后的默认界面
MainViewController *mainVC = [MainViewController new];
//设置背景颜色
mainVC.view.backgroundColor = [UIColor whiteColor];
//配置窗口的root controller
_window.rootViewController = mainVC;
//显示窗口
[_window makeKeyAndVisible];
return YES;
}
2.自己创建一个MainViewController类作为主视图
#import "MainViewController.h"

@interface MainViewController ()

@property (nonatomic, strong) UIView *orangeView;
@property (nonatomic, strong) UIView *blackView;


@end

@implementation MainViewController
//界面如何布局
//init
- (instancetype)init{
    self = [super init];

    if (self != nil) {

    }

    return self;

}

/*
//loadView
-  (void)loadView{
    NSLog(@"loadView");
}
*/

//viewDidLoad
- (void)viewDidLoad{
    [super viewDidLoad];

    //创建视图 self.view 控件与控件之间可以相互添加
    self.orangeView = [[UIView alloc] initWithFrame:CGRectMake(50, 20+50, 200, 300)];

    //改形状
    _orangeView.layer.cornerRadius = 100;

    //设置背景颜色 backgroundColor
    _orangeView.backgroundColor = [UIColor orangeColor];

    //设置将超出显示区域的子视图 裁剪
    _orangeView.clipsToBounds = YES;

    //设置tag值 用来快速查找某个子视图
    _orangeView.tag = 1;

    //将orangeView添加到界面上(添加到self.view) addSubview
    [self.view addSubview:_orangeView];

    UIView *redView = [[UIView alloc] initWithFrame:CGRectMake(20, 20, 260, 260)];
    redView.backgroundColor = [UIColor redColor];
    [_orangeView addSubview:redView];

    self.blackView = [[UIView alloc] initWithFrame:CGRectMake(150, 40, 200, 200)];
    _blackView.backgroundColor = [UIColor blackColor];
    _blackView.layer.cornerRadius = 100;
    [self.view addSubview:_blackView];


}
/*
//viewWillAppear
- (void)viewWillAppear:(BOOL)animated{
    NSLog(@"viewWillAppear");
}
*/
//响应点击事件
- (void)touchesBegan:(NSSet<UITouch *> *)touches withEvent:(UIEvent *)event{
    //交换orangeView和blackView的层级关系
    //1.如何获取这两个对象
    //通过子视图父视图的关系来获取
    /*
    UIView *v1 = [self.view.subviews objectAtIndex:0];
    UIView *v2 = [self.view.subviews objectAtIndex:1];
    [self.view bringSubviewToFront:v1];
    */
    //通过view的tag属性 每一个控件都有一个tag属性 整数 默认是0
    //viewWithTag方法通过tag获取一个子视图
    /*
    UIView *v1 = [self.view viewWithTag:1];
    [self.view bringSubviewToFront:v1];
    */
    //添加属性变量
    [self.view bringSubviewToFront:self.orangeView];


}

-(void)touchesMoved:(NSSet<UITouch *> *)touches withEvent:(UIEvent *)event{
    //获取手指触摸位置,点的坐标
    //获取UITouch对象 touches数组里面只有一个Touch对象
    UITouch *touch = [touches anyObject];

    //获取touch对象在self.view上触摸点的坐标
    CGPoint touchPoint = [touch locationInView:self.view];

    //更改黑色视图的位置 center
    self.blackView.center = touchPoint;

}


@end


 339
339


 被折叠的 条评论
为什么被折叠?
被折叠的 条评论
为什么被折叠?
 到【灌水乐园】发言


