


学习来源:MQ消息中间件之RabbitMQ以及整合SpringBoot2.x实战教程,已完结!
1.MQ引言
1.1 什么是MQ
MQ(Message Quene) : 翻译为 消息队列,通过典型的 生产者和消费者模型,生产者不断向消息队列中生产消息,消费者不断的从队列中获取消息。因为消息的生产和消费都是异步的,而且只关心消息的发送和接收,没有业务逻辑的侵入,轻松的实现系统间解耦。别名为 消息中间件 通过利用高效可靠的消息传递机制进行平台无关的数据交流,并基于数据通信来进行分布式系统的集成。
1.2 MQ有哪些
当今市面上有很多主流的消息中间件,如老牌的ActiveMQ、RabbitMQ,炙手可热的Kafka,阿里巴巴自主开发RocketMQ等。
1.3 不同MQ特点
# 1.ActiveMQ
		ActiveMQ 是Apache出品,最流行的,能力强劲的开源消息总线。它是一个完全支持JMS规范的的消息中间件。丰富的API,多种集群架构模式让ActiveMQ在业界成为老牌的消息中间件,在中小型企业颇受欢迎!

# 2.Kafka
		Kafka是LinkedIn开源的分布式发布-订阅消息系统,目前归属于Apache顶级项目。Kafka主要特点是基于Pull的模式来处理消息消费,
		追求高吞吐量,一开始的目的就是用于日志收集和传输。0.8版本开始支持复制,不支持事务,对消息的重复、丢失、错误没有严格要求,
		适合产生大量数据的互联网服务的数据收集业务。

# 3.RocketMQ
		RocketMQ是阿里开源的消息中间件,它是纯Java开发,具有高吞吐量、高可用性、适合大规模分布式系统应用的特点。RocketMQ思路起
		源于Kafka,但并不是Kafka的一个Copy,它对消息的可靠传输及事务性做了优化,目前在阿里集团被广泛应用于交易、充值、流计算、消
		息推送、日志流式处理、binglog分发等场景。

# 4.RabbitMQ
		RabbitMQ是使用Erlang语言开发的开源消息队列系统,基于AMQP协议来实现。AMQP的主要特征是面向消息、队列、路由(包括点对点和
		发布/订阅)、可靠性、安全。AMQP协议更多用在企业系统内对数据一致性、稳定性和可靠性要求很高的场景,对性能和吞吐量的要求还在
		其次。
RabbitMQ比Kafka可靠,Kafka更适合IO高吞吐的处理,一般应用在大数据日志处理或对实时性(少量延迟),可靠性(少量丢数据)要求稍低的场景使用,比如ELK日志收集。
2.RabbitMQde引言
2.1 RabbitMQ
基于
AMQP,elang语言开发,是部署最广泛的消息中间件,值最受欢迎的开源消息中间件之一。
# AMQP
    AMQP,Advanced Message Queuing Protocol,翻译成中文即高级消息队列协议。它是一个提供统一消息服务的应用层二进制协议.	基于此协议的客户端与消息中间件可传递消息,并不受不同平台、开发语言和操作系统的影响,即可跨平台传输。
协议模型:
2.2 RabbitMQ的安装
- 创建docker-compose.yml
version: "3.8"
services:
  rabbitmq:
     image: rabbitmq:3.8.3-management   # 版本可以不一样,但后缀一定要带,不然会拒绝访问
     container_name: rabbitmq
     restart: always
     ports:
       - 15672:15672
       - 5672:5672
     volumes:
       - /usr/local/docker/rabbitmq/data:/var/lib/rabbitmq
     environment:
       - RABBITMQ_DEFAULT_USER=guest
       - RABBITMQ_DEFAULT_PASS=guest
- 启动
[root@iZ2zeilgs2g5mj257lu8d4Z rabbitmq]# docker-compose up -d
Pulling rabbitmq (rabbitmq:3.8.3-management)...
3.8.3-management: Pulling from library/rabbitmq
23884877105a: Pull complete
bc38caa0f5b9: Pull complete
2910811b6c42: Pull complete
36505266dcc6: Pull complete
15c38f93e1dd: Pull complete
3d3f9ad120a1: Pull complete
5b6fe3271410: Pull complete
f19a60139bb3: Pull complete
6473f260fa7d: Pull complete
c6bfc255d245: Pull complete
ab9457e6d377: Pull complete
6b744fa5d23e: Pull complete
Digest: sha256:2895b23e08cd7fa0615d39147c1746908b0cb8064e9fbbf7770619651b501814
Status: Downloaded newer image for rabbitmq:3.8.3-management
Creating rabbitmq ... done
- 访问
3.RabbitMQ配置
3.1 RabbitMQ管理命令行
# 1.服务启动相关
	systemctl start|restart|stop|status rabbitmq-server

# 2.管理命令行。用来在不使用web管理界面的情况下命令操作RabbitMQ
	rabbitmqctl help 可以查看跟多的命令

# 3.插件命令管理
	rabbitmq-plugins enable|list|disable
3.2 web管理界面
3.2.1 overview概览
4.RabbitMQ的第一个程序
4.1AMQP协议回顾
4.2 RabbitMQ支持的消息模型
4.3 开发准备
引入依赖
<!-- https://mvnrepository.com/artifact/com.rabbitmq/amqp-client -->
<dependency>
  <groupId>com.rabbitmq</groupId>
  <artifactId>amqp-client</artifactId>
  <version>5.9.0</version>
</dependency>
创建工具类
public class RabbitMqUtils {

  private static ConnectionFactory factory;

  /**
     * 初始化连接工厂
     */
  static {
    factory = new ConnectionFactory();
    factory.setHost("127.0.0.1");
    factory.setPort(5672);
    factory.setVirtualHost("ems");
    factory.setUsername("ems");
    factory.setPassword("ems");
  }

  /**
     * 得到连接
     *
     * @return
     * @throws IOException
     * @throws TimeoutException
     */
  public static Connection getConnection() throws IOException, TimeoutException {
    return factory.newConnection();
  }

  /**
     * 关闭连接
     * @param channel
     * @param connection
     */
  public static void close(Channel channel, Connection connection) {
    try {
      if (null != channel) {
        channel.close();
      }
      if (null != connection) {
        connection.close();
      }
    } catch (Exception e) {
      e.printStackTrace();
    }
  }
}
4.4 第一种模型(直连)
在上图的模型中,有胰腺癌概念:
- P:生产者,也就是要发送消息的程序
- C:消费者,消息的接受者,会一直等待消息的到来
- queue:消息队列,途中红色部分。类似一个邮箱,可以缓存消息;生产者向其中投递消息,消费者从其中取出消息
1.开发生产者
// 得到连接
Connection connection = RabbitMqUtils.getConnection();
// 得到连接通道
Channel channel = connection.createChannel();
/*
         声明队列
         参数说明:第一个参数:队列名称,若没有,则自动创建
                 第二个参数:队列是否可持久化
                 第三个参数:是否独占队列
                 第四个参数:是否在消费完后,自动删除队列
                 第五个参数:额外附加参数
         */
channel.queueDeclare("hello",false,false,false,null);
/*
         发布消息
         参数说明:第一个参数:交换机
                 第二个参数:路由key
                 第三个参数:附带的参数设置,如消息的持久化等参数都是通过这里进行设置
                 第四个参数:具体消息
         */
channel.basicPublish("", "hello", null, "hello,world".getBytes());

// 关闭连接
RabbitMqUtils.close(channel, connection);
2.开发消费者
// 得到连接
Connection connection = RabbitMqUtils.getConnection();
// 得到连接通道
Channel channel = connection.createChannel();
/*
         声明队列
         参数说明:第一个参数:队列名称,若没有,则自动创建
                 第二个参数:队列是否可持久化
                 第三个参数:是否独占队列
                 第四个参数:是否在消费完后,自动删除队列
                 第五个参数:额外附加参数,队列的额外配置
         */
channel.queueDeclare("hello",false,false,false,null);

// 接受并打印消息
channel.basicConsume("hello",true,new DefaultConsumer(channel){
  @Override
  public void handleDelivery(String consumerTag, Envelope envelope, AMQP.BasicProperties properties, byte[] body) throws IOException {

    System.out.println("接收到的消息是:===="+new String(body));
  }
});
3.运行结果
4.5 第二种模型(工作队列)
`WOrk queues`,也被称为任务队列,任务模型。当消息处理比较耗时的时候,可能生产消息的速度会远远大于消息的消费速度。场次遗忘,消息会越积越多,无法及时处理。此时就可以使用work queues:**让多个消费者绑定同一队列,共同消费队列中的消息。**队列中的消息一旦消费,就会消失。因此任务是不会被重复执行的。
在上图的模型中,有胰腺癌概念:
- P:生产者,也就是要发送消息的程序
- C1:消费者1,消息的接受者,会一直等待消息的到来,假设他的消费速度很慢
- C2:消费者2,消息的接受者,会一直等待消息的到来,假设他的消费速度很快
1. 开发生产者
// 声明队列
channel.queueDeclare("work",false,false,false,null);
// 发送消息
for (int i = 0; i < 20; i++) {
  channel.basicPublish("","work",null,("第"+i+"条").getBytes());
}
2. 开发消费者1
channel.queueDeclare("work",false,false,false,null);

channel.basicConsume("work",true,new DefaultConsumer(channel){
  @Override
  public void handleDelivery(String consumerTag, Envelope envelope, AMQP.BasicProperties properties, byte[] body) throws IOException {
    try {
      Thread.sleep(500);
    } catch (InterruptedException e) {
      e.printStackTrace();
    }
    System.out.println("接收到的消息===="+new String(body));
  }
});
3.开发消费者2
channel.queueDeclare("work",false,false,false,null);

channel.basicConsume("work",true,new DefaultConsumer(channel){
  @Override
  public void handleDelivery(String consumerTag, Envelope envelope, AMQP.BasicProperties properties, byte[] body) throws IOException {
    System.out.println("接收到的消息===="+new String(body));
  }
});
4.运行结果
消费者1:
消费者2:
总结:默认情况下,RabbitMQ将按照顺序将每个消息发给下一个试用装。平均而言,每个消费者都会收到相同数量的消息。这种分法消息的方式称为循环
5. 消息自动确认机制
原文:Doing a task can take a few seconds. You may wonder what happens if one of the consumers starts a long task and dies with it only partly done. With our current code once RabbitMQ delivers message to the consumer it immediately marks it for deletion. In this case, if you kill a worker we will lose the message it was just processing. We’ll also lose all the messages that were dispatched to this particular worker but were not yet handled.
But we don’t want to lose any tasks. If a worker dies, we’d like the task to be delivered to another worker.
翻译:完成一项任务需要几秒钟的时间。您可能想知道,如果一个使用者开始了一个长任务,并且只完成了一部分,那么会发生什么情况。对于我们当前的代码,一旦 RabbitMQ 将消息传递给消费者,它会立即将其标记为删除。在这种情况下,如果你杀了一个工人,我们将失去它正在处理的消息。我们还会丢失所有发送给这个特定工作人员但尚未处理的消息。但我们不想失去任何任务。如果一个工人死了,我们希望把这个任务交给另一个工人。
// 每次只从消息队列中消费一条,实现能者多劳,不在平均分配
channel.basicQos(1);

// 关闭自动确认 autoAsk=false
channel.basicConsume("work",false,new DefaultConsumer(channel){
  @Override
  public void handleDelivery(String consumerTag, Envelope envelope, AMQP.BasicProperties properties, byte[] body) throws IOException {
    try {
      Thread.sleep(500);
    } catch (InterruptedException e) {
      e.printStackTrace();
    }
    System.out.println("接收到的消息===="+new String(body));
    // 手动确认   参数一:手动确认消息标识  参数二: 每次确认一个
    channel.basicAck(envelope.getDeliveryTag(),false);
  }
});
- 设置通道一次只能消费一个消息
- 关闭消息的自动确认,开启手动确认消息
消费者1:
消费者2:
4.6 第三种模型(广播)
fanout,也称广播
在广播模式下,消息发送流程是这样的:
- 可以有多个消费者
- 每个消费者有自己的队列
- 每个队列都要绑定到交换机
- 生产者发送的消息,只能发送到交换机,由交换机来决定要发诶那个队列,生产者无法决定
- 交换机吧消息发送给绑定过的所有队列
- 队列的消费者都能拿到消息,数据线一条消息被多个消费着消费
1.开发生产者
Connection connection = RabbitMqUtils.getConnection();

Channel channel = connection.createChannel();

// 声明交换机
channel.exchangeDeclare("message","fanout");

// 发送消息
channel.basicPublish("message","",null,"fanout=========".getBytes());

RabbitMqUtils.close(channel,connection);
2.开发消费者1
Connection connection = RabbitMqUtils.getConnection();

Channel channel = connection.createChannel();

// 声明交换机
channel.exchangeDeclare("message","fanout");

// 声明随机队列
String queue = channel.queueDeclare().getQueue();

// 绑定队列与交换机
channel.queueBind(queue,"message","");

// 消费消息
channel.basicConsume(queue,true,new DefaultConsumer(channel){
  @Override
  public void handleDelivery(String consumerTag, Envelope envelope, AMQP.BasicProperties properties, byte[] body) throws IOException {
    System.out.println("接收到消息======"+new String(body));
  }
});
3.开发消费者2
Connection connection = RabbitMqUtils.getConnection();

Channel channel = connection.createChannel();

// 声明交换机
channel.exchangeDeclare("message","fanout");

// 声明随机队列
String queue = channel.queueDeclare().getQueue();

// 绑定队列与交换机
channel.queueBind(queue,"message","");

// 消费消息
channel.basicConsume(queue,true,new DefaultConsumer(channel){
  @Override
  public void handleDelivery(String consumerTag, Envelope envelope, AMQP.BasicProperties properties, byte[] body) throws IOException {
    System.out.println("接收到消息======"+new String(body));
  }
});
4.运行结果
消费者1:
消费者2:
4.7 第四种模型(路由)
4.7.1 Routing之订阅模型-Direct直连
在fanout模式下,一条消息,会被所有绑定过同一交换机的队列消费,但是,在某些场景下,我们希望不同的消息被不同的消费者消费。这时就要用到direct类型的交换机。
在路由模式下:
- 队列与交换机的绑定,不能是任意绑定了,而是要指定一个RoutingKey,即路由key
- 消息的发送方在想交换机发送消息的时候,也必须指定消息的RoutingKey
- 加环境不在吧消息交个每一个绑定的队列,而是根据消息的RoutingKey进行判断,只有RoutingKey与消息的RoutingKey一致的队列,才会接收到消息。
流程:
图解:
- P:生产者,想交换机发送消息,发送消息时,会指定一个RoutingKey
- X:交换机,接收生产者的消息,然后吧消息递交给与RoutingKey完全匹配的队列
- C1:消费者,其所在的队列指定了需要RoutingKey为info、error、warning的消息
- C2:消费者,其所在的队列指定了需要RoutingKey为error的消息
1.开发生产者
Connection connection = RabbitMqUtils.getConnection();

Channel channel = connection.createChannel();

// 声明交换机
channel.exchangeDeclare("logs","direct");

// 发送指定路由key的消息
channel.basicPublish("logs","info",null,"info========".getBytes());
channel.basicPublish("logs","warning",null,"warning========".getBytes());
channel.basicPublish("logs","error",null,"error========".getBytes());

RabbitMqUtils.close(channel,connection);
2.开发消费者1
Connection connection = RabbitMqUtils.getConnection();

Channel channel = connection.createChannel();

channel.exchangeDeclare("logs","direct");

// 声明随机队列
String queue = channel.queueDeclare().getQueue();

// 绑定交换机与队列、路由key
channel.queueBind(queue,"logs","info");
channel.queueBind(queue,"logs","warning");
channel.queueBind(queue,"logs","error");

// 消费消息
channel.basicConsume(queue,true,new DefaultConsumer(channel){
  @Override
  public void handleDelivery(String consumerTag, Envelope envelope, AMQP.BasicProperties properties, byte[] body) throws IOException {
    System.out.println("接收到的消息是:====="+new String(body));
  }
});
3.开发消费者2
Connection connection = RabbitMqUtils.getConnection();

Channel channel = connection.createChannel();

channel.exchangeDeclare("logs","direct");

// 声明随机队列
String queue = channel.queueDeclare().getQueue();

// 绑定交换机与队列、路由key
channel.queueBind(queue,"logs","error");

// 消费消息
channel.basicConsume(queue,true,new DefaultConsumer(channel){
  @Override
  public void handleDelivery(String consumerTag, Envelope envelope, AMQP.BasicProperties properties, byte[] body) throws IOException {
    System.out.println("接收到的消息是:====="+new String(body));
  }
});
4.运行结果
消费者1:
消费者2:
4.7.2 Routing之订阅模型-Topic
Topic类型的交换机与Direct相比,都是根据RoutingKey把消息路由到不同的队列,只不过Topic类型key让队列子啊绑定RoutingKey的时候使用通配符!这种RoutingKey一般都是由一个或多个单词做成,多个单词之间以“.”分割,例如:item.insert
# 通配符
	* (star) can substitute for exactly one word.
	# (hash) can substitute for zero or more words.
# 如
	user.#    匹配 user.save.all 或者 user.save 等
	user.*    只能匹配 user.save
1.开发生产者
Connection connection = RabbitMqUtils.getConnection();

Channel channel = connection.createChannel();

// 声明交换机
channel.exchangeDeclare("user","topic");

// 发送指定路由key的消息
channel.basicPublish("user","user.save.all",null,"保存(#)========".getBytes());
channel.basicPublish("user","user.save",null,"保存(*)========".getBytes());

RabbitMqUtils.close(channel,connection);
2.开发消费者1
Connection connection = RabbitMqUtils.getConnection();

Channel channel = connection.createChannel();

channel.exchangeDeclare("user","topic");

// 声明随机队列
String queue = channel.queueDeclare().getQueue();

// 绑定交换机与队列、路由key
channel.queueBind(queue,"user","user.#");
channel.queueBind(queue,"user","user.*");

// 消费消息
channel.basicConsume(queue,true,new DefaultConsumer(channel){
  @Override
  public void handleDelivery(String consumerTag, Envelope envelope, AMQP.BasicProperties properties, byte[] body) throws IOException {
    System.out.println("接收到的消息是:====="+new String(body));
  }
});
3.开发消费者2
Connection connection = RabbitMqUtils.getConnection();

Channel channel = connection.createChannel();

channel.exchangeDeclare("user","topic");

// 声明随机队列
String queue = channel.queueDeclare().getQueue();

// 绑定交换机与队列、路由key
channel.queueBind(queue,"user","user.*");

// 消费消息
channel.basicConsume(queue,true,new DefaultConsumer(channel){
  @Override
  public void handleDelivery(String consumerTag, Envelope envelope, AMQP.BasicProperties properties, byte[] body) throws IOException {
    System.out.println("接收到的消息是:====="+new String(body));
  }
});
4.运行结果
消费者1:
消费者2:
注意⚠️:通配符的路由key是配置在在消费者
5.SpringBoot使用RabbitMQ
5.1 环境搭建
导入依赖
<dependency>
  <groupId>org.springframework.boot</groupId>
  <artifactId>spring-boot-starter-amqp</artifactId>
</dependency>
配置文件
spring:
  application:
    name: rabbitmq-springboot
  rabbitmq:
    host: 127.0.0.1
    port: 5672
    username: ems
    password: ems
    virtual-host: /ems
RabbitTemplate 用来简化rabbitmq的操作
5.2 第一种hello world模型使用
-
开发生产者
// hello world @Test public void test(){ rabbitTemplate.convertAndSend("hello","hello,world"); } -
开发消费者
@Component // 默认的是 持久化、非独占、不自动删除的队列 @RabbitListener(queuesToDeclare = @Queue("hello")) public class HelloCustomer { @RabbitHandler // 声明该方法为消费者的回调函数 public void receive(String message){ System.out.println("message="+message); } } -
运行结果
5.3 第二种work queue模型使用
-
开发生产者
// work queue @Test public void testWorkQueue(){ for (int i = 0; i < 10; i++) { rabbitTemplate.convertAndSend("work","work模型"+i); } } -
开发消费者
@Component public class WorkCustomer { @RabbitListener(queuesToDeclare = @Queue("work")) public void receive1(String message){ System.out.println("message1="+message); } @RabbitListener(queuesToDeclare = @Queue("work")) public void receive2(String message){ System.out.println("messages2"+message); } } -
运行结果
)
5.3 第三种publish/subscirbe(fanout)模型使用
-
开发生产者
// fanout @Test public void testFanout(){ rabbitTemplate.convertAndSend("logs","","fanout广播模型"); } -
开发消费者
@Component public class FanoutCustomer { @RabbitListener(bindings = { @QueueBinding( value = @Queue, // 声明临时队列 exchange = @Exchange(value = "logs", type = "fanout") ) }) public void receive1(String message) { System.out.println("message1=" + message); } @RabbitListener(bindings = { @QueueBinding( value = @Queue, // 声明临时队列 exchange = @Exchange(value = "logs", type = "fanout") ) }) public void receive2(String message) { System.out.println("message2=" + message); } } -
运行结果
5.4 第四种routing模型使用
-
开发生产者
// routing @Test public void testRouting(){ rabbitTemplate.convertAndSend("logs_routing","info","info日志"); rabbitTemplate.convertAndSend("logs_routing","warning","warning日志"); rabbitTemplate.convertAndSend("logs_routing","error","error日志"); } -
开发消费者
@Component public class RoutingCustomer { @RabbitListener(bindings = { @QueueBinding( value = @Queue, // 临时队列 exchange = @Exchange(value = "logs_routing",type = "direct"), // 指定交换机 key = {"info","warning","error"} // 路由key ), }) public void receive1(String message) { System.out.println("message1= " + message); } @RabbitListener(bindings = { @QueueBinding( value = @Queue, // 临时队列 exchange = @Exchange(value = "logs_routing",type = "direct"), // 指定交换机 key = {"error"} // 路由key ), }) public void receive2(String message) { System.out.println("message2= " + message); } } -
运行结果
5.5 第五种topic模型使用
-
开发生产者
// routing @Test public void testRouting(){ rabbitTemplate.convertAndSend("logs_routing","info","info日志"); rabbitTemplate.convertAndSend("logs_routing","warning","warning日志"); rabbitTemplate.convertAndSend("logs_routing","error","error日志"); } -
开发消费者
@Component public class TopicCustomer { @RabbitListener(bindings = { @QueueBinding( value = @Queue, exchange = @Exchange(value = "user",type = "topic"), key = {"user.#","user.*"} ) }) public void receive1(String message){ System.out.println("message1= "+message); } @RabbitListener(bindings = { @QueueBinding( value = @Queue, exchange = @Exchange(value = "user",type = "topic"), key = {"user.*"} ) }) public void receive2(String message){ System.out.println("message2= "+message); } } -
运行结果
6.MQ的应用场景
6.1 异步处理
场景说明:用户注册后,需要发送邮件和注册短信,传统的方法有两种 :串行和并行
-
串行:将注册信息写入数据库后,发送邮件,在发送注册短信,以上三个任务全部完成后才返回给客户的。这有个一个问题,邮件、短信并不是必须的,他只是一个通知,而这种做法让客户等待没有必要等待的东西。
-
并行:将注册信息写入数据库后,发送邮件的同时,发送短信,以上三个任务完成后,返回给客户端,并行方式能提高处理时间。
-
消息队列:虽然并行处理已经提高了处理时间,但是前面说了,邮件和短信对我使用网站没有任何影响,所有客户端没有必要等着其发送完成才显示注册成功,应该写入数据库后就返回。引入消息队列后,将发邮件、短信的业务进行异步处理。
由此可以看出,引入消息队列后,用户的响应时间就等于写入数据库的时间+写入消息队列的时间(可忽略不计),响应时间是串行的3倍,并行的2倍。
6.2 应用解耦
场景:双11是购物狂欢节,用户下单后,订单系统需要通知库存系统,传统的做法是订单系统调用库存系统的接口
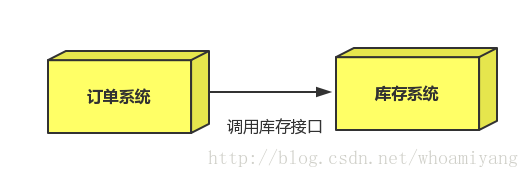
这种做法有一个缺点:
- 当库存系统出现故障时,订单就会失败。(这样马云将少赚好多好多钱^ ^)
- 订单系统和库存系统高耦合.
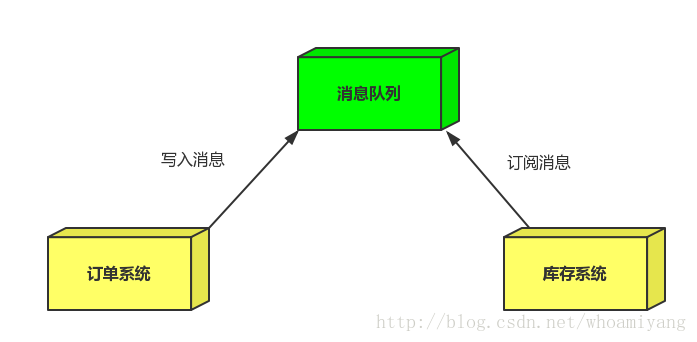
引入消息队列
- 订单系统:用户下单后,订单系统完成持久化处理,将消息写入消息队列,返回用户订单下单成功。
- 库存系统:订阅下单的消息,获取下单消息,进行库操作。
就算库存系统出现故障,消息队列也能保证消息的可靠投递,不会导致消息丢失(马云这下高兴了).
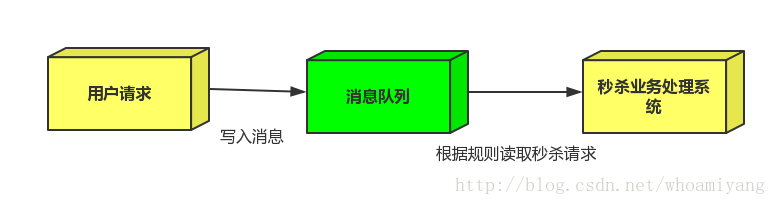
6.3 流量削峰
场景:秒杀活动,一般会因为流量过大,导致应用挂掉,为了解决这个问题,一般在应用前端加入消息队列。
作用:
- 可以控制活动人数,超过此一定阀值的订单直接丢弃(我为什么秒杀一次都没有成功过呢^^)
- 可以缓解短时间的高流量压垮应用(应用程序按自己的最大处理能力获取订单)
- 用户的请求,服务器收到之后,首先写入消息队列,加入消息队列长度超过最大值,则直接抛弃用户请求或跳转到错误页面.
- 秒杀业务根据消息队列中的请求信息,再做后续处理.
7. RabbitMQ的集群
7.1 集群架构
7.1.1 普通集群(副本集群)
https://www.rabbitmq.com/clustering.html
原文:All data/state required for the operation of a RabbitMQ broker is replicated across all nodes. An exception to this are message queues, which by default reside on one node, though they are visible and reachable from all nodes. To replicate queues across nodes in a cluster, use a queue type that supports replication.
翻译:RabbitMQ 代理操作所需的所有数据/状态都在所有节点上复制。这方面的一个例外是消息队列,默认情况下它驻留在一个节点上,但是它们是可见的,并且可以从所有节点访问。若要跨集群中的节点复制队列,请使用支持复制的队列类型。
- 架构图
该集群模式的问题
该模式存在一个问题就是当主节点故障后,从节点无法取到主节点中还未消费的消息实体。如果做了队列持久化或消息持久化,那么得等主节点恢复,然后才可被消费,并且在主节点恢复之前其它节点不能再创建主节点已经创建过的持久队列;如果没有持久化的话,消息就会失丢。
这种模式更适合非持久化队列,只有该队列是非持久的,客户端才能重新连接到集群里的其他节点,并重新创建队列。假如该队列是持久化的,那么唯一办法是将故障节点恢复起来。


 936
936


 被折叠的 条评论
为什么被折叠?
被折叠的 条评论
为什么被折叠?
 到【灌水乐园】发言


