


今天来学习一下模仿实现一个网易新闻客户端的主界面。话不多说,直接看效果图:

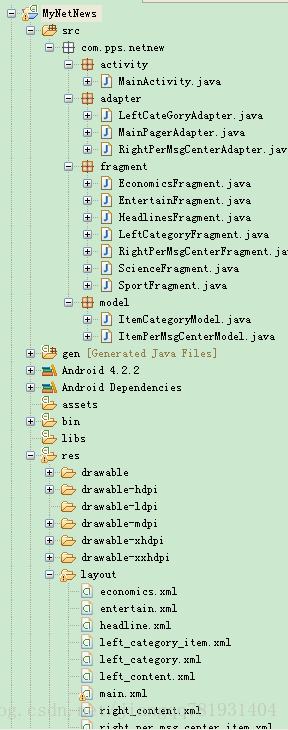
项目结构截图如下:
1.1:分析主页界面实现方法:
①:主界面的效果是,两边分别是左侧新闻服务列别,右侧是个人信息中心,分别是左右侧滑的。中间是各类别的新闻浏览,也是滑动的。
②:模拟实现方式:两侧可以使用上一讲我们实现人人客户端的的开源组件(SlidingMenu),使用方法请看上一篇(点击进入)。
③:中间滑动界面,可以使用ViewPager进行加入相应的布局,ViewPager的基本使用方法(请点击进入)。
④:中间切换类似于TabHost,这里我们不适用tabhost,直接使用ViewPager+Fragment来进行实现。
2.1:界面分别分析:
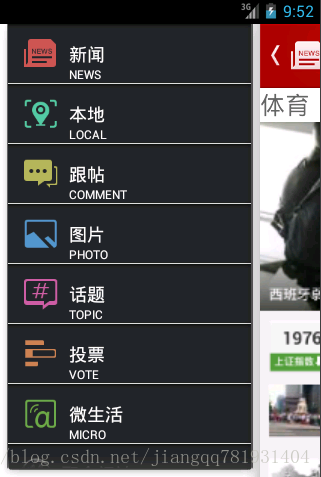
2.1.1:左边新闻服务列表界面:

这个界面很清晰,直接放入一个ListView布局就行:left_category.xml
<?xml version="1.0" encoding="utf-8"?>
<LinearLayout xmlns:android="http://schemas.android.com/apk/res/android"
    android:layout_width="match_parent"
    android:layout_height="match_parent"
    android:orientation="vertical"
    android:background="@drawable/biz_pics_menu_bg"
    android:id="@+id/left_category_id"
    >
    <ListView
        android:id="@+id/listview_left_category"
        android:layout_width="fill_parent"
        android:layout_height="fill_parent"
        android:cacheColorHint="#00000000"/>

</LinearLayout>下面是实现的该布局的fragment:LeftCategoryFragment.java
public class LeftCategoryFragment extends Fragment {
	private View mView;
	private Context mContext;
	private ListView listview_right_category;
	private LeftCateGoryAdapter mAdapter;
	private String[] category_name;
	private String[] category_title;
	private Integer[] category_img;
	private List<ItemCategoryModel> mLists;
	@Override
	public View onCreateView(LayoutInflater inflater, ViewGroup container,
			Bundle savedInstanceState) {
		if (null == mView) {
			mView = inflater.inflate(R.layout.left_category, container, false);
			initView();
			initValidata();
			bindData();
			initListener();
		}
		return mView;
	}

	/**
	 * 初始化界面元素
	 */
	private void initView() {
		listview_right_category = (ListView) mView
				.findViewById(R.id.listview_left_category);

	}

	/**
	 * 初始化变量
	 */
	private void initValidata() {
		mContext = mView.getContext();
		// 进行模拟和初始化需要进行服务类别设置的数据
		category_name = mContext.getResources().getStringArray(
				R.array.category_name);
		category_title = mContext.getResources().getStringArray(
				R.array.category_title);
		category_img = new Integer[] { R.drawable.biz_navigation_tab_news,
				R.drawable.biz_navigation_tab_local_news,
				R.drawable.biz_navigation_tab_ties,
				R.drawable.biz_navigation_tab_pics,
				R.drawable.biz_navigation_tab_ugc,
				R.drawable.biz_navigation_tab_voted,
				R.drawable.biz_navigation_tab_micro,
				R.drawable.biz_pc_list_polymetric_icon };

		mLists = new ArrayList<ItemCategoryModel>();
		// 构造要显示的服务类别对象集合
		for (int i = 0; i < category_img.length; i++) {
			mLists.add(new ItemCategoryModel(category_img[i], category_name[i],
					category_title[i]));
		}
		// 初始化适配器
		mAdapter = new LeftCateGoryAdapter(mContext, mLists);
	}

	/**
	 * 绑定数据
	 */
	private void bindData() {
		listview_right_category.setAdapter(mAdapter);
	}

	/**
	 * 初始化监听器
	 */
	private void initListener() {
		listview_right_category
				.setOnItemClickListener(new MyOnItemClickListener());
	}

	/**
	 * listview列表的item的点击监听
	 */
	class MyOnItemClickListener implements OnItemClickListener {

		public void onItemClick(AdapterView<?> arg0, View arg1, int arg2,
				long arg3) {
            Toast.makeText(mContext, "你选择了"+category_name[arg2], Toast.LENGTH_SHORT).show();
		}
	}
2.1.2:主页相应新闻tab:

中间很通常的想法就是使用TabHost,不过现在新版本基本已经不建议使用这种方式,那就用一种替代的方法,更加的方便好用ViewPager+Fragment; ViewPager选项卡,可以滑动,动态添加或者删除view。我们需要在布局文件中添加这个ViewPager,接下来看布局文件:main.xml
<LinearLayout xmlns:android="http://schemas.android.com/apk/res/android"
    xmlns:tools="http://schemas.android.com/tools"
    android:layout_width="fill_parent"
    android:layout_height="fill_parent"
    android:orientation="vertical">
     <RelativeLayout
         android:layout_width="fill_parent"
         android:layout_height="wrap_content"
         android:background="@drawable/base_actionbar_bg">
         <ImageButton
             android:id="@+id/main_left_imgbtn"
             android:layout_width="wrap_content"
             android:layout_height="wrap_content"
             android:layout_centerVertical="true"
             android:background="@drawable/biz_news_main_back_normal"
             android:layout_marginLeft="5dip"
             />
         <ImageView
             android:id="@+id/main_center_logo"
             android:layout_width="wrap_content"
             android:layout_height="wrap_content"
             android:layout_centerVertical="true"
             android:src="@drawable/logo"
             android:layout_toRightOf="@id/main_left_imgbtn"/>
         <TextView
             android:layout_width="wrap_content"
             android:layout_height="wrap_content"
             android:layout_toRightOf="@id/main_center_logo"
             android:layout_centerVertical="true"
             android:text="新闻"
             android:textColor="@color/whilte"
             android:textSize="25sp"/>
         <ImageButton
             android:id="@+id/main_right_imgbtn"
             android:layout_width="wrap_content"
             android:layout_height="wrap_content"
             android:layout_alignParentRight="true"
             android:layout_centerVertical="true"
             android:layout_marginRight="5dip"
             android:background="@drawable/night_base_main_action_personal_normal"/>
     </RelativeLayout>
      <android.support.v4.view.ViewPager
          android:id="@+id/myviewpager"
          android:layout_width="fill_parent"
          android:layout_height="wrap_content"
          >
          <android.support.v4.view.PagerTitleStrip
            android:id="@+id/pagertitle"
            android:layout_width="wrap_content"
            android:layout_height="wrap_content"
            android:layout_gravity="top" />
      </android.support.v4.view.ViewPager>

</LinearLayout> myViewPager=(ViewPager)this.findViewById(R.id.myviewpager);
pagertitle=(PagerTitleStrip)this.findViewById(R.id.pagertitle);
接着把要显示的视图(这边是相应的Fragment)添加到ViewPager中,此时我需要一个PagerAdapter,这里我们自定义一个PagerAdapter,继承FragmentPagerAdapter类
public class MainPagerAdapter extends FragmentPagerAdapter {
	private List<Fragment> mFragments;
	private String[] mViewpager_title;

	public MainPagerAdapter(FragmentManager fm) {
		super(fm);
		mFragments=new ArrayList<Fragment>();
		//把所有要显示的Fragment选项卡加入到集合中
		mFragments.add(new HeadlinesFragment());
		mFragments.add(new EntertainFragment());
		mFragments.add(new SportFragment());
		mFragments.add(new EconomicsFragment());
		mFragments.add(new ScienceFragment());
		mViewpager_title=new String[]{"头条","娱乐","体育","财经","科技"};
	}

	@Override
	public CharSequence getPageTitle(int position) {
		// TODO Auto-generated method stub
		return mViewpager_title[position];
	}

	@Override
	public Fragment getItem(int arg0) {
		return mFragments.get(arg0);
	}
	@Override
	public int getCount() {
		// TODO Auto-generated method stub
		return mFragments!=null?mFragments.size():0;
}上面的是ViewPager+Fragment视图滑动显示,因为网易新闻的主界面效果是侧滑效果,在这里我们是用SlidingMenu,使用方式见点击查看
// 设置滑动菜单的属性值
getSlidingMenu().setMode(SlidingMenu.LEFT_RIGHT);
getSlidingMenu().setTouchModeAbove(SlidingMenu.TOUCHMODE_MARGIN);
getSlidingMenu().setShadowWidthRes(R.dimen.shadow_width);
getSlidingMenu().setShadowDrawable(R.drawable.shadow);
getSlidingMenu().setBehindOffsetRes(R.dimen.slidingmenu_offset);
getSlidingMenu().setFadeDegree(0.35f);
//设置主界面的视图
setContentView(R.layout.main);
// 设置左边菜单打开后的视图界面
setBehindContentView(R.layout.left_content);
getSupportFragmentManager().beginTransaction().replace(R.id.left_content_id, new LeftCategoryFragment()).commit();
// 设置右边菜单打开后的视图界面
getSlidingMenu().setSecondaryMenu(R.layout.right_content);
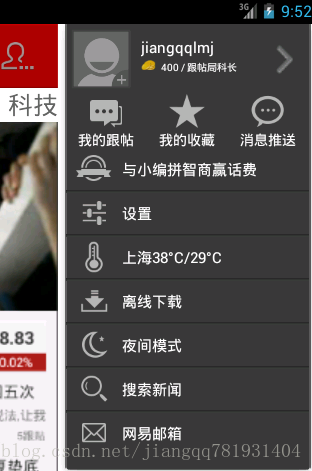
getSupportFragmentManager().beginTransaction().replace(R.id.right_content_id, new RightPerMsgCenterFragment()).commit();2.1.3:右边个人信息中心界面:
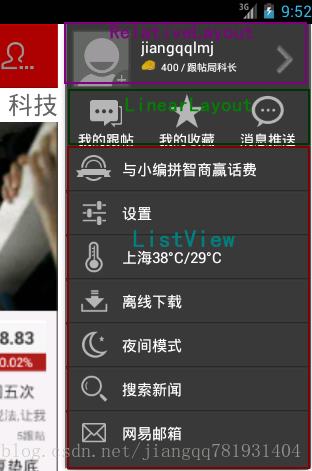
分析这个功能界面,顶部是一个RetativeLayout布局,中间是三个Button的LinearLayout,下面是一个ListView布局(个人实现分析.当然各位还有可能有其他的想法,只要能实现就OK)
①:顶部布局:
 <!-- 顶部个人基本信息 -->
    <RelativeLayout
        android:layout_width="fill_parent"
        android:layout_height="70dip">
        <ImageView
            android:id="@+id/right_permsg_center_img_usericon"
            android:layout_width="60dip"
            android:layout_height="60dip"
            android:layout_marginLeft="5dip"
            android:layout_marginTop="5dip"
            android:layout_marginBottom="5dip"
            android:src="@drawable/night_biz_pc_account_avatar_bg"
            android:scaleType="fitXY"/>
        <TextView
            android:id="@+id/right_permsg_center_tv_name"
            android:layout_width="wrap_content"
            android:layout_height="wrap_content"
            android:text="@string/permsg_center_name"
            android:layout_toRightOf="@id/right_permsg_center_img_usericon"
            android:layout_marginLeft="10dip"
            android:textColor="@color/whilte"
            android:textSize="15sp"
            android:layout_marginTop="13dip"/>
        <ImageView
            android:id="@+id/right_permsg_center_img_icon"
            android:layout_width="15dip"
            android:layout_height="15dip"
            android:scaleType="fitXY"
            android:layout_toRightOf="@id/right_permsg_center_img_usericon"
            android:layout_below="@id/right_permsg_center_tv_name"
            android:src="@drawable/biz_pc_main_money_icon"
            android:layout_alignLeft="@id/right_permsg_center_tv_name"/>
        <TextView
            android:id="@+id/right_permsg_center_tv_level"
            android:layout_width="wrap_content"
            android:layout_height="wrap_content"
            android:layout_below="@id/right_permsg_center_tv_name"
            android:layout_toRightOf="@id/right_permsg_center_img_icon"
            android:text="@string/permsg_center_level"
            android:textColor="@color/whilte"
            android:layout_marginLeft="5dip"
            android:textSize="10sp"
            android:layout_alignBaseline="@id/right_permsg_center_img_icon"
            android:layout_marginTop="2dip"/>
        <ImageButton
            android:id="@+id/right_permsg_center_imgbtn_select"
            android:layout_width="30dip"
            android:layout_height="30dip"
            android:layout_alignParentRight="true"
            android:layout_marginRight="10dip"
            android:background="@drawable/app_recommend_arrow"
            android:layout_centerVertical="true"/>
    </RelativeLayout>
<!-- 中间三个button  我的跟帖,我的收藏,消息推送 -->
    <LinearLayout
        android:layout_width="fill_parent"
        android:layout_height="wrap_content"
        android:orientation="horizontal">
        <Button
            android:id="@+id/right_permsg_center_btn_thread"
            android:layout_width="wrap_content"
            android:layout_height="wrap_content"
            android:text="@string/permsg_center_thread"
            android:drawableTop="@drawable/biz_pc_go_tie"
            android:background="#00000000"
            android:textColor="@color/whilte"
            android:layout_weight="1"
             />
        <Button
            android:id="@+id/right_permsg_center_btn_collect"
            android:layout_width="wrap_content"
            android:layout_height="wrap_content"
            android:text="@string/permsg_center_collect"
            android:drawableTop="@drawable/biz_pc_go_favor"
            android:background="#00000000"
            android:textColor="@color/whilte"
            android:layout_weight="1"
            />
        <Button

            android:id="@+id/right_permsg_center_btn_msgpush"
            android:layout_width="wrap_content"
            android:layout_height="wrap_content"
            android:text="@string/permsg_center_msgpush"
            android:drawableTop="@drawable/biz_pc_go_msg"
            android:background="#00000000"
            android:textColor="@color/whilte"
            android:layout_weight="1"
/> <ListView
android:id="@+id/right_permsg_center_listview"
android:layout_width="fill_parent"
android:layout_height="wrap_content"
android:divider="@drawable/biz_main_tab_divider"
android:cacheColorHint="#00000000"/>
public class RightPerMsgCenterFragment extends Fragment {
	private View mView;
	private Context mContext;
	private RightPerMsgCenterAdapter mAdapter;
	private ListView right_permsg_center_listview;
	private List<ItemPerMsgCenterModel> mLists;
	private String[] msg_center;
	private Integer[] img_center;

    @Override
    public View onCreateView(LayoutInflater inflater, ViewGroup container,
    		Bundle savedInstanceState) {
    	if(mView==null)
    	{
    	 mView=inflater.inflate(R.layout.right_per_msg_center, container, false);
    	 initView();
    	 initValidata();
    	 bindData();
    	}
    	return mView;
    }
    /**
     * 初始化界面元素
     */
    private void initView()
    {
    	right_permsg_center_listview=(ListView)mView.findViewById(R.id.right_permsg_center_listview);
    }

    /**
     * 初始化变量
     */
    private void initValidata()
    {
    	mContext=mView.getContext();
    	msg_center=mContext.getResources().getStringArray(R.array.msg_center);
    	img_center=new Integer[]{R.drawable.biz_pc_list_extra_plugin_icon_dark,
    			R.drawable.biz_pc_list_setting_icon_dark,
    			R.drawable.biz_pc_list_weather_icon_dark,
    			R.drawable.biz_pc_list_offline_icon_dark,
    			R.drawable.biz_pc_list_theme_icon_night_dark,
    			R.drawable.biz_pc_list_search_icon_dark,
    			R.drawable.biz_pc_list_mail_icon_dark};
    	mLists=new ArrayList<ItemPerMsgCenterModel>();
    	for(int i=0;i<msg_center.length;i++)
    	{
    		mLists.add(new ItemPerMsgCenterModel(img_center[i], msg_center[i]));
    	}
    	mAdapter=new RightPerMsgCenterAdapter(mContext, mLists);
    }

    /**
     * 绑定数据
     */
    private void bindData()
    {
    	right_permsg_center_listview.setAdapter(mAdapter);
    }
http://download.csdn.net/detail/jiangqq781931404/5835315
[注意]:这个Demo用到了开源组件slidingmenu_library,没有这个jar支持是有错误的,使用方法请见;
http://blog.csdn.net/developer_jiangqq/article/details/9466171


 1206
1206

 被折叠的 条评论
为什么被折叠?
被折叠的 条评论
为什么被折叠?
 到【灌水乐园】发言


