


【GitHub】
https://github.com/greenrobot/EventBus
【Jar文件】
http://download.csdn.net/download/yy1300326388/8727699
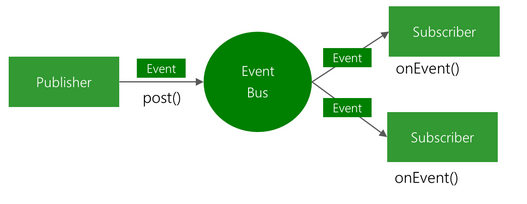
【原理】
EventBus是一个发/订阅事件的库,原理如下图所示:
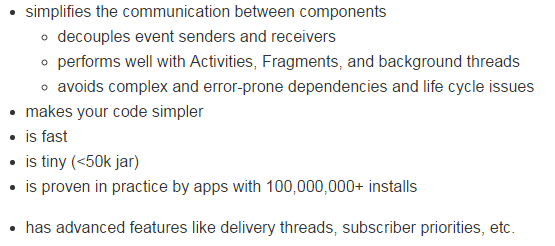
【特点】
【集成】
以event-bus 2.4.0 版本为例
1,下载EventBus Jar文件,添加到工程libs目录下,并将该Jar Add As Library
2,定义Model
package test.baozou.com.main;

/**
 * Created by jiangyu on 2015/10/16.
 */
public class MessageEvent {
public final String message;

    public MessageEvent(String msg) {
        this.message = msg;
    }
}
3,消息发送者
package test.baozou.com.main;
/**
 * Created by jiangyu on 2015/10/16.
 *
 * Event poster
 *
 */

import android.os.Bundle;
import android.support.v7.app.AppCompatActivity;
import android.view.View;
import android.widget.TextView;
import de.greenrobot.event.EventBus;

public class MainActivity extends AppCompatActivity {

    TextView postMsg;

    @Override
    protected void onCreate(Bundle savedInstanceState) {
         super.onCreate(savedInstanceState);
         setContentView(R.layout.activity_main);
         postMsg = (TextView)findViewById(R.id.post);
         postMsg.setOnClickListener(new View.OnClickListener() {
         @Override
         public void onClick(View v) {
              EventBus.getDefault().post(new MessageEvent("Hello everyone!"));
         }
        });
    }
}
4,消息订阅者
package test.baozou.com.main;

import android.app.Activity;
import android.content.Intent;
import android.os.Bundle;
import android.view.View;
import android.widget.TextView;
import de.greenrobot.event.EventBus;

/**
 * Created by jiangyu on 2015/10/16.
 * <p/>
* Event receiver
 */

public class ReceiverActivity extends Activity {

    TextView publish;

    @Override
    protected void onCreate(Bundle savedInstanceState) {
       super.onCreate(savedInstanceState);
       setContentView(R.layout.publish);
       EventBus.getDefault().register(this);
       publish = (TextView) findViewById(R.id.publish);
       publish.setOnClickListener(new View.OnClickListener() {
       @Override
       public void onClick(View v) {
          Intent intent = new Intent(ReceiverActivity.this,
MainActivity.class);
          startActivity(intent);
       }
    });
}

      @Override
      protected void onDestroy() {
           super.onDestroy();
           EventBus.getDefault().unregister(this);
      }

      public void onEvent(MessageEvent event) {
           publish.setText(event.message);
      }
}
【解析】
1,Event Bus支持4种订阅消息的方式
onEvent
onEventMainThread
onEventBackgroundThread
onEventAsync
四种订阅消息的区别:
onEvent:消息发送者和消息接收者在同一个线程,在onEvent中完成简单的任务。
onEventMainThread:消息接收者在主线程中调用,需要更新UI的操作在这个方法中实现。
onEventBackgroundThread:在后台线程中处理,如果消息的发送者不在主线程中,则直接在发送消息的后台线程中处理消息;如果消息的发送者在主线程中,则使用一个后台线程顺序处理所有的消息。例如例子中的saveToDisk耗时操作,通过这种方式处理。
onEventAsync:另起一个异步线程接收消息,耗时操作在这里接收处理。
onEvent

onEventMainThread

onEventBackgroundThread

onEventAsync

2,接收消息的优先级以及有序消息的传递
高优先级的接受者将会比低优先级的注册者先收到消息

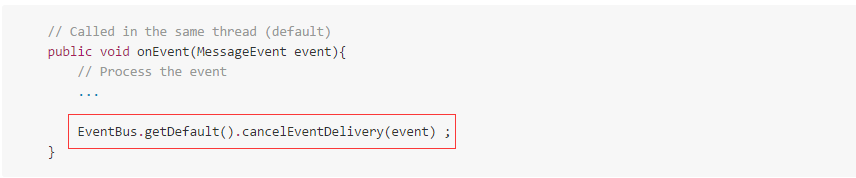
3,取消消息的接收
【小结】
EventBus的主要作用是用于组件间的消息传递,在这之前,用广播可以实现组件间的消息传递,EventBus具有更好的性能以及更优的代码可读性,降低了代码的耦合度,是一个不可多得的优秀开源项目。
今天先总结到这里,后续将进一步学习EventBus的实现原理,并总结成文,希望对大家有帮助。
【参考】
http://blog.csdn.net/harvic880925/article/details/40660137
http://blog.csdn.net/harvic880925/article/details/40787203
https://github.com/greenrobot/EventBus/blob/master/HOWTO.md


 2400
2400

 被折叠的 条评论
为什么被折叠?
被折叠的 条评论
为什么被折叠?
 到【灌水乐园】发言


