


大家好,我是你们的朋友 朋哥,今天开始朋哥开始研究鸿蒙了,会写一些文章分享给大家,希望多多提意见。
上一篇原创文章 解读了 鸿蒙开发布局的线性布局,也是使用最多的布局,一般情况下,该布局都能实现。
但是如果在一个布局多个组件的位置排布太乱,排列方式更多的时候,还是相对布局更实用。
简介:
DependentLayout是鸿蒙开发Java UI系统里的另一种常见布局。与DirectionalLayout相比,拥有更多的排布方式,每个组件可以指定相对于其他同级元素的位置,或者指定相对于父组件的位置。
总结一句:一个组件相对其它组件设置位置。
老规矩来个图看起来更直观:
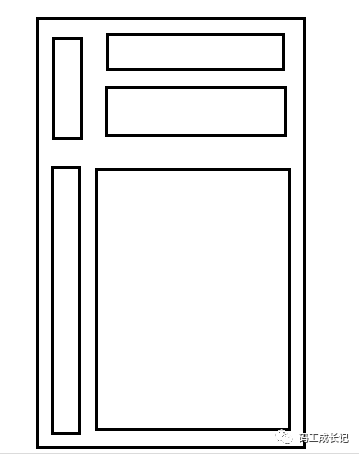
看上图一个界面中五个组件效果,相对布局就是一个相对另一个设置位置。
支持的XML属性
DependentLayout的自有XML属性(更详尽的文档 请查看 官网api)
属性名称
中文描述
取值说明
alignment
对齐方式
表示左对齐。
表示顶部对齐。
表示右对齐。
表示底部对齐。
表示水平居中对齐。
表示垂直居中对齐。
表示居中对齐。
DependentLayout所包含组件可支持的XML属性见下表:(更详尽的文档 请查看 官网api)
| 属性名称 | 中文描述 | 使用案例 |
|---|---|---|
| left_of | 将右边缘与另一个子组件的左边缘对齐 | ohos:left_of="$id:component_id" |
| right_of | 将左边缘与另一个子组件的右边缘对齐 | ohos:right_of="$id:component_id" |
| start_of | 将结束边与另一个子组件的起始边对齐 | ohos:start_of="$id:component_id" |
| end_of | 将起始边与另一个子组件的结束边对齐 | ohos:end_of="$id:component_id" |
| above | 将下边缘与另一个子组件的上边缘对齐 | ohos:above="$id:component_id" |
| below | 将上边缘与另一个子组件的下边缘对齐 | ohos:below="$id:component_id" |
| align_baseline | 将子组件的基线与另一个子组件的基线对齐 | ohos:align_baseline="$id:component_id" |
| align_left | 将左边缘与另一个子组件的左边缘对齐 | ohos:align_left="$id:component_id" |
| align_top | 将上边缘与另一个子组件的上边缘对齐 | ohos:align_top="$id:component_id" |
| align_right | 将右边缘与另一个子组件的右边缘对齐 | ohos:align_right="$id:component_id" |
| align_bottom | 将底边与另一个子组件的底边对齐 | ohos:align_bottom="$id:component_id" |
| align_start | 将起始边与另一个子组件的起始边对齐 | ohos:align_start="$id:component_id" |
| align_end | 将结束边与另一个子组件的结束边对齐 | ohos:align_end="$id:component_id" |
| align_parent_left | 将左边缘与父组件的左边缘对齐 | ohos:align_parent_left="true" ohos:align_parent_left="$boolean:true" |
| align_parent_top | 将上边缘与父组件的上边缘对齐 | ohos:align_parent_top="true" ohos:align_parent_top="$boolean:true" |
| align_parent_right | 将右边缘与父组件的右边缘对齐 | ohos:align_parent_right="true" ohos:align_parent_right="$boolean:true" |
| align_parent_bottom | 将底边与父组件的底边对齐 | ohos:align_parent_bottom="true" ohos:align_parent_bottom="$boolean:true" |
| align_parent_start | 将起始边与父组件的起始边对齐 | ohos:align_parent_start="true" ohos:align_parent_start="$boolean:true" |
| align_parent_end | 将结束边与父组件的结束边对齐 | ohos:align_parent_end="true" ohos:align_parent_end="$boolean:true" |
| center_in_parent | 将子组件保持在父组件的中心 | ohos:center_in_parent="true" ohos:center_in_parent="$boolean:true" |
| horizontal_center | 将子组件保持在父组件水平方向的中心 | ohos:horizontal_center="true" ohos:horizontal_center="$boolean:true" |
| vertical_center | 将子组件保持在父组件垂直方向的中心 | ohos:vertical_center="true" ohos:vertical_center="$boolean:true" |
排列方式
DependentLayout的排列方式分为两种:1,相对于其他同级组件,2,相对于其他父组件的位置进行布局。
相对于同级组件
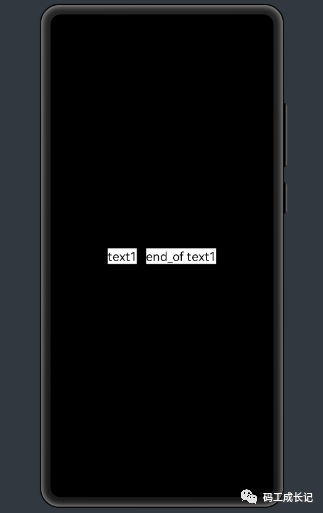
1,相对 同级 右对齐
<?xml version="1.0" encoding="utf-8"?>
<DependentLayout
    xmlns:ohos="http://schemas.huawei.com/res/ohos"
    ohos:width="match_parent"
    ohos:height="match_parent"
    ohos:alignment="center"
    ohos:background_element="#000000">
    <Text
        ohos:id="$+id:text1"
        ohos:width="match_content"
        ohos:height="match_content"
        ohos:left_margin="15vp"
        ohos:top_margin="15vp"
        ohos:bottom_margin="15vp"
        ohos:text="text1"
        ohos:text_size="20fp"
        ohos:background_element="#ffffff"/>
    <Text
        ohos:id="$+id:text2"
        ohos:width="match_content"
        ohos:height="match_content"
        ohos:left_margin="15vp"
        ohos:top_margin="15vp"
        ohos:right_margin="15vp"
        ohos:bottom_margin="15vp"
        ohos:text="end_of text1"
        ohos:text_size="20fp"
        ohos:background_element="#ffffff"
        ohos:end_of="$id:text1" // 相对于上面 text1 右边对其
        />
</DependentLayout>
效果图:
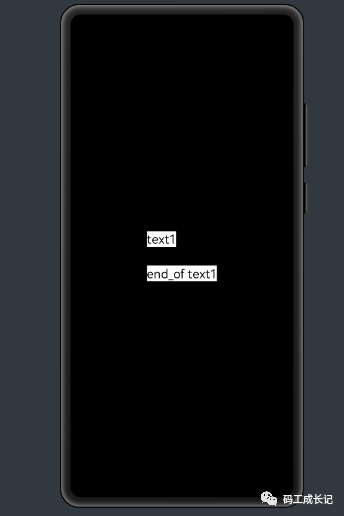
2,相对 同级 底部对齐
<?xml version="1.0" encoding="utf-8"?>
<DependentLayout
    xmlns:ohos="http://schemas.huawei.com/res/ohos"
    ohos:width="match_parent"
    ohos:height="match_parent"
    ohos:alignment="center"
    ohos:background_element="#000000">
    <Text
        ohos:id="$+id:text1"
        ohos:width="match_content"
        ohos:height="match_content"
        ohos:left_margin="15vp"
        ohos:top_margin="15vp"
        ohos:bottom_margin="15vp"
        ohos:text="text1"
        ohos:text_size="20fp"
        ohos:background_element="#ffffff"/>
    <Text
        ohos:id="$+id:text2"
        ohos:width="match_content"
        ohos:height="match_content"
        ohos:left_margin="15vp"
        ohos:top_margin="15vp"
        ohos:right_margin="15vp"
        ohos:bottom_margin="15vp"
        ohos:text="end_of text1"
        ohos:text_size="20fp"
        ohos:background_element="#ffffff"
        ohos:below="$id:text1"  // 相对于上面 text1 底部对其
        />
</DependentLayout>
效果图:
同样的 规律,其它的(above、start_of、left_of、right_of)分别设置不同的相对位置。
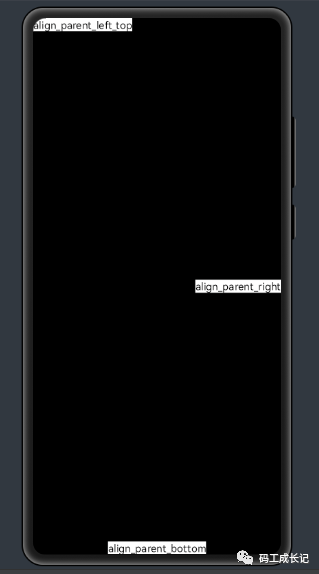
相对于父组件
以上位置布局可以组合,形成处于左上角、左下角、右上角、右下角的布局。
<?xml version="1.0" encoding="utf-8"?>
<DependentLayout
    xmlns:ohos="http://schemas.huawei.com/res/ohos"
    ohos:width="match_parent"
    ohos:height="match_parent"
    ohos:alignment="center"
    ohos:background_element="#000000">
    <Text
        ohos:id="$+id:text6"
        ohos:width="match_content"
        ohos:height="match_content"
        ohos:text="align_parent_right"
        ohos:text_size="15fp"
        ohos:background_element="#ffffff"
        ohos:align_parent_right="true" // 对象父组件居右
        ohos:center_in_parent="true" //剧中对其
        //  两者结合来就是 该组件显示在 屏幕最右侧,中间位置
        />
    <Text
        ohos:id="$+id:text7"
        ohos:width="match_content"
        ohos:height="match_content"
        ohos:text="align_parent_bottom"
        ohos:text_size="15fp"
        ohos:background_element="#ffffff"
        ohos:align_parent_bottom="true" // 相对父组件居低
        ohos:center_in_parent="true" // 屏幕剧中
        //  组合起来就是 该组件显示在底部的中间位置
        />
    <Text
        ohos:id="$+id:text9"
        ohos:width="match_content"
        ohos:height="match_content"
        ohos:text="align_parent_left_top"
        ohos:text_size="15fp"
        ohos:background_element="#ffffff"
        ohos:align_parent_left="true" // 相对父组件居左对其
        ohos:align_parent_top="true" // 相对父组件 居顶部对其
        />
        // 组合起来 该组件显示在屏幕的顶部最左边
</DependentLayout>效果图:
相对布局其实使用习惯了是最好实现界面的一种方式,建议大家多了解一下该布局的开发。
关注公众号【程序员漫话编程】,后台回复【鸿蒙】,即可获取上千鸿蒙开源组件~
原创不易,有用就关注一下。要是帮到了你 就给个三连吧,多谢支持。
觉得不错的小伙伴,记得帮我 点个赞和关注哟,笔芯笔芯~**
作者:码工
有问题请留言或者私信,可以 微信搜索:程序员漫话编程,关注公众号获得更多免费学习资料。


 823
823


 被折叠的 条评论
为什么被折叠?
被折叠的 条评论
为什么被折叠?
 到【灌水乐园】发言


