


本人是非计算机学院纯零基础,学了极客班的安卓微专业一个半月,准备将课程学习中做的作业进行一个整理,欢迎大家指正。
今天记录的项目是一个类似于安卓原生计时器使用handler来更新UI。当然这种方法肯定不是计时器的正确编写方法,在时间上会有很大误差,只是为了练习自定义控件和Handler的用法。
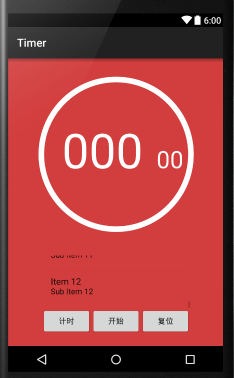
最后做出的结果如图所示,在自定义控件中绘制了圆环作为进度条,在进度条内绘制数字来显示时间。有开始、计次、复位三个按钮。当按计次按钮时在按钮上方的listview中会记录下当前记录条数、当前记录的总时间、当前记录和上次记录的间隔时间。
总体的思路就是绘制一个自定义控件,在activity中引用自定义控件,在activity中使用handler不断发送信息来更新自定义控件。
话不多说,直接上代码,由于是初学者,所以代码会注释得十分详细,也很适合初学者看。
public class ProgressBarByMyself extends View {
    //当前进度条进度
    private static float mProgress;
    //总进度
    private int mTotalProgress = 10000;
    //画圆环背景的画笔
    private Paint mCirclePaint;
    //画圆环的画笔
    private Paint mRingPaint;
    //画字体的画笔
    private Paint mTextPaint;
    //文字长度
    private float mTextWidth;
    //文字高度
    private float mTextHeight;
    //设置毫秒字体的画笔、文字长度、文字高度
    private Paint mTestTextPaint;
    private float mTestTextWidth;
    private float mTestTextHeight;
    //圆环背景颜色
    private int mCircleColor;
    //圆环颜色
    private int mRingColor;
    //圆环半径
    private float mRingRadius;
    //圆环宽度
    private float mStrokeWidth;
    //内圆半径
    private float mRadius;
    //圆心X坐标
    private int mXCenter;
    //圆心Y坐标
    private int mYCenter;


    public ProgressBarByMyself(Context context) {
        this(context, null);
    }

    public ProgressBarByMyself(Context context, AttributeSet attrs) {
        this(context, attrs, 0);
        //获取自定义属性
    }

    public ProgressBarByMyself(Context context, AttributeSet attrs, int defStyleAttr) {
        super(context, attrs, defStyleAttr);
        //初始化各种属性
        initAttrs(context, attrs);
        //获取画笔属性
        initVariable();
    }

    private void initVariable() {
        //设置背景圆环的画笔属性
        //设置抗锯齿属性
        mCirclePaint.setAntiAlias(true);
        //设置颜色
        mCirclePaint.setColor(mCircleColor);
        //设置画图样式为圆环
        mCirclePaint.setStyle(Paint.Style.STROKE);
        mCirclePaint.setStrokeWidth(mStrokeWidth);

        //设置红色活动进度条的画笔属性
        mRingPaint.setAntiAlias(true);
        mRingPaint.setColor(mRingColor);
        mRingPaint.setStyle(Paint.Style.STROKE);
        mRingPaint.setStrokeWidth(mStrokeWidth);

        //设置字体的画笔属性
        mTextPaint.setAntiAlias(true);
        mTextPaint.setStyle(Paint.Style.FILL);
        //设置透明度和色彩,第一个参数是透明度,后三个参数是色彩
        mTextPaint.setARGB(255, 255, 255, 255);
        //设置毫秒字体的画笔属性
        mTestTextPaint.setAntiAlias(true);
        mTestTextPaint.setStyle(Paint.Style.FILL);
        mTestTextPaint.setARGB(255, 255, 255, 255);
    }


    private void initAttrs(Context context, AttributeSet attrs) {
        //构建画笔实例
        mCirclePaint = new Paint();
        mRingPaint = new Paint();
        mTextPaint = new Paint();
        mTestTextPaint = new Paint();

        TypedArray typeArray = context.obtainStyledAttributes(attrs,R.styleable.ProgressBarByMyself);
        //设置圆环宽度
        mStrokeWidth = typeArray.getDimension(R.styleable.ProgressBarByMyself_strokeWidth, 20);
        //设置背景进度条的颜色
        mCircleColor=typeArray.getColor(R.styleable.ProgressBarByMyself_circleColor, 0xFFFFFFFF);
        //设置红色活动进度条的颜色
        mRingColor =typeArray.getColor(R.styleable.ProgressBarByMyself_ringColor, 0xFFFF3426);
    }


    @Override
    protected void onDraw(Canvas canvas) {
        super.onDraw(canvas);
        //获取各属性的具体数字,mXcenter和mYcenter是圆环的圆心坐标。
        mXCenter = getWidth()/2;
        mYCenter =getHeight()/3;
        mRadius = getWidth()/3;
        //设置字体的大小
        mTextPaint.setTextSize(mRadius*2/3);
        mTestTextPaint.setTextSize(mRadius/3);
        mRingRadius = mRadius +mStrokeWidth/2;
        //绘制出背景圆环
        canvas.drawCircle(mXCenter, mYCenter, mRingRadius, mCirclePaint);
        //获取字体属性
        Paint.FontMetrics fm = mTextPaint.getFontMetrics();
        mTextHeight = (int) Math.ceil(fm.descent - fm.ascent);
        Paint.FontMetrics lf = mTestTextPaint.getFontMetrics();
        mTestTextHeight = (int) Math.ceil(fm.descent - fm.ascent);
        //设置格式化显示数字
        String text = String.format("%1$03d",((int)mProgress/100));
        String testtext = String.format("%1$02d",(int)mProgress%100);
        //设置字体宽度是刚好将自己放满的宽度
        mTextWidth = mTextPaint.measureText(text, 0, text.length());
        mTestTextWidth = mTestTextPaint.measureText(testtext, 0, testtext.length());
        //计算外切矩形的点
        RectF Oval = new RectF();
        Oval.left = (mXCenter - mRingRadius);
        Oval.top=(mYCenter - mRingRadius);
        Oval.right = mRingRadius+mXCenter;
        Oval.bottom = mRingRadius+mYCenter;
        //画出显示秒和毫秒的数字以及红色活动进度条
        canvas.drawText(text,mXCenter-mTextWidth*2/3,mYCenter+mTextHeight/4,mTextPaint);
        canvas.drawText(testtext,mXCenter+mTextWidth/2,mYCenter+mTestTextHeight/4,mTestTextPaint);
        canvas.drawArc(Oval,-90,(mProgress/mTotalProgress*360),false,mRingPaint);
    }

    public static void setProgress(float progress) {
        mProgress = progress;
    }

    public static float getProgress(){
        float l=mProgress;
        return l;
    }
}
在自定义控件中主要画出的就是计时器的圆形进度条和显示的数字,其中的mProgress设置的是当前进度条的进度,在Activity中就是通过这一参数才对进度条进行更新,同样的计次中listview中的数据也是通过获取这个mProgress来计时的。
接着就上MainActivity的代码。
public class HandlerActivity extends Activity implements View.OnClickListener {

    private ArrayList<TimeCount> timeCounts = new ArrayList<TimeCount>();
    //设置Message的辨别代号
    public static final int MESSAGE_CODE = 888888;
    //初始化Handler
    private TestHandler mTestHandler;
    //初始化按钮
    private Button startButton;
    private Button timeCountButton;
    private Button resetButton;
    //初始化自定义控件
    public ProgressBarByMyself progressBarByMyself;
    //设置进度条状态标识,flag的真假显示了当前是运行还是暂停
    private Boolean flag = true;
    //用于记录当前是第几次计次
    private int count = 1;
    //初始化listView
    private ListView listView;
    private TimeAdapter adapter;
    private float countthistime=0;

    @Override
    protected void onCreate(Bundle savedInstanceState) {
        super.onCreate(savedInstanceState);
        setContentView(R.layout.activity_main);
        //通过id寻找按钮和自定义控件
        progressBarByMyself = (ProgressBarByMyself) findViewById(R.id.my_progress_view);
        startButton = (Button) findViewById(R.id.start_button);
        timeCountButton = (Button) findViewById(R.id.time_count_button);
        resetButton = (Button) findViewById(R.id.reset_button);
        //为按钮设置点击事件
        startButton.setOnClickListener(this);
        timeCountButton.setOnClickListener(this);
        resetButton.setOnClickListener(this);
        //为listview设置适配器
        adapter= new TimeAdapter(HandlerActivity.this,R.layout.time_countent,timeCounts);
        listView = (ListView) findViewById(R.id.listView);
        listView.setAdapter(adapter);
    }


    @Override
    public void onClick(View v) {
        switch (v.getId()){
            case R.id.start_button:
                start();
                break;
            case R.id.time_count_button:
                count();
                break;
            case R.id.reset_button:
                reset();
                break;
        }
    }

    public void start(){
        if (flag) {
            //如果之前是暂停状态,那么获取当前进度条的进度信息然后继续发送消息
            mTestHandler = new TestHandler(this);
            Message message = mTestHandler.obtainMessage();
            message.arg1 = 0;
            message.arg2 = 1;
            message.what = MESSAGE_CODE;
            message.obj = (int) progressBarByMyself.getProgress();
            mTestHandler.sendMessage(message);
            //当flag设置为false即开始状态
            flag = false;
            startButton.setText("停止");
        } else {
            //如果之前是开始状态,那么现在将loop里的消息全部清除,这样就暂停了
            mTestHandler.removeMessages(MESSAGE_CODE);
            flag = true;
            startButton.setText("开始");
            }
    }

    //计时方法
    public void count() {
        //向listView的适配器传入当前记录是第几条,当前经过总时间,和当前总之间与上次记录的时间差
        TimeCount timeCount= new TimeCount(count,progressBarByMyself.getProgress()/100,(progressBarByMyself.getProgress()-countthistime)/100);
        //将当前记录的总时间保存起来,用来下次减的时候用
        countthistime=progressBarByMyself.getProgress();
        timeCounts.add(timeCount);
        //liseView里加上变化的数据
        adapter.notifyDataSetChanged();
        //让表示记录个数的变量自增
        count += 1;
    }

    //重置方法
    public void reset(){
        //移除loop内的Message
        mTestHandler.removeMessages(MESSAGE_CODE);
        //将进度条进度设置为零并重画
        progressBarByMyself.setProgress(0);
        progressBarByMyself.invalidate();
        //将liseView和适配器都清零
        timeCounts.clear();
        adapter.clear();
        count=1;
        countthistime = 0;
        //将按钮和文本都清零
        startButton.setText("开始");
        flag=true;
    }

    //创建TestHandler类
    public class TestHandler extends Handler {

        public WeakReference<HandlerActivity> mHandlerActivityWeakReference;

        public TestHandler(HandlerActivity activity) {
            mHandlerActivityWeakReference = new WeakReference<>(activity);
        }

        @Override
        public void handleMessage(Message msg) {
            super.handleMessage(msg);
            HandlerActivity handlerActivity = mHandlerActivityWeakReference.get();
            // 接收消息
            switch (msg.what) {
                case MESSAGE_CODE:
                    int value = (int) msg.obj;
                    //将接受到的时间值设置为进度条的进度值并让控件重画
                    progressBarByMyself.setProgress(value);
                    progressBarByMyself.invalidate();
                    //更改Message信息
                    msg = Message.obtain();
                    msg.arg1 = 0;
                    msg.arg2 = 1;
                    msg.what = MESSAGE_CODE;
                    msg.obj = value + 1;
                    //每隔10ms发一次消息
                    sendMessageDelayed(msg, 10);
                    break;
            }
        }
    }
}
在主布局中,通过开始、计次和清零按钮来对UI进行控制。
当点击开始按钮时,Message消息开始每隔10ms发送一次,接受到消息之后就将消息里的value值给mProgress,然后进行UI更新。
当计时器开始计时后,开始按钮的文本就更换为暂停,点击暂停后,就会将MessageQueue里的Message全部清空,这样就不会继续接受和发送了,进度条也就不动了。
当点击计次按钮时,会将当前的次数count、进度条的进度mProgress、本次记录的进度与上次记录的进度相减这三个信息传入adapter,同时将当前进度记录下来用来下次计算。为了让最后的记录始终能最先看到,listview里要设置一个属性android:stackFromBottom=”true”这样每次listview更新后会自动滚动到最下方。
接下来贴上Adapter和计次类。
public class TimeCount {

    //初始化当前记录条数、当前总时间、本次与上次记录的时间差
    private int mNumber;
    private float time;
    private float alltime;
    private static float Alltime;

    //获取到当前记录条数、当前总时间、本次与上次记录的时间差
    public TimeCount(int count, float progress, float v) {
        this.mNumber = count;
        this.alltime = progress;
        this.time = v;
    }

    public int getmNumber() {
        return mNumber;
    }

    public float getTime() {
        return time;
    }

    public float getAlltime() {
        return alltime;
    }


}
public class TimeAdapter extends ArrayAdapter<TimeCount> {
private int resourceId;
public TimeAdapter(Context context, int textViewResourceId, List<TimeCount> objects) {
super(context,textViewResourceId, objects);
resourceId = textViewResourceId;
}
@Override
public View getView( int position,View convertView, ViewGroup parent) {
//获取位置信息
TimeCount timeCount = getItem(position);
View view;
view = LayoutInflater.from(getContext()).inflate(resourceId, null);
//计次参数
TextView number= (TextView) view.findViewById(R.id.number);
//计次时间间隔
TextView time= (TextView) view.findViewById(R.id.time);
//当前经过的总时间
TextView alltime= (TextView) view.findViewById(R.id.all_time);
//获取到HandlerActivity传入TimeCount里的记录条数、当前总时间、两次记录时间差得信息
number.setText(String.format("# %1$02d",timeCount.getmNumber()));
time.setText(timeCount.getTime()+"");
alltime.setText(timeCount.getAlltime()+"");
return view;
}
}由于本人是新手,所以一些命名和格式可能做得不规范,欢迎大家指正。


 1816
1816


 被折叠的 条评论
为什么被折叠?
被折叠的 条评论
为什么被折叠?
 到【灌水乐园】发言


