


 本文深入探讨了Spring Boot中@Transactional注解的工作原理,从@EnableTransactionManagement注解开始,详细解释了TransactionAutoConfiguration配置类的作用。内容涉及内部类TransactionTemplateConfiguration和EnableTransactionManagementConfiguration,以及如何通过AutoProxyRegistrar和InfrastructureAdvisorAutoProxyCreator创建代理。文章还分析了事务代理的创建过程,包括BeanFactoryTransactionAttributeSourceAdvisor、TransactionAttributeSource和TransactionInterceptor之间的关系,并解释了为何内部调用事务可能会失效及其解决方案。
上节《springboot ApplicationContext之finishBeanFactoryInitialization(getBean())下》我们遗留了一个问题:
InfrastructureAdvisorAutoProxyCreator是什么时候加载到spring容器的,又是怎么产生代理的呢?
我们就来解答下,但是跟今天的主题@Transactional又有什么关系呢?跟我往下看!
springboot 中@Transactional起作用是启用了**@EnableTransactionManagement**注解,而这个注解的默认加载是在TransactionAutoConfiguration中,这个类定义在spring.factories中对应的key=org.springframework.boot.autoconfigure.EnableAutoConfiguration(关于这个注解如何使用,及作用,看相关的springboot starter)。
@Configuration(proxyBeanMethods = false)
@ConditionalOnClass(PlatformTransactionManager.class)
@AutoConfigureAfter({ JtaAutoConfiguration.class, HibernateJpaAutoConfiguration.class,
		DataSourceTransactionManagerAutoConfiguration.class, Neo4jDataAutoConfiguration.class })
@EnableConfigurationProperties(TransactionProperties.class)
public class TransactionAutoConfiguration {

	@Bean
	@ConditionalOnMissingBean
	public TransactionManagerCustomizers platformTransactionManagerCustomizers(
			ObjectProvider<PlatformTransactionManagerCustomizer<?>> customizers) {
		return new TransactionManagerCustomizers(customizers.orderedStream().collect(Collectors.toList()));
	}

	@Bean
	@ConditionalOnMissingBean
	@ConditionalOnSingleCandidate(ReactiveTransactionManager.class)
	public TransactionalOperator transactionalOperator(ReactiveTransactionManager transactionManager) {
		return TransactionalOperator.create(transactionManager);
	}

	@Configuration(proxyBeanMethods = false)
	@ConditionalOnSingleCandidate(PlatformTransactionManager.class)
	public static class TransactionTemplateConfiguration {

		@Bean
		@ConditionalOnMissingBean(TransactionOperations.class)
		public TransactionTemplate transactionTemplate(PlatformTransactionManager transactionManager) {
			return new TransactionTemplate(transactionManager);
		}

	}

	@Configuration(proxyBeanMethods = false)
	@ConditionalOnBean(TransactionManager.class)
	@ConditionalOnMissingBean(AbstractTransactionManagementConfiguration.class)
	public static class EnableTransactionManagementConfiguration {

		@Configuration(proxyBeanMethods = false)
		@EnableTransactionManagement(proxyTargetClass = false)
		@ConditionalOnProperty(prefix = "spring.aop", name = "proxy-target-class", havingValue = "false",
				matchIfMissing = false)
		public static class JdkDynamicAutoProxyConfiguration {

		}

		@Configuration(proxyBeanMethods = false)
		@EnableTransactionManagement(proxyTargetClass = true)
		@ConditionalOnProperty(prefix = "spring.aop", name = "proxy-target-class", havingValue = "true",
				matchIfMissing = true)
		public static class CglibAutoProxyConfiguration {

		}

	}

}
这个配置类,装了一个个内部类,我们看跟@Transactional相关的EnableTransactionManagementConfiguration 类,该类中定义了两个内部类JdkDynamicAutoProxyConfiguration 、CglibAutoProxyConfiguration 区别在于spring.aop.proxy-target-class的处理:
- true, 使用cglib代理
- false,使用jdk代理(注意要相关的类满足条件,不然还是会使用cglib代理)
同时都有注解@EnableTransactionManagement,该注解引入了类TransactionManagementConfigurationSelector(import的解析《springboot启动bean加载处理器ConfigurationClassPostProcessor 三(@Import注解)》),注意其中的另一个属性mode,本文在AdviceMode.PROXY(jdk代理)模式下。
@Target(ElementType.TYPE)
@Retention(RetentionPolicy.RUNTIME)
@Documented
@Import(TransactionManagementConfigurationSelector.class)
public @interface EnableTransactionManagement {

	/**
	 * Indicate whether subclass-based (CGLIB) proxies are to be created ({@code true}) as
	 * opposed to standard Java interface-based proxies ({@code false}). The default is
	 * {@code false}. <strong>Applicable only if {@link #mode()} is set to
	 * {@link AdviceMode#PROXY}</strong>.
	 * <p>Note that setting this attribute to {@code true} will affect <em>all</em>
	 * Spring-managed beans requiring proxying, not just those marked with
	 * {@code @Transactional}. For example, other beans marked with Spring's
	 * {@code @Async} annotation will be upgraded to subclass proxying at the same
	 * time. This approach has no negative impact in practice unless one is explicitly
	 * expecting one type of proxy vs another, e.g. in tests.
	 */
	boolean proxyTargetClass() default false;

	/**
	 * Indicate how transactional advice should be applied.
	 * <p><b>The default is {@link AdviceMode#PROXY}.</b>
	 * Please note that proxy mode allows for interception of calls through the proxy
	 * only. Local calls within the same class cannot get intercepted that way; an
	 * {@link Transactional} annotation on such a method within a local call will be
	 * ignored since Spring's interceptor does not even kick in for such a runtime
	 * scenario. For a more advanced mode of interception, consider switching this to
	 * {@link AdviceMode#ASPECTJ}.
	 */
	AdviceMode mode() default AdviceMode.PROXY;

	/**
	 * Indicate the ordering of the execution of the transaction advisor
	 * when multiple advices are applied at a specific joinpoint.
	 * <p>The default is {@link Ordered#LOWEST_PRECEDENCE}.
	 */
	int order() default Ordered.LOWEST_PRECEDENCE;

}
看看这个引入类都引进了啥
public class TransactionManagementConfigurationSelector extends AdviceModeImportSelector<EnableTransactionManagement> {

	/**
	 * Returns {@link ProxyTransactionManagementConfiguration} or
	 * {@code AspectJ(Jta)TransactionManagementConfiguration} for {@code PROXY}
	 * and {@code ASPECTJ} values of {@link EnableTransactionManagement#mode()},
	 * respectively.
	 */
	@Override
	protected String[] selectImports(AdviceMode adviceMode) {
		switch (adviceMode) {
			//当前模式
			case PROXY:
				return new String[] {AutoProxyRegistrar.class.getName(),
						ProxyTransactionManagementConfiguration.class.getName()};
			case ASPECTJ:
				return new String[] {determineTransactionAspectClass()};
			default:
				return null;
		}
	}

	private String determineTransactionAspectClass() {
		return (ClassUtils.isPresent("javax.transaction.Transactional", getClass().getClassLoader()) ?
				TransactionManagementConfigUtils.JTA_TRANSACTION_ASPECT_CONFIGURATION_CLASS_NAME :
				TransactionManagementConfigUtils.TRANSACTION_ASPECT_CONFIGURATION_CLASS_NAME);
	}

}
两个重要的类:
-
AutoProxyRegistrar,又是个引入类,
if (mode == AdviceMode.PROXY) { //重点看下这里注入的类 AopConfigUtils.registerAutoProxyCreatorIfNecessary(registry); if ((Boolean) proxyTargetClass) { AopConfigUtils.forceAutoProxyCreatorToUseClassProxying(registry); return; } }最终注入InfrastructureAdvisorAutoProxyCreator,这就回答了开头是如何注入的问题了!good!
-
ProxyTransactionManagementConfiguration
这里要注意下:springboot 默认开启@EnableAspectJAutoProxy注解(详情看AopAutoConfiguration),会导致在容器中不是InfrastructureAdvisorAutoProxyCreator,而是AnnotationAwareAspectJAutoProxyCreator,本文是在加了spring.aop.auto=false 关闭状态!
这里会有个优先级,spring容器中beanname=org.springframework.aop.config.internalAutoProxyCreator 会只有一个类型!例如我们加了@EnableTransactionManagement注解,又同时有@EnableAspectJAutoProxy注解,这时候AnnotationAwareAspectJAutoProxyCreator就会覆盖InfrastructureAdvisorAutoProxyCreator注入到容器中。
public abstract class AopConfigUtils {
	public static final String AUTO_PROXY_CREATOR_BEAN_NAME =
			"org.springframework.aop.config.internalAutoProxyCreator";
	static {
		// 三种类型
		APC_PRIORITY_LIST.add(InfrastructureAdvisorAutoProxyCreator.class);
		APC_PRIORITY_LIST.add(AspectJAwareAdvisorAutoProxyCreator.class);
		APC_PRIORITY_LIST.add(AnnotationAwareAspectJAutoProxyCreator.class);
	}

	@Nullable
	private static BeanDefinition registerOrEscalateApcAsRequired(
			Class<?> cls, BeanDefinitionRegistry registry, @Nullable Object source) {

		Assert.notNull(registry, "BeanDefinitionRegistry must not be null");

		if (registry.containsBeanDefinition(AUTO_PROXY_CREATOR_BEAN_NAME)) {
			BeanDefinition apcDefinition = registry.getBeanDefinition(AUTO_PROXY_CREATOR_BEAN_NAME);
			//优先级高的会覆盖之前注入bean
			if (!cls.getName().equals(apcDefinition.getBeanClassName())) {
				int currentPriority = findPriorityForClass(apcDefinition.getBeanClassName());
				int requiredPriority = findPriorityForClass(cls);
				if (currentPriority < requiredPriority) {
					apcDefinition.setBeanClassName(cls.getName());
				}
			}
			return null;
		}

		RootBeanDefinition beanDefinition = new RootBeanDefinition(cls);
		beanDefinition.setSource(source);
		beanDefinition.getPropertyValues().add("order", Ordered.HIGHEST_PRECEDENCE);
		beanDefinition.setRole(BeanDefinition.ROLE_INFRASTRUCTURE);
		registry.registerBeanDefinition(AUTO_PROXY_CREATOR_BEAN_NAME, beanDefinition);
		return beanDefinition;
	}
}
当然我们今天的主题才开始,我们总结当前的引入类,spring 一串串的记不住,还是看个图吧

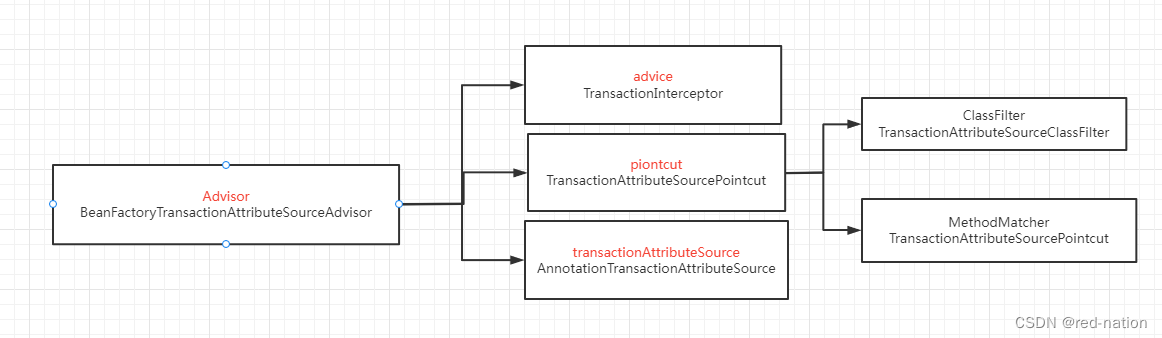
标注颜色的是跟事务相关的类,其它的异步、缓存跟当前的逻辑相同,看蓝色的三个引入类
- BeanFactoryTransactionAttributeSourceAdvisor
- AnnotationTransactionAttributeSource
- TransactionInterceptor
它们三个的关系是,看下ProxyTransactionManagementConfiguration类
@Configuration(proxyBeanMethods = false)
@Role(BeanDefinition.ROLE_INFRASTRUCTURE)
public class ProxyTransactionManagementConfiguration extends AbstractTransactionManagementConfiguration {

	@Bean(name = TransactionManagementConfigUtils.TRANSACTION_ADVISOR_BEAN_NAME)
	@Role(BeanDefinition.ROLE_INFRASTRUCTURE)
	public BeanFactoryTransactionAttributeSourceAdvisor transactionAdvisor(
			TransactionAttributeSource transactionAttributeSource, TransactionInterceptor transactionInterceptor) {

		BeanFactoryTransactionAttributeSourceAdvisor advisor = new BeanFactoryTransactionAttributeSourceAdvisor();
		advisor.setTransactionAttributeSource(transactionAttributeSource);
		advisor.setAdvice(transactionInterceptor);
		if (this.enableTx != null) {
			advisor.setOrder(this.enableTx.<Integer>getNumber("order"));
		}
		return advisor;
	}

	@Bean
	@Role(BeanDefinition.ROLE_INFRASTRUCTURE)
	public TransactionAttributeSource transactionAttributeSource() {
		return new AnnotationTransactionAttributeSource();
	}

	@Bean
	@Role(BeanDefinition.ROLE_INFRASTRUCTURE)
	public TransactionInterceptor transactionInterceptor(TransactionAttributeSource transactionAttributeSource) {
		TransactionInterceptor interceptor = new TransactionInterceptor();
		interceptor.setTransactionAttributeSource(transactionAttributeSource);
		if (this.txManager != null) {
			interceptor.setTransactionManager(this.txManager);
		}
		return interceptor;
	}

}
好了目前为止,springboot对@Transactional注解,前奏已经完成,准备好进入了。
当我们定义了一个类
@Service
public class TestC {

    @Autowired
    private TestMapper testMapper;

    public void say1(){
        TestC o = (TestC)AopContext.currentProxy();
        o.say2();
    }

    @Transactional
    public void say2(){
        Map<Object, Object> hashMap = new HashMap<>();
        hashMap .put("id",1);
        testMapper.say(hashMap);
    }

}
在spring加载TestC的时候,会被beanpostprocessor(InfrastructureAdvisorAutoProxyCreator)拦截产出代理类,具体什么时候调用《springboot ApplicationContext之finishBeanFactoryInitialization(getBean())下》
现在来看看代理类是怎么产生的,拦截的入口就是wrapIfNecessary方法
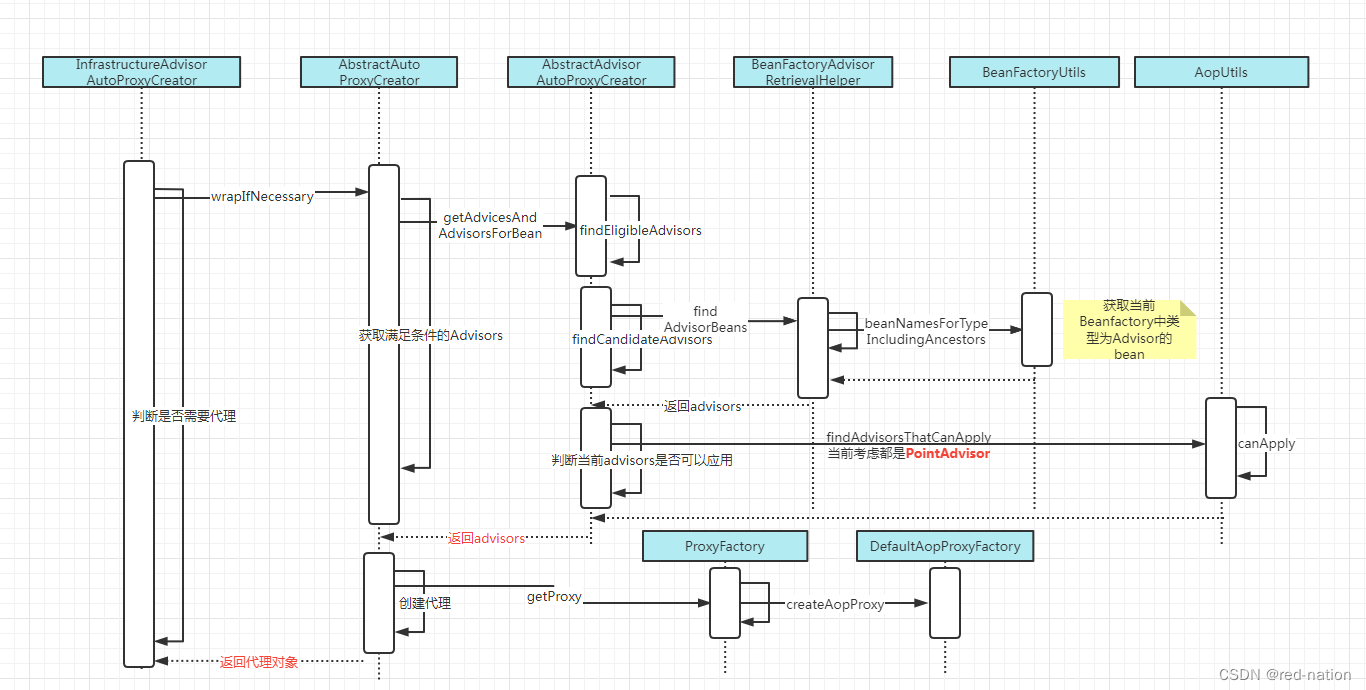
分成两个步骤:
-
查看当前bean满足条件的advisor、advice
首先会从当前容器中,查找类型是Advisor,当然当前满足条件的是之前注入到容器中的BeanFactoryTransactionAttributeSourceAdvisor,然后判断改advisor是否可以对当前类进行拦截就是图中的参canApply方法

两个判断:
classFiltermatch
methodMatcher.match,满足条件的是(重点来了),还是分两步:循环当前类的方法(如果类中加了事务注解但是没方法,不会拦截),对当前的方法进行判断。方法需要满足以下条件:1) 方法修饰符必须是public 2)对应的方法上存在@Transactional 3)如果2不满足,对应方法的类存在@Transactionalprotected TransactionAttribute computeTransactionAttribute(Method method, @Nullable Class<?> targetClass) { // Don't allow no-public methods as required. if (allowPublicMethodsOnly() && !Modifier.isPublic(method.getModifiers())) { return null; } // The method may be on an interface, but we need attributes from the target class. // If the target class is null, the method will be unchanged. Method specificMethod = AopUtils.getMostSpecificMethod(method, targetClass); // First try is the method in the target class. TransactionAttribute txAttr = findTransactionAttribute(specificMethod); if (txAttr != null) { return txAttr; } // Second try is the transaction attribute on the target class. txAttr = findTransactionAttribute(specificMethod.getDeclaringClass()); if (txAttr != null && ClassUtils.isUserLevelMethod(method)) { return txAttr; } if (specificMethod != method) { // Fallback is to look at the original method. txAttr = findTransactionAttribute(method); if (txAttr != null) { return txAttr; } // Last fallback is the class of the original method. txAttr = findTransactionAttribute(method.getDeclaringClass()); if (txAttr != null && ClassUtils.isUserLevelMethod(method)) { return txAttr; } } return null; } -
存在满足条件的进行创建代理,代理(当前使用cglib)后的对象信息,主要加了拦截器DynamicAdvisedInterceptor
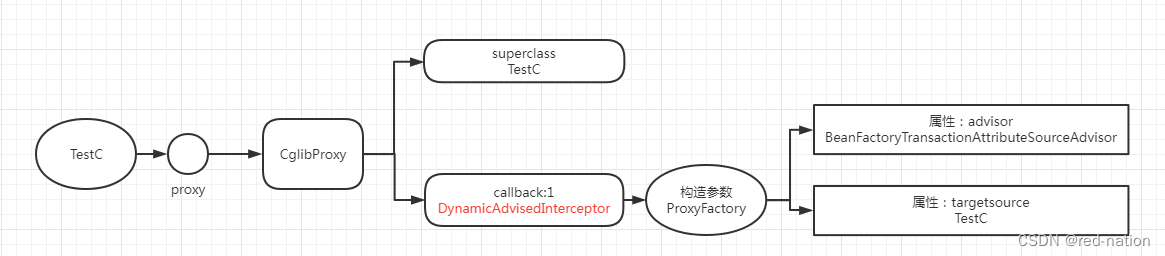
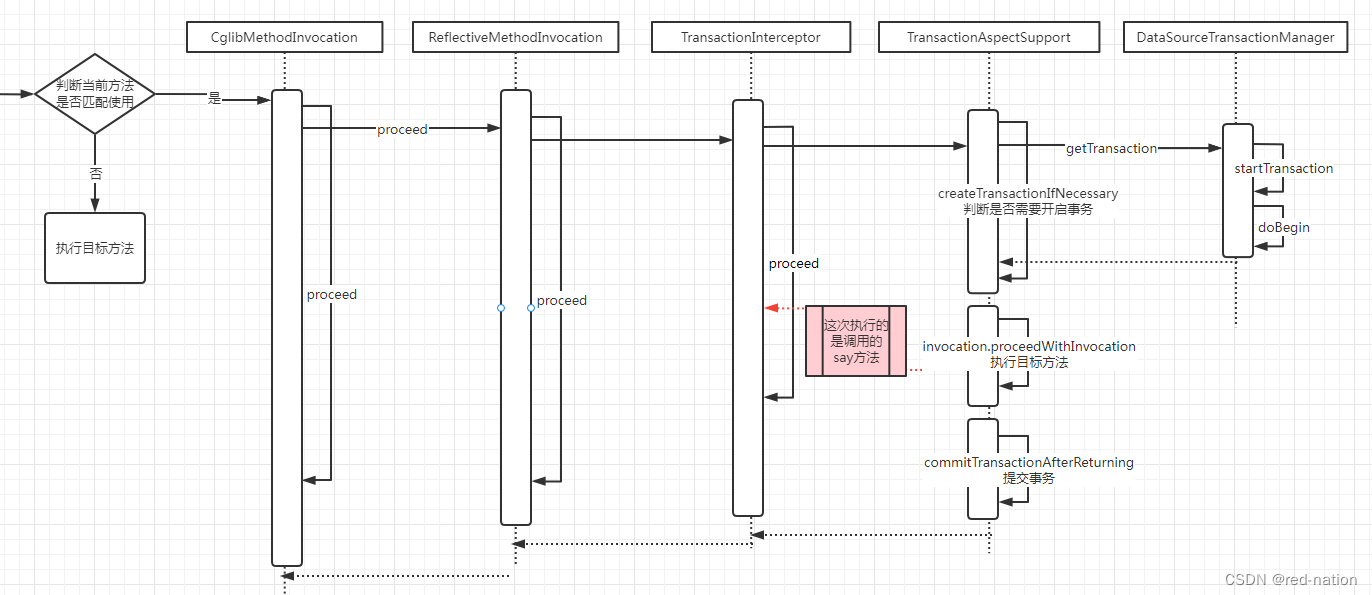
这时候Testc的代理对象已经产生,当调调用Testc.say2()方法,会被DynamicAdvisedInterceptor拦截器拦截
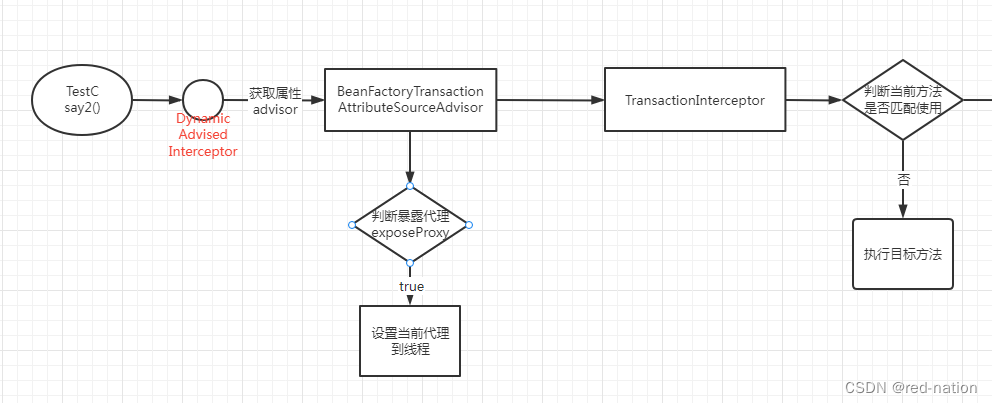
判断是否匹配的方式,跟wrapIfNecessary基本一致,唯一区别是针对当前的方法(什么内部调用事务失效的原因),而不是当前类的所有方法。匹配后看下,调用的流程:开启事务–》执行方法–》提交事务。
刚才提到,内部调用失效的解决方式是要设置:暴露代理,覆盖默认注解@EnableAspectJAutoProxy(exposeProxy = true),就会执行AopConfigUtils.forceAutoProxyCreatorToExposeProxy(registry)
class AspectJAutoProxyRegistrar implements ImportBeanDefinitionRegistrar {

	/**
	 * Register, escalate, and configure the AspectJ auto proxy creator based on the value
	 * of the @{@link EnableAspectJAutoProxy#proxyTargetClass()} attribute on the importing
	 * {@code @Configuration} class.
	 */
	@Override
	public void registerBeanDefinitions(
			AnnotationMetadata importingClassMetadata, BeanDefinitionRegistry registry) {

		AopConfigUtils.registerAspectJAnnotationAutoProxyCreatorIfNecessary(registry);

		AnnotationAttributes enableAspectJAutoProxy =
				AnnotationConfigUtils.attributesFor(importingClassMetadata, EnableAspectJAutoProxy.class);
		if (enableAspectJAutoProxy != null) {
			if (enableAspectJAutoProxy.getBoolean("proxyTargetClass")) {
				AopConfigUtils.forceAutoProxyCreatorToUseClassProxying(registry);
			}
			if (enableAspectJAutoProxy.getBoolean("exposeProxy")) {
				AopConfigUtils.forceAutoProxyCreatorToExposeProxy(registry);
			}
		}
	}

}
@EnableAspectJAutoProxy(exposeProxy = true)
@Service
public class TestC {

    @Autowired
    private TestMapper testMapper;

    public void say1(){
        TestC o = (TestC)AopContext.currentProxy();
        o.say2();
    }

    @Transactional
    public void say2(){
        Map<Object, Object> objectObjectHashMap = new HashMap<>();
        objectObjectHashMap.put("id",1);
        testMapper.say(objectObjectHashMap);
    }


}
想象下,当我们获取到代理对象(TestC)AopContext.currentProxy(),再执行调用方法say2(), 是不是又会被DynamicAdvisedInterceptor拦截,事务是不是又起作用了呢。
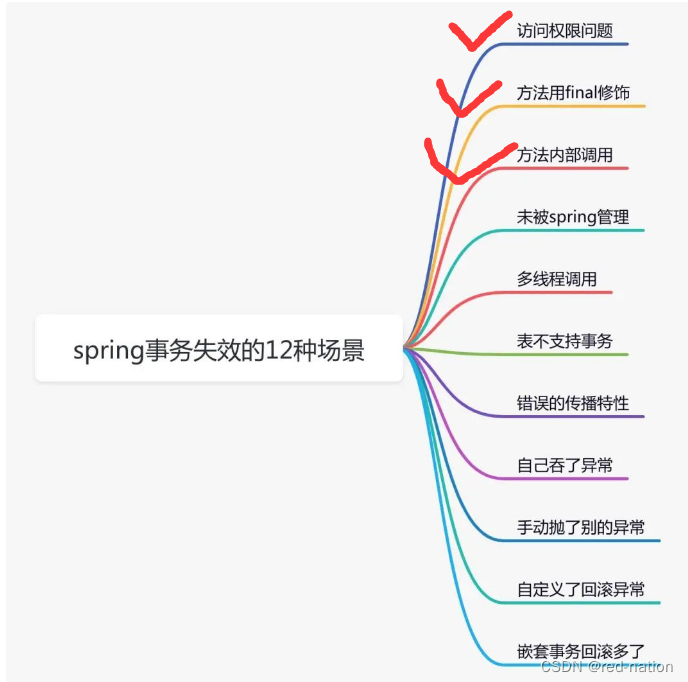
最后 最后扣了一张网上的图,前面几种我想应该是清楚了吧!


 3402
3402

 被折叠的 条评论
为什么被折叠?
被折叠的 条评论
为什么被折叠?
 到【灌水乐园】发言


