


目录
2.给QPushButton 增加背景图片:背景图片可根据Button大小自由缩放。
。命名规范
类名 首字母大写,单词和单词之间首字母大写
函数名 变量名称 首字母小写,单词与单词之间首字母大写
多多查看帮助文档
1.快捷键
注释 ctrl+ /
运行 ctrl+r
编译 ctrl +b
查找 ctrl +f
帮助文档 F1
自动对齐ctrl+i
同名之间切换 F4 例如 .h和.cpp切换
跳到符号定义 F2 或者ctrl + 鼠标点击
整行移动代码 ctrl + shift + ↑或↓
2.初始化代码介绍
#include "mywidget.h"

#include <QApplication>//QT 的应用程序头文件
//在写QT 程序的时候,如果不是必要的情况下,不会在此文件编写代码
int main(int argc, char *argv[])
{
    //a 应用程序对象,每个项目有并且只能由一个
    QApplication a(argc, argv);
    MyWidget w;//w 自己的界面对象
    w.show();//将界面显示出来
    return a.exec();//使得代码在此行阻塞
    //相当于
    /*
     *while(1)
     * {
     *  if(点击叉子)
     * {
     *  break;
     *
     * }
     *
     * }
     *
     */
}
1.添加按钮,设置窗口
MyWidget::MyWidget(QWidget *parent)//设置父对象
    : QWidget(parent)//初始化列表 ,让我的父类调用 他的 有参构造
{
    //在QT 里面  常用按钮的类为QPushButton
    //如果在创建的时候就绑定了父对象,那么会让窗口和控件一样大小
    QPushButton *btn1 = new QPushButton(this);

    this->resize(500,500);//重新设置窗口大小
    this->setFixedSize(500,500);//设置固定的窗口大小,并且会使得resize 失效
    //btn1->show();//将按钮控件 以顶层的方式弹出来
    //如果你想要这个按钮 显示在我的界面上,除非当我界面的儿子
    btn1->setParent(this);//设置按钮父对象
    btn1->setText("第一个按钮");//设置按钮文本
    btn1->setIcon(QIcon("E:\\woke\\QT_Pro\\2305\\Day5\\second\\QT_Souces\\1.png"));
    //QPushButton btn;为了避免普通变量在构造函数结束的时候,被回收,因此我们一般使用指针对象
    //btn.setParent(this);
    QPushButton *btn2 = new QPushButton("第二个按钮",this);
    //我们创建的控件,会默认放在Qt界面的(0,0)点
    btn2->move(200,200);//将按钮2移动到坐标200,200的位置

    //修改窗口标题
    this->setWindowTitle("我的第一个程序");//设置窗口标题
    this->setWindowIcon(QIcon("E:\\woke\\QT_Pro\\2305\\Day5\\second\\QT_Souces\\1.png"));//设置窗口图标
    btn2->resize(200,200);//设置按钮的大小

    //创建一个自定义按钮
    MyPushButton *btn = new MyPushButton(this);
    btn->move(50,50);
    btn->setText("我的自定义按钮");
    //QT 的父对象树
    //父窗口的析构函数会自动销毁其所有未被释放子对象,因此即使 子对象使用了 new 操作符,我们也可以不使用delete 去释放,
    //并且不需要担心内存泄漏的问题,只要保证父窗口正常的被销毁了,那么子对象也会被正常销毁

}

MyWidget::~MyWidget()
{
    qDebug()<<"主窗口析构了";
}
Qt的坐标系 左上角为(0,0)
//QPushButton btn;为了避免普通变量在构造函数结束的时候,被回收,因此我们一般使用指针对象
//btn.setParent(this);
QPushButton *btn2 = new QPushButton("第二个按钮",this);
2.一些基础概念:
各个窗口对象通过建立父子关系构造的一个关系树
内存管理:
父对象释放的时候会自动释放各个子对象(使用children列表)
以后基本都是用new的方式来创建窗口对象
注意点:
1 父对象能够被释放
2 父对象、子对象,直接或者间接继承自QObject
QT 的父对象树
父窗口的析构函数会自动销毁其所有未被释放子对象,因此即使 子对象使用了 new 操作符,我们也可以不使用delete 去释放,
并且不需要担心内存泄漏的问题,只要保证父窗口正常的被销毁了,那么子对象也会被正常销毁
3.信号与槽
连接函数 connect(信号的发送者,发送的信号(函数的地址),信号的接收者,槽);
connect也可以有第五个参数,一般不写默认为自动连接。
信号函数的参数个数可以比槽函数多!!!如果槽函数也有参数类型,那么必须一 一对应,因为函数参数
是从右往左入栈,从左往右出栈,然后比对参数,参数数量相等时顺序也应该相同。
槽函数的参数个数要小于等于信号函数的参数个数,且要有对应关系。
1.信号
信号只需要在signal 下声明,别定义,返回类型为空。可以重载

发送信号使用emit
emit signal();2.槽函数
槽函数在除了signals的地方声明,直接声明即可,不需要信号像那样加signals,一般我放Public下声明,类外定义。返回类型void。可以重载。
信号与槽函数示例代码
connect(btn1,&QPushButton::clicked,this,&MainWindow::slot);4.Lambda表达式
lamba表达式: [函数对象参数](操作符重载函数参数)mutable->返回值类型{函数体}
lamba是匿名函数对象,用lamba表达式放connect连接函数中会导致无法使用disconnect断开,会一直连接.
[ ],标识一个Lambda的开始。
[=, &a] 除了a使用引用方式, 其余是值传递的方式
[&,a] a使用值传递方式, 其余是引用传递的方式
[ = ] 按值传递,可以使用Lambda 表达式所在作用域内所有可见的变量,包含this
[ & ] 按引用传递
[this] 只能使用this的成员变量
Opt 部分是可选项,最常用的是mutable声明,这部分可以省略。外部函数局部变量通过值传递引进来时,其默认是const,所以不能修改这个局部变量的拷贝,加上mutable就可以
int a = 10 ;
    [=]()
    {
        a=20;//编译报错,a引进来是const
}
    [=]()mutable
    {
        a=20;//编译成功
};
槽函数使用Lambda表达式
以QPushButton点击事件为例:
 QPushButton *btn = new QPushButton("按钮1",this);
    int a = 10;
    int b = 20;
     connect(btn,&QPushButton::clicked,[=]()
     {
         qDebug()<<a <<b;
     }
     );
5.菜单栏,工具栏及部件
主窗口加菜单——菜单加菜单或行为——行为设置快捷方式
#include "mainwindow.h"
#include <QMenuBar>//菜单栏
#include <QMenu>
#include <QAction>
#include <QKeySequence>
#include <QDebug>
#include <QToolBar>
#include <QPushButton>
#include <QDockWidget>//铆接部件
#include <QTextEdit>
#include <QStatusBar>//状态栏
#include <QLabel>
MainWindow::MainWindow(QWidget *parent)
    : QMainWindow(parent)
{
    //QWidget 界面类
    //QMainWindow 主窗口类
    //QDialog  对话框类
    this->setWindowTitle("我的主窗口");
    //一个主窗口只能有一个菜单栏
    //菜单栏的创建方式 两种
    this->resize(500,500);
//    QMenuBar *menubar = new QMenuBar(this);
//    this->setMenuBar(menubar);
    QMenuBar *menu = menuBar();//以这种方式  我们是将菜单栏设置给了主窗口
    //菜单栏里面加菜单
    QMenu *file = menu->addMenu("文件");
    //菜单里面加行为
    QAction *newfile = file->addAction("新建");
    file->addAction("打开");
    newfile->setShortcut(QKeySequence("ctrl+o"));//设置快捷方式
    connect(newfile,&QAction::triggered,this,[=](){
        qDebug()<<"新建文件成功";
    });

    //菜单里面添加菜单
    QMenu * add = file->addMenu("新加的菜单");
    add->addAction("你好");
    //添加分隔符
    add->addSeparator();
    add->addAction("不好");
    add->addSeparator();
    //菜单栏里面添加行为
    QAction *addnew = menu->addAction("新加的行为");
    connect(addnew,&QAction::triggered,this,[=](){
        qDebug()<<"新添加的行为";
    });

    //主窗口的工具栏  可以有多个 需要使用add方法
    QToolBar *bar1 = new QToolBar(this);
    QToolBar *bar2 = new QToolBar(this);

    //将工具栏设置到主窗口
    this->addToolBar(Qt::BottomToolBarArea,bar1);
    this->addToolBar(Qt::LeftToolBarArea,bar2);
    bar1->addAction("工具栏1");
    bar1->setAllowedAreas(Qt::BottomToolBarArea);//此工具栏 只可以在主窗口下方停靠
    bar2->addAction("工具栏2");
    bar2->setAllowedAreas(Qt::LeftToolBarArea | Qt::RightToolBarArea);//左右停靠
    //工具栏里面添加按钮
    bar1->addWidget(new QPushButton("工具栏按钮",this));

    //设置工具栏不可浮空
    bar1->setFloatable(false);

    //设置工具栏不可以移动
    bar2->setMovable(false);

    //浮动窗口  也叫铆接部件  可以有多个
    QDockWidget *dock1 = new QDockWidget(this);
    QDockWidget *dock2 = new QDockWidget(this);
    this->addDockWidget(Qt::LeftDockWidgetArea,dock1);
    this->addDockWidget(Qt::RightDockWidgetArea,dock2);
    //浮动窗口 是根据中心控件来确定位置的

    //设置中心控件  只能有一个  必须要有一个
    //设置文本框作为我的中心控件
    this->setCentralWidget(new QTextEdit(this));

    QStatusBar *state = statusBar();//创建一个状态栏
    state->addWidget(new QLabel("我是标签",this));
    //将状态栏里面的东西放入到右边
    state->addPermanentWidget(new QLabel("我是右边的状态栏",this));


}

MainWindow::~MainWindow()
{
}
this->setWindowTitle("登录");
this->setWindowIcon(QIcon(":/QT_Souces/2.png"));//设置标题图标
6.对话框
模态、非模态、消息、提示、文件、字体、颜色对话框等等
常用提示 QMessageBox::information(this,"信息提示","我给你的提示",QMessageBox::Apply);
#include "mainwindow.h"
#include "ui_mainwindow.h"
#include <QDialog>
#include <QWidget>
#include <QPushButton>
#include <QMessageBox>//消息对话框
#include <QDebug>
#include <QPixmap>
#include <QColorDialog>
#include <QColor>
#include <QFontDialog>
#include <QFont>
#include <QFileDialog>
MainWindow::MainWindow(QWidget *parent)
    : QMainWindow(parent)
    , ui(new Ui::MainWindow)
{
    //练习:使用QMainWindow 菜单栏里面添加一个 对话框的菜单,选择三种不同类型的对话框
    //将其显示出来,需要给菜单加上图片 ,使用资源文件


    ui->setupUi(this);
    //对话框:模态对话框(不能对其他窗口操作) 与 非模态对话框(可以对其他窗口操作)
    QWidget *wid = new QWidget;
    this->resize(500,500);
    wid->resize(400,400);
    this->setCentralWidget(wid);//使用一个界面作为中心控件
    QPushButton *btn1 = new QPushButton("打开模态对话框",wid);
    QPushButton *btn2 = new QPushButton("打开非模态对话框",wid);
    btn2->move(200,0);
    connect(btn1,&QPushButton::clicked,this,[=](){
        QDialog dlg(this);//模态对话框会发生阻塞 ,因此无需使用指针
        dlg.resize(200,200);
        dlg.setWindowTitle("模特对话框");
        //让对话框 显示出来并且阻塞
        dlg.exec();
    });

    connect(btn2,&QPushButton::clicked,this,[=](){
        QDialog *dlg = new QDialog(this);//
        dlg->resize(200,200);
        //让对话框 显示出来非阻塞
        dlg->show();
        dlg->setWindowTitle("非模态对话框");
        dlg->setAttribute(Qt::WA_DeleteOnClose);
    });
    //再QMainWindow 里面  我们需要把所有的控件 放入 中心控件  而不能直接放入 QMainWindow 里面
    QPushButton *btn3 = new QPushButton("错误对话框",wid);
    QPushButton *btn4 = new QPushButton("信息对话框",wid);
    QPushButton *btn5 = new QPushButton("提示对话框",wid);
    QPushButton *btn6 = new QPushButton("警告对话框",wid);
    QPushButton *btn7 = new QPushButton("自定义消息对话框",wid);
    btn3->move(0,100);
    btn4->move(200,100);
    btn5->move(0,200);
    btn6->move(200,200);
    btn7->move(0,300);

    connect(btn3,&QPushButton::clicked,this,[=](){
        QMessageBox::critical(this,"错误对话框","出错了",QMessageBox::Close);
    });

    connect(btn4,&QPushButton::clicked,this,[=](){
        QMessageBox::information(this,"信息提示","我给你的提示",QMessageBox::Apply);
    });

    connect(btn5,&QPushButton::clicked,this,[=](){
        //参数5 默认关联回车键
        //返回值类型为 StandardButton 你按下那个按钮,就hi返回那个

       if (QMessageBox::Save == QMessageBox::question(this,"提问对话框","请做出选择",QMessageBox::Save
                              | QMessageBox::Cancel,QMessageBox::Cancel) )
       {
            qDebug() << "选择保存";
       }
       else
       {
           qDebug() << "选择取消";
       }
    });

    connect(btn6,&QPushButton::clicked,this,[=](){
        QMessageBox::warning(this,"警告对话框","请注意",QMessageBox::Close);
    });

    connect(btn7,&QPushButton::clicked,this,[=](){
        //自定义消息对话框
        QMessageBox mes;
        mes.setWindowTitle("自定义消息对话框");
        mes.setText("你吃饭了没");
        //mes.setIcon(QMessageBox::Critical);
        //QPixmap pix(0,0);
        mes.setFixedSize(100,100);
        //pix.load(":/QT_Souces/1.png.jpeg");
        //mes.setIconPixmap(pix);
        mes.addButton("新增按钮",QMessageBox::YesRole);
        mes.exec();
    });

    QPushButton *btn8 = new QPushButton("颜色对话框",wid);
    btn8->move(200,300);
    connect(btn8,&QPushButton::clicked,this,[=](){
       QColor col = QColorDialog::getColor(QColor(255,0,0),this,"颜色对话框");
       qDebug() << col.red() << col.green()<<col.blue();
    });
    QPushButton *btn9 = new QPushButton("字体对话框",wid);
    btn9->move(0,400);
    QPushButton *btn10 = new QPushButton("文件对话框",wid);
    btn10->move(300,200);

    connect(btn9,&QPushButton::clicked,this,[=](){
        bool flag;
        //flag 代表是否选择了字体
        QFont font = QFontDialog::getFont(&flag,QFont("黑体",36),this,"选择字体");
        qDebug()<<flag;
        qDebug()<<font.family() << font.pointSize() << font.italic()<<font.bold();
        //字体 形式  大小  是否倾斜  是否加粗
    });

    connect(btn10,&QPushButton::clicked,this,[=](){
        QString path = QFileDialog::getOpenFileName(NULL,"打开文件","C:\\Users\\MrXie\\Desktop","Images (*.png *.xpm *.jpg);;Text files (*.txt);;XML files (*.xml)");
        qDebug()<<path;
    });
    //资源文件的添加
    btn10->setIcon(QIcon(":/QT_Souces/1.png.jpeg"));

}

MainWindow::~MainWindow()
{
    delete ui;
}
7.资源文件的添加
1.点击新建或添加项目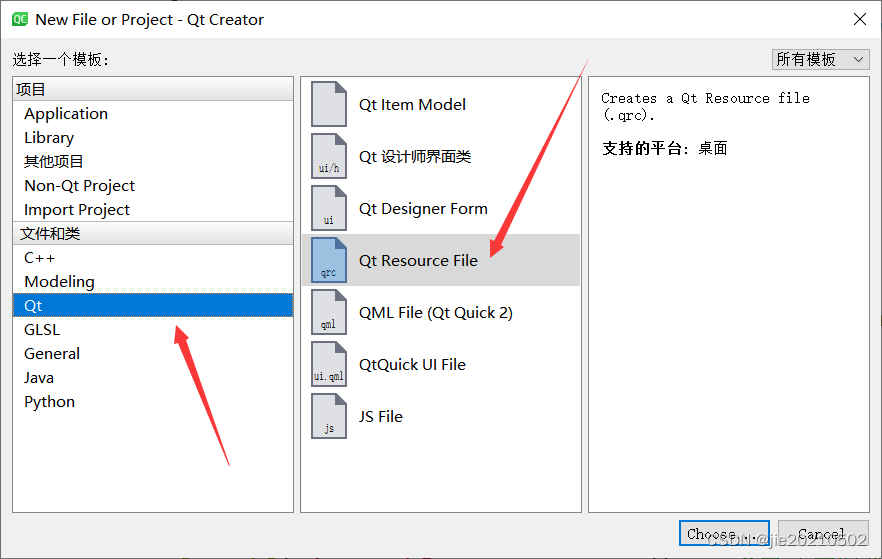
2.路径
要将资源文件放在当前项目所在文件中

3.选择当前工程配置pro文件(一定要选择正确)

4.Add prefix 修改前缀名,点击添加文件


5.点击运行,资源文件便添加成功了


8.添加背景图片
1.用样式表添加,指定区域显示
this->setStyleSheet("#MainWindow{border-image: url(:/yan.jpeg);}");

2.给QPushButton 增加背景图片:背景图片可根据Button大小自由缩放。
void setButtonBackImage(QPushButton *button,QString image,int sizeW, int sizeH)
{
    //163,163为原始分辨率,这里稍做了调整。
    QPixmap pixmap(image);
    QPixmap fitpixmap=pixmap.scaled(163,163).scaled(sizeW, sizeH, Qt::IgnoreAspectRatio, Qt::SmoothTransformation);  //消锯齿
    button->setIcon(QIcon(fitpixmap));
    button->setIconSize(QSize(sizeW,sizeH));
    button->setFlat(true);//就是这句能够实现按钮透明,用png图片时很有用
    button->setStyleSheet("border: 0px");//消除边框,取消点击效果
}
3.给QWidget 增加背景图片:图片可自由缩放。
this->setAutoFillBackground(true);    //Widget增加背景图片时,这句一定要。
QPixmap pixmap(":/images/bg_news.png");
QPixmap fitpixmap=pixmap.scaled(1200, 1200).scaled(config->mainWindowW,config->mainWindowH, Qt::IgnoreAspectRatio, Qt::SmoothTransformation);
QPalette palette;
palette.setBrush(QPalette::Background, QBrush(fitpixmap));
this->setPalette(palette);
4.给QLabel 增加背景图片:图片可自由缩放。
QPixmap pixmap(normalIcon);
QPixmap fitpixmap=pixmap.scaled(labelIcon->width(), labelIcon->height(), Qt::IgnoreAspectRatio, Qt::SmoothTransformation);
labelIcon->setPixmap(fitpixmap);
5.用画家事件设置背景
void MainWindow::paintEvent(QPaintEvent *)
{
    QPainter pa(this);
    pa.drawPixmap(0,0,this->centralWidget()->width(),this->centralWidget()->height(),QPixmap(path));
}    //path为自定义的图片存放路径
9.常用控件
#include <QToolButton>//工具按钮
#include <QMessageBox>
1.radiobutton
ui->radioButton_4->setChecked(true); 设置为默认勾选
  connect(ui->radioButton,&QRadioButton::clicked,this,[=](){
        QMessageBox::information(this,"性别有误","你不是男的,是个女的");
2.checkBox
ui->checkBox_4->checkState() == Qt::Checked //选中状态
3.listWidget 链表控件
#include "mainwindow.h"
#include "ui_mainwindow.h"
#include <QListWidget>
#include <QListWidgetItem>
#include <QDebug>
MainWindow::MainWindow(QWidget *parent)
    : QMainWindow(parent)
    , ui(new Ui::MainWindow)
{
    ui->setupUi(this);
    //链表控件
    //在链表控件里面添加项目
    ui->listWidget->addItem("悯农");//对于添加的QString 无法设置居中
    QListWidgetItem *item = new QListWidgetItem("锄禾日当午");
    ui->listWidget->addItem(item);
    item->setTextAlignment(Qt::AlignHCenter);
    //QStringList  = QList<QString>
    QStringList list;
    list << "汗滴禾下土" << "谁知盘中餐" << "粒粒皆辛苦";
    ui->listWidget->addItems(list);
    //练习:点击什么项目,打印什么内容
//    connect(ui->listWidget,&QListWidget::itemClicked,this,[=](QListWidgetItem *item){
//        qDebug() << item->text().toUtf8().data();
//    });
    //方法2
    connect(ui->listWidget,&QListWidget::currentRowChanged,this,[=](int row){
            //qDebug() << item->text().toUtf8().data();
            qDebug() << ui->listWidget->item(row)->text().toUtf8().data();
        });
    //设置默认选中第一项
    ui->listWidget->setCurrentRow(0);
}

MainWindow::~MainWindow()
{
    delete ui;
}
4.SpinBox与Slider
 //设置SpinBox 与 滑块的区间
    ui->spinBox->setRange(0,100);
    ui->horizontalSlider->setRange(0,100);

    //设置SpinBox 的步距  点击一下加多少
    ui->spinBox->setSingleStep(5);

    //建立滑块与 Spinbox 的联系
    connect(ui->horizontalSlider,&QSlider::valueChanged,ui->spinBox,&QSpinBox::setValue);

    //建立 Spinbox 与 滑块的联系  使得他们可以呼吸联系
    void(QSpinBox::*spin)(int) = &QSpinBox::valueChanged;
    connect(ui->spinBox,spin,ui->horizontalSlider,&QSlider::setValue);
5.comboBox
    void(QComboBox:: *com)(const QString &) = &QComboBox::currentIndexChanged;
    connect(ui->comboBox,com,this,[=](const QString &t){
          qDebug() << t;
          qDebug()<<ui->comboBox->currentText();
    });
6.tableWidget
    //tablewidget 表格控件
    //设置函数与列数
    ui->tableWidget->setRowCount(3);
    ui->tableWidget->setColumnCount(3);
    //设置表头
    ui->tableWidget->setHorizontalHeaderLabels(QStringList() << "班级"<<"名字"<<"性别");
    ui->tableWidget->setFixedSize(500,200);
    ui->tableWidget->setItem(0,0,new QTableWidgetItem("你好") );
    this->num = 0;
    connect(ui->pushButton,&QPushButton::clicked,this,[=](){
        ui->stackedWidget->setCurrentIndex(num++);
        if(num == 3)
        {
            num = 0;
        }
    });
7.QTreeWidget
#include "mainwindow.h"
#include "ui_mainwindow.h"

MainWindow::MainWindow(QWidget *parent)
    : QMainWindow(parent)
    , ui(new Ui::MainWindow)
{
    ui->setupUi(this);
    //树型控件  QTreeWidget
    //设置水平表头
    //QStringList() << "作者" << "代表作" 匿名的QStringList
    ui->wwww->setHeaderLabels(QStringList() << "作者" << "代表作");

    //创建根节点
    QTreeWidgetItem *good_woman_star = new QTreeWidgetItem(QStringList() << "优质女星"<<"国内");
    QTreeWidgetItem *good_man_star = new QTreeWidgetItem(QStringList() << "优质男星"<<"国内");

    //将根节点添加至树型控件
    ui->wwww->addTopLevelItem(good_woman_star);
    ui->wwww->addTopLevelItem(good_man_star);

    //创建叶子节点
    QTreeWidgetItem *Mrs_Gao = new QTreeWidgetItem(QStringList()<<"范冰冰" << "偷税");
    QTreeWidgetItem *Mrs_Di = new QTreeWidgetItem(QStringList()<<"迪丽热巴" << "三生三世");

    QTreeWidgetItem *Mr_Kun = new QTreeWidgetItem(QStringList()<<"坤坤" <<"只因你太美");
    QTreeWidgetItem *Mr_Liu = new QTreeWidgetItem(QStringList()<<"华仔" <<"忘情水");

    //将叶子节点加入到根节点
    good_woman_star->addChild(Mrs_Gao);
    good_woman_star->addChild(Mrs_Di);
    good_man_star->addChild(Mr_Kun);
    good_man_star->addChild(Mr_Liu);
}

MainWindow::~MainWindow()
{
    delete ui;
}
8.stackedWidget
在这一个widget中可以存放多个页面, 可以用setCurrentIndex进行切换,默认第一个主页面index为0。
10.event 事件
//对于现在已经存在的控件,他们的事件 已经被qt封装好了,如果你想更改事件
//那么只能通过继承 然后使用子类去重写父类的事件
//注意:任何你声明的事件 一定要重写!!!


1.鼠标事件
按下、释放、滚动、双击
mylabel.h中
public:
     void mousePressEvent(QMouseEvent *event)override;
     void mouseReleaseEvent(QMouseEvent *event) override;
     void mouseDoubleClickEvent(QMouseEvent *event) override;
     void wheelEvent(QWheelEvent *event) override;
mylabel.c
#include "mylabel.h"
#include "ui_mylabel.h"
#include <QDebug>
Mylabel::Mylabel(QWidget *parent) :
    QWidget(parent),
    ui(new Ui::Mylabel)
{
    ui->setupUi(this);
    //由于我们想将图片 放入到标签里面  因此我们需要给他设置图片包含
    ui->label->setScaledContents(true);
    //设置默认图片
    ui->label->setPixmap(QPixmap(":/图片/1.jfif"));
    ui->label->setStyleSheet("background-color: rgb(255, 255, 255);");//设置样式表
    this->picture_id = 1;
}

Mylabel::~Mylabel()
{
    delete ui;
}

void Mylabel::mousePressEvent(QMouseEvent *)
{
    //鼠标按下去显示空白  -> 白板(左键)
    //右键按下显示白板
    ui->label->setPixmap(QPixmap(":/图片/8.jfif"));
}

void Mylabel::mouseReleaseEvent(QMouseEvent *event)
{
    //鼠标释放放一张图片 -> 10;第一次释放 显示第一张图片  第二次释放显示第二张图片(左键)
    //右键释放 显示上一张图片
    //不需要组合按钮 因此我们只需要使用 button
    if(event->button() == Qt::LeftButton)
    {
        picture_id++;
        if(picture_id == 8)
        {
            picture_id = 1;
        }
        QString path = ":/图片/" + QString::number(picture_id)+".jfif";
        ui->label->setPixmap(QPixmap(path));
    }
    else if(event->button() == Qt::RightButton)
    {
        picture_id--;
        if(picture_id == 0)
        {
            picture_id = 7;
        }
        QString path = ":/图片/" + QString::number(picture_id)+".jfif";
        ui->label->setPixmap(QPixmap(path));
    }
}

void Mylabel::mouseDoubleClickEvent(QMouseEvent *event)
{
    //左键双击按下 关闭此控件
    if(event->button() == Qt::LeftButton)
    {
        this->close();
    }
    else if(event->button() == Qt::RightButton)
    {
        emit close_signal();
    }

}

void Mylabel::wheelEvent(QWheelEvent *event)
{
      //对于滚轮事件来说  分为前滚与后滚
      //每一次滚动是15°
      //event->delta() 为 转动的度数 * 8 ,向前滚为120 向后为 -120
      if(event->delta() > 0)
      {
          qDebug()<<"向前滚动" << event->delta();
      }
      else if(event->delta() < 0)
      {
          qDebug()<<"向后滚动" << event->delta();
      }
}
2.事件过滤器、事件分发器
首先有事件过滤器,然后再经过事件分发器
先给指定控件安装事件过滤器
#include "widget.h"
#include "ui_widget.h"
#include <QDebug>
Widget::Widget(QWidget *parent)
    : QWidget(parent)
    , ui(new Ui::Widget)
{
    ui->setupUi(this);
    //给指定控件安装事件过滤器!!!
    ui->widget->installEventFilter(this);//由主窗口来管理这个控件!! 他的生死由主窗口掌控
}

Widget::~Widget()
{
    delete ui;
}

bool Widget::eventFilter(QObject *watched, QEvent *event)
{
    if(watched ==ui->widget && event->type() ==  QEvent::MouseButtonDblClick)
    {
        //自己处理 ui->widget 控件的 鼠标双击事件,不接这往下发放了
        qDebug()<<"我不用双击了,终于下课了!!!!";
        return true;
    }
    return this->QWidget::eventFilter(watched,event); //如果不是双击事件则按原返回
}
在widget.h中声明
#ifndef WIDGET_H
#define WIDGET_H

#include <QWidget>

QT_BEGIN_NAMESPACE
namespace Ui { class Widget; }
QT_END_NAMESPACE

class Widget : public QWidget
{
    Q_OBJECT

public:
    Widget(QWidget *parent = nullptr);
    ~Widget();
    bool eventFilter(QObject *watched, QEvent *event);    //here
private:
    Ui::Widget *ui;
};
#endif // WIDGET_H
mymyl.h
#ifndef MYL_H
#define MYL_H

#include <QMouseEvent>
#include <QWidget>
#include <QDebug>
#include <QEvent>
namespace Ui {
class MyL;
}

class MyL : public QWidget
{
    Q_OBJECT

public:
    explicit MyL(QWidget *parent = nullptr);
    ~MyL();
    void mouseDoubleClickEvent(QMouseEvent *event) override;
    void wheelEvent(QWheelEvent *event)override;
    bool event(QEvent *event) override;    //分发事件
private:
    Ui::MyL *ui;
};

#endif // MYL_H
myl.cpp 分发事件event
#include "myl.h"
#include "ui_myl.h"

MyL::MyL(QWidget *parent) :
    QWidget(parent),
    ui(new Ui::MyL)
{
    ui->setupUi(this);
}

MyL::~MyL()
{
    delete ui;
}

void MyL::mouseDoubleClickEvent(QMouseEvent *)
{
    qDebug() << "鼠标双击了!!!!" << endl;
}

void MyL::wheelEvent(QWheelEvent *)
{
    qDebug() << "滚轮滚动了";
}

bool MyL::event(QEvent *e)
{
    //此函数的作用 用于分发事件的,如果不想交给下一层去处理,则返回true,由自己处理
    //现在我想 自己处理鼠标双击事件
    if(e->type() == QEvent::MouseButtonDblClick)
    {
        qDebug() << "我们马上学完事件了!!再也不想用双击了!!!!";
        return true;//代表此事件我已经处理完了,不要继续分发此事件到下层
    }
    //其他事件 则调用父类的默认分发函数
    return this->QWidget::event(e);
}
11.timer 定时器
有两种定时器,一种是声明一个QTimer对象作为这个类的成员属性,超时管理,一种是重写定时器对象,每过设定时间计数加1。
mytimer.h
#ifndef MYTIMER_H
#define MYTIMER_H

#include <QWidget>
#include <QTimer>
namespace Ui {
class Mytimer;
}

class Mytimer : public QWidget
{
    Q_OBJECT

public:
    explicit Mytimer(QWidget *parent = nullptr);
    ~Mytimer();
    void timerEvent(QTimerEvent *event)override;
    static int timer_num1;//定时为 1秒的 定时器 数字
    static int timer_num2;//定时为 2秒的 定时器 数字
    static int timer_num3;
    int timer1;//定时为1秒的 定时器的唯一标识符
    int timer2;//定时为2妙的 定时器的唯一标识符

    int count;//定时器编号  使用第一个定时器还是第二个定时器!!
    void setcount(int num);

    void stop_timer1();
    void stop_timer2();
    void stop_timer3();
    void start_timer1();
    void start_timer2();
    void start_timer3();
    QTimer *timer3;
private:
    Ui::Mytimer *ui;
};

#endif // MYTIMER_H
mytimer.cpp
#include "mytimer.h"
#include "ui_mytimer.h"
int Mytimer::timer_num1 = 1;
int Mytimer::timer_num2 = 1;
int Mytimer::timer_num3 = 1;
Mytimer::Mytimer(QWidget *parent) :
    QWidget(parent),
    ui(new Ui::Mytimer)
{
    ui->setupUi(this);

    //在Qt 里面创建定时器的方式有两种
    //第一种  重写定时器事件
    //启动定时器事件
    this->timer1 = startTimer(1000);//启动定时器  参数为 定时的时间  单位为 ms
    //每过一秒钟就会触发定时器事件

    //问:我想再设置一个定时器  每过2s 计数+1
    this->timer2 = startTimer(2000);//startTimer  返回定时器的标识ID

    //第二种创建定时器的方法
    //使用QTimer  ->声明一个 QTimer 对象作为这个类的成员属性
    //第二步 初始化指针
    this->timer3 = new QTimer(this);
    //此方法使用了信号与槽的机制
    timer3->start(500);//设置超时信号,单位为ms,每过0.5s触发超时信号
    connect(timer3,&QTimer::timeout,this,[=](){
        if(this->count == 3)
        {
            ui->label->setText(QString::number(timer_num3++));
        }
    });
}

Mytimer::~Mytimer()
{
    delete ui;
}

void Mytimer::timerEvent(QTimerEvent *event)
{
    if(event->timerId() == this->timer1 && count == 1)
    {
      ui->label->setText(QString::number(this->timer_num1++));
    }
    else if(event->timerId() == this->timer2 && count == 2)
    {
        ui->label->setText(QString::number(this->timer_num2++));
    }

}

void Mytimer::setcount(int num)
{
    this->count = num;
}

void Mytimer::stop_timer1()
{
    //如果使用的是 starttTimer 来启动定时器
    killTimer(this->timer1);//使用此方法 暂定定时器
    //参数为定时器标识符
}

void Mytimer::stop_timer2()
{
    //如果使用的是 starttTimer 来启动定时器
    killTimer(this->timer2);//使用此方法 暂定定时器
    //参数为定时器标识符
}

void Mytimer::stop_timer3()
{
    //如果是使用QTimer 来创建定时器,我们需要使用stop来停止
    timer3->stop();
}

void Mytimer::start_timer1()
{
    this->timer1 = startTimer(1000);
}

void Mytimer::start_timer2()
{
    this->timer2 = startTimer(2000);
}

void Mytimer::start_timer3()
{
    this->timer3->start();
}
12.file读写
#include "mainwindow.h"
#include "ui_mainwindow.h"
#include <QFileDialog>
#include <QFile>
#include <QTextCodec>
#include <QMessageBox>
#include <QDebug>
#include <QDateTime>
MainWindow::MainWindow(QWidget *parent)
    : QMainWindow(parent)
    , ui(new Ui::MainWindow)
{
    ui->setupUi(this);
    ui->btn_read->setEnabled(false);
    ui->btn_modify->setEnabled(false);
    ui->btn_get_info->setEnabled(false);
    connect(ui->btn_selectFile,&QPushButton::clicked,this,[=](){
        QString path = QFileDialog::getOpenFileName(this,"选择文件","C:\\Users\\MrXie\\Desktop","*.txt");
        //将获取到的路径 设置给 单行文本框
        if(path.size() != 0)
        {
           ui->lineEdit_path->setText(path);
        }
        if(ui->lineEdit_path->text().size() != 0)//如果路径有了 那就将读取按钮设为可用
        {
            ui->btn_read->setEnabled(true);
            ui->btn_get_info->setEnabled(true);
        }
        else
        {
            ui->btn_read->setEnabled(false);
        }
    });

    connect(ui->btn_read,&QPushButton::clicked,this,[=](){
        QFile file(ui->lineEdit_path->text());

        //设置文件打开方式
        file.open(QIODevice::ReadOnly);

        QByteArray data = file.readAll();//读取所有内容
        //再将读取的内容放入到文本编辑框

        //在Qt 里面  QByteArray 可以正常隐式转换为QString
        //但是 QString 无法正常隐式转换为QByteArry

        //如果我们要读取的文件 全是GBK 的  ,我们就使用此方法,将读取到的GBK 格式的编码转换为UTF8
        //缺点是只能读取GBK 格式的代码,如果想读各种编码的文件,需要自行去写一个判断函数,来判断所读取
        //文件的编码
        //设置编码格式
        //QTextCodec *code = QTextCodec::codecForName("gbk");
        //QString utf8_data = code->toUnicode(data);//将读取的内容转换为qt 支持的中文编码格式
        ui->textEdit_data->setText(data);
        file.close();

        ui->btn_modify->setEnabled(true);
    });

    connect(ui->btn_modify,&QPushButton::clicked,this,[=](){
        QFile file(ui->lineEdit_path->text());
        file.open(QIODevice::WriteOnly);//覆盖写的方式,会将原来的代码给覆盖
        QByteArray data = ui->textEdit_data->toPlainText().toUtf8();
        //设置编码  以GBK 的编码格式写入!!!
        //QTextCodec *codec = QTextCodec::codecForName("gbk");
        //QByteArray gbk_data = codec->fromUnicode(data);
        file.write(data);
        file.close();
        QMessageBox::information(this,"成功","已修改文件");
    });

    connect(ui->btn_get_info,&QPushButton::clicked,this,[=](){
        //获取文件信息的类
        QFileInfo info(ui->lineEdit_path->text());

        qDebug()<<"文件大小:" << info.size() <<"文件后缀名为" << info.suffix() << "文件路径为" << info.filePath();
        qDebug()<< "文件名为:" << info.fileName();
        qDebug()<<"文件创建日期" << info.created().toString("yy/MM/dd  hh/mm/ss");
        qDebug() <<"最后修改时间" << info.lastModified().toString("yy-MM-dd  hh/mm");
        qDebug() << "访问时间" << info.lastRead().toString("MM-dd");
    });


}

MainWindow::~MainWindow()
{
    delete ui;
}
13.serialport
串口通信:起始位 、数据位、校验位、结束位、空闲位
校验:奇校验、偶校验、空校验。
奇偶校验:数据位与校验位1数之和为奇或偶。
#include "mainwindow.h"
#include "ui_mainwindow.h"

#include <QMessageBox>
#include <QTextCodec>

MainWindow::MainWindow(QWidget *parent)
    : QMainWindow(parent)
    , ui(new Ui::MainWindow)
{
    ui->setupUi(this);
    //在Qt 里面用于串口通信的类有两个
    //QSerialPort  串口类
    //QSerialPortInfo 串口信息类
    this->serialport = new QSerialPort(this);

    //初始化串口
    InitSerialport_slot();
    //连接更新串口按钮 与 初始化串口函数
    connect(ui->updata_port,&QPushButton::clicked,this,&MainWindow::InitSerialport_slot);

    //进行串口通信之前必须先打开串口,但是打开串口通信又必须设置好参数,因此如果两个设备的配置不同
    //将导致无法通讯,所以在点击打开串口的时候,就应该配置好串口信息
    connect(ui->open_port,&QPushButton::clicked,this,&MainWindow::OpenPort);

    connect(ui->btn_clear,&QPushButton::clicked,ui->textEdit_send,&QTextEdit::clear);

    //发送数据按钮
    connect(ui->btn_send,&QPushButton::clicked,this,[=](){

        QByteArray data= ui->textEdit_send->toPlainText().toUtf8();
        //由于接收的通信工具 使用的是GBK 格式,而我们发送的数据数UTF8,因此需要将发送的数据
        //把编码以GBK 格式发送
        QTextCodec *code = QTextCodec::codecForName("gbk");
        QByteArray gbk_data = code->fromUnicode(data);

        this->serialport->write(gbk_data);
        //发送完之后 将数据显示到 数据接收区域
        ui->textEdit_reve->append("自定义串口:" + data);
    });

    //接收数据
    connect(this->serialport,&QSerialPort::readyRead,this,[=](){
        QByteArray data = this->serialport->readAll();

        //由于 接收到的数据是GBK 格式的数据  因此我需要将GBK 格式的数据
        //转换位 QT 适应编码
        QTextCodec *code = QTextCodec::codecForName("gbk");
        ui->textEdit_reve->append("收到的信息:" + code->toUnicode(data));
    });

}

MainWindow::~MainWindow()
{
    delete ui;
}

void MainWindow::InitSerialport_slot()
{
    //清空 ui里面 串口选择下拉框里面的所有内容
    ui->port->clear();
    //获取当前可用的串口
    //QList<QSerialPortInfo> QSerialPortInfo::availablePorts() 获取可用的串口
    QList<QSerialPortInfo> serialInfo = QSerialPortInfo::availablePorts();

    //将可用的串口名字加入到ui下拉框里面
    for(int i = 0;i < serialInfo.size();i++)
    {
        ui->port->addItem(serialInfo[i].portName());
    }
}

void MainWindow::OpenPort()
{
    //打开串口之前 必须先配置好信息
    //信息从 ui 界面里面的下拉框获取!!!
    QString portName = ui->port->currentText();
    QString BaudRate = ui->BaudRate->currentText();
    QString StopBit = ui->StopBit->currentText();
    QString DataBit = ui->DataBit->currentText();
    QString Parity = ui->Parity->currentText();

    //将获取到的信息 设置给串口
    this->serialport->setPortName(portName);
    this->serialport->setBaudRate(BaudRate.toUInt());
    if(StopBit == "1")
    {
        this->serialport->setStopBits(QSerialPort::OneStop);
    }
    else if(StopBit == "1.5")
    {
        this->serialport->setStopBits(QSerialPort::OneAndHalfStop);
    }
    else if(StopBit == "2")
    {
        this->serialport->setStopBits(QSerialPort::TwoStop);
    }

    if(DataBit == "8")
    {
        this->serialport->setDataBits(QSerialPort::Data8);
    }
    else if(DataBit == "7")
    {
        this->serialport->setDataBits(QSerialPort::Data7);
    }
    else if(DataBit == "6")
    {
        this->serialport->setDataBits(QSerialPort::Data6);
    }
    else if(DataBit == "5")
    {
        this->serialport->setDataBits(QSerialPort::Data5);
    }

    if(Parity == "无校验")
    {
        this->serialport->setParity(QSerialPort::NoParity);
    }
    else if(Parity == "奇校验")
    {
        this->serialport->setParity(QSerialPort::OddParity);
    }
    else if(Parity == "偶校验")
    {
        this->serialport->setParity(QSerialPort::EvenParity);
    }

    //串口信息设置好后  可以打开串口了!!
    if(ui->open_port->text() == "打开串口")
    {
        //串口的打开方式  已读写的方式打开,打开成功返回true ,否则返回false
        if(this->serialport->open(QIODevice::ReadWrite))
        {
            QMessageBox::information(this,"成功","串口打开成功");
            ui->open_port->setText("关闭串口");
        }
        else
        {
            QMessageBox::critical(this,"失败","串口打开失败");
        }
    }
    else
    {
        this->serialport->close();
        QMessageBox::information(this,"成功","串口关闭成功");
        ui->open_port->setText("打开串口");
    }
}
Qt程序打包
1

2

3

4

5

6

7

8

9

10

11


 1588
1588

 被折叠的 条评论
为什么被折叠?
被折叠的 条评论
为什么被折叠?
 到【灌水乐园】发言


