


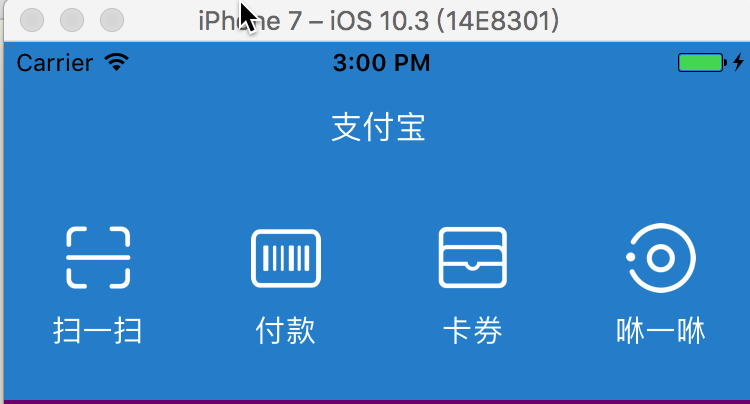
假设需求是这样的
分类按钮.png
controller里面创建topView,一看ZFBHomeTopView就知道封装了。。。
 ZFBHomeTopView *topView = [[ZFBHomeTopView alloc] init];
    topView.backgroundColor = [UIColor colorWithHex:0x2e90d4];
    [self.view addSubview:topView];

    [topView mas_makeConstraints:^(MASConstraintMaker *make) {
        make.left.top.right.offset(0);
        make.height.offset(115);
    }];
精彩部分代码来了
#import "ZFBHomeTopView.h"
#import "NSAttributedString+Additon.h"
#import "Masonry.h"
@implementation ZFBHomeTopView
// 重写初始化方法在此方法中创建及添加子控件
- (instancetype)initWithFrame:(CGRect)frame
{
self = [super initWithFrame:frame];
if (self) {
[self setupUI];
}
return self;
}
- (void)setupUI {
// 1.扫一扫
UIButton *scanBtn = [self makeHomeTopViewWithButtonImageName:@"home_scan" andButtonWithTitle:@"扫一扫"];
UIButton *payBtn = [self makeHomeTopViewWithButtonImageName:@"home_pay" andButtonWithTitle:@"付款"];
UIButton *cardBtn = [self makeHomeTopViewWithButtonImageName:@"home_card" andButtonWithTitle:@"卡券"];
UIButton *xiuxiuBtn = [self makeHomeTopViewWithButtonImageName:@"home_xiu" andButtonWithTitle:@"咻一咻"];
[self.subviews mas_makeConstraints:^(MASConstraintMaker *make) {
make.top.bottom.offset(0);
}];
[scanBtn mas_makeConstraints:^(MASConstraintMaker *make) {
make.left.offset(0);
}];
[payBtn mas_makeConstraints:^(MASConstraintMaker *make) {
make.left.equalTo(scanBtn.mas_right).offset(0);
make.width.equalTo(scanBtn.mas_width).offset(0);
}];
[cardBtn mas_makeConstraints:^(MASConstraintMaker *make) {
make.left.equalTo(payBtn.mas_right).offset(0);
make.width.equalTo(payBtn.mas_width).offset(0);
}];
[xiuxiuBtn mas_makeConstraints:^(MASConstraintMaker *make) {
make.left.equalTo(cardBtn.mas_right).offset(0);
make.width.equalTo(cardBtn.mas_width).offset(0);
make.right.offset(0);
}];
}
- (UIButton *)makeHomeTopViewWithButtonImageName:(NSString *)imageNmae andButtonWithTitle:(NSString *)title {
UIButton *btn = [UIButton buttonWithType:UIButtonTypeSystem];
NSAttributedString *attrStr = [NSAttributedString imageTextWithImage:[UIImage imageNamed:imageNmae] imageWH:35 title:title fontSize:15 titleColor:[UIColor whiteColor] spacing:8];
// 设置按钮换行
btn.titleLabel.numberOfLines = 0;
// 设置按钮中的文字居中显示
btn.titleLabel.textAlignment = NSTextAlignmentCenter;
[btn setAttributedTitle:attrStr forState:UIControlStateNormal];
[self addSubview:btn];
return btn;
}
@end这里面的按钮通过图文混排来实现,通过创建分类NSAttributedString ,看代码你就恍然大悟了。
h文件
//  NSAttributedString+CZAdditon.h

#import <UIKit/UIKit.h>

@interface NSAttributedString (Additon)

/// 使用图像和文本生成上下排列的属性文本
///
/// @param image      图像
/// @param imageWH    图像宽高
/// @param title      标题文字
/// @param fontSize   标题字体大小
/// @param titleColor 标题颜色
/// @param spacing    图像和标题间距
///
/// @return 属性文本
+ (instancetype)imageTextWithImage:(UIImage*)image imageWH:(CGFloat)imageWH title:(NSString*)title fontSize:(CGFloat)fontSize titleColor:(UIColor*)titleColor spacing:(CGFloat)spacing;
@end


m文件

//  NSAttributedString+CZAdditon.m

#import "NSAttributedString+Additon.h"

@implementation NSAttributedString (Additon)

+ (instancetype)imageTextWithImage:(UIImage *)image imageWH:(CGFloat)imageWH title:(NSString *)title fontSize:(CGFloat)fontSize titleColor:(UIColor *)titleColor spacing:(CGFloat)spacing {
    // 文本字典
    NSDictionary *titleDict = @{NSFontAttributeName : [UIFont systemFontOfSize:fontSize],
                                NSForegroundColorAttributeName : titleColor};
    NSDictionary *spacingDict = @{NSFontAttributeName : [UIFont systemFontOfSize:spacing]};

    // 图片文本
    NSTextAttachment *attachment = [[NSTextAttachment alloc] init];
    attachment.image = image;
    attachment.bounds = CGRectMake(0, 0, imageWH, imageWH);
    NSAttributedString *imageText = [NSAttributedString attributedStringWithAttachment:attachment];

    // 换行文本
    NSAttributedString *lineText = [[NSAttributedString alloc] initWithString:@"\n\n" attributes:spacingDict];

    // 按钮文字
    NSAttributedString *text = [[NSAttributedString alloc] initWithString:title attributes:titleDict];

    // 合并文字
    NSMutableAttributedString *attM = [[NSMutableAttributedString alloc] initWithAttributedString:imageText];
    [attM appendAttributedString:lineText];
    [attM appendAttributedString:text];

    return attM.copy;
}

@end
不得不承认,这样写出来来的代码高度整洁,易维护,逼格高。思路更上一层楼。小白一般是通过循环创建UIView,上面放UIImageView 和Label拼起来的,添加手势tap。。。
老司机之所以是这样写是因为老司机有扎实的iOS基础。这点很重要
扎实的基础是必要的!iOS分类概念深刻理解和灵活运用。尽管初级也会使用Masonry,但怎么看,老司机使用Masonry很6。如果不是看代码,还真不知道Masonry
make.left.top.right.offset(0);这样写简洁舒服多了呢!
总之,做技术这么久,笨笨的我才领悟到你会做再高深的东西,那些东西也是别人苹果已经给你准备好的,或者其他人封装好的,你只是模仿写而已。基础不扎实,代码写不好一切都是空中楼阁,回头看看自己几年以前写的代码价值不忍直视。


 9289
9289

 被折叠的 条评论
为什么被折叠?
被折叠的 条评论
为什么被折叠?
 到【灌水乐园】发言


