


一、什么是状态管理?为什么需要 Vuex?
1. 状态管理的基本概念
在 Vue 应用中,状态指的是应用中的数据。例如:
- 用户登录状态
- 购物车中的商品
- 文章列表的分页信息
状态管理就是对这些数据的创建、读取、更新和删除进行有效管理。
2. 为什么需要 Vuex?
在小型应用中,我们可以通过 props 和 events 实现组件间通信。但在中大型应用中,这种方式会面临以下问题:
- 多层级组件通信复杂:跨级组件通信需要通过中间组件层层传递
- 状态共享困难:多个不相关组件需要共享同一状态时,代码会变得混乱
- 状态变化不可追踪:数据流向不清晰,调试困难
Vuex 通过集中式存储应用的所有组件的状态,并以相应的规则保证状态以一种可预测的方式发生变化,解决了上述问题。
二、Vuex 核心概念
Vuex 的核心由以下几个部分组成:
1. State:应用状态的单一数据源
State 是存储应用状态的对象,类似于组件中的 data。但与组件的 data 不同的是,Vuex 的 state 是全局共享的。
// store.js
const store = createStore({
  state: {
    count: 0,
    user: null,
    cartItems: []
  }
})
组件可以通过 this.$store.state 访问这些状态:
<template>
  <div>
    <p>Count: {{ $store.state.count }}</p>
  </div>
</template>
2. Getters:类似于计算属性,获取派生状态
Getters 用于获取 state 经过处理后的值,类似于组件中的计算属性。
// store.js
const store = createStore({
  state: {
    todos: [
      { id: 1, text: 'Learn Vuex', completed: true },
      { id: 2, text: 'Build an app', completed: false }
    ]
  },
  getters: {
    completedTodos(state) {
      return state.todos.filter(todo => todo.completed);
    }
  }
})
组件中使用:
<template>
  <div>
    <p>Completed todos: {{ $store.getters.completedTodos.length }}</p>
  </div>
</template>
3. Mutations:更改 state 的唯一方法
Mutations 是唯一可以修改 state 的地方,并且必须是同步的。
// store.js
const store = createStore({
  state: {
    count: 0
  },
  mutations: {
    increment(state) {
      state.count++;
    },
    incrementBy(state, payload) {
      state.count += payload;
    }
  }
})
组件中通过 commit 触发 mutation:
<script>
export default {
  methods: {
    handleIncrement() {
      this.$store.commit('increment'); // 触发 increment mutation
      this.$store.commit('incrementBy', 5); // 传递参数
    }
  }
}
</script>
4. Actions:处理异步操作
Actions 用于处理异步操作(如 API 请求),完成后通过 commit 提交 mutation。
// store.js
const store = createStore({
  state: {
    user: null,
    loading: false
  },
  mutations: {
    SET_USER(state, user) {
      state.user = user;
    },
    SET_LOADING(state, loading) {
      state.loading = loading;
    }
  },
  actions: {
    async fetchUser({ commit }) {
      commit('SET_LOADING', true);
      try {
        const response = await fetch('/api/user');
        const user = await response.json();
        commit('SET_USER', user);
      } catch (error) {
        console.error('Failed to fetch user', error);
      } finally {
        commit('SET_LOADING', false);
      }
    }
  }
})
组件中通过 dispatch 触发 action:
<script>
export default {
  methods: {
    async loadUser() {
      await this.$store.dispatch('fetchUser');
    }
  }
}
</script>
5. Modules:模块化管理大型应用
当应用变得复杂时,可以将 store 分割成多个模块,每个模块有自己的 state、mutations、actions 和 getters。
// store/modules/cart.js
export default {
  namespaced: true, // 启用命名空间
  state: {
    items: []
  },
  mutations: {
    ADD_ITEM(state, item) {
      state.items.push(item);
    }
  },
  actions: {
    addToCart({ commit }, item) {
      commit('ADD_ITEM', item);
    }
  },
  getters: {
    itemCount(state) {
      return state.items.length;
    }
  }
}
在根 store 中注册模块:
// store/index.js
import { createStore } from 'vuex'
import cart from './modules/cart'
import user from './modules/user'

export default createStore({
  modules: {
    cart,
    user
  }
})
三、Vuex 工作流程:单向数据流
Vuex 采用单向数据流的设计理念,所有状态变更都遵循固定的流程:
- 视图触发 Action:组件通过
dispatch触发 action - Action 处理异步逻辑:如 API 请求、定时器等
- Action 提交 Mutation:完成后通过
commit提交 mutation - Mutation 修改 State:mutation 是唯一允许修改 state 的地方
- State 变化触发视图更新:Vue 的响应式系统会自动更新所有依赖该 state 的组件
组件(dispatch) → Action(commit) → Mutation(modify) → State → 组件更新四、实战案例:使用 Vuex 构建购物车应用
下面通过一个简单的购物车应用来演示 Vuex 的实际应用。
实现效果:
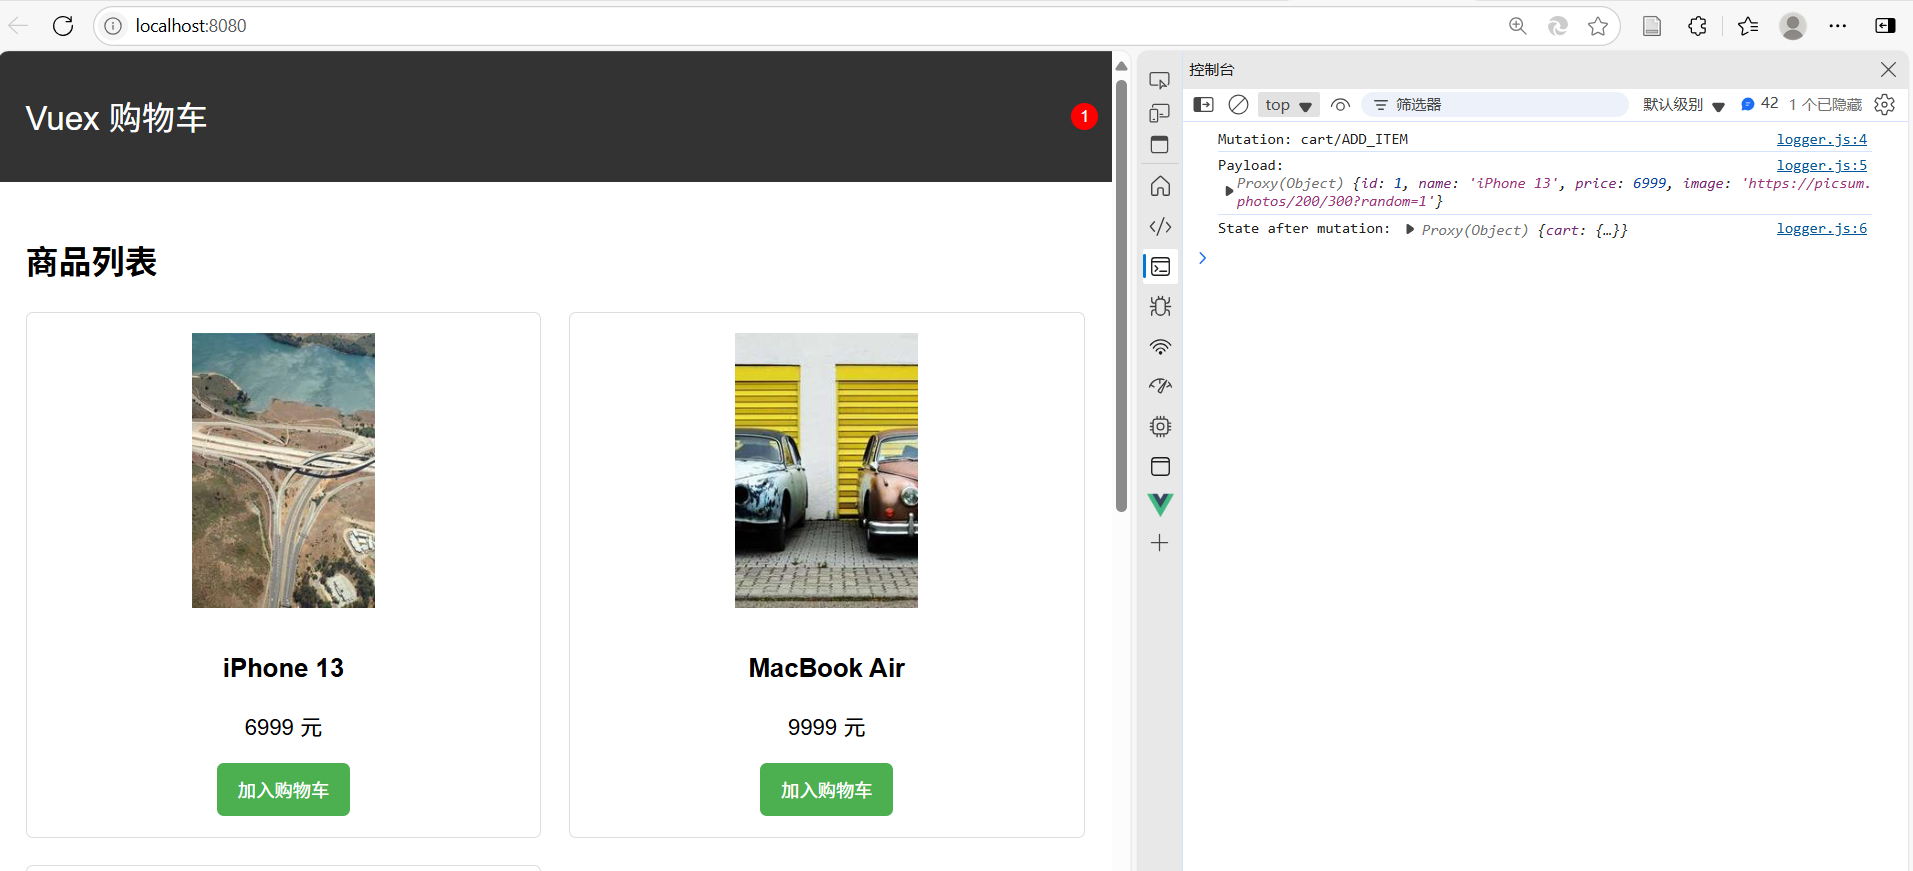
vuex实现购物车
1. 项目结构
src/
  ├── store/
  │    ├── index.js       # 根 store
  │    └── modules/
  │         └── cart.js   # 购物车模块
  ├── components/
  │    ├── ProductList.vue  # 商品列表
  │    ├── Cart.vue         # 购物车
  │    └── Navbar.vue       # 导航栏
  └── App.vue
2. 创建购物车模块
// store/modules/cart.js
export default {
    // 设置命名空间,以便在多个模块中避免状态、getters、mutations和actions的命名冲突
    namespaced: true,
    // 定义模块的状态
    state: {
        // 购物车中的商品项
        items: []
    },
    // 定义获取状态的getter函数
    getters: {
        // 计算购物车中的商品数量
        itemCount: state => state.items.length,
        // 计算购物车中商品的总价
        totalPrice: state => {
            return state.items.reduce((total, item) => {
                return total + item.price * item.quantity;
            }, 0);
        }
    },
    // 定义直接修改状态的mutation函数
    mutations: {
        // 添加商品到购物车
        ADD_ITEM(state, product) {
            // 查找购物车中是否已存在该商品
            const existingItem = state.items.find(item => item.id === product.id);
            if (existingItem) {
                // 如果存在,增加该商品的数量
                existingItem.quantity++;
            } else {
                // 如果不存在,将该商品添加到购物车中,并设置数量为1
                state.items.push({ ...product, quantity: 1 });
            }
        },
        // 从购物车中移除商品
        REMOVE_ITEM(state, productId) {
            // 过滤掉要移除的商品
            state.items = state.items.filter(item => item.id !== productId);
        },
        // 清空购物车
        CLEAR_CART(state) {
            // 将购物车中的商品项设置为空数组
            state.items = [];
        }
    },
    // 定义异步操作和提交mutation的action函数
    actions: {
        // 将商品添加到购物车的action
        addToCart({ commit }, product) {
            // 提交ADD_ITEM的mutation
            commit('ADD_ITEM', product);
        },
        // 从购物车中移除商品的action
        removeFromCart({ commit }, productId) {
            // 提交REMOVE_ITEM的mutation
            commit('REMOVE_ITEM', productId);
        },
        // 清空购物车的action
        clearCart({ commit }) {
            // 提交CLEAR_CART的mutation
            commit('CLEAR_CART');
        }
    }
};
3. 注册模块到根 store
// store/index.js
import { createStore } from 'vuex';
import cart from './modules/cart';

export default createStore({
  modules: {
    cart
  }
});
4. 创建商品列表组件
<!-- components/ProductList.vue -->
<template>
  <div class="product-list">
    <h2>商品列表</h2>
    <div class="products">
      <div v-for="product in products" :key="product.id" class="product">
        <img :src="product.image" alt="Product" />
        <h3>{{ product.name }}</h3>
        <p>{{ product.price }} 元</p>
        <button @click="addToCart(product)">加入购物车</button>
      </div>
    </div>
  </div>
</template>

<script>
export default {
  data() {
    return {
      products: [
        { id: 1, name: 'iPhone 13', price: 6999, image: 'https://picsum.photos/200/300?random=1' },
        { id: 2, name: 'MacBook Air', price: 9999, image: 'https://picsum.photos/200/300?random=2' },
        { id: 3, name: 'iPad Pro', price: 7999, image: 'https://picsum.photos/200/300?random=3' }
      ]
    };
  },
  methods: {
    addToCart(product) {
      this.$store.dispatch('cart/addToCart', product);
      alert(`${product.name} 已添加到购物车`);
    }
  }
};
</script>
5. 创建购物车组件
<!-- components/Cart.vue -->
<template>
  <div class="cart">
    <h2>购物车</h2>
    <div v-if="cartItems.length === 0" class="empty-cart">
      购物车为空
    </div>
    <div v-else>
      <ul>
        <li v-for="item in cartItems" :key="item.id" class="cart-item">
          <img :src="item.image" alt="Product" />
          <div class="item-info">
            <h3>{{ item.name }}</h3>
            <p>{{ item.price }} 元 x {{ item.quantity }}</p>
            <button @click="removeFromCart(item.id)">移除</button>
          </div>
        </li>
      </ul>
      <div class="cart-summary">
        <p>总计: {{ totalPrice }} 元</p>
        <button @click="clearCart">清空购物车</button>
      </div>
    </div>
  </div>
</template>

<script>
export default {
  computed: {
    cartItems() {
      return this.$store.state.cart.items;
    },
    totalPrice() {
      return this.$store.getters['cart/totalPrice'];
    }
  },
  methods: {
    removeFromCart(productId) {
      this.$store.dispatch('cart/removeFromCart', productId);
    },
    clearCart() {
      this.$store.dispatch('cart/clearCart');
    }
  }
};
</script>
6. 创建导航栏组件(显示购物车数量)
<!-- components/Navbar.vue -->
<template>
  <nav class="navbar">
    <div class="container">
      <a href="#" class="brand">Vuex 购物车</a>
      <div class="cart-icon">
        <i class="fas fa-shopping-cart"></i>
        <span class="cart-count">{{ cartItemCount }}</span>
      </div>
    </div>
  </nav>
</template>

<script>
export default {
  computed: {
    cartItemCount() {
      return this.$store.getters['cart/itemCount'];
    }
  }
};
</script>
7. 在 App.vue 中组合所有组件
<!-- App.vue -->
<template>
  <div id="app">
    <Navbar />
    <div class="container">
      <ProductList />
      <Cart />
    </div>
  </div>
</template>

<script>
import Navbar from './components/Navbar.vue';
import ProductList from './components/ProductList.vue';
import Cart from './components/Cart.vue';

export default {
  components: {
    Navbar,
    ProductList,
    Cart
  }
};
</script>

<style>
/* 全局样式 */
body {
  font-family: Arial, sans-serif;
  margin: 0;
  padding: 0;
}

.container {
  max-width: 1200px;
  margin: 0 auto;
  padding: 20px;
}

.navbar {
  background-color: #333;
  color: white;
  padding: 10px 0;
}

.navbar .container {
  display: flex;
  justify-content: space-between;
  align-items: center;
}

.brand {
  font-size: 24px;
  text-decoration: none;
  color: white;
}

.cart-icon {
  position: relative;
  cursor: pointer;
}

.cart-count {
  position: absolute;
  top: -10px;
  right: -10px;
  background-color: red;
  color: white;
  border-radius: 50%;
  width: 20px;
  height: 20px;
  display: flex;
  justify-content: center;
  align-items: center;
  font-size: 12px;
}

.product-list {
  margin-bottom: 40px;
}

.products {
  display: grid;
  grid-template-columns: repeat(auto-fill, minmax(250px, 1fr));
  gap: 20px;
}

.product {
  border: 1px solid #ddd;
  padding: 15px;
  border-radius: 5px;
  text-align: center;
}

.product img {
  max-width: 100%;
  height: 200px;
  object-fit: cover;
  margin-bottom: 10px;
}

.product button {
  background-color: #4CAF50;
  color: white;
  border: none;
  padding: 10px 15px;
  cursor: pointer;
  border-radius: 5px;
}

.product button:hover {
  background-color: #45a049;
}

.cart-item {
  display: flex;
  align-items: center;
  border-bottom: 1px solid #ddd;
  padding: 15px 0;
}

.cart-item img {
  width: 80px;
  height: 80px;
  object-fit: cover;
  margin-right: 15px;
}

.item-info {
  flex: 1;
}

.item-info button {
  background-color: #f44336;
  color: white;
  border: none;
  padding: 5px 10px;
  cursor: pointer;
  border-radius: 3px;
}

.item-info button:hover {
  background-color: #d32f2f;
}

.cart-summary {
  margin-top: 20px;
  text-align: right;
}

.cart-summary button {
  background-color: #333;
  color: white;
  border: none;
  padding: 10px 15px;
  cursor: pointer;
  border-radius: 5px;
}

.cart-summary button:hover {
  background-color: #555;
}

.empty-cart {
  padding: 20px;
  text-align: center;
  color: #666;
}
</style>
五、Vuex 高级技巧
1. 使用辅助函数简化代码
Vuex 提供了 mapState、mapGetters、mapMutations 和 mapActions 辅助函数来简化组件中的代码。
<template>
  <div>
    <p>Count: {{ count }}</p>
    <button @click="increment">+</button>
  </div>
</template>

<script>
import { mapState, mapMutations } from 'vuex';

export default {
  computed: {
    ...mapState(['count'])
  },
  methods: {
    ...mapMutations(['increment'])
  }
}
</script>
2. 严格模式
在开发环境中启用严格模式,确保所有状态变更都通过 mutations。
// store/index.js
export default createStore({
  strict: process.env.NODE_ENV !== 'production'
});
3. 插件机制
Vuex 插件是一个函数,接收 store 作为唯一参数,可以用于记录日志、持久化存储等。
// store/plugins/logger.js
export default function logger(store) {
  store.subscribe((mutation, state) => {
    console.log('Mutation:', mutation.type);
    console.log('Payload:', mutation.payload);
    console.log('State after mutation:', state);
  });
}

// store/index.js
import logger from './plugins/logger';

export default createStore({
  plugins: [logger]
});
4. 状态持久化
使用 vuex-persistedstate 插件将 state 持久化到本地存储。
npm install vuex-persistedstate
// store/index.js
import createPersistedState from 'vuex-persistedstate';

export default createStore({
  plugins: [createPersistedState()]
});
六、Vuex 常见问题与解决方案
1. 何时使用 Vuex?
- 多组件共享状态
- 组件间通信复杂
- 状态需要被多个视图监听
- 中大型应用
2. 与 Vue Router 结合使用
在路由导航守卫中访问 Vuex 状态:
router.beforeEach((to, from, next) => {
  if (to.meta.requiresAuth && !store.state.user) {
    next('/login');
  } else {
    next();
  }
});
3. 性能优化
- 避免在大型列表中频繁修改 state
- 使用
mapState和mapGetters缓存计算结果 - 对大型数据使用
Vue.set()或store.replaceState()


 被折叠的 条评论
为什么被折叠?
被折叠的 条评论
为什么被折叠?
 到【灌水乐园】发言


