


准备
安装好rabbitmq等环境:
- 在docker安装:https://blog.csdn.net/jingxin_123/article/details/121393913?spm=1001.2014.3001.5502
- 在windows安装:https://blog.csdn.net/tirster/article/details/121938987
pom.xml
<!-- 引入RabbitMq -->
<dependency>
    <groupId>org.springframework.boot</groupId>
    <artifactId>spring-boot-starter-amqp</artifactId>
</dependency>
yml配置
spring:
  rabbitmq:
    host: 127.0.0.1
    port: 5672
    #虚拟机
    virtual-host: /abc
    username: guest
    password: guest
    #手动确认
    listener:
      simple:
		# acknowledgeMode: NONE # rabbitmq的自动确认
        acknowledgeMode: AUTO # rabbitmq的手动确认, springboot会自动发送确认回执 (默认)
        # acknowledgeMode: MANUAL # rabbitmq的手动确认, springboot不发送回执, 必须自己编码发送回执
选择模式
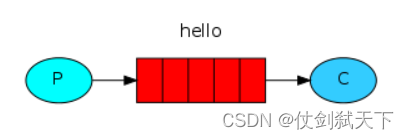
1、简单模式:一个生产者对应一个消费者!!
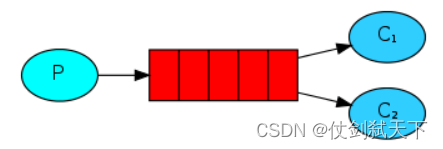
2、工作模式:一个生产者对应多个消费者,但是一条消息只能有一个消费者获得消息!!!
轮询分发就是将消息队列中的消息,依次发送给所有消费者。一个消息只能被一个消费者获取
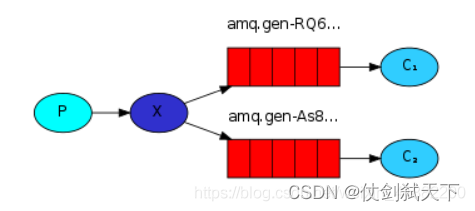
3、发布和订阅模式:一个消费者将消息首先发送到交换器,交换器绑定到多个队列,然后被监听该队列的消费者所接收并消费。如果没有队列绑定交换机,则消息将丢失。因为交换机没有存储能力,消息只能存储在队列中。
4、路由模式:生产者将消息发送到direct交换器,在绑定队列和交换器的时候有一个路由key,生产者发送的消息会指定一个路由key,那么消息只会发送到相应key相同的队列,接着监听该队列的消费者消费消息。

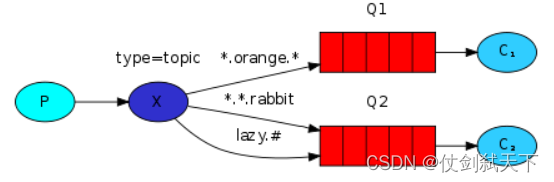
5、主题模式:上面的路由模式是根据路由key进行完整的匹配(完全相等才发送消息),这里的通配符模式通俗的来讲就是模糊匹配。符号“#”表示匹配一个或多个词,符号“*”表示匹配一个词。与路由模式相似,但是,主题模式是一种模糊的匹配方式。
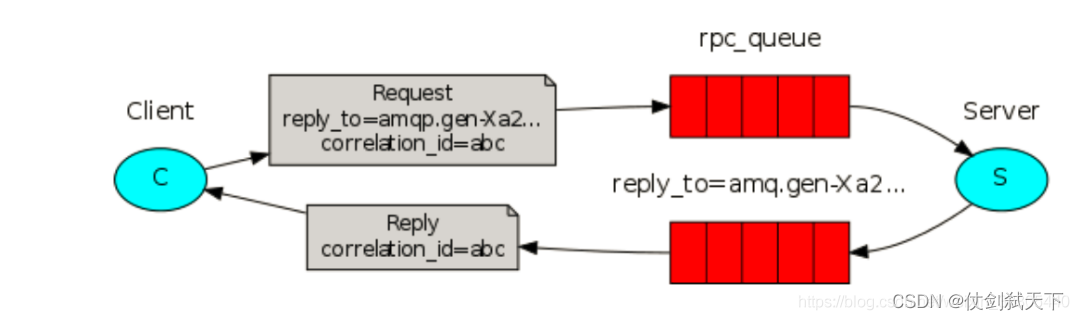
6、RPC异步调用:如果我们需要在远程电脑上运行一个方法,并且还要等待一个返回结果该怎么办?这和前面的例子不太一样, 这种模式我们通常称为远程过程调用,即RPC
代码实现
- 简单模式
- 简单模式配置文件
@Configuration
public class RabbitSimpleConfig {
    @Bean
    public Queue simpleQueue(){
    	/*
		 * 可用以下形式:
		 * new Queue("simpleQueue") - 持久,非排他,非自动删除
		 * new Queue("simpleQueue",false,false,false,null)
		 */
        return new Queue("simpleQueue");
    }
}
- 简单模式生产者部分
@SpringBootTest(classes = RabbitmqProducerApplication.class)
public class ProducerTest {
    @Autowired
    RabbitTemplate rabbitTemplate;
    @Test
    public void simpleProduct(){
        for (int num = 0; num < 20; num++) {
            rabbitTemplate.convertAndSend("simpleQueue", "简单模式"+num);
        }
    }
}
- 简单模式消费者部分
@Component
public class MessageListener {
    @RabbitListener(queues = "simpleQueue")
    public void simpleListener(String message){
        System.out.println("简单模式监听器:"+message);
    }
}
// 另外,@RabbitListener 注解中也可以直接定义队列:
//	@RabbitListener(queuesToDeclare = @Queue(name = "helloworld",durable = "false"))
这里还可以使用另一种形式:
@Component
@RabbitListener(queues = "simpleQueue")
public class SimpleReceiver {
	@RabbitHandler
	public void receive(String msg) {
		System.out.println("收到: "+msg);
	}
}
// 通过@RabbitListener从指定的队列接收消息
// 使用@RebbitHandler注解的方法来处理消息
- 工作模式
- 工作模式配置文件
@Bean
 public Queue workQueue(){
	 // 这个构造方法创建的队列参数为: 持久,非排他,非自动删除
     return new Queue("workQueue");
 }
- 工作模式生产者部分
@Test
public void workProduct(){
    for (int num = 0; num < 20; num++) {
    	//spring 默认将消息的 DeliveryMode 设置为 PERSISTENT 持久化,
        rabbitTemplate.convertAndSend("workQueue", "工作模式"+num);
    }
}
spring boot封装的 rabbitmq api 中, 发送的消息默认是持久化消息. 如果希望发送非持久化消息,
需要在发送消息时做以下设置:
使用
MessagePostProcessor前置处理器参数
从消息中获取消息的属性对象
在属性中把DeliveryMode设置为非持久化//如果需要设置消息为非持久化,可以取得消息的属性对象,修改它的deliveryMode属性 t.convertAndSend("task_queue", (Object) s, new MessagePostProcessor() { @Override public Message postProcessMessage(Message message) throws AmqpException { MessageProperties props = message.getMessageProperties(); props.setDeliveryMode(MessageDeliveryMode.NON_PERSISTENT); return message; } });
- 工作模式消费者部分
 @RabbitListener(queues = "workQueue")
 public void workListener1(String message) {
     System.out.println("工作模式监听器1:" + message);
 }

 @RabbitListener(queues = "workQueue")
 public void workListener2(String message) {
     System.out.println("工作模式监听器2:" + message);
 }
- 发布订阅模式
- 发布订阅模式配置文件
//配置交换器
@Bean
public FanoutExchange fanoutExchange() {
    return new FanoutExchange("fanoutExchange");
}
//配置队列
@Bean
public Queue fanoutQueue1() {
    return new Queue("fanoutQueue1", true, false, false, null);
}

@Bean
public Queue fanoutQueue2() {
    return new Queue("fanoutQueue2", true, false, false, null);
}
//配置绑定
@Bean
public Binding fanoutBinding1(FanoutExchange fanoutExchange, Queue fanoutQueue1) {
        return BindingBuilder.bind(fanoutQueue1).to(fanoutExchange);
}

@Bean
public Binding fanoutBinding2(FanoutExchange fanoutExchange, Queue fanoutQueue2) {
    return BindingBuilder.bind(fanoutQueue2).to(fanoutExchange);
}
- 发布订阅模式生产者部分
@Test
public void FanoutProduct(){
    for (int num = 0; num < 10; num++) {
        rabbitTemplate.convertAndSend("fanoutExchange","","发布订阅模式"+num);
    }
}
- 发布订阅模式消费者部分
@RabbitListener(queues = "fanoutQueue1")
public void fanoutListener1(String message) {
    System.out.println("发布订阅监听器1:" + message);
}

@RabbitListener(queues = "fanoutQueue2")
public void fanoutListener2(String message) {
    System.out.println("发布订阅监听器2:" + message);
}
- 路由模式
- 路由模式配置文件
//配置交换机
@Bean
public DirectExchange directExchange() {
    return new DirectExchange("directExchange");
}

//配置队列
@Bean
public Queue directQueue1() {
    return new Queue("directQueue1", true, false, false, null);
}

@Bean
public Queue directQueue2() {
    return new Queue("directQueue2", true, false, false, null);
}
//配置绑定
@Bean
public Binding directBinding1(Queue directQueue1, DirectExchange directExchange) {
    return BindingBuilder.bind(directQueue1).to(directExchange).with("one");
}

@Bean
public Binding directBinding2(Queue directQueue2, DirectExchange directExchange) {
    return BindingBuilder.bind(directQueue2).to(directExchange).with("two");
}
- 路由模式生产者部分
@Test
public void directProduct1() {
    for (int num = 0; num < 5; num++) {
        rabbitTemplate.convertAndSend("directExchange","one", "发送到路由队列1消息"+num);
    }
}
@Test
public void directProduct2() {
    for (int num = 0; num < 5; num++) {
        rabbitTemplate.convertAndSend("directExchange","two", "发送到路由队列2消息"+num);
    }
}
- 路由模式消费者部分
@RabbitListener(queues = "directQueue1")
public void fanoutListener1(String message) {
    System.out.println("路由模式监听器1:" + message);
}

@RabbitListener(queues = "directQueue2")
public void fanoutListener2(String message) {
    System.out.println("路由模式监听器2:" + message);
}
- 主题模式
- 通配符模式配置文件
//配置队列
@Bean
public Queue topicQueue1() {
   return new Queue("topicQueue1");
}

@Bean
public Queue topicQueue2() {
   return new Queue("topicQueue2");
}
//配置交换器
@Bean
public TopicExchange topicExchange() {
   return new TopicExchange("topicExchange");
}
//配置绑定
@Bean
public Binding topicBinding1(Queue topicQueue1, TopicExchange topicExchange) {
   return BindingBuilder.bind(topicQueue1).to(topicExchange).with("topic.*");
}

@Bean
public Binding topicBinding2(Queue topicQueue2, TopicExchange topicExchange) {
   return BindingBuilder.bind(topicQueue2).to(topicExchange).with("topic.#");
}
- 通配符模式生产者部分
/*
 * 通配符模式测试
 * */
@Test
public void topicProduct() {
    rabbitTemplate.convertAndSend("topicExchange","topic.one", "routkey为topic.one的消息");
    rabbitTemplate.convertAndSend("topicExchange","topic.one.two", "routkey为topic.one.two的消息");
}
- 通配符模式消费者部分
@RabbitListener(queues = "topicQueue1")
public void fanoutListener1(String message) {
    System.out.println("通配符监听器1:" + message);
}

@RabbitListener(queues = "topicQueue2")
public void fanoutListener2(String message) {
    System.out.println("通配符监听器2:" + message);
}
- RPC模式
- RPC模式配置文件
@SpringBootApplication
public class Main {
	public static void main(String[] args) {
		SpringApplication.run(Main.class, args);
	}
	@Bean
	public Queue sendQueue() {
		return new Queue("rpc_queue",false);
	}
	@Bean
	public Queue rndQueue() {
		return new Queue(UUID.randomUUID().toString(), false);
	}
}
- 服务端部分
// 从rpc_queue接收调用数据, 执行运算求斐波那契数,并返回计算结果.
// @Rabbitlistener注解对于具有返回值的方法:
// 会自动获取 replyTo 属性
// 自动获取 correlationId 属性
// 向 replyTo 属性指定的队列发送计算结果, 并携带 correlationId 属性
@Component
public class RpcServer {
	@RabbitListener(queues = "rpc_queue")
	public long getFbnq(int n) {
		return f(n);
	}

	private long f(int n) {
		if (n==1 || n==2) {
			return 1;
		}
		return f(n-1) + f(n-2);
	}
}
- 客户端部分
// 使用 SPEL 表达式获取随机队列名: "#{rndQueue.name}"
// 发送调用数据时, 携带随机队列名和correlationId
// 从随机队列接收调用结果, 并获取correlationId
@Component
public class RpcClient {
	@Autowired
	AmqpTemplate t;

	@Value("#{rndQueue.name}")
	String rndQueue;

	public void send(int n) {
		// 发送调用信息时, 通过前置消息处理器, 对消息属性进行设置, 添加返回队列名和关联id
		t.convertAndSend("rpc_queue", (Object)n, new MessagePostProcessor() {
			@Override
			public Message postProcessMessage(Message message) throws AmqpException {
				MessageProperties p = message.getMessageProperties();
				p.setReplyTo(rndQueue);
				p.setCorrelationId(UUID.randomUUID().toString());
				return message;
			}
		});
	}

	//从随机队列接收计算结果
	@RabbitListener(queues = "#{rndQueue.name}")
	public void receive(long r, @Header(name=AmqpHeaders.CORRELATION_ID) String correlationId) {
		System.out.println("\n\n"+correlationId+" - 收到: "+r);
	}
}
注意
- 如果消息传的是对象,则这个对象必须实现序列化接口
- 如果yaml配置文件配置了手动确认:
acknowledgeMode: MANUAL那么接收消息后必须发送回执,告诉队列已确认收到,否则消息会重复被消费。发送回执代码:channel.basicAck(message.getMessageProperties().getDeliveryTag(), false); // 消息的标识,false只确认当前一个消息收到,true确认所有consumer获得的消息(成功消费,消息从队列中删除 )
参考文章:
RabbitMQ五种工作模式
RabbitMQ - Spring boot 整合
RabbitMQ
SpringBoot+RabbitMQ实战系列


 190
190


 被折叠的 条评论
为什么被折叠?
被折叠的 条评论
为什么被折叠?
 到【灌水乐园】发言


