


Eclipse插件Lazy Start实现原理分析
朱兴(zhu_xing@live.cn)
每次提到有关Eclipse插件启动的问题的时候,脑子中自然的反应就是:可以设定为预先启动(org.eclipse.ui.startup),否则默认的情况下是懒启动(Lazy Start),只有当插件中的功能被真正调用的时候,插件才会被启动。可能是人也跟着变懒了,也一直没有去留心Eclipse底层是怎么实现这种懒加载的,只是有个大致的猜测,估计又是用hook机制了。昨天闲着具体看了一下实现,果然是类似的实现。下面就大致和大家分享一下,说的不一定准确,仅供参考 ~_~。
直接进入主题,我们的Eclipse实例启动肯定要构造工作区,那么ResourcesPlugin肯定会被启动,我们就在ResourcesPlugin.startup方法设置一个断点,调试栈如下:

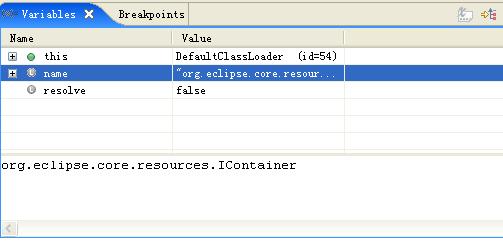
假设我们对插件类型加载细节不知道,猜测大致过程如下:
1、 DefaultClassLoader加载类型(org.eclipse.core.resources.IContainer)
2、EclipseLazyStarter.preFindLocalClass
3、 启动资源插件:ResourcesPlugin.startup
补充说明:
1、 org.eclipse.osgi.internal.baseadaptor.DefaultClassLoader是Eclipse针对OSGI类加载实现的核心角色,也是eclipse插件默认的类加载器类型,当然,每个插件有自己独立的类加载器实例来负责类型加载。
2、 DefaultClassLoader、BundleLoader、ClasspathManager三者协作,处理类型加载请求(为什么一个类加载过程要搞的这么复杂呢?Eclipse的考虑是什么呢? 大家思考吧~_~)
【EclipseLazyStarter调用分析】
我们先大致看一下 EclipseLazyStarter.preFindLocalClass 方法的代码实现:
2 public void preFindLocalClass(String name, ClasspathManager manager) throws ClassNotFoundException {
3 // 首先判断,如果不需要启动则返回
4
5 // 如果插件正在启动,则设定5000ms超时等待;如果超时,直接报错返回
6
7 // 启动插件
8 }
9 }
加载类型之前为什么要给回调一下EclipseLazyStarter. preFindLocalClass,又hook了?我们看了一下EclipseLazyStarter继承了ClassLoadingStatsHook接口,ClassLoadingStatsHook接口的类型API文档说明了它的作用:
A ClassLoadingStatsHook hooks into the <code>ClasspathManager</code> class.
追踪前面的调用栈,ClassLoadingStatsHook是在ClasspathManager. findLocalClass中被调用的:
2 Class result = null ;
3 ClassLoadingStatsHook[] hooks = data.getAdaptor().getHookRegistry().getClassLoadingStatsHooks();
4 try {
5 for ( int i = 0 ; i < hooks.length; i ++ )
6 hooks[i].preFindLocalClass(classname, this );
7 result = findLocalClassImpl(classname, hooks);
8 return result;
9 } finally {
10 for ( int i = 0 ; i < hooks.length; i ++ )
11 hooks[i].postFindLocalClass(classname, result, this );
12 }
13 }
再接着往下看之前,我们大致已经知道来的Eclipse的插件lazy start是怎么回事了:
EclipseLazyStarter hook到了插件类加载器的类型加载过程中了,在类型被加载之前会回调EclipseLazyStarter. preFindLocalClass方法:如果类型所在插件还没启动,启动它;如果正在启动,则设置5000ms的超时,限时不能完成启动,则报错返回!
(附加说明:头一段时间在另外一篇随笔中,写了一些编写插件启动类应该注意的点,其中有一条就是避免在插件启动方法中干耗时的事情。这里真正告诉我们了原因:如果超过5000ms不能完成启动--注意这其中还不包含所依赖插件的启动时间,那么肯定会出现类加载超时的错误了:
While loading class "{1}", thread "{0}" timed out waiting ({4}ms) for thread "{2}" to finish starting bundle "{3}". To avoid deadlock, thread "{0}" is proceeding but "{1}" may not be fully initialized.
)
【EclipseLazyStarter是如何完成注册过程的?】
过程简要解释如下:
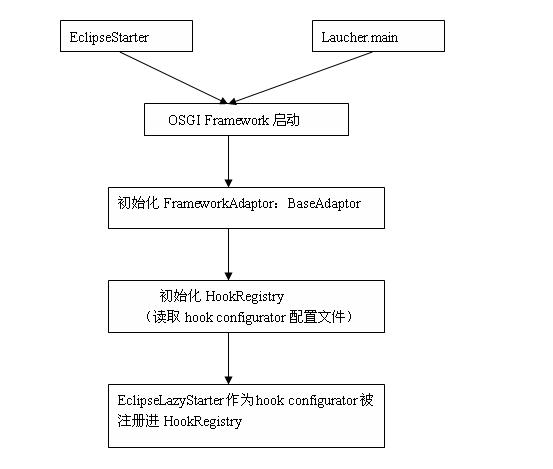
1、启动osgi framework,两种启动方式:如果想利用Eclipse的一些特性,则就以EclipseStarter为入口点启动;否则,可以用命令行的方式,以Laucher.main为入口点启动
2、初始化FrameworkAdaptor(对应eclipse实现是BaseAdaptor)看一下接口说明:
* FrameworkAdaptor interface to the osgi framework. This class is used to provide
* platform specific support for the osgi framework.
*
* <p>The OSGi framework will call this class to perform platform specific functions.
*
* Classes that implement FrameworkAdaptor MUST provide a constructor that takes as a
* parameter an array of Strings. This array will contain arguments to be
* handled by the FrameworkAdaptor. The FrameworkAdaptor implementation may define the format
* and content of its arguments.
*
* The constructor should parse the arguments passed to it and remember them.
* The initialize method should perform the actual processing of the adaptor
* arguments.
* <p>
* Clients may implement this interface.
* </p>
* @since 3.1
*/
看一下BaseAdaptor的构造函数:
2 * Constructs a BaseAdaptor.
3 * @param args arguments passed to the adaptor by the framework.
4 */
5 public BaseAdaptor(String[] args) {
6 if (LocationManager.getConfigurationLocation() == null )
7 LocationManager.initializeLocations();
8 hookRegistry = new HookRegistry( this );
9 FrameworkLogEntry[] errors = hookRegistry.initialize();
10 if (errors.length > 0 )
11 for ( int i = 0 ; i < errors.length; i ++ )
12 getFrameworkLog().log(errors[i]);
13 // get the storage after the registry has been initialized
14 storage = getStorage();
15 // TODO consider passing args to BaseAdaptorHooks
16 }
3、初始化HookRegistry,我们直接看一下HookRegistry.initialize方法实现
2 * Initializes the hook configurators. The following steps are used to initialize the hook configurators. <p>
3 * 1. Get a list of hook configurators from all hook configurators properties files on the classpath,
4 * add this list to the overall list of hook configurators, remove duplicates. <p>
5 * 2. Get a list of hook configurators from the ("osgi.hook.configurators.include") system property
6 * and add this list to the overall list of hook configurators, remove duplicates. <p>
7 * 3. Get a list of hook configurators from the ("osgi.hook.configurators.exclude") system property
8 * and remove this list from the overall list of hook configurators. <p>
9 * 4. Load each hook configurator class, create a new instance, then call the { @link HookConfigurator#addHooks(HookRegistry)} method <p>
10 * 5. Set this HookRegistry object to read only to prevent any other hooks from being added. <p>
11 * @return an array of error log entries that occurred while initializing the hooks
12 */
13 public FrameworkLogEntry[] initialize() {
14 ArrayList configurators = new ArrayList( 5 );
15 ArrayList errors = new ArrayList( 0 ); // optimistic that no errors will occur
16 mergeFileHookConfigurators(configurators, errors);
17 mergePropertyHookConfigurators(configurators);
18 loadConfigurators(configurators, errors);
19 // set to read-only
20 readonly = true ;
21 return (FrameworkLogEntry[]) errors.toArray( new FrameworkLogEntry[errors.size()]);
22 }
其中的 mergeFileHookConfigurators方法调用,读取了一个名为 hookconfigurators.properties的属性配置文件,在org.eclipse.osgi插件中。看一下里面的内容:
2 # Copyright (c) 2005 , 2006 IBM Corporation and others.
3 # All rights reserved. This program and the accompanying materials
4 # are made available under the terms of the Eclipse Public License v1. 0
5 # which accompanies this distribution, and is available at
6 # http: // www.eclipse.org/legal/epl-v10.html
7 #
8 # Contributors:
9 # IBM Corporation - initial API and implementation
10 ###############################################################################
11 hook.configurators = \
12 org.eclipse.osgi.internal.baseadaptor.BaseHookConfigurator,\
13 org.eclipse.osgi.internal.baseadaptor.DevClassLoadingHook,\
14 org.eclipse.core.runtime.internal.adaptor.EclipseStorageHook,\
15 org.eclipse.core.runtime.internal.adaptor.EclipseLogHook,\
16 org.eclipse.core.runtime.internal.adaptor.EclipseErrorHandler,\
17 org.eclipse.core.runtime.internal.adaptor.EclipseAdaptorHook,\
18 org.eclipse.core.runtime.internal.adaptor.EclipseClassLoadingHook,\
19 org.eclipse.core.runtime.internal.adaptor.EclipseLazyStarter,\
20 org.eclipse.core.runtime.internal.stats.StatsManager,\
21 org.eclipse.osgi.internal.verifier.SignedBundleHook
22
^_^,我们的EclipseLazyStarter赫然在列!!!
回过头来看一下EclipseLazyStarter(继承ClassLoadingStatsHook)的使用方式:
BaseAdaptor.getHookRegistry().getClassLoadingStatsHooks()
前面已经看了ClasspathManager中findLocalClass方法的代码,就是这么调用ClassLoadingStatsHook policy的(我们的EclipseLazyStarter...)
【总结】
hook了,osgi framework留了个后门,Eclipse好好的利用了这个后门~_~
【附加说明】
1、EclipseLazyStarter只是ClassLoadingStatsHook policy的实现,其实HookRegsitry中还有其他的hook policy,例如:
org.eclipse.osgi.baseadaptor.hooks.ClassLoadingHook
org.eclipse.osgi.baseadaptor.hooks.BundleFileWrapperFactoryHook
org.eclipse.osgi.baseadaptor.hooks.BundleFileFactoryHook
org.eclipse.osgi.baseadaptor.hooks.StorageHook
org.eclipse.osgi.baseadaptor.hooks.AdaptorHook
2、大家可以顺带详细的看一下HookRegistry、HookConfigurator、BaseAdaptor等
3、hook这种手法在Eclipse的资源管理中也有比较成功的应用,可以看一下
org.eclipse.core.resources.team.IMoveDeleteHook
例如cvs、ClearCase等团队开发管理工具中,都实现了这种hook,通过扩展点org.eclipse.core.resources.moveDeleteHook动态挂入。大家有兴趣可以深入看看,看过之后应该就明白了为什么cvs、ClearCase等一些团队开发管理工具功能有一些不同了~_~
4、对osgi感兴趣的同学,可以看一下org.eclipse.osgi插件中的代码,质量很高~_~
乱轰轰的,凑合着看吧


 668
668


 被折叠的 条评论
为什么被折叠?
被折叠的 条评论
为什么被折叠?
 到【灌水乐园】发言


