


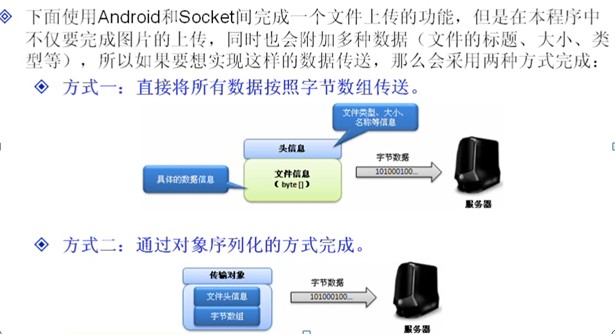
首先看一下这张截图希望在结构上对读者有所启发:
下面进入正文:
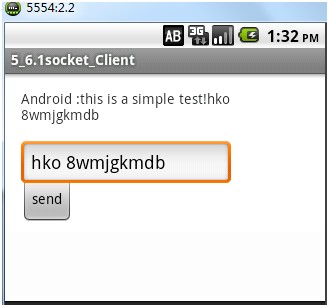
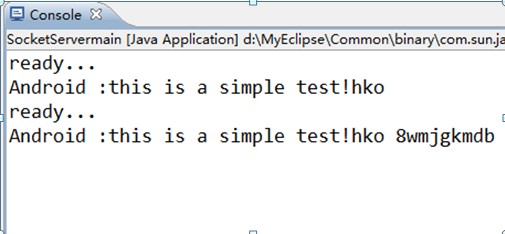
首先展示一下socket通信效果
Android客户端:
服务器端
首先贴出Android客户端布局代码如下:
<RelativeLayoutxmlns:android="http://schemas.android.com/apk/res/android"
xmlns:tools="http://schemas.android.com/tools"
android:layout_width="match_parent"
android:layout_height="match_parent"
android:paddingBottom="@dimen/activity_vertical_margin"
android:paddingLeft="@dimen/activity_horizontal_margin"
android:paddingRight="@dimen/activity_horizontal_margin"
android:paddingTop="@dimen/activity_vertical_margin"
tools:context=".MainActivity">
<TextView
android:id="@+id/info"
android:layout_width="wrap_content"
android:layout_height="wrap_content"
android:text="@string/hello_world"/>
<Button
android:id="@+id/send"
android:layout_width="wrap_content"
android:layout_height="wrap_content"
android:layout_alignRight="@+id/textView1"
android:layout_below="@+id/textView1"
android:layout_marginTop="88dp"
android:text="send"/>
<EditText
android:id="@+id/editget"
android:layout_width="wrap_content"
android:layout_height="wrap_content"
android:layout_alignLeft="@+id/info"
android:layout_below="@+id/info"
android:layout_marginTop="16dp"
android:ems="10"
android:inputType="textPersonName">
<requestFocus/>
</EditText>
</RelativeLayout>
Android客户端MainActivity代码如下:
package com.example.socket_client;
public class MainActivity extends Activity implements OnClickListener{
private Button send = null;
private TextView info = null;
private EditText editget = null;
@Override
protected void onCreate(BundlesavedInstanceState) {
super.onCreate(savedInstanceState);
setContentView(R.layout.activity_main);
this.send =(Button)findViewById(R.id.send);
this.info =(TextView)findViewById(R.id.info);
this.editget =(EditText)findViewById(R.id.editget);
this.send.setOnClickListener(this);
}
@Override
public booleanonCreateOptionsMenu(Menu menu) {
// Inflate the menu; this addsitems to the action bar if it is present.
getMenuInflater().inflate(R.menu.main,menu);
return true;
}
@Override
public void onClick(View v) {
// TODO Auto-generated methodstub
try {
Socket client = newSocket("10.255.4.24",8880);//建立套接字链接。
//client.getOutputStream()返回此套接字的输出流 写文件
PrintStream out = newPrintStream(client.getOutputStream());
out.println("this isa simple test!"+editget.getText());//向服务器发送数据。
//client.getInputStream() 返回此套接字的输入流 读文件
BufferedReader buf = newBufferedReader(new InputStreamReader(client.getInputStream()));
this.info.setText(buf.readLine());
out.close();
buf.close();
client.close();
} catch (Exception e) {
// TODO: handle exception
}
}
}
服务器端SocketServermain代码如下:
packageorg.lz.socketMainserver;
importjava.net.ServerSocket;
publicclass SocketServermain {
publicstaticvoidmain(String[] args)throws Exception{
//TODO Auto-generated method stub
ServerSocketserverSocket =new ServerSocket(8880);//设置端口号
boolean flag =true;
while(flag){
//使用多线程同时可以响应多个客户端的通信,其实一些Socket聊天室就是基于这个原理进行开发出的。
new Thread(newServerThreadUtil(serverSocket.accept())).start();
}
}
}
下面列出ServerThreadUtil类如下:
packageorg.lz.socketMainserver;
publicclass ServerThreadUtilimplements Runnable {
private Socketclient = null;
public ServerThreadUtil(Socket client){
this.client= client;
}
@Override
publicvoid run() {
System.out.println("ready...");
PrintStreamout =null;
BufferedReaderbuf =null;
try {
out= new PrintStream(client.getOutputStream());//得到套接字输出流
buf= new BufferedReader(new InputStreamReader(client.getInputStream()));
StringBufferinfo =new StringBuffer();
info.append("Android :");
info.append(buf.readLine());
out.print(info);
System.out.println(info.toString());
}catch (IOException e) {
//TODO Auto-generated catch block
e.printStackTrace();
}finally{
try {
out.close();
buf.close();
client.close();
}catch (IOException e) {
//TODO Auto-generated catch block
e.printStackTrace();
}
}
}
}


 3239
3239

 被折叠的 条评论
为什么被折叠?
被折叠的 条评论
为什么被折叠?
 到【灌水乐园】发言


