微信小程序优惠券列表领取(send-coupon插件)

12 篇文章 4 订阅
7 篇文章 1 订阅

官方领取流程:

插件配置和引入请参考官方文档:https://pay.weixin.qq.com/wiki/doc/apiv3/apis/chapter9_3_1.shtml

<send-coupon
    bind:sendcoupon="getcoupon"
    bind:userconfirm="redirectuser"
    send_coupon_params="{{send_coupon_params}}"
    sign="{{sign}}"
    send_coupon_merchant="{{send_coupon_merchant}}"
    suggest_immediate_use="{{suggest_immediate_use}}"
  >
    <!-- 内部为自定义代码,按钮点击部分的代码写在这里 -->
    <!-- [[以下为示例代码 -->
    <view class="text">领券</view>
    <!-- 以上为示例代码 ]] -->
  </send-coupon>

上方是官方给出的WXML模板,<send-coupon>标签内部的内容可以自定义

1. 点击领券之前先获取:发券参数,签名,发券商户号,这些参数从后台获取

2. 点击“领券”后触发bindsendcoupon方法,弹出微信原生页面

3.点击"我知道了",触发binduserconfirm方法,关闭弹窗,领券完成
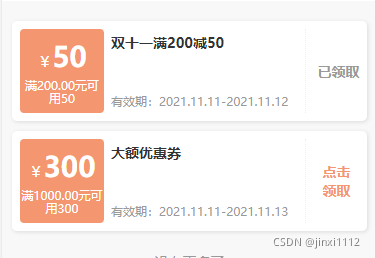
针对列表形式做的优化:

样式如下图所示

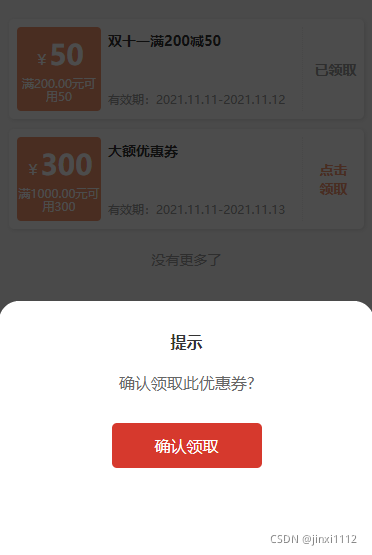
因为每张优惠券的签名唯一,所以上图的“点击领取”按钮用来获取签名等系列参数,获取完成后弹窗显示真正的领取按钮,如下图所示

代码片段如下:

点击列表中领取按钮:

    <view class="btn">
         <text
             bind:tap="getParas(item.stock_id)" // 获取签名等参数
             wx:class="{{{orange:item.type==1, blue: item.type!=1}}}"
         >点击领取</text>
    </view>

确认弹窗代码:

<van-popup show="{{ show }}" bind:close="onClose" position="bottom" custom-style="height: 50%;" round>
            <send-coupon
                bindsendcoupon="getCoupon"
                binduserconfirm="couponConfirm"
                send_coupon_params="{{send_coupon_params}}"
                sign="{{sign}}"
                send_coupon_merchant="{{send_coupon_merchant}}"
                ><view class="get-wrapper" wx:if="comfirmShow">
                    <text class="title">提示</text>
                    <text>确认领取此优惠券?</text>
                    <view class="order-btn main-bk">
                        <text class="text-color">确认领取</text>
                    </view>
                </view>
            </send-coupon>
        </van-popup>

 领取优惠券的回调函数:

getCoupon(params) {
                // 插件返回信息在params.detail
                wx.showLoading()
                if (params.detail.errcode == 'OK') {
                    // 调用成功
                    if (params.detail.send_coupon_result[0].code == 'SUCCESS') {
                        // 成功领取
                        wx.hideLoading()
                    } else {
                        // 领取失败
                        wx.hideLoading()
                        this.setData({ show: false })
                        wx.showToast({
                            title: params.detail.send_coupon_result[0].message,
                            icon: 'none',
                            duration: 1500,
                        })
                    }
                } else {
                    // 失败
                    wx.hideLoading()
                    this.setData({ show: false })
                    wx.showToast({
                        title: params.detail.send_coupon_result[0].message,
                        icon: 'none',
                        duration: 1500,
                    })
                }

  • 2
    点赞
  • 35
    收藏
    觉得还不错? 一键收藏
  • 3
    评论
优惠券添加到微信卡包中需要使用微信支付提供的API,而且需要申请微信支付的商户号和相关的证书,因此下面提供的Java代码只是示例代码,实际使用时需要根据具体情况进行修改。 1. 首先需要引入相关的包: ```java import java.util.HashMap; import java.util.Map; import java.security.KeyStore; import org.apache.http.conn.ssl.SSLConnectionSocketFactory; import org.apache.http.conn.ssl.SSLContextBuilder; import org.apache.http.conn.ssl.TrustSelfSignedStrategy; import org.apache.http.impl.client.CloseableHttpClient; import org.apache.http.impl.client.HttpClients; import org.apache.http.ssl.SSLContexts; import org.apache.http.ssl.TrustStrategy; import org.springframework.core.io.ClassPathResource; import org.springframework.core.io.Resource; import org.springframework.core.io.support.PropertiesLoaderUtils; import org.springframework.http.HttpEntity; import org.springframework.http.HttpHeaders; import org.springframework.http.HttpMethod; import org.springframework.http.HttpStatus; import org.springframework.http.ResponseEntity; import org.springframework.http.client.HttpComponentsClientHttpRequestFactory; import org.springframework.web.client.RestTemplate; ``` 2. 然后定义相关的参数: ```java String apiUrl = "https://api.weixin.qq.com/card/qrcode/create?access_token="; String accessToken = "YOUR_ACCESS_TOKEN"; String cardId = "YOUR_CARD_ID"; String code = "YOUR_COUPON_CODE"; String openId = "USER_OPENID"; String keyPath = "YOUR_KEY_PATH"; String keyPassword = "YOUR_KEY_PASSWORD"; ``` 其中,accessToken 是通过调用微信支付提供的获取 access_token 的 API 获取的,cardId 是要添加的优惠券的卡券 ID,code 是要添加的优惠券的 code,openId 是要添加优惠券的用户的 openid,keyPath 是商户证书的路径,keyPassword 是商户证书的密码。 3. 构造 HTTP 请求: ```java String url = apiUrl + accessToken; RestTemplate restTemplate = getRestTemplate(keyPath, keyPassword); HttpHeaders headers = new HttpHeaders(); headers.add("Content-Type", "application/json"); String json = "{\"action_name\": \"QR_CARD\", \"action_info\": {\"card\": {\"card_id\": \"" + cardId + "\", \"code\": \"" + code + "\"}}}"; HttpEntity<String> request = new HttpEntity<String>(json, headers); ResponseEntity<String> response = restTemplate.exchange(url, HttpMethod.POST, request, String.class); if (response.getStatusCode() != HttpStatus.OK) { // 请求失败 } String responseBody = response.getBody(); ``` 其中,getRestTemplate 方法用来构造带有商户证书的 RestTemplate。 4. 解析返回结果: ```java ObjectMapper mapper = new ObjectMapper(); JsonNode node = mapper.readTree(responseBody); if (node.has("errcode") && node.get("errcode").asInt() != 0) { // 添加失败 } String ticket = node.get("ticket").asText(); ``` 其中,使用了 Jackson 库来解析 JSON 数据。 5. 最后,将 ticket 添加到用户的卡包中: ```java String addUrl = "https://api.weixin.qq.com/card/user/addcard?access_token=" + accessToken; json = "{\"card_id\":\"" + cardId + "\",\"code\":\"" + code + "\",\"openid\":\"" + openId + "\",\"is_unique_code\":false,\"outer_str\":\"" +

“相关推荐”对你有帮助么?

  • 非常没帮助
  • 没帮助
  • 一般
  • 有帮助
  • 非常有帮助
提交
评论 3
添加红包

请填写红包祝福语或标题

红包个数最小为10个

红包金额最低5元

当前余额3.43前往充值 >
需支付:10.00
成就一亿技术人!
领取后你会自动成为博主和红包主的粉丝 规则
hope_wisdom
发出的红包
实付
使用余额支付
点击重新获取
扫码支付
钱包余额 0

抵扣说明:

1.余额是钱包充值的虚拟货币,按照1:1的比例进行支付金额的抵扣。
2.余额无法直接购买下载,可以购买VIP、付费专栏及课程。

余额充值