Radmin自动登陆器 v3.0 - By: [email protected] 20180106
By: [email protected] , http://dep.yibinu.cn/wgzxnew/
1、程序功能和使用环境介绍
2、程序操作方法介绍
3、登录信息文件RadminM.txt介绍
4、登录信息文件RadminM.txt的转换和编制
5、v3.0版新增解锁
远程桌面功能
6、相关配置和多种语言支持介绍
7、免责申明
1、程序功能和使用环境介绍
(1)、程序功能
为了安全高效地使用Radmin Viewer来自动登录和管理多台服务器,故编制RadminM (Radmin Connection Manager,Radmin自动登录器)。
v3.0版的可执行文件是RadminM.exe,一台电脑只能运行一个实例,再次运行只是将已运行的实例调到前台。v3.0版之前的老版本的可执行文件是RadminM2.exe。
新版的功能已经比较完善,基本上可以代替Radmin Viewer 3.5进行管理(除Intel AMT功能外),另外还增加了一些实用功能,支持Windows Xp、Vista、Win7、Win8、2003、2000、9x及相应Windows Server版等操作系统。
(2)、程序使用环境要求
使用前请将Radmin Viewer 3.5的Radmin.exe文件直接拷贝到该目录中,其它Radmin Viewer 3.x版本也可以,中文版、英文版均可;
请设置防火墙允许Radmin.exe和RadminM.exe(仅扫描功能用)访问网络;
若要用到聊天、语音聊天、传送信息等连接模式,必须将相应的8个dll文件也拷贝到该目录中:ChatLPCx.dll、raudiox.dll、rchatx.dll、unicows.dll、vcintcx.dll、vcintsx.dll、voicex.dll、WinLpcDl.dll。
(3)、Radmin Server使用权限设置(新版本可选)
注意:在v1.5及以前的老版本中,Radmin Server被控端必须将“使用权限...”(Permissions)设置为“Windows NT 安全性”(Security),如果设置为“Radmin安全性”(Security)将不能实现自动登录功能。在新版本中,这两种安全性模式下,都可以实现自动登录功能。
(4)、开发环境
v1.5及以前的老版本用AutoIt语言开发,AutoIt是解释性语言,功能和稳定性有限,并且一些防病毒软件会报警。
为了在功能和稳定性方面进一步提高和改进,v2.0版使用VC++ Unicode(MFC)编程,程序在编译时已经集成了VC运行库,可独立运行。
由于MFC越益臃肿笨重,为了提高稳定性和效率,v3.0版使用WTL VC++ Unicode编程,程序短小精悍、可独立运行。WTL是Windows Template Library,可参见 http://wtl.sourceforge.net/ 。
2、程序操作方法介绍
(1)、程序中的鼠标操作
* 双击某条记录以默认模式自动连接(等待6秒);若该记录包含私有代理将自动进行代理连接(代理登录和目标登录各等待6秒);
* 左上角的选择框或主菜单都可以选择默认连接模式;
* 先右击某条记录(或F9)填为强制代理(支持域名),并选中强制代理选项,便可对另一条记录强制进行代理连接(将忽略私有代理);
* 支持鼠标滚轮;
* 主菜单和右键菜单均可完成本程序的常规操作;记录窗格的右键菜单或单击工具栏的相应按钮可直接选择进行指定模式的连接(将忽略默认连接模式);
* 主菜单中的“配置”菜单可以选择程序的各项相关配置;
* 工具栏各个按钮的功能均有提示;
* 单击工具栏上的“显示隐藏树状目录”按钮可以显示隐藏目录树窗格,目录树窗格的右键菜单可完成目录树的一些常规操作;
* 单击工具栏上的“选择切换图标查看模式”按钮可以切换或选择记录窗格的图标查看模式;
* 记录窗格和目录树窗格都支持鼠标拖放功能,强烈建议用户使用该功能前备份RadminM.txt,以免损坏或丢失数据;直接鼠标拖放为移动,Ctrl+鼠标拖放为复制。拖放时状态栏有提示信息;
* 程序启动时,记录自动按记录名称升序排列;在记录窗格单击列表框某列表头,可以按该列进行记录排序,再次单击可以反向排序。
(2)、程序中的常用快捷键
* Enter :以默认模式连接记录;
* Insert :新建记录;
* Ctrl+e :编辑记录;
* Ctrl+c :复制记录;
* Ctrl+x :剪切记录;
* Ctrl+v :粘贴记录;
* Delete :删除记录或目录(在记录窗格),或删除树状目录(在目录树窗格);
* F1 :显示程序信息;
* F2 :更名树状目录;
* F3 :单条扫描(等待5秒,用于扫描网速较慢的记录);
* F5 :全部扫描(多线程同时扫描,每条记录等待5秒);
扫描过程中左下角状态栏会有提示,扫描完成后提示消失,扫描过程中建议不要新建、修改、删除、粘贴、剪切、排序记录,不然可能出现扫描结果错乱,其它功能可正常使用;
* F7 :新建树状目录;
* F9 :将选中记录填为强制代理(主菜单上“强制代理信息”项显示将从[无]变为[有],打开该菜单可查看信息);
* Ctrl+- :隐藏窗口到系统托盘;
* Ctrl+= :显示窗口;
* 双击系统托盘图标可隐藏或显示窗口;
* 窗口大小可调整,支持最大化和还原;
* 支持Home、End、PageUp、PageDown等操作。
3、登录信息文件RadminM.txt介绍
(1)、RadminM.txt内容说明
登录信息存放在RadminM.txt文件中,若没有会自动创建,密码用RC4加密,请用户注意保管。RadminM.txt是遵循CSV格式的ANSI文本文件,所有字段内容都不能包含英文惊叹号“!”、英文逗号“,”、竖线分隔符“|”。
第一行为登录记录各字段的名称。每行存放一条记录,每条记录包含用17个英文逗号分隔的18个字段。
RecordName 记录名称是关键字段,支持中文记录名称,不能为空、不要有重名;
IP、Port、User、Password 分别是IP地址、端口、用户名、密码。IP地址不能为空,若端口为空程序将使用缺省端口4899;
Domain 是域名,该字段有内容在登录时便会自动填写;
ColorDepth 是在“完全控制”或“仅限查看”连接模式,指定传输图像的色彩深度。色彩深度大小与传输速度成反比;
Updates 是在“完全控制”或“仅限查看”连接模式,指定屏幕每秒最大刷新率,为1到100之间的数值;
UnlockDesktop 是在“完全控制”连接模式连接成功后,若远程桌面已登录锁定、且焦点位于密码输入框,可用连接Radmin的密码解锁远程桌面、或 (当服务器端为Radmin Server v3.5时) 先锁定再解锁远程桌面。具体配置参见后面的介绍;
Fullscreen 是在“完全控制”或“仅限查看”连接模式,以全屏幕方式、或全屏伸展方式显示远程PC窗口;
Nofullkbcontrol 是在“完全控制”连接模式,阻止系统热键(如ALT-TAB)传递到远程PC;
Monitor 是在“完全控制”或“仅限查看”连接模式,若远程PC有多个监视器,可指定显示其中某个监视器上的图像。比如:/monitor"\\.\DISPLAY1"。注意:只能指定在已连接窗口的菜单中显示出来的监视器;
Sendrequest 是请求Radmin服务器发送Radmin服务器激活文件。将忽略其它选项。详情请参见Radmin帮助文档;
Pbpath 是以指定的电话薄文件启动Radmin Viewer。比如:/pbpath"C:\my.rpb"。将忽略其它选项;
Proxy 是记录的私有代理信息。私有代理格式:记录名称+目录路径。需要先将某条已有记录设置为强制代理,再选作私有代理。
AsProxyBy 是被用作私有代理字段。是指该记录被其它哪些记录用作私有代理,由程序自动处理(只读);
Memory 是备注字段;
TreePath 是目录路径字段,由若干英文惊叹号“!”(目录分隔符)分隔的字符串构成,支持中文目录名,如根目录下DirA子目录下的DirB子目录:!DirA!DirB 。
(2)、私有代理字段Proxy
本程序除了支持强制代理外,每条记录都可以指定私有代理。Proxy字段便是存放用作私有代理的记录信息,只能有一条;注意:只能从已有记录中指定私有代理;Proxy字段的格式:记录名称+目录路径;建议先将某条已有记录设置为强制代理,再到新建记录或编辑记录对话框中填写为私有代理;当然,若熟悉后也可以手工填写。
(3)、被用作私有代理字段AsProxyBy
AsProxyBy是被用作私有代理字段,用于存放该记录被其它哪些记录用作私有代理的信息,多条记录间用竖线分隔符“|”分隔,由程序自动处理(只读);该字段主要用于当该记录名称或目录路径更改时,程序会自动更新将该记录用作私有代理的其它记录的私有代理信息;建议用户不要随意修改RadminM.txt文件中该字段的内容,不然可能会出现程序功能错乱。
(4)、格式符合要求的RadminM.txt文件示范
RecordName,IP,Port,User,Password,Domain,ColorDepth,Updates,UnlockDesktop,Fullscreen,Nofullkbcontrol,Monitor,Sendrequest,Pbpath,Proxy,AsProxyBy,Memory,TreePath
sample01,192.168.0.6,4899,user01,,,,,,,,,,,,,,!
sample02,192.168.0.8,4899,user02,,,,,,,,,,,,,,!DirA!DirB
sample03,192.168.0.9,4899,user03,,,,,,,,,,,,,,!DirC!DirD
4、登录信息文件RadminM.txt的转换和编制
(1)、V2.0转V3.0记录文件
单击主菜单、帮助中的“V2.0转V3.0记录文件”菜单项,可以将RadminM V2.0的记录文件转换为RadminM V3.0的记录文件。执行转换之前,请先备份好RadminM.txt。新生成的文件可能覆盖RadminM.txt。
(2)、v1.5的RadminM.txt文件需先转换为v2.0的格式,再导入新版本v3.0中使用
v1.5的RadminM.txt简单修改一下就可以转换为v2.0的格式。修改的具体方法是:
(A)用UltraEdit编辑器打开v1.5的RadminM.txt(用其它编辑器也可参照完成类似修改);
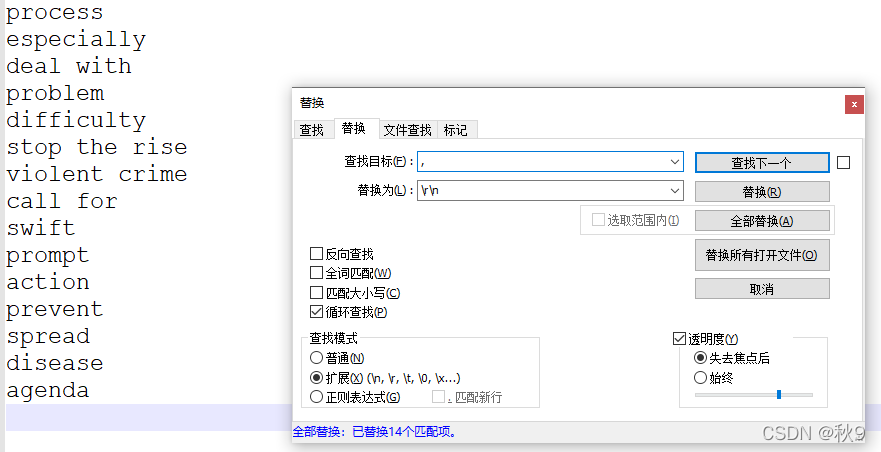
(B)Ctrl+R调出替换对话框,在上面需要替换栏输入:^p ,在下面替换为栏输入:,!^p ,(这里,^p代表回车换行),设置好后再单击“全部替换”按钮即可,需要时可单击“帮助”按钮查看帮助信息;
(C)将第一行末尾的 “!” 手工改为 “TreePath”;
(D)处理完后保存为RadminM.txt。
用其它编辑器也可参照完成类似修改。转换完成后,再用上面介绍的“V2.0转V3.0记录文件”菜单项导入v3.0中使用。
(3)、用记事本、UltraEdit、Excel等编制RadminM.txt
RadminM.txt可以用记事本、UltraEdit、Excel等编制。也可将已有RadminM.txt导入Excel处理,具体方法是:
(A)启动Excel,选择菜单“数据->导入外部数据->导入数据”,选择RadminM.txt文件;
(B)文本导入向导第1步,直接单击“下一步”;
(C)第2步必须选中“逗号”分隔符,再单击“下一步”;
(D)第3步必须将所有18列都设置为文本,依次选中下面数据预览里的各列,再选择右上面列数据格式里的“文本”。全部设置好后,再单击“完成”、“确定”即可成功导入;
(E)处理完后须保存为CSV格式文件,再更名为RadminM.txt便可使用。
5、v3.0版新增解锁远程桌面功能
(1)、解锁远程桌面功能简介
当以“完全控制”连接远程PC成功后,若远程桌面已登录锁定、且焦点位于密码输入框,可用连接Radmin的密码解锁远程桌面、或 (当服务器端为Radmin Server v3.5时) 先锁定再解锁远程桌面。
要正常使用这一功能,必须满足以下条件:远程PC已经登录、锁定远程桌面的用户密码与连接Radmin的密码一致、远程桌面的焦点位于密码输入框。
(2)、可能存在的安全隐患
注意:当服务器端为Radmin Server v3.5之前的老版本、解锁前远程桌面并未锁定而焦点又正好位于文本编辑框中,启用该功能可能会出现明文密码。
(3)、相关配置
用户可以为每条记录单独配置解锁远程桌面功能,相关配置信息保存在每条记录的UnlockDesktop字段中。慎重起见,默认并未启用该功能。用户可以根据实际情况,单独为每条记录选择不使用(该字段为空白)、或者“UnlockDesktop”、或者“LockThenUnlock”。
该字段为空白,也就是不使用该功能,便不会出现明文密码。
“UnlockDesktop”是指直接解锁远程桌面,适用于Radmin Server各版本,但可能出现明文密码。
“LockThenUnlock”是指若解锁前远程桌面处于未锁定状态、可以先锁定远程桌面再解锁,这样可以避免出现明文密码。但这要求必须使用Radmin Viewer 3.5的Radmin.exe文件,并且只对连接Radmin Server v3.5版本才有效。Radmin Viewer 3.5之前的老版本无法发送锁屏组合键Win+L,Radmin Server v3.5之前的老版本无法接收锁屏组合键Win+L,仍然存在出现明文密码的可能性。
6、相关配置和多种语言支持介绍
(1)、配置文件RadminM.ini
主菜单中的“配置”菜单可以选择程序的各项相关配置。程序的各项配置都保存在RadminM.ini配置文件中,若不存在程序会自动创建。若由于配置混乱、异常关闭等原因导致程序运行后无法显示主窗口,可以先备份然后删除RadminM.ini文件即可正常运行。
(2)、多种语言支持
本程序使用INI文件实现多种语言支持,每种语言信息用一个扩展名为lng的INI格式文件存放。语言文件可以使用Unicode或ANSI格式,一般建议使用Unicode格式。这种方式具有更多扩展性,用户可以非常简单方便地添加自己的语言文件。
本程序的默认语言是简体中文,另外提供英文语言文件English.lng。本程序启动时若没有外部语言文件,将使用内置的默认语言(简体中文)。若本程序目录下有*.lng的外部语言,程序启动后便会自动在“关于->语言”菜单下列出外部语言(以语言文件的文件名命名)。用户选择某种外部语言便可以动态切换到新语言界面,无需重新启动程序,用户的语言选择将自动保存到RadminM.ini文件中,关闭程序后下次启动也会自动使用用户选择的新语言界面。
用户可以参照English.lng语言文件的格式和内容,方便地编制修改自己的语言文件,比如French.lng。用户只需将自己编制好的语言文件拷贝到本程序目录下,重新启动程序后便会自动在“关于->语言”菜单下列出用户添加的新语言French。选择该语言便可以动态切换到新语言界面,无需重新启动程序,关闭程序后下次启动也会自动使用用户选择的新语言界面。
注意:语言文件中间不能有空行,空行就意味文件结束,空行之后就无法查找翻译。若需要空行标识分隔,可以在空行前加英文分号 ;,也即注释行。
语言文件中的字符串,若需要前导和后导空格,可以将字符串用英文双引号或英文单引号包含即可。不需要空格的就无需加引号。
本程序的多种语言支持功能参照网友Yonsm提供的方式实现,有兴趣的用户可以访问网站 http://yonsm.net/ini-language-engine/。
(3)、启用Radmin帮助
在本程序中,若要启用菜单项“帮助->Radmin帮助”,需要将Radmin的chm帮助拷贝为本程序目录中的Radmin35.chm。
7、免责申明
用户可自行斟酌选用该程序,若转载请注明出处。对一切后果,作者不承担任何责任!
========================================================================================
RadminM v3.0 - By: [email protected] 20150615
By: [email protected] , http://dep.yibinu.cn/wgzxnew/
1. The features and the running environmental of RadminM
2. The operation of RadminM
3. RadminM.txt of login information file
4. Translate and Preparation RadminM.txt
5. UnlockDesktop feature of v3.0 newly additional
6. Related settings and Multilanguage support
7. Disclaimer
1. The features and the running environmental of RadminM
(1). The features of RadminM
In order to safely and efficiently use Radmin Viewer to automatically login and manage multiple servers, so the program RadminM(Radmin Connection Manager) was intended to develop.
The executable file is RadminM.exe of RadminM v3.0. Only one instance can run in a computer, and it only bring the running instance to the foreground if RadminM run again. And the executable file of RadminM before v3.0 is RadminM2.exe.
The new version have been more improvement of the function, and user basically can manage instead of Radmin Viewer 3.5 (except Intel AMT technology). And there ars some useful features else. It support for Windows Xp, Vista, Win7, Win8, 2003, 2000, 9x and the corresponding version of Windows Server operating systems.
(2). The environmental requirements of RadminM running
Before use, please copy the Radmin.exe of Radmin Viewer 3.5 to this directory, Other Radmin Viewer 3.x versions of Chinese or English are also available.
Please set the firewall to allow Radmin.exe and RadminM.exe (only scan function used) to access the network.
To use Text Chat, Voice Chat, Send Message such as connection mode, user must copy also corresponding 8 dll files to this directory: ChatLPCx.dll, raudiox.dll, rchatx.dll, unicows.dll, vcintcx.dll, vcintsx.dll, voicex.dll, WinLpcDl.dll.
(3). To set Radmin Server's Permissions(Option in the new version)
Note: In v1.5 and previous versions, Radmin Server's "Permissions ..." must be set to "Windows NT security", RadminM can not be automatically login feature if it was set to "Radmin security". The new version can be automatically login in these two security modes.
(4). The development environments of RadminM
RadminM v1.5 and the previous version is developed by AutoIt language. As AutoIt is an interpreted language, it is limited in the functionality and stability, and some anti-virus software will alarm.
In order to further improve the functionality and stability, the new version using VC++ UNICODE(MFC) programming environment. The program had already integrated VC runtime library when it was compiled, it can run independently.
Because the MFC is more and more bloated and heavy, in order to further improve the stability and efficiency, v3.0 using WTL VC++ UNICODE programming environment. The program dapper, and can run independently. WTL is the abbreviation of Windows Template Library, user may refer to http://wtl.sourceforge.net/ .
2. The operation of RadminM
(1). The mouse operation of RadminM
* Double-click a record, RadminM will automatically connect in the default mode(wait 6 second), or RadminM will automatically Proxy connect if the record has Proxy(each of Proxy login and Target login wait respectively 6 second).
* You may select the default connection mode at the ComboBox of the top left corner or the main menu.
* Right-click a record (or F9) to fill as Forced Proxy (supports domain name) at first, and check the CheckBox of Forced Proxy or the menu item, you can connect another record via Forced Proxy (the Proxy will be ignored).
* Mouse wheel support.
* You can complete the normal operation with the main menu and right-click menu. By the right-click menu of records pane (Right Pane) or click the corresponding button on the toolbar, you can directly connect in specify mode (the default connection mode will be ignored).
* There is the function prompted for each button on the toolbar.
* Clicking "Show or Hide Tree" button on the toolbar will show or hide the directory tree pane. You may complete some normal trees operations by right-click menu in trees pane (Left Pane).
* Records pane and trees pane support the mouse drag-and-drop function. To avoid damage or loss of data, we strongly recommended to backup RadminM.txt before useing this function. Directly drag-and-drop to move, Ctrl + drag-and-drop to copy. There is the prompted information at the status bar as drag-and-drop.
* Records automatically sort in ascending order by record name when the program starts. Clicking the table head of listctrl in records pane will sort records according to this column, and clicking again will sort reverse.
(2). The common Shortcuts of RadminM:
* Enter : automatically connection in the default mode.
* Insert : new record.
* Ctrl+e : edit record.
* Ctrl+c : copy record.
* Ctrl+x : cut record.
* Ctrl+v : paste record.
* Delete : delete record and subdir (in records pane). delete subdir (in trees pane).
* F1 : help information.
* F2 : rename subdir (in trees pane) or edit record(in records pane).
* F3 : scan one record (wait 5 seconds, used for slowly network).
* F5 : scan all records by multithreading (wait 5 second for each record).
There is prompt at the status bar of bottom left corner when the scan is processing, and prompt will disappear after the scan has finished. We are not recommended to create, modify, delete, paste, cut, sort records when the scan is processing, otherwise the scan results may appear confusion. But other functions may be used normally.
* F7 : new subdir.
* F9 : fill the selected record as Forced Proxy. (The "Forced-Proxy" item of the main menu will show from [No] to [Yes]. To click the menu, you can view the information.)
* Ctrl+- : hide RadminM window to the system tray.
* Ctrl+= : show RadminM window.
* Double-click the system tray icon to hide or show RadminM window.
* RadminM window is resizable, maximize and restore support.
* RadminM supports Home, End, PageUp, PageDown, etc.
3. RadminM.txt of login information file
(1). RadminM.txt description
Login information is stored in RadminM.txt file. RadminM will automatically create if RadminM.txt is not exist. PassWord is encrypted by RC4, user keep attention to store. RadminM.txt is text file to follow CSV (ANSI) formatted. The contents of all field can not contain English exclamation mark "!", English comma ",", vertical separator "|".
The first line is the the names of login record fields. There is only a record each line, what contains 18 fields delimited by 17 English comma.
RecordName (Record Name) is the key field, support Chinese record name, but can not be empty, do not have the same record name.
IP, Port, User, Password are the IP address, port, username, password. IP address can not be empty.The program will use the default port 4899 if the Port is empty.
Domain is the domain name, it will be used to automatically fill in the login if Domain has content.
ColorDepth is used with the "Full Control" connection mode (no mode switches) or "View Only" connection mode (the "/noinput" switch). Defines the color depth of images that Radmin Server will transfer to Radmin Viewer. ColorDepth is in inverse proportion to transmission rate.
Updates is used with "Full Control" connection mode or "View Only" connection mode. Will display the remote computer window with no more than the specified number of updates per second. That is the maximum updates per second. Please input number between 1 to 100.
UnlockDesktop is used with "Full Control" connection mode . After "Full Control" connection has successed, it can unlock the remote desktop with the connection password if the remote desktop has locked and the focus is in the password input box, or lock first the remote desktop then unlock when remote PC run Radmin Server v3.5.
Fullscreen is used with the "Full Control" connection mode or "View Only" connection mode. Will display the remote computer window in full screen, or expanding the image if the screens resolution of the remote and local computer differs.
Nofullkbcontrol is used with "Full Control" mode. The key prevents the transfer of system hotkeys (such as ALT-TAB) to the remote computer.
Monitor is used with "Full Control" or "View Only" connection mode. If there are several monitors on the remote computer, this key makes it possible for you to display an image on one of them. Example: /monitor"\\.\DISPLAY1" . Note, you can only specify a monitor from which show on the connected window's menu.
Sendrequest is to send specified Radmin Server activation request file to the Famatech Activation Server and saves received license file. Will ignore other options. Please refer to Radmin help for details.
Pbpath is to start Radmin Viewer with specified phonebook file. Example: /pbpath"C:\my.rpb". Will ignore other options.
Proxy is used to store private-proxy information of the record. Proxy Format: RecordName+TreePath. User need to select a record and set to forced-proxy at first, then fill as Proxy in the NewRecord or EditRecord dialog.
AsProxyBy is being used as Proxy field. It is automatically processed by the program (Read Only).
Memory is memo field.
TreePath is the directory path field. TreePath is a string that consist of multiple strings division by English exclamation mark '!' (directory separator). It support Chinese directory name. Example: !DirA!DirB, the DirB under the DirA under the root.
(2). The Proxy field
This program not noly supports forced-proxy, each record but also can be specified private-proxy (abbreviated as Proxy). The Proxy field is used to store private-proxy information of the record, it can be only one. Note, user can only specify Proxy from existing records. Proxy Format: RecordName+TreePath.
We recommend to select a record and set to forced-proxy at first, then fill as Proxy in the NewRecord or EditRecord dialog. Of course, you can also fill it by hand after familiar.
(3). The AsProxyBy field
The AsProxyBy field is being used as Proxy field, it is used to store the information which other records use this record as Proxy. Multiple records are delimited with vertical separator "|".
It is automatically processed by the program (Read Only). This field is mainly used to automatically update the Proxy information of other records which use this record as Proxy when this record's RecordName or TreePath is changed. We recommend that user do not arbitrarily modify the contents of this field in RadminM.txt, otherwise the program may appear functional disorder.
(4). Example: a fitting format RadminM.txt
RecordName,IP,Port,User,Password,Domain,ColorDepth,Updates,UnlockDesktop,Fullscreen,Nofullkbcontrol,Monitor,Sendrequest,Pbpath,Proxy,AsProxyBy,Memory,TreePath
sample01,192.168.0.6,4899,user01,,,,,,,,,,,,,,!
sample02,192.168.0.8,4899,user02,,,,,,,,,,,,,,!DirA!DirB
sample03,192.168.0.9,4899,user03,,,,,,,,,,,,,,!DirC!DirD
4. Translate and Preparation RadminM.txt
(1). V2.0 to V3.0 RadminM.txt
User can translate RadminM V2.0 record file to V3.0 by "V2.0 to V3.0 RadminM.txt" menu of Help in the main menu. Please backup RadminM.txt before performing the transfer. New file may overwrite RadminM.txt.
(2). The v1.5 RadminM.txt need to translate to v2.0 fromat, then it can be translated to v3.0
The v1.5 RadminM.txt can be used in the new version after simply modification. The modification procedure is:
(A) To open the v1.5 RadminM.txt by UltraEdit editor.
(B) Ctrl+R to bring up the Replace dialog box, input in the above Find What pane: ^p, input in the below Replace With pane: ,!^p . (^p is CRLF here.). After properly setting, then click "Replace All" button. You may click the "Help" button to get the help information if you need.
(C) Replace "!" with "TreePath" by hand at end of the first line.
(D) Save the file to RadminM.txt after processed.
You can also refer to complete a similar modification with other editors. After this, user can Translate it to v3.0 by fore-mentioned "V2.0 to V3.0 RadminM.txt" menu. Then it can be used in the new version v3.0.
(3). To prepare RadminM.txt by Notepad, UltraEdit, Excel, etc
RadminM.txt can be prepared using Notepad, UltraEdit, Excel, etc. You can also import RadminM.txt to Excel to process. The procedure is:
(A) Start Excel, then click the menu "Data|Import External Data|Import Data", select RadminM.txt file.
(B) Text Import Wizard - Step 1 of 3, direct click "Next".
(C) Text Import Wizard - Step 2 of 3, you must check the "Comma" delimiter and then click "Next".
(D) Text Import Wizard - Step 3 of 3, you must set all 18 columns to text format. You should select the data columns in turn below Data preview, and then check the "Text" above Column data format. After properly setting, to click "Finish" and "OK" to complete successfully import.
(E) The file must save as CSV format after processed. The file can be used for RadminM after direct renamed to RadminM.txt.
5. UnlockDesktop feature of v3.0 newly additional
(1). The UnlockDesktop feature
After "Full Control" connection has successed, it can unlock the remote desktop with the connection password if the remote desktop has locked and the focus is in the password input box, or lock first the remote desktop then unlock when remote PC run Radmin Server v3.5.
To successfully use this feature, there must be conditions: remote PC has already logined, and the password for locked remote desktop as same as the password for conneced Radmin Server, and the focus of remote desktop is in the password input box.
(2). Possible security risk
Note, there may be plaintext password, if the Radmin Server is old version before v3.5, and the remote desktop has not locked before to unlock, and the focus of remote desktop is exactly on a text edit box.
(3). UnlockDesktop setting
User can singly prepare UnlockDesktop setting for every record. UnlockDesktop setting is saved in UnlockDesktop filed of every record in RadminM.txt. To be deliberate, this feature is not enabled by default. User can choose and use this feature according to the actual situation. User can choose disabled this feature(Blank filed), or "UnlockDesktop", or "LockThenUnlock" for every record.
When this filed is blank, that is disabled this feature, and there wiil not be plaintext password.
When this filed is “UnlockDesktop”, that is directly unlock remote desktop. That suit each versions of Radmin Server. But there may be plaintext password.
When this filed is “LockThenUnlock”, that is locked first the remote desktop then unlocked if the remote desktop has not locked before to unlock. This will avoid to appear plaintext password. But it must use the Radmin.exe of Radmin Viewer 3.5, and it only suit to connect Radmin Server v3.5. It can not send the Win+L LockScreen combination key to the remote computer by old version before Radmin Viewer 3.5. It can not receive the Win+L LockScreen combination key by old version before Radmin Server 3.5. The possibility to appear plaintext password still exists.
6. Related settings and Multilanguage support
(1). Settings file RadminM.ini
User may select the RadminM's related settings by Settings Menu of the main menu. All RadminM's related settings is stored in file RadminM.ini. RadminM will automatically create if RadminM.ini is not exist.
If the RadminM main window can not display, it maybe the settings is confusion, or abnormal shutdown. User may backup the file RadminM.ini and then delete it. After this, user can run RadminM normal.
(2). Multilanguage support
This program achieve multilingual support by INI file. Each language information is stored in an INI format file with .lng extension. Language files is text file to follow Unicode or ANSI formatted. We generally recommended to use Unicode format. This mode has more scalability, the user can very simply and easily add your own language file.
The default language of this program is simplified Chinese, there is other English language file English.lng as example. If there is no external language file, RadminM use the built-in default language(Chinese) when the program starts. If there are any *.lng external languages under this program directory, RadminM will automatically load and list in the "Settings|Language" menu after the program starts. In this menu, the name of external language is used the filename of the language file. By choosed a language in the menu, users can dynamically switch to the new language interface without having to restart the program. The user's language selection will be automatically saved to RadminM.ini file. After closeing the program, RadminM will automatically use the new language interface selected by the user when the next start.
Users can refer to the format and content of English.lng, and easily prepared to modify their own language files, such French.lng. Users only need to copy the prepared language file to this program directory. After restarting the program, RadminM will automatically load and list the new language added by the user (such French) in the "Settings|Language" menu. By choosed the new language in the menu, users can dynamically switch to the new language interface without having to restart the program. After closeing the program, RadminM will automatically use the new language interface selected by the user when the next start.
Note, Intermediate of language file can not have blank lines. Blank lines will mean the end of the file, the items will not be able to find the translation after the blank line. If you need a blank line identification or separator, you can add english semicolon in front of blank line. That is a comment line.
If you need leading or rear guide space, the string of language file may be contained with double quotes or single quotes.Or it need not quotation marks.
This program's multilingual support features achieve by reference of Yonsm's way, interested users may visit the website http://yonsm.net/ini-language-engine/.
(3). Use Radmin Help
If user want to use Help->Radmin Help of this program, user need to copy the chm help file to Radmin35.chm in the RadminM directory.
7. Disclaimer
Users can choose and use this program at their discretion. Please indicate the source if reproduced. The author does not assume any responsibility for all the consequences!


 2929
2929


 被折叠的 条评论
为什么被折叠?
被折叠的 条评论
为什么被折叠?
 到【灌水乐园】发言


