


最近写了一个小项目,用的就是okhttp+retrofit组合。今天我就写写OkHttp的源码分析,能力有限,有不足的地方希望大家能给我指出来,相互学习。
基本框架流程
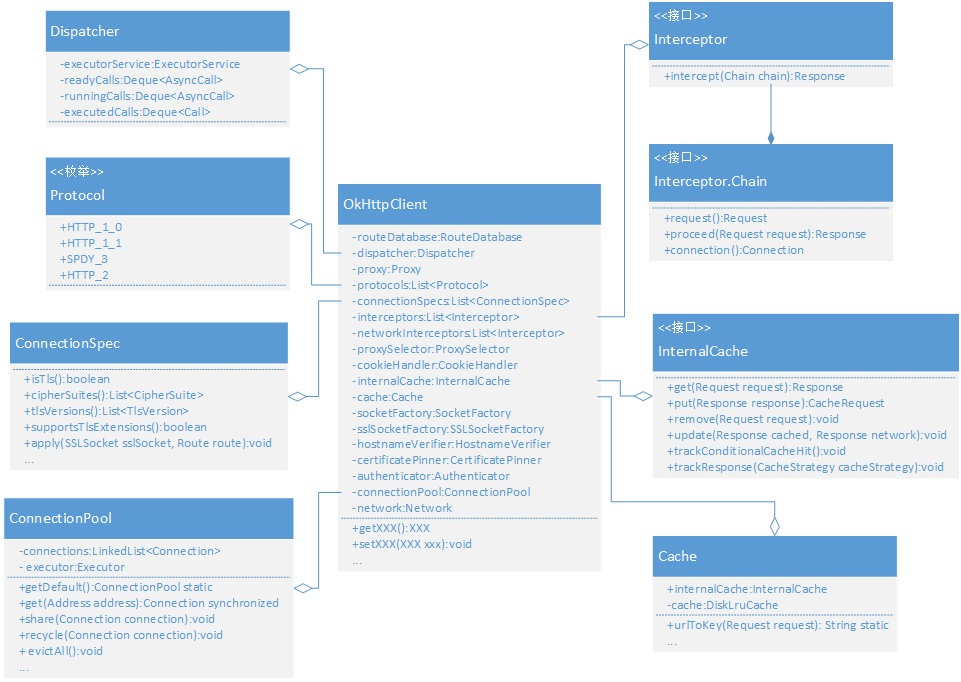
主要类
- Requst:Http的请求类
- OkHttpClient:Calls的工厂类
- Call/RealCall: HTTP请求任务封装
- HttpStream/Http1xStream: 维护HTTP的流,用来对Requset/Response进行IO操作
- StreamAllocation: 用来控制Connections/HttpStreams的资源分配与释放
- Connections: 对JDK中的socket进行了引用计数封装,用来控制socket连接
HttpEngine:处理Request/Response
详细类关系图
具体分析
首先我们看一下OkHttpClient的声明
public class OkHttpClient implements Cloneable, Call.Factory 可以看到其实现了Call.Factory接口
OkHttpClient#newCall()
 @Override public Call newCall(Request request) {
    return new RealCall(this, request);
  }
在此方法中,我们可以看到这里将request请求封装成call,而call的真正实现是RealCall。
RealCall#execute()
  @Override public Response execute() throws IOException {
    synchronized (this) {
      if (executed) throw new IllegalStateException("Already Executed");
      executed = true;
    }
    try {
      client.dispatcher().executed(this);
      Response result = getResponseWithInterceptorChain(false);
      if (result == null) throw new IOException("Canceled");
      return result;
    } finally {
      client.dispatcher().finished(this);
    }
  }
此时call将被放到Dispatcher里去执行。它有两种方法,一个是普通的同步单线程;另一种是使用了队列进行并发任务的分发(Dispatch)与回调,我们下面主要分析第二种,也就是队列这种情况。
下面我们分析一下Dispatcher这个类。
Dispatcher的结构
Dispatcher维护了如下变量,用于控制并发的请求
- maxRequests = 64: 最大并发请求数为64
- maxRequestsPerHost = 5: 每个主机最大请求数为5
- Dispatcher: 分发者,也就是生产者(默认在主线程)
- AsyncCall: 队列中需要处理的Runnable(包装了异步回调接口)
- ExecutorService:消费者池(也就是线程池)
- Deque:缓存(用数组实现,可自动扩容,无大小限制)
- Deque:正在运行的任务,仅仅是用来引用正在运行的任务以判断并发量,注意它并不是消费者缓存
Dispatcher#enqueue
  synchronized void enqueue(AsyncCall call) {
    if (runningAsyncCalls.size() < maxRequests && runningCallsForHost(call) < maxRequestsPerHost) {
      runningAsyncCalls.add(call);
      executorService().execute(call);
    } else {
      readyAsyncCalls.add(call);
    }
  }
当入队(enqueue)请求时,如果满足(runningRequests<64 && runningRequestsPerHost<5),那么就直接把AsyncCall直接加到runningCalls的队列中,并在线程池中执行。如果消费者缓存满了,就放入readyAsyncCalls进行缓存等待。
Dispatcher#finished&&promoteCalls
  /** Used by {@code AsyncCall#run} to signal completion. */
  synchronized void finished(AsyncCall call) {
    if (!runningAsyncCalls.remove(call)) throw new AssertionError("AsyncCall wasn't running!");
    promoteCalls();
  }

  private void promoteCalls() {
    if (runningAsyncCalls.size() >= maxRequests) return; // Already running max capacity.
    if (readyAsyncCalls.isEmpty()) return; // No ready calls to promote.

    for (Iterator<AsyncCall> i = readyAsyncCalls.iterator(); i.hasNext(); ) {
      AsyncCall call = i.next();

      if (runningCallsForHost(call) < maxRequestsPerHost) {
        i.remove();
        runningAsyncCalls.add(call);
        executorService().execute(call);
      }

      if (runningAsyncCalls.size() >= maxRequests) return; // Reached max capacity.
    }
  }
当任务执行完成后,调用finished的promoteCalls()函数,这样,就主动的把缓存队列向前走了一步,而没有使用锁等复杂编码(不会发生死锁)。
我们再分析请求元素AsyncCall(本质是实现了Runnable接口),它内部实现的execute方法如下
AsyncCall#execute
@Override protected void execute() {
  boolean signalledCallback = false;
  try {
    Response response = getResponseWithInterceptorChain(forWebSocket);
    if (canceled) {
      signalledCallback = true;
      //回调,注意这里回调是在线程池中,而不是想当然的主线程回调
      responseCallback.onFailure(RealCall.this, new IOException("Canceled"));
    } else {
      signalledCallback = true;
      //回调
      responseCallback.onResponse(RealCall.this, response);
    }
  } catch (IOException e) {
    if (signalledCallback) {
      // Do not signal the callback twice!
      logger.log(Level.INFO, "Callback failure for " + toLoggableString(), e);
    } else {
      responseCallback.onFailure(RealCall.this, e);
    }
  } finally {
    //精彩的调用finished
    client.dispatcher().finished(this);
  }
}
当Dipatcher里的线程池开始任务时(executorService().execute(AsyncCall call)),其实就是调用call内部实现的execute方法。
  @Override public final void run() {
    String oldName = Thread.currentThread().getName();
    Thread.currentThread().setName(name);
    try {
      execute();
    } finally {
      Thread.currentThread().setName(oldName);
    }
  }
明显的看到实现Runable接口的run方法就是调用call内部实现的execute方法。
这里Dipatcher就分析的差不多了。总结一下:
- OkHttp采用Dispatcher技术,与线程池配合实现了高并发,低阻塞的运行
- 采用Deque作为缓存,按照入队的顺序先进先出
- 在try/finally中调用了finished函数,可以主动控制等待队列的移动,而不是采用锁,极大减少了编码复杂性。
- 最后上个图吧

分析完Dispatcher我们继续往下分析。当执行 AsyncCall#execute(代码上面已给出)时,已经回到了RealCall中。这时Response response = getResponseWithInterceptorChain(forWebSocket); 会调用RealCall里的getResponseWithInterceptorChain().
private Response getResponseWithInterceptorChain(boolean forWebSocket) throws IOException {
    Interceptor.Chain chain = new ApplicationInterceptorChain(0, originalRequest, forWebSocket);
    return chain.proceed(originalRequest);
  }
@Override public Response proceed(Request request) throws IOException {
// If there's another interceptor in the chain, call that.
if (index < client.interceptors().size()) {
Interceptor.Chain chain = new ApplicationInterceptorChain(index + 1, request, forWebSocket);
Interceptor interceptor = client.interceptors().get(index);
Response interceptedResponse = interceptor.intercept(chain);
if (interceptedResponse == null) {
throw new NullPointerException("application interceptor " + interceptor
+ " returned null");
}
return interceptedResponse;
}
// No more interceptors. Do HTTP.
return getResponse(request, forWebSocket);
}由上代码可以看出先执行拦截器的处理(这详细内容以后讲,本篇只讲大概内容),没有拦截器后就调用getResponse方法。
Response getResponse(Request request, boolean forWebSocket) throws IOException {
    // Copy body metadata to the appropriate request headers.
    RequestBody body = request.body();
    if (body != null) {
      Request.Builder requestBuilder = request.newBuilder();

      MediaType contentType = body.contentType();
      if (contentType != null) {
        requestBuilder.header("Content-Type", contentType.toString());
      }

      long contentLength = body.contentLength();
      if (contentLength != -1) {
        requestBuilder.header("Content-Length", Long.toString(contentLength));
        requestBuilder.removeHeader("Transfer-Encoding");
      } else {
        requestBuilder.header("Transfer-Encoding", "chunked");
        requestBuilder.removeHeader("Content-Length");
      }

      request = requestBuilder.build();
    }

    // Create the initial HTTP engine. Retries and redirects need new engine for each attempt.
    engine = new HttpEngine(client, request, false, false, forWebSocket, null, null, null);

    int followUpCount = 0;
    while (true) {
      if (canceled) {
        engine.releaseStreamAllocation();
        throw new IOException("Canceled");
      }

      boolean releaseConnection = true;
      try {
        engine.sendRequest();
        engine.readResponse();
        releaseConnection = false;
      } catch (RequestException e) {
        // The attempt to interpret the request failed. Give up.
        throw e.getCause();
      } catch (RouteException e) {
        // The attempt to connect via a route failed. The request will not have been sent.
        HttpEngine retryEngine = engine.recover(e.getLastConnectException(), null);
        if (retryEngine != null) {
          releaseConnection = false;
          engine = retryEngine;
          continue;
        }
        // Give up; recovery is not possible.
        throw e.getLastConnectException();
      } catch (IOException e) {
        // An attempt to communicate with a server failed. The request may have been sent.
        HttpEngine retryEngine = engine.recover(e, null);
        if (retryEngine != null) {
          releaseConnection = false;
          engine = retryEngine;
          continue;
        }

        // Give up; recovery is not possible.
        throw e;
      } finally {
        // We're throwing an unchecked exception. Release any resources.
        if (releaseConnection) {
          StreamAllocation streamAllocation = engine.close();
          streamAllocation.release();
        }
      }

      Response response = engine.getResponse();
      Request followUp = engine.followUpRequest();

      if (followUp == null) {
        if (!forWebSocket) {
          engine.releaseStreamAllocation();
        }
        return response;
      }

      StreamAllocation streamAllocation = engine.close();

      if (++followUpCount > MAX_FOLLOW_UPS) {
        streamAllocation.release();
        throw new ProtocolException("Too many follow-up requests: " + followUpCount);
      }

      if (!engine.sameConnection(followUp.url())) {
        streamAllocation.release();
        streamAllocation = null;
      }

      request = followUp;
      engine = new HttpEngine(client, request, false, false, forWebSocket, streamAllocation, null,
          response);
    }
  }
从上面代码看出此方法是真正执行网络请求的地方,将返回网络响应。
接下来我在简述一下此方法的执行过程,首先复制Body中的元数据到适当的请求头。 然后创建一个HttpEngine对象。再调用HttpEngine对象的sendRequest()和readResponse()方法。最后调用HttpEngine对象的getResponse()方法获得网络响应。
sendRequest()
此方法是对可能的Response资源进行一个预判,如果需要就会开启一个socket来获取资源。如果请求存在那么就会为当前request添加请求头部并且准备开始写入request body。
public void sendRequest() throws RequestException, RouteException, IOException {
    if (cacheStrategy != null) return; // Already sent.
    if (httpStream != null) throw new IllegalStateException();

    Request request = networkRequest(userRequest);

    InternalCache responseCache = Internal.instance.internalCache(client);
    Response cacheCandidate = responseCache != null
        ? responseCache.get(request)
        : null;

    long now = System.currentTimeMillis();
    cacheStrategy = new CacheStrategy.Factory(now, request, cacheCandidate).get();
    networkRequest = cacheStrategy.networkRequest;
    cacheResponse = cacheStrategy.cacheResponse;

    if (responseCache != null) {
      responseCache.trackResponse(cacheStrategy);
    }

    if (cacheCandidate != null && cacheResponse == null) {
      closeQuietly(cacheCandidate.body()); // The cache candidate wasn't applicable. Close it.
    }

    // If we're forbidden from using the network and the cache is insufficient, fail.
    if (networkRequest == null && cacheResponse == null) {
      userResponse = new Response.Builder()
          .request(userRequest)
          .priorResponse(stripBody(priorResponse))
          .protocol(Protocol.HTTP_1_1)
          .code(504)
          .message("Unsatisfiable Request (only-if-cached)")
          .body(EMPTY_BODY)
          .build();
      return;
    }

    // If we don't need the network, we're done.
    if (networkRequest == null) {
      userResponse = cacheResponse.newBuilder()
          .request(userRequest)
          .priorResponse(stripBody(priorResponse))
          .cacheResponse(stripBody(cacheResponse))
          .build();
      userResponse = unzip(userResponse);
      return;
    }

    // We need the network to satisfy this request. Possibly for validating a conditional GET.
    boolean success = false;
    try {
      httpStream = connect();
      httpStream.setHttpEngine(this);

      if (writeRequestHeadersEagerly()) {
        long contentLength = OkHeaders.contentLength(request);
        if (bufferRequestBody) {
          if (contentLength > Integer.MAX_VALUE) {
            throw new IllegalStateException("Use setFixedLengthStreamingMode() or "
                + "setChunkedStreamingMode() for requests larger than 2 GiB.");
          }

          if (contentLength != -1) {
            // Buffer a request body of a known length.
            httpStream.writeRequestHeaders(networkRequest);
            requestBodyOut = new RetryableSink((int) contentLength);
          } else {
            // Buffer a request body of an unknown length. Don't write request headers until the
            // entire body is ready; otherwise we can't set the Content-Length header correctly.
            requestBodyOut = new RetryableSink();
          }
        } else {
          httpStream.writeRequestHeaders(networkRequest);
          requestBodyOut = httpStream.createRequestBody(networkRequest, contentLength);
        }
      }
      success = true;
    } finally {
      // If we're crashing on I/O or otherwise, don't leak the cache body.
      if (!success && cacheCandidate != null) {
        closeQuietly(cacheCandidate.body());
      }
    }
  }
体,解析HTTP回应头部,并且如果HTTP回应体存在的话就开始读取当前回应头。在这里有发起返回存入缓存系统,也有返回和缓存系统进行一个对比的过程。
  public void readResponse() throws IOException {
if (userResponse != null) {
  return; // Already ready.
}
if (networkRequest == null && cacheResponse == null) {
  throw new IllegalStateException("call sendRequest() first!");
}
if (networkRequest == null) {
  return; // No network response to read.
}

Response networkResponse;

if (forWebSocket) {
  httpStream.writeRequestHeaders(networkRequest);
  networkResponse = readNetworkResponse();
} else if (!callerWritesRequestBody) {
  networkResponse = new NetworkInterceptorChain(0, networkRequest).proceed(networkRequest);
} else {
  // Emit the request body's buffer so that everything is in requestBodyOut.
  if (bufferedRequestBody != null && bufferedRequestBody.buffer().size() > 0) {
    bufferedRequestBody.emit();
  }

  // Emit the request headers if we haven't yet. We might have just learned the Content-Length.
  if (sentRequestMillis == -1) {
    if (OkHeaders.contentLength(networkRequest) == -1
        && requestBodyOut instanceof RetryableSink) {
      long contentLength = ((RetryableSink) requestBodyOut).contentLength();
      networkRequest = networkRequest.newBuilder()
          .header("Content-Length", Long.toString(contentLength))
          .build();
    }
    httpStream.writeRequestHeaders(networkRequest);
  }

  // Write the request body to the socket.
  if (requestBodyOut != null) {
    if (bufferedRequestBody != null) {
      // This also closes the wrapped requestBodyOut.
      bufferedRequestBody.close();
    } else {
      requestBodyOut.close();
    }
    if (requestBodyOut instanceof RetryableSink) {
      httpStream.writeRequestBody((RetryableSink) requestBodyOut);
    }
  }

  networkResponse = readNetworkResponse();
}

receiveHeaders(networkResponse.headers());

// If we have a cache response too, then we're doing a conditional get.
if (cacheResponse != null) {
  if (validate(cacheResponse, networkResponse)) {
    userResponse = cacheResponse.newBuilder()
        .request(userRequest)
        .priorResponse(stripBody(priorResponse))
        .headers(combine(cacheResponse.headers(), networkResponse.headers()))
        .cacheResponse(stripBody(cacheResponse))
        .networkResponse(stripBody(networkResponse))
        .build();
    networkResponse.body().close();
    releaseStreamAllocation();

    // Update the cache after combining headers but before stripping the
    // Content-Encoding header (as performed by initContentStream()).
    InternalCache responseCache = Internal.instance.internalCache(client);
    responseCache.trackConditionalCacheHit();
    responseCache.update(cacheResponse, stripBody(userResponse));
    userResponse = unzip(userResponse);
    return;
  } else {
    closeQuietly(cacheResponse.body());
  }
}

userResponse = networkResponse.newBuilder()
    .request(userRequest)
    .priorResponse(stripBody(priorResponse))
    .cacheResponse(stripBody(cacheResponse))
    .networkResponse(stripBody(networkResponse))
    .build();

if (hasBody(userResponse)) {
  maybeCache();
  userResponse = unzip(cacheWritingResponse(storeRequest, userResponse));
}
篇幅有限,分两篇吧。我是ly,我希望和大家共同学习进步。


 4276
4276

 被折叠的 条评论
为什么被折叠?
被折叠的 条评论
为什么被折叠?
 到【灌水乐园】发言


