


Spring源码-DI的过程
接下来我们分析下Spring源码中Bean初始化过程中的DI过程。也就是属性的依赖注入。
一、构造参数依赖
1. 如何确定构造方法
在Spring中生成Bean实例的时候默认是调用对应的无参构造方法来处理。
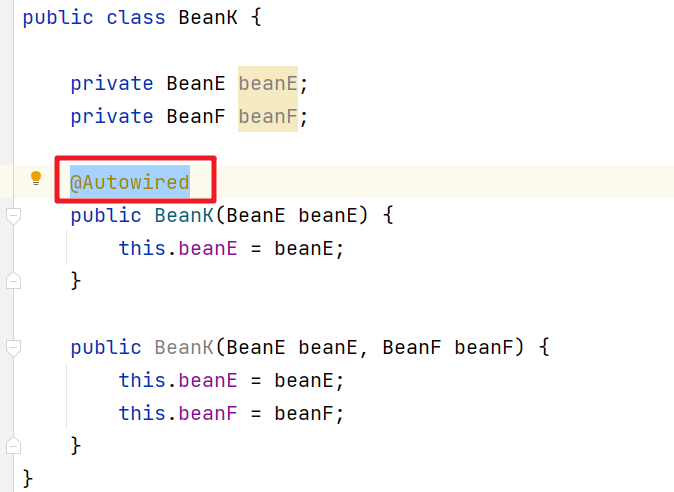
@Component
 public class BeanK {

     private BeanE beanE;
     private BeanF beanF;


     public BeanK(BeanE beanE) {
         this.beanE = beanE;
     }

     public BeanK(BeanE beanE, BeanF beanF) {
         this.beanE = beanE;
         this.beanF = beanF;
     }
 }
声明了两个构造方法,但是没有提供无参的构造方法。这时从容器中获取会报错。
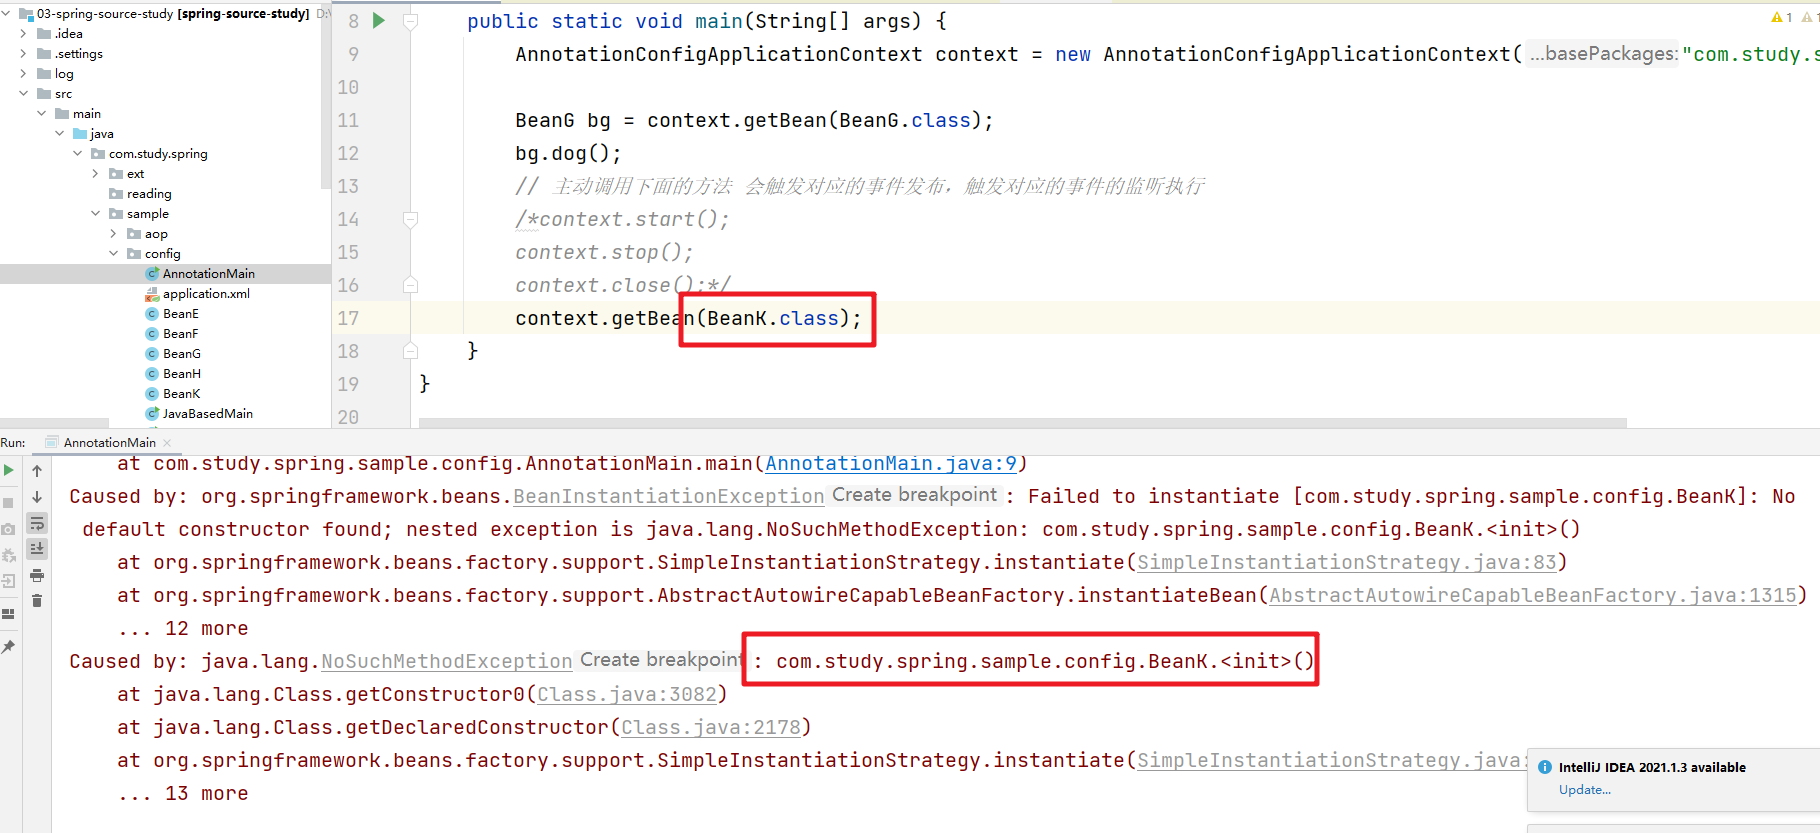
这时我们需要在显示使用的构造方法中添加@Autowired注解即可
源码层面的核心
protected BeanWrapper createBeanInstance(String beanName, RootBeanDefinition mbd, @Nullable Object[] args) {
         // Make sure bean class is actually resolved at this point.
         // 确认需要创建的bean实例的类可以实例化
         Class<?> beanClass = resolveBeanClass(mbd, beanName);

         // 确保class不为空,并且访问权限是public
         if (beanClass != null && !Modifier.isPublic(beanClass.getModifiers()) && !mbd.isNonPublicAccessAllowed()) {
             throw new BeanCreationException(mbd.getResourceDescription(), beanName,
                     "Bean class isn't public, and non-public access not allowed: " + beanClass.getName());
         }

         // 判断当前beanDefinition中是否包含实例供应器,此处相当于一个回调方法,利用回调方法来创建bean
         Supplier<?> instanceSupplier = mbd.getInstanceSupplier();
         if (instanceSupplier != null) {
             return obtainFromSupplier(instanceSupplier, beanName);
         }

         // 如果工厂方法不为空则使用工厂方法初始化策略
         if (mbd.getFactoryMethodName() != null) {
             return instantiateUsingFactoryMethod(beanName, mbd, args);
         }

         // 一个类可能有多个构造器,所以Spring得根据参数个数、类型确定需要调用的构造器
         // 在使用构造器创建实例后,Spring会将解析过后确定下来的构造器或工厂方法保存在缓存中,避免再次创建相同bean时再次解析

         // Shortcut when re-creating the same bean...
         // 标记下,防止重复创建同一个bean
         boolean resolved = false;
         // 是否需要自动装配
         boolean autowireNecessary = false;
         // 如果没有参数
         if (args == null) {
             synchronized (mbd.constructorArgumentLock) {
                 // 因为一个类可能由多个构造函数,所以需要根据配置文件中配置的参数或传入的参数来确定最终调用的构造函数。
                 // 因为判断过程会比较,所以spring会将解析、确定好的构造函数缓存到BeanDefinition中的resolvedConstructorOrFactoryMethod字段中。
                 // 在下次创建相同时直接从RootBeanDefinition中的属性resolvedConstructorOrFactoryMethod缓存的值获取,避免再次解析
                 if (mbd.resolvedConstructorOrFactoryMethod != null) {
                     resolved = true;
                     autowireNecessary = mbd.constructorArgumentsResolved;
                 }
             }
         }
         // 有构造参数的或者工厂方法
         if (resolved) {
             // 构造器有参数
             if (autowireNecessary) {
                 // 构造函数自动注入
                 return autowireConstructor(beanName, mbd, null, null);
             }
             else {
                 // 使用默认构造函数构造
                 return instantiateBean(beanName, mbd);
             }
         }

         // Candidate constructors for autowiring?
         // 从bean后置处理器中为自动装配寻找构造方法, 有且仅有一个有参构造或者有且仅有@Autowired注解构造
         Constructor<?>[] ctors = determineConstructorsFromBeanPostProcessors(beanClass, beanName);
         // 以下情况符合其一即可进入
         // 1、存在可选构造方法
         // 2、自动装配模型为构造函数自动装配
         // 3、给BeanDefinition中设置了构造参数值
         // 4、有参与构造函数参数列表的参数
         if (ctors != null || mbd.getResolvedAutowireMode() == AUTOWIRE_CONSTRUCTOR ||
                 mbd.hasConstructorArgumentValues() || !ObjectUtils.isEmpty(args)) {
             return autowireConstructor(beanName, mbd, ctors, args);
         }

         // Preferred constructors for default construction?
         // 找出最合适的默认构造方法
         ctors = mbd.getPreferredConstructors();
         if (ctors != null) {
             // 构造函数自动注入
             return autowireConstructor(beanName, mbd, ctors, null);
         }

         // No special handling: simply use no-arg constructor.
         // 使用默认无参构造函数创建对象,如果没有无参构造且存在多个有参构造且没有@AutoWired注解构造,会报错
         return instantiateBean(beanName, mbd);
     }
2. 循环依赖
接下来我们看看在构造注入的情况下。对循环依赖的检测是怎么做的。前面我们分析过,在构造注入的情况下,对于循环依赖是没有办法解决的。只能检测,然后抛出对应的异常信息。
@Component
 public class BeanL {

     private BeanM beanM;

     @Autowired
     public BeanL(BeanM beanM) {
         this.beanM = beanM;
     }
 }

 @Component
 public class BeanM {
     private BeanL beanL;

     @Autowired
     public BeanM(BeanL beanL) {
         this.beanL = beanL;
     }
 }
然后启动代码看到循环依赖的报错

然后我们来看看他是如何实现循环检测的。
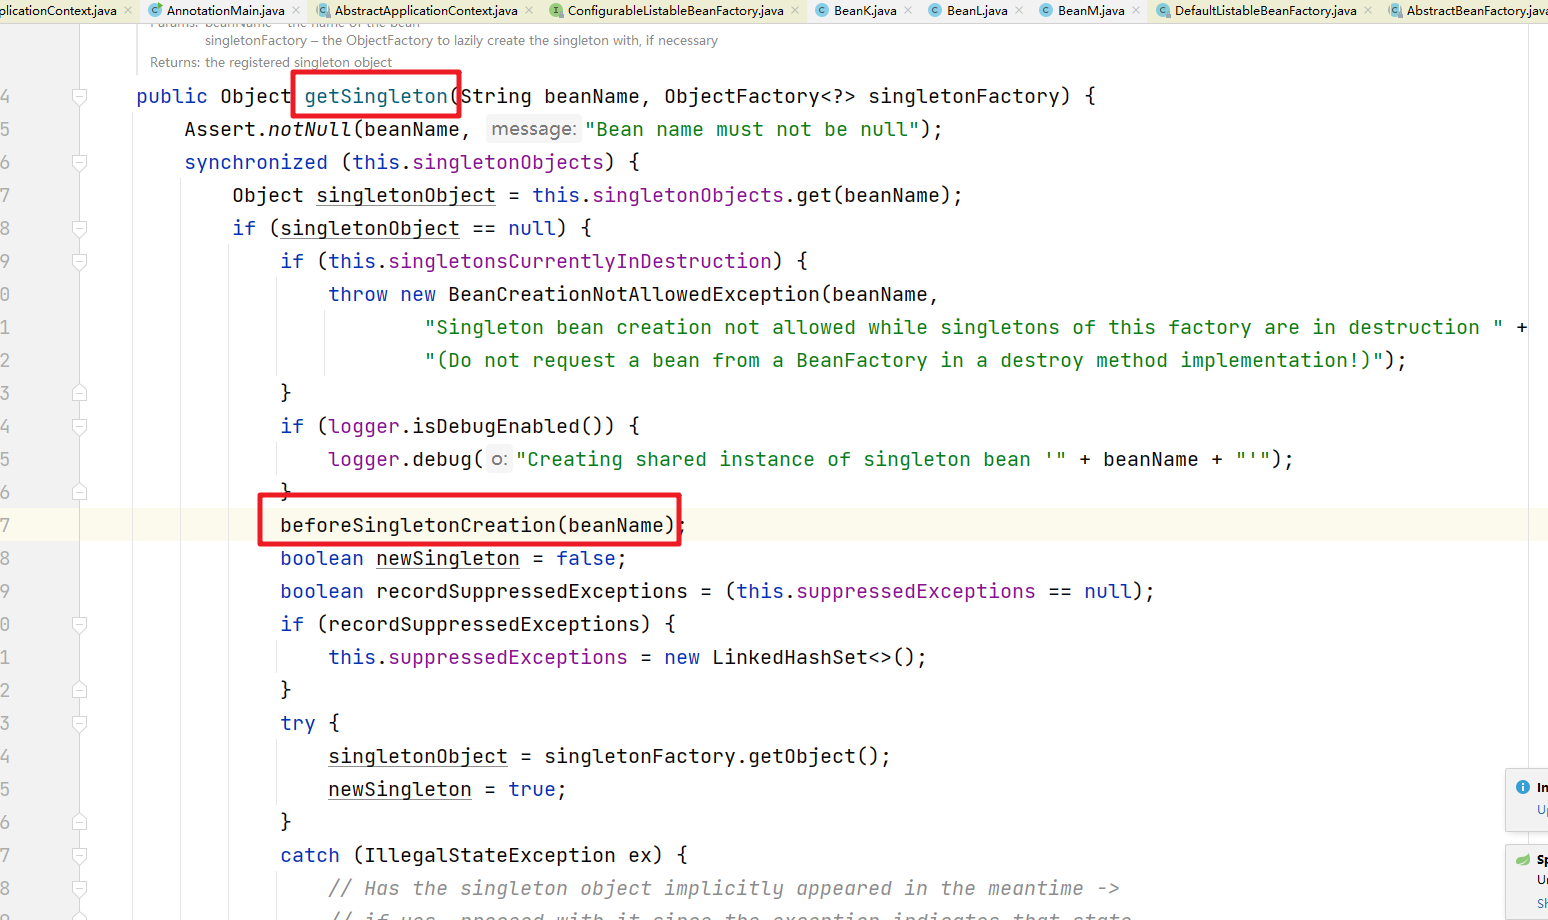
进入到这个 beforeSingletonCreation方法中。
protected void beforeSingletonCreation(String beanName) {
         // 如果当前在创建检查中的排除bean名列表中不包含该beanName且将beanName添加到当前正在创建的bean名称列表后,出现
         // beanName已经在当前正在创建的bean名称列表中添加过
         if (!this.inCreationCheckExclusions.contains(beanName) && !this.singletonsCurrentlyInCreation.add(beanName)) {
             // 抛出当前正在创建的Bean异常
             throw new BeanCurrentlyInCreationException(beanName);
         }
     }
然后当对象创建完成后。会异常对应的检测
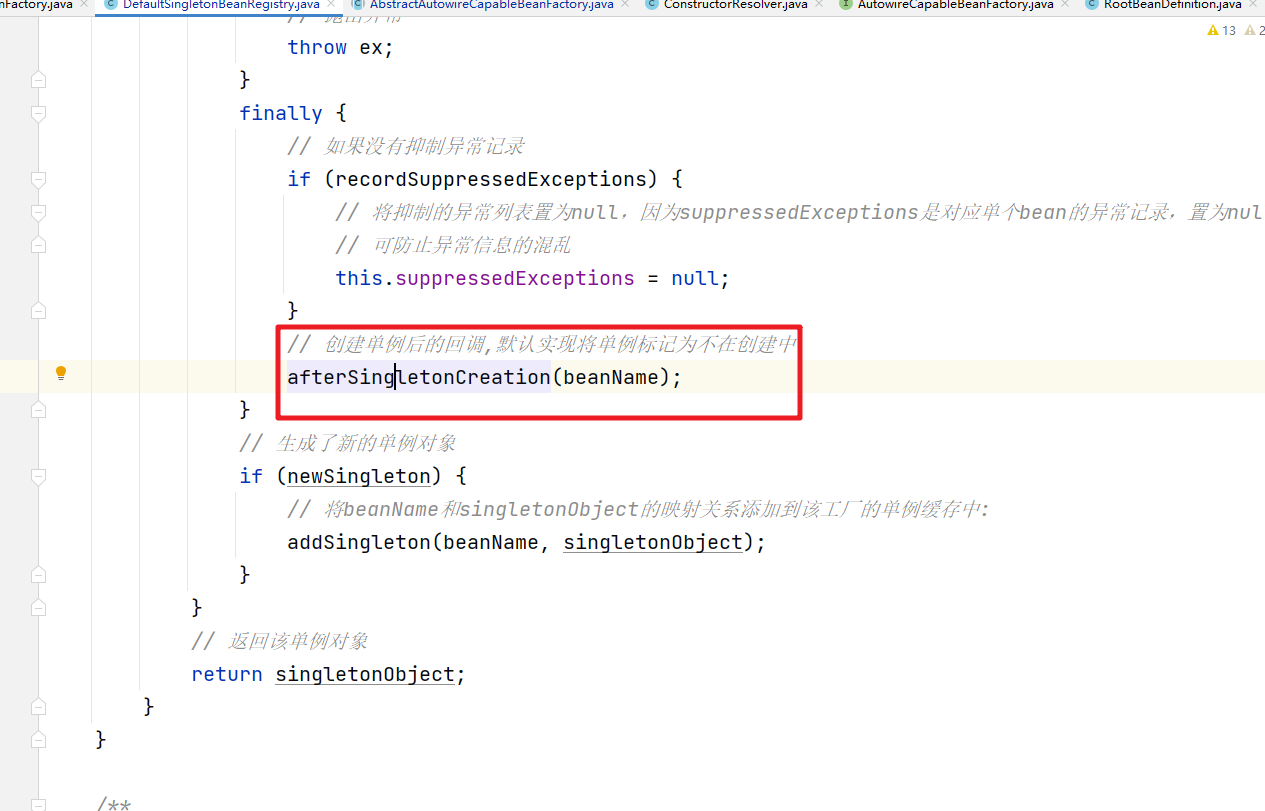
protected void afterSingletonCreation(String beanName) {
// 如果当前在创建检查中的排除bean名列表中不包含该beanName且将beanName从当前正在创建的bean名称列表异常后,出现
// beanName已经没在当前正在创建的bean名称列表中出现过
if (!this.inCreationCheckExclusions.contains(beanName) && !this.singletonsCurrentlyInCreation.remove(beanName)) {
// 抛出非法状态异常:单例'beanName'不是当前正在创建的
throw new IllegalStateException("Singleton '" + beanName + "' isn't currently in creation");
}
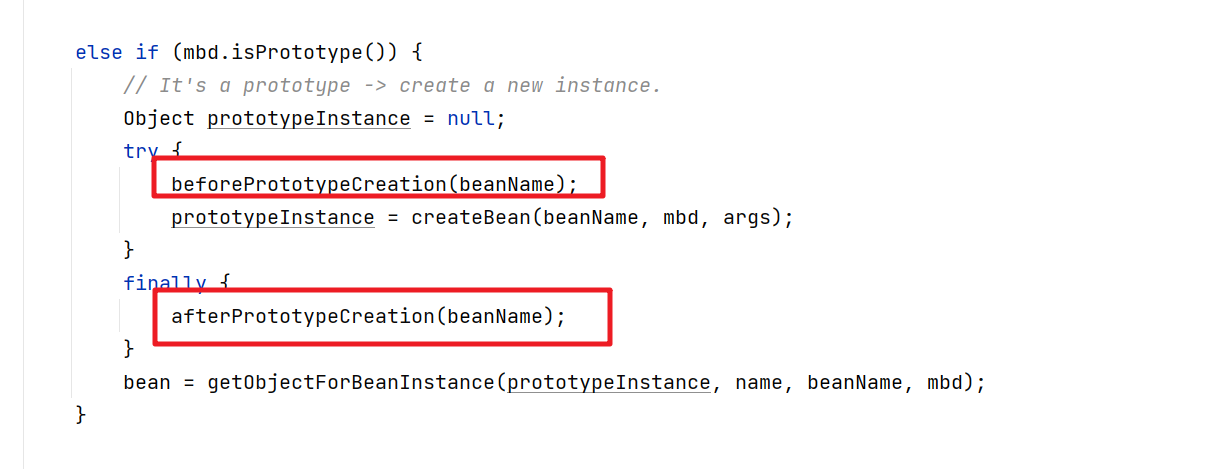
}当然上面的针对单例的处理,如果是原型的话。我们继续来看
// 原型模式的bean对象创建
                 else if (mbd.isPrototype()) {
                     // It's a prototype -> create a new instance.
                     // 它是一个原型 -> 创建一个新实例
                     // 定义prototype实例
                     Object prototypeInstance = null;
                     try {
                         // 创建Prototype对象前的准备工作,默认实现将beanName添加到prototypesCurrentlyInCreation中
                         beforePrototypeCreation(beanName);
                         // 为mbd(和参数)创建一个bean实例
                         prototypeInstance = createBean(beanName, mbd, args);
                     }
                     finally {
                         // 创建完prototype实例后的回调,默认是将beanName从prototypesCurrentlyInCreation移除
                         afterPrototypeCreation(beanName);
                     }
                     // 从beanInstance中获取公开的Bean对象,主要处理beanInstance是FactoryBean对象的情况,如果不是
                     // FactoryBean会直接返回beanInstance实例
                     bean = getObjectForBeanInstance(prototypeInstance, name, beanName, mbd);
                 }
而且我们可以发现在原型对象的检测中使用的是ThreadLocal来存储了

二、属性依赖
然后我们来看看Bean的属性依赖的处理。属性依赖的具体方法是 polulateBean
protected void populateBean(String beanName, RootBeanDefinition mbd, @Nullable BeanWrapper bw) {
         // 如果beanWrapper为空
         if (bw == null) {
             // 如果mbd有需要设置的属性
             if (mbd.hasPropertyValues()) {
                 // 抛出bean创建异常
                 throw new BeanCreationException(
                         mbd.getResourceDescription(), beanName, "Cannot apply property values to null instance");
             }
             else {
                 // Skip property population phase for null instance.
                 // 没有可填充的属性,直接跳过
                 return;
             }
         }

         // Give any InstantiationAwareBeanPostProcessors the opportunity to modify the
         // state of the bean before properties are set. This can be used, for example,
         // to support styles of field injection.
         // 给任何实现了InstantiationAwareBeanPostProcessors的子类机会去修改bean的状态再设置属性之前,可以被用来支持类型的字段注入

         // 否是"synthetic"。一般是指只有AOP相关的pointCut配置或者Advice配置才会将 synthetic设置为true
         // 如果mdb是不是'syntheic'且工厂拥有InstantiationAwareBeanPostProcessor
         if (!mbd.isSynthetic() && hasInstantiationAwareBeanPostProcessors()) {
             //遍历工厂中的BeanPostProcessor对象
             for (BeanPostProcessor bp : getBeanPostProcessors()) {
                 //如果 bp 是 InstantiationAwareBeanPostProcessor 实例
                 if (bp instanceof InstantiationAwareBeanPostProcessor) {
                     InstantiationAwareBeanPostProcessor ibp = (InstantiationAwareBeanPostProcessor) bp;
                     // //postProcessAfterInstantiation:一般用于设置属性
                     if (!ibp.postProcessAfterInstantiation(bw.getWrappedInstance(), beanName)) {
                         return;
                     }
                 }
             }
         }
         //PropertyValues:包含以一个或多个PropertyValue对象的容器,通常包括针对特定目标Bean的一次更新
         //如果mdb有PropertyValues就获取其PropertyValues
         PropertyValues pvs = (mbd.hasPropertyValues() ? mbd.getPropertyValues() : null);

         // 获取 mbd 的 自动装配模式
         int resolvedAutowireMode = mbd.getResolvedAutowireMode();
         // 如果 自动装配模式 为 按名称自动装配bean属性 或者 按类型自动装配bean属性
         if (resolvedAutowireMode == AUTOWIRE_BY_NAME || resolvedAutowireMode == AUTOWIRE_BY_TYPE) {
             //MutablePropertyValues:PropertyValues接口的默认实现。允许对属性进行简单操作,并提供构造函数来支持从映射 进行深度复制和构造
             MutablePropertyValues newPvs = new MutablePropertyValues(pvs);
             // Add property values based on autowire by name if applicable.
             // 根据autotowire的名称(如适用)添加属性值
             if (resolvedAutowireMode == AUTOWIRE_BY_NAME) {
                 //通过bw的PropertyDescriptor属性名,查找出对应的Bean对象,将其添加到newPvs中
                 autowireByName(beanName, mbd, bw, newPvs);
             }
             // Add property values based on autowire by type if applicable.
             // 根据自动装配的类型(如果适用)添加属性值
             if (resolvedAutowireMode == AUTOWIRE_BY_TYPE) {
                 //通过bw的PropertyDescriptor属性类型,查找出对应的Bean对象,将其添加到newPvs中
                 autowireByType(beanName, mbd, bw, newPvs);
             }
             //让pvs重新引用newPvs,newPvs此时已经包含了pvs的属性值以及通过AUTOWIRE_BY_NAME,AUTOWIRE_BY_TYPE自动装配所得到的属性值
             pvs = newPvs;
         }

         //工厂是否拥有InstiationAwareBeanPostProcessor
         boolean hasInstAwareBpps = hasInstantiationAwareBeanPostProcessors();
         //mbd.getDependencyCheck(),默认返回 DEPENDENCY_CHECK_NONE,表示 不检查
         //是否需要依赖检查
         boolean needsDepCheck = (mbd.getDependencyCheck() != AbstractBeanDefinition.DEPENDENCY_CHECK_NONE);

         //经过筛选的PropertyDesciptor数组,存放着排除忽略的依赖项或忽略项上的定义的属性
         PropertyDescriptor[] filteredPds = null;
         //如果工厂拥有InstiationAwareBeanPostProcessor,那么处理对应的流程,主要是对几个注解的赋值工作包含的两个关键子类是CommonAnnoationBeanPostProcessor,AutowiredAnnotationBeanPostProcessor
         if (hasInstAwareBpps) {
             //如果pvs为null
             if (pvs == null) {
                 //尝试获取mbd的PropertyValues
                 pvs = mbd.getPropertyValues();
             }
             //遍历工厂内的所有后置处理器
             for (BeanPostProcessor bp : getBeanPostProcessors()) {
                 //如果 bp 是 InstantiationAwareBeanPostProcessor 的实例
                 if (bp instanceof InstantiationAwareBeanPostProcessor) {
                     //将bp 强转成 InstantiationAwareBeanPostProcessor 对象
                     InstantiationAwareBeanPostProcessor ibp = (InstantiationAwareBeanPostProcessor) bp;
                     //postProcessProperties:在工厂将给定的属性值应用到给定Bean之前,对它们进行后处理,不需要任何属性扫描符。该回调方法在未来的版本会被删掉。
                     // -- 取而代之的是 postProcessPropertyValues 回调方法。
                     // 让ibp对pvs增加对bw的Bean对象的propertyValue,或编辑pvs的proertyValue
                     PropertyValues pvsToUse = ibp.postProcessProperties(pvs, bw.getWrappedInstance(), beanName);
                     //如果pvs为null
                     if (pvsToUse == null) {
                         //如果filteredPds为null
                         if (filteredPds == null) {
                             //mbd.allowCaching:是否允许缓存,默认时允许的。缓存除了可以提高效率以外,还可以保证在并发的情况下,返回的PropertyDesciptor[]永远都是同一份
                             //从bw提取一组经过筛选的PropertyDesciptor,排除忽略的依赖项或忽略项上的定义的属性
                             filteredPds = filterPropertyDescriptorsForDependencyCheck(bw, mbd.allowCaching);
                         }
                         //postProcessPropertyValues:一般进行检查是否所有依赖项都满足,例如基于"Require"注释在 bean属性 setter,
                         //  -- 替换要应用的属性值,通常是通过基于原始的PropertyValues创建一个新的MutablePropertyValue实例, 添加或删除特定的值
                         //  -- 返回的PropertyValues 将应用于bw包装的bean实例 的实际属性值(添加PropertyValues实例到pvs 或者 设置为null以跳过属性填充)
                         //回到ipd的postProcessPropertyValues方法
                         pvsToUse = ibp.postProcessPropertyValues(pvs, filteredPds, bw.getWrappedInstance(), beanName);
                         //如果pvsToUse为null,将终止该方法精致,以跳过属性填充
                         if (pvsToUse == null) {
                             return;
                         }
                     }
                     //让pvs引用pvsToUse
                     pvs = pvsToUse;
                 }
             }
         }
         //如果需要依赖检查
         if (needsDepCheck) {
             //如果filteredPds为null
             if (filteredPds == null) {
                 //从bw提取一组经过筛选的PropertyDesciptor,排除忽略的依赖项或忽略项上的定义的属性
                 filteredPds = filterPropertyDescriptorsForDependencyCheck(bw, mbd.allowCaching);
             }
             //检查依赖项:主要检查pd的setter方法需要赋值时,pvs中有没有满足其pd的需求的属性值可供其赋值
             checkDependencies(beanName, mbd, filteredPds, pvs);
         }

         //如果pvs不为null
         if (pvs != null) {
             //应用给定的属性值,解决任何在这个bean工厂运行时其他bean的引用。必须使用深拷贝,所以我们 不会永久地修改这个属性
             applyPropertyValues(beanName, mbd, bw, pvs);
         }
     }
1. 提前暴露
然后来看看是如何处理循环依赖的。
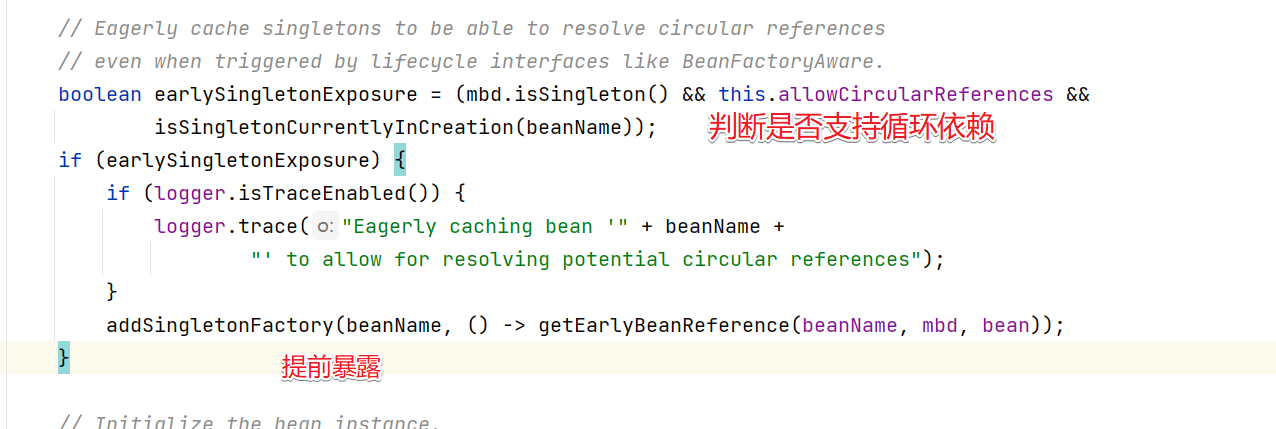
对应的 addSingletonFactory方法
protected void addSingletonFactory(String beanName, ObjectFactory<?> singletonFactory) {
Assert.notNull(singletonFactory, "Singleton factory must not be null");
// 使用singletonObjects进行加锁,保证线程安全
synchronized (this.singletonObjects) {
// 如果单例对象的高速缓存【beam名称-bean实例】没有beanName的对象
if (!this.singletonObjects.containsKey(beanName)) {
// 将beanName,singletonFactory放到单例工厂的缓存【bean名称 - ObjectFactory】
this.singletonFactories.put(beanName, singletonFactory);
// 从早期单例对象的高速缓存【bean名称-bean实例】 移除beanName的相关缓存对象
this.earlySingletonObjects.remove(beanName);
// 将beanName添加已注册的单例集中
this.registeredSingletons.add(beanName);
}
}
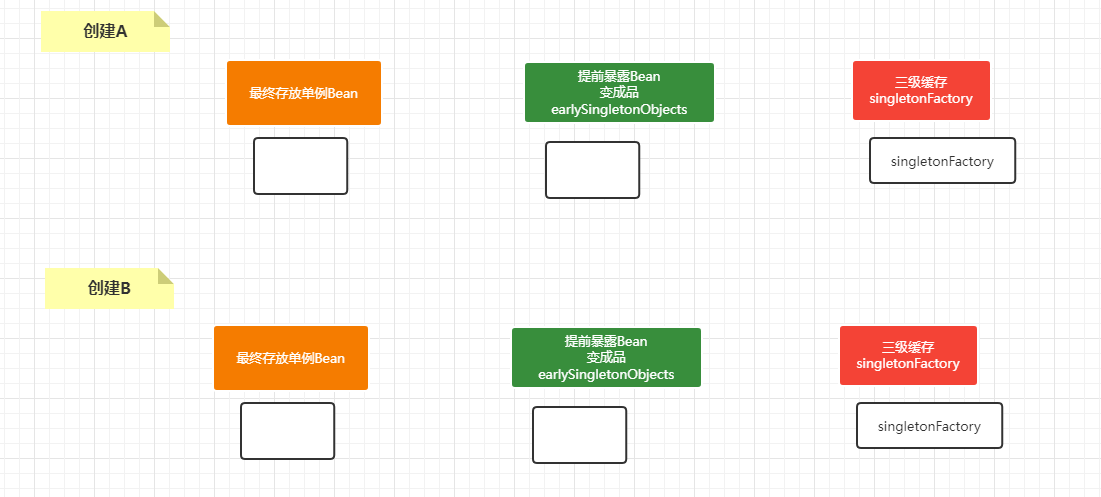
}2. 循环依赖
循环依赖的图解
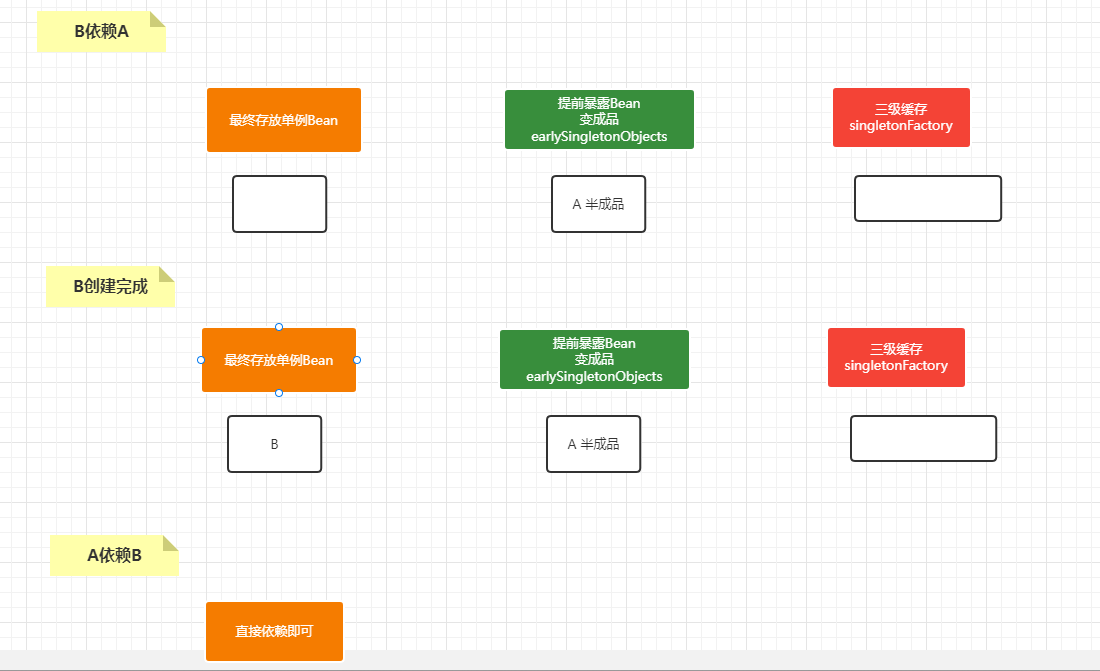
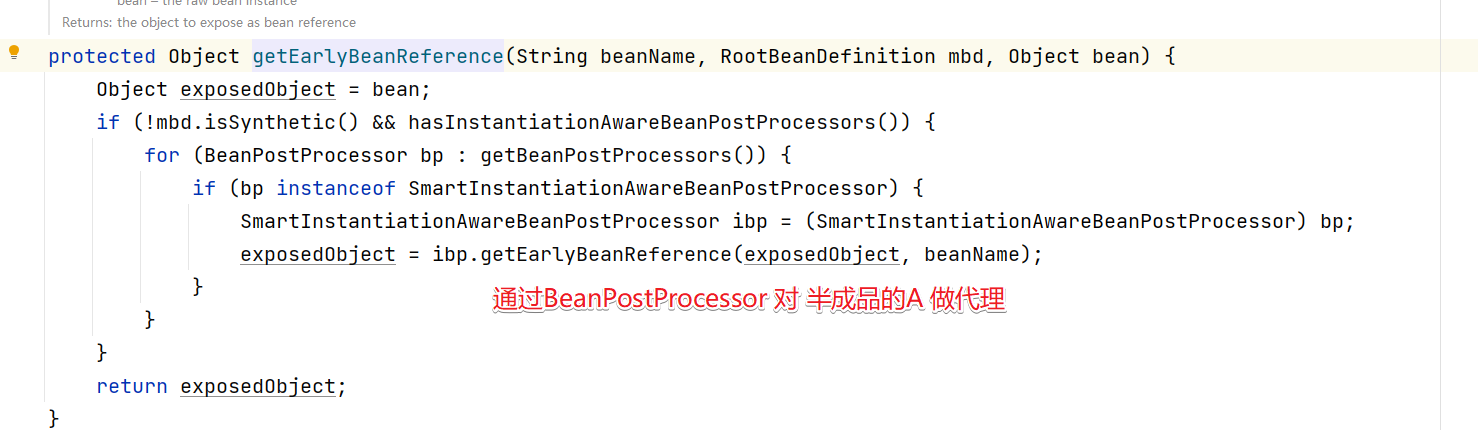
相关代码介绍
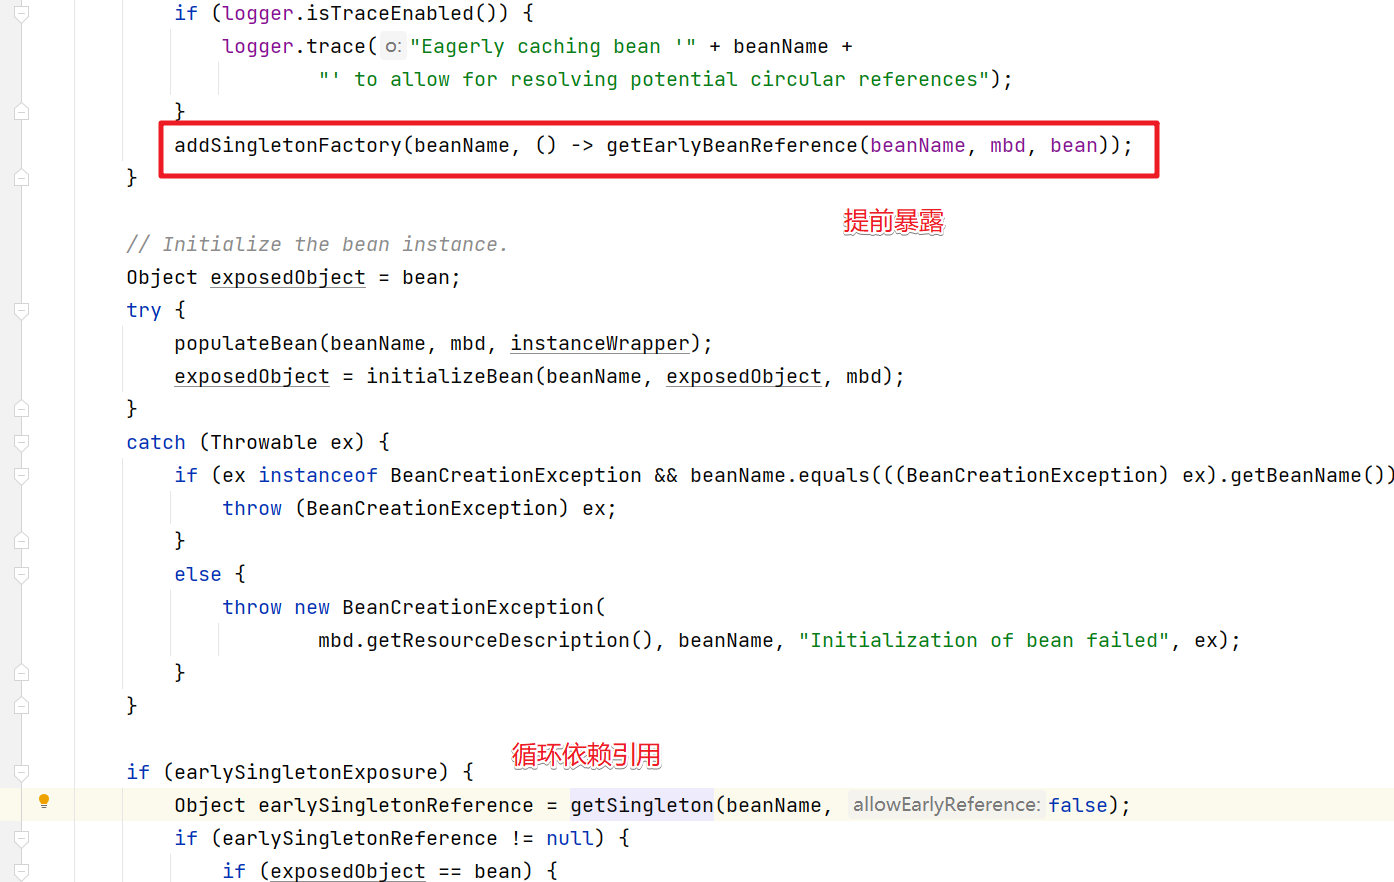
getEarlyBeanReference方法
getSingleton方法


 569
569

 被折叠的 条评论
为什么被折叠?
被折叠的 条评论
为什么被折叠?
 到【灌水乐园】发言


