


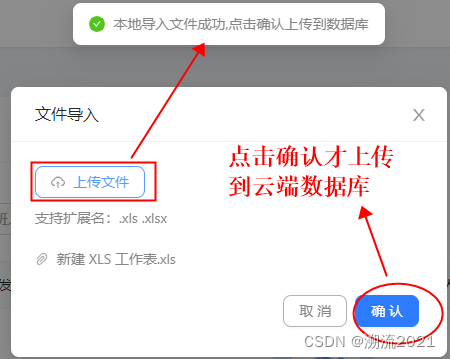
根据需求完成下图功能:
限制只能上传表格文件,本地上传显示进度条,点击确认上传表格数据保存到云端,并关闭弹窗刷新table。
// 上传弹窗渲染
const uploadProps: UploadProps = {
  name: 'file',
  action: `${API_HOST}/monitor/monitorAirflowAlarmConfig/uploadFile`,
  // antd 上传组件上传文件成功直接调用上传接口,不符合本次需求所以注释,通过Modal确认按钮去触发
  // headers: {
  //   // 'Content-Type': 'multipart/form-data',
  //   'page-path': '/monitor/scheduling/warningConfig',
  //   'token-id': TOKEN,
  //   'menu-id': '4086dcdd82d8417e9a0294a6454d1894'
  // },
  withCredentials: true,
  maxCount: 1, // 文件最大上传个数
  // 限制类型
  accept: '.csv,.xls,.xlsx, application/vnd.openxmlformats-officedocument.spreadsheetml.sheet, application/vnd.ms-excel', // 限制只能上传表格文件
  beforeUpload: file => {
    const isPNG = ['.csv', '.xls', '.xlsx', 'application/vnd.openxmlformats-officedocument.spreadsheetml.sheet', 'application/vnd.ms-excel'].includes(file.type)
    if (!isPNG) {
      message.error(`文件格式不正确!`);
    } else {
      // console.log('beforeUpload', file);
      //转化为formData格式
      const formData = new FormData();
      formData.append('file', file);
      setFormDataParams(formData)
    }
    return isPNG || Upload.LIST_IGNORE;
  },
  onChange: info => {
    if (info.file.status !== 'uploading') {
      console.log('onChange', info, info.fileList);
    }
    if (info.file.status === 'done') {
      setReqUpload(true)
      message.success(`本地导入文件成功,点击确认上传到数据库`);
    } else if (info.file.status === 'error') {
      setReqUpload(false)
      message.error(`本地导入文件失败`);
    } else if (info.file.status === 'removed') {
      setReqUpload(false)
    }
  },
  progress: { // 文件上传展示的上传进度条样式
    strokeColor: {
      '0%': '#108ee9',
      '100%': '#87d068',
    },
    strokeWidth: 3,
    format: percent => percent && `${parseFloat(percent.toFixed(2))}%`,
  },
};

// 上传组件渲染
const basicNodeUpload = (
    <>
      <Upload {...uploadProps}>
        <Button icon={<CloudUploadOutlined />}>上传文件</Button>
      </Upload>
      <div className={styles.uploadRemark}>支持扩展名:.xls .xlsx</div>
    </>
  )

//导入Modal确定
const handleUploadOk = async () => {
  if (!reqUpload) {
    message.error('未导入文件!')
    return
  }
  setLoading(true);
  setRefresh(false)
  try {
    await request.post(`${API_HOST}/monitor/monitorAirflowAlarmConfig/uploadFile`, {
      data: formDataParams,
      requestType: 'form',  // 请求报文类型为表单
      headers: {
        'page-path': '/monitor/scheduling/warningConfig',
        'token-id': TOKEN,
        'menu-id': '4086dcdd82d8417e9a0294a6454d1894'
      },
    }).then((res: any) => {
      setLoading(false);
      if (res.code === '1') {
        message.success(res?.msg || '文件上传成功');
        setRefresh(true)
        Modal.destroyAll(); // 销毁弹窗,这种写法好像不生效不赞成使用
        handleCancelModal()
      } else {
        message.error(res?.msg || '文件上传失败');
      }
    })
  } catch (errorInfo) {
  }
}

// 弹窗
< Modal
  title="文件导入"
  destroyOnClose // 弹窗关闭时销毁组件,解决再次打开时组件内存在历史上传文件!!!
  visible={openUploadModal}
  className={styles.uploadModal}
  onOk={handleUploadOk}
  onCancel={handleCancelModal}
  footer={[
    <Button key="back" onClick={handleCancelModal}>
      取消
    </Button>,
    <Button key="submit" type="primary" loading={loading} onClick={handleUploadOk}>
      确认
    </Button>,
  ]}
>
  {basicNodeUpload}
</Modal>
总结:
上述方案不完善存在缺陷,成熟方案应该是这样:上传文件触发应该将文件传给后端,后端接收缓存但并不直接存入库中而是返回该文件生成id标识(标识后端生成)给前端。前端拿到标识在此条件下,用户操作确认按钮前端本次仅将id标识传给后端,后端接收后才将对应文件数据保存下来。以上为个人思考,供大家学习讨论。


 6372
6372


 被折叠的 条评论
为什么被折叠?
被折叠的 条评论
为什么被折叠?
 到【灌水乐园】发言


