


原文地址:http://www.cnblogs.com/zhgyee/archive/2011/12/27/2302709.html
NuPlayer for HTTP live streaming
HTTP Live Streaming is separated from Stagefright on the recent release, which is basically another light-weighted playback engine, except it only supports the fixed container and codecs format currently.
It seems that the author really prefers rewriting than refactoring:)
Unlike Awesomeplayer, NuPlayer is built upon Stagefright's foundation classes, and leverages the Looper/Handlers mechanism to handle requests asynchronously by queuing them in a message loop, so there are less mutex/lock in place.

-
NuPlayer::Source is the parser module. Actually its interface looks like a combination of MediaExtractor and MediaSource, and it also makes seekTo as an explicit API now.
-
NuPlayer::Decoder connects to ACodec for AVC decoding, and to DecoderWrapper for AAC decoding, which in turn wrapps AAC software decoder in the OpenMAX style. ACodec is functionally similar as OMXCodec in Stagefright, besides the application of State pattern and passing MediaBuffers around with messages.
-
NuPlayer::Render is responsible for rendering audio and also controls when to post video buffers back to NativeWindow for A/V sync.
RTSP support was added into Stagefright on GingerBread release:
-
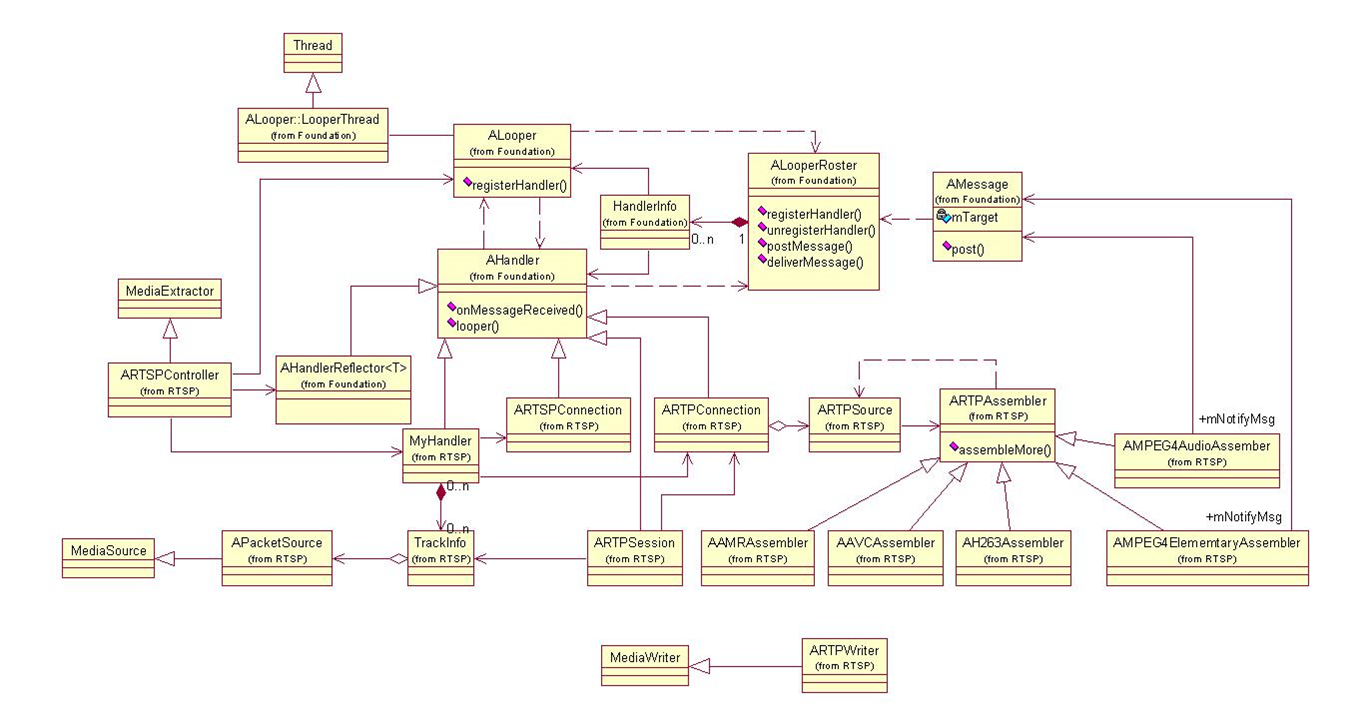
A preliminary foundation module, provides a generic way to asynchronously handle commands and events/messages sequentially in the schedule thread. Each message has a target id, indicating its corresponding handler, which is then registered in a looper. A looper spawns a thread, and schedules registered handlers to process any messages posted to it.
-
ARTSPController acts as MediaExtractor for RTSP playback, which then delegates RTSP related stuff to ARTSPConnection, and payload parsing related to ARTPConnection/ARTPSource. ARTPSource leverages ARTPAssembler to re-assemble RTP packets to frames. AAMRAssembler, AH263Assembler, etc. all inherit from ARTPAssember according to the corresponding protocols. Buffers parsed are sent back via AMessage and queued in APacketSource, which acts as the MediaSource for downstream components.
-
There is also ARTPSession and ARTPWriter which re-uses the existing RTP protocol for VOIP(Gtalk?) solution.
A basic sequence diagram of setting up RTSP connection in Stagefright:

DRM integration in Stagefright
Google has pushed a change into AOSP which integrates DRM support into Stagefright recently:
http://android.git.kernel.org/?p=platform/frameworks/base.git;a=commitdiff;h=d5770917a50a828cb4337c2a392b3e4a375624b9#patch12
Before we delve into the change, there are basically two types of DRM schemes:
1. All of the data was stored under a uniform encryption layer (which is defined as DecryptApiType::CONTAINER_BASED in drm framework currently);
2. Encrypted data is embedded within a plain-text container format, so it can be decrypted packet by packet, thus also applicable for progressive download and streaming.
The entire commit is mainly composed of the following parts:
1)Extension in DataSource interface:
+ // for DRM
+ virtual DecryptHandle* DrmInitialization(DrmManagerClient *client) {
+ return NULL;
+ }
+ virtual void getDrmInfo(DecryptHandle **handle, DrmManagerClient **client) {};
FileSource implements those APIs, where it communicates with DRM service to open a decryption session. For CONTAINER based protection (e.g. OMA DRM v1), FileSource intercepts readAt() function and return the decrypted data transparently to its client -- file parser, which is thereby ignorant of the underlying protection mechanism.
2)Extension in MediaExtractor interface:
+ // for DRM
+ virtual void setDrmFlag(bool flag) {};
+ virtual char* getDrmTrackInfo(size_t trackID, int *len) {
+ return NULL;
+ }
The above APIs are used to retrieve context data, such as Protection Scheme Information Box in mp4/3gp files, to properly initialize the corresponding DRM plugin.
3)DRMExtractor and the DRM format sniffer:
SniffDRM is registered to identify DRM-protected files and its original container format. As mentioned, for CONTAINER_BASED encryption, FileSource handles data decryption transparently for parsers. For the other scheme, which are encrypted with sample/NAL as the basic unit, DRMExtractor is created to wrap the original MediaExtractor, to decrypt data after reading each sample/NAL from the original extractor. In this way, DRM related stuff is separated from actual file parsers.
However, as DRM is usually an extension based on the underlying container format, so it may not be as easily decoupled from file parser when it comes to other protection schemes. For example, Microsoft's PIFF extension to ISO base media format requires IV for each sample, and details of sub-sample encryption info if applicable, etc. Besides, it also imposes duplicate logic in DRM service to recognize the original container format for non-CONTAINER_BASED encryption.
4)Misc:
-changes in AwesomePlayer for rights management;
-changes in MPEG4Extractor to retrieve "sinf";
-etc.
1. Native console app for video playback in Android
I spent some time for writing a native C++ app to test video in console, actually it seems to be much easier than I thought:) Below is the code snippet:
PS. I thought I should paint a hole above video surface as SurfaceView does, but it appears not necessary.
int main(int argc, char** argv)
{
LOGI("entering main...");
sp<ProcessState> proc = ProcessState::self();
proc->startThreadPool();
MediaPlayer mediaplayer;
if(argc > 1)
{
LOGI("set datasource: %s", argv[1]);
mediaplayer.setDataSource(argv[1]);
}
else
{
LOGI("set datasource: /data/test.mp4");
mediaplayer.setDataSource("/data/test.mp4");
}
LOGI("create SurfaceComposerClient");
int pid = getpid();
int nState = 0;
sp<SurfaceComposerClient> videoClient = new SurfaceComposerClient;
LOGI("create video surface");
sp<surface> videoSurface(videoClient->createSurface(pid, 0, 176, 144, PIXEL_FORMAT_OPAQUE, ISurfaceComposer::eFXSurfaceNormal|ISurfaceComposer::ePushBuffers));
videoClient->openTransaction();
//nState = videoSurface->setSize(176, 144);
//LOGI("videosurface->setSize, %d", nState);
//nState = videoSurface->setPosition(0, 0);
//LOGI("videosurface->setPosition, %d", nState);
//set toppest z-order
nState = videoSurface->setLayer(INT_MAX);
LOGI("videosurface->setLayer, %d", nState);
nState = videoSurface->show();
LOGI("videosurface->show, %d", nState);
videoClient->closeTransaction();
LOGI("set video surface to player");
mediaplayer.setVideoSurface(videoSurface);
status_t retCode = mediaplayer.prepare();
if(retCode < 0)
{
LOGE("prepare failed: %d\n", retCode);
IPCThreadState::self()->stopProcess();
return -1;
};
mediaplayer.start();
for(int i=0; i < 10; i++)
{
sleep(1);
LOGI("playing, i=%d\n", i);
}
mediaplayer.reset();
LOGI("quiting...");
//close binder fd, still need waiting for all binder threads exit?
IPCThreadState::self()->stopProcess();
return 0;
}


 1万+
1万+

 被折叠的 条评论
为什么被折叠?
被折叠的 条评论
为什么被折叠?
 到【灌水乐园】发言


