


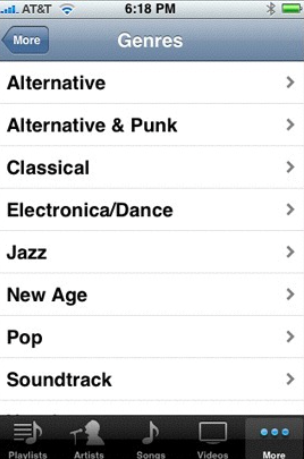
表视图 UITableView
表视图 UITableView,iOS中最重要的视图,随处可见。 表视图通常用来管理一组具有相同数据结构的数据。
UITableView继承自UIScrollView,所以可以滚动。
表视图的每一条数据都是显示在UITableViewCell对象中。
表视图可以分区显示数据,每个分区称为一个section,每一行称为 row,编号都是从0开始。
创建
| 重要属性 | |
|---|---|
| style样式 | plain/grouped |
| 分割线样式 | separatorStyle |
| 分割线颜色 | separatorColor |
| 行高 | rowHeight |
显示数据(DataSource数据源)
我们需要给tableView指定一个数据源,它负责给tableView提供数据 需要实现协议中两个必须实现的方法(否则程序无法运行)
1.返回分区的个数
- (NSInteger)tableView:(UITableView *)tableView
numberOfRowsInSection:(NSInteger)section;
2. 返回 索引处(分别是哪个分区的哪一行)的 每一个cell(单元格)
- (UITableViewCell *)tableView:(UITableView *)tableView cellForRowAtIndexPath:(NSIndexPath *)indexPath
表视图的单元格
UITableView中每一个单元格,被称为一个cell(UITableViewCell)。 系统预置了4种(枚举)样式的cell。
不同样式的cell包含的控件有细微差别。
结构:
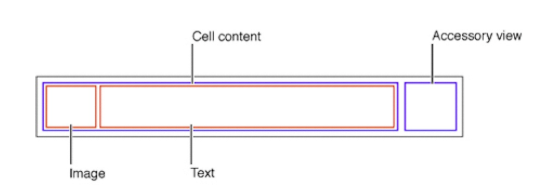
subTitle方式中含有detailTextLabel这一属性,而default方式中没有
自定义区头区尾
| 重要属性 | |
|---|---|
| 设置图片 | imageView |
| 设置文本 | textLabel |
| 指定选中效果 | selectionStyle |
| 指定辅助效果样式 | accessoryType |
UITableViewCell的重用机制
为什么要采用重用机制?
理论上cell的数量可以是无数个,但这样会上升到内存问题,会产生由于程序内存溢出而导致系统崩溃的问题。
UITableViewCell重用:
  需要一个重用集合  作用:把滑出屏幕的cell(完全消失在屏幕上时) 放入重用集合(备用)
  当屏幕下方 需要新的cell进行展示的时候 开始重用
  方式是 首先 系统会先去重用的集合中找 看有没有cell可以重新使用
  如果有 就直接使用   如果没有 就创建一个进行使用
表视图的相关配置方法
NSIndexPath
| 重要属性 | |
|---|---|
| 行 | row |
| 分区 | section |
| 方法 | +(NSIndexPath *)indexPathForRow: (NSUInteger)row inSection:(NSUInteger)section |
多个分区
tableView默认是一个分区,可以设置多个分区
tableView的plain、group样式决定分区的样式不同
每个分区可以设置区头区尾
1.分区数
- (NSInteger)numberOfSectionsInTableView:(UITableView
*)tableView
2.分区头标题
- (NSString *)tableView:(UITableView *)tableView titleForHeaderInSection:(NSInteger)section
3.右侧竖排索引(快速查找分区)
 (NSArray *)sectionIndexTitlesForTableView:(UITableView
*)tableView
自定义区头区尾
// 头高度
- (CGFloat)tableView:(UITableView *)tableView
heightForHeaderInSection:(NSInteger)section;
// 尾高度
- (CGFloat)tableView:(UITableView *)tableView
heightForFooterInSection:(NSInteger)section;
// 表头视图
- (UIView *)tableView:(UITableView *)tableView
viewForHeaderInSection:(NSInteger)section;
// 表尾视图
- (UIView *)tableView:(UITableView *)tableView
viewForFooterInSection:(NSInteger)section;
单元格高度和选中
// 选中(利用单元格属性,跳转页面)
- (void)tableView:(UITableView *)tableView
didSelectRowAtIndexPath:(NSIndexPath *)indexPath;
// 高度
- (CGFloat)tableView:(UITableView *)tableView
heightForRowAtIndexPath:(NSIndexPath *)indexPath;
例题:效果图
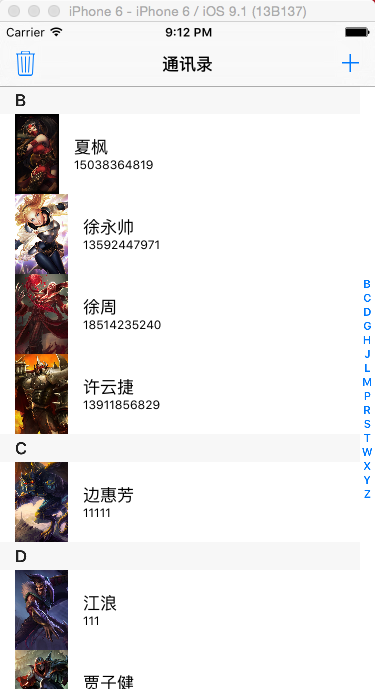
数据
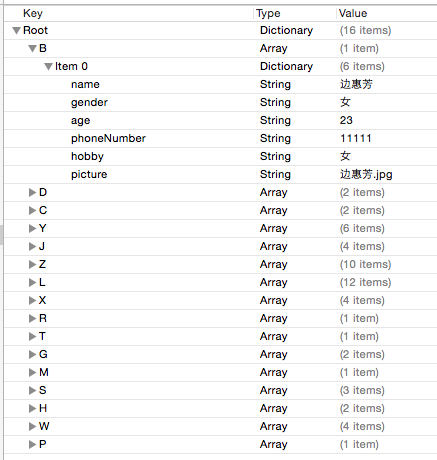
该如何实现呢?一起来试试吧
步骤
1.新建工程,创建一个视图控制器作为导航控制器的根视图控制器,然后将导航控制器作为window的根视图。
RootViewController *rootVC = [[RootViewController alloc] init];
    UINavigationController *navC = [[UINavigationController alloc] initWithRootViewController:rootVC];
    self.window.rootViewController = navC;
    [navC release];
    [rootVC release];
2.新建一个CellModel继承于NSObject
声明属性与数据最内层字典的key对应
在CellModel.m中添加方法(找不到关键字时起安全保护的作用,程序不会崩溃)
- (void)setValue:(id)value forUndefinedKey:(NSString *)key
3.在rootVC中
 1.添加加载数据的方法(将内层字典的key封装成model再还原的过程)
- (void)setUpData
{
  // 拿到文件路径
    NSString *path = [[NSBundle mainBundle] pathForResource:@"Class25ContactList" ofType:@"plist"];
    NSDictionary *dic = [NSDictionary dictionaryWithContentsOfFile:path];
    // 创建装完model的字典
    self.dataDic = [NSMutableDictionary dictionary];

    // 把value中的字典转化为数据模型
    // 遍历字典
    // 取出所有的key
    NSArray *keys = dic.allKeys;
    for (int i = 0; i < keys.count; i++) {
        // 取出每一个key
        NSString *key = keys[i];
        // 用每一个key取出对应的value
        NSArray *values = dic[key];

        // 创建临时数组 保存每一个赋值完成的model
        NSMutableArray *tempArr = [NSMutableArray array];

        // 遍历每一个value
        for (NSDictionary *oneDic in values) {
            // 创建model
            CellModel *model = [[CellModel alloc] init];
            // 给model赋值
            [model setValuesForKeysWithDictionary:oneDic];
            // 把model装进临时数组
            [tempArr addObject:model];
            // 释放
            [model release];
        }

        // 重新构建 字典的键值对
        [self.dataDic setObject:tempArr forKey:key];
        // 对key进行排序
        self.sortedArr = [self.dataDic.allKeys sortedArrayUsingSelector:@selector(compare:)];

    }
    }
2.添加创建tableView的方法
- (void)addTableView
{
    UITableView *tableView = [[UITableView alloc] initWithFrame:[UIScreen mainScreen].bounds style:(UITableViewStylePlain)];
    // 设置代理
    tableView.delegate = self;
    tableView.dataSource = self;
    [self.view addSubview:tableView];
    [tableView release];
}
3.实现代理方法
1.必须实现的
   // 定义cell
- (UITableViewCell *)tableView:(UITableView *)tableView cellForRowAtIndexPath:(NSIndexPath *)indexPath
{
    static NSString *identifier = @"MyCell";
    UITableViewCell *cell = [tableView dequeueReusableCellWithIdentifier:identifier];
    if (cell == nil) {
        cell = [[[UITableViewCell alloc] initWithStyle:(UITableViewCellStyleSubtitle) reuseIdentifier:identifier] autorelease];
    }
    // 赋值位置
    NSArray *keys = self.dataDic.allKeys;
    NSString *key = keys[indexPath.section];
    NSArray *values = self.dataDic[key];
    // 用model来接收数组中的model
    CellModel *model = values[indexPath.row];
    cell.textLabel.text = model.name;
    cell.detailTextLabel.text = model.phoneNumber;
    cell.imageView.image = [UIImage imageNamed:model.picture];

  return cell;
}

// cell个数
- (NSInteger)tableView:(UITableView *)tableView numberOfRowsInSection:(NSInteger)section
{
    // 取出所有的key
    NSArray *keys = self.dataDic.allKeys;
    // 用分区取出对应的key
    NSString *key = keys[section];
    // 用key取出value
    NSArray *values = self.dataDic[key];
    // 返回value的元素个数
    return values.count;
}
2.点击跳转方法
// 点击跳转的方法
- (void)tableView:(UITableView *)tableView didSelectRowAtIndexPath:(NSIndexPath *)indexPath
{
    NSArray *keys = self.dataDic.allKeys;
    NSString *key = keys[indexPath.section];
    NSArray *values = self.dataDic[key];
    CellModel *model = values[indexPath.row];

    SecondViewController *secondVC = [[SecondViewController alloc] init];
    secondVC.imageName = model.picture;
    secondVC.labelName = model.name;
    secondVC.labelph = model.phoneNumber;
    [self.navigationController pushViewController:secondVC animated:YES];
}
3.其他方法
// cell高度
- (CGFloat)tableView:(UITableView *)tableView heightForRowAtIndexPath:(NSIndexPath *)indexPath
{
    return 80;
}

// 分区个数
- (NSInteger)numberOfSectionsInTableView:(UITableView *)tableView
{
    return self.dataDic.count;
}

// 分区标题
- (NSString *)tableView:(UITableView *)tableView titleForHeaderInSection:(NSInteger)section
{
    return self.sortedArr[section];
}

- (NSArray<NSString *> *)sectionIndexTitlesForTableView:(UITableView *)tableView
{
    return self.sortedArr;
}
第二个界面
- (void)viewDidLoad {
    [super viewDidLoad];
    // Do any additional setup after loading the view.
    self.view.backgroundColor = [UIColor whiteColor];

    UIImageView *imageView = [[UIImageView alloc] initWithImage:[UIImage imageNamed:self.imageName]];
    imageView.frame = CGRectMake(20, 80, 120, 150);
    [self.view addSubview:imageView];
    [imageView release];

    UILabel *name = [[UILabel alloc] initWithFrame:CGRectMake(180, 80, 150, 40)];
    name.text = self.labelName;
    [self.view addSubview:name];
    [name release];

    UILabel *phoneNum = [[UILabel alloc] initWithFrame:CGRectMake(180, 150, 150, 40)];
    phoneNum.text = self.labelph;
    [self.view addSubview:phoneNum];
    [phoneNum release];

    UIBarButtonItem *rightButton = [[UIBarButtonItem alloc] initWithBarButtonSystemItem:(UIBarButtonSystemItemTrash) target:self action:@selector(rightButtonAction:)];
    self.navigationItem.rightBarButtonItem = rightButton;
    [rightButton release];


}

- (void)rightButtonAction:(UIBarButtonItem *)rightButton
{

}
这样就可以实现效果了


 1282
1282

 被折叠的 条评论
为什么被折叠?
被折叠的 条评论
为什么被折叠?
 到【灌水乐园】发言


