


 tableView编辑包括:cell的添加,cell的删除编辑的步骤:1.让tableView处于编辑状态- (void)setEditing:(BOOL)editing animated:(BOOL)animated;2.指定tableView哪些行可以编辑- (BOOL)tableView:(UITableView *)tableViewcanEditRowAtIndexPath:(NSInd
tableView编辑
包括:cell的添加,cell的删除
编辑的步骤:
1.让tableView处于编辑状态
- (void)setEditing:(BOOL)editing animated:(BOOL)animated;2.指定tableView哪些行可以编辑
- (BOOL)tableView:(UITableView *)tableView
canEditRowAtIndexPath:(NSIndexPath *)indexPath;
3.指定tableView编辑的样式(添加、删除)
- (UITableViewCellEditingStyle)tableView:(UITableView
*)tableView editingStyleForRowAtIndexPath:(NSIndexPath
*)indexPath;
4.完成编辑,提交(先操作数据源,再修改UI)
- (void)tableView:(UITableView *)tableView commitEditingStyle:
(UITableViewCellEditingStyle)editingStyle forRowAtIndexPath:
(NSIndexPath *)indexPath;
tableView移动
移动的步骤:
1、让tableView处于编辑状态
- (void)setEditing:(BOOL)editing animated:(BOOL)animated;2.指定tableView哪些⾏行可以移动
- (BOOL)tableView:(UITableView *)tableView canMoveRowAtIndexPath:
(NSIndexPath *)indexPath;
3.移动完成
- (void)tableView:(UITableView *)tableView moveRowAtIndexPath:
(NSIndexPath *)sourceIndexPath toIndexPath:(NSIndexPath
*)destinationIndexPath
移动过程
监测移动过程,实现限制跨区移动
- (NSIndexPath *)tableView:(UITableView *)tableView
targetIndexPathForMoveFromRowAtIndexPath:(NSIndexPath
*)sourceIndexPath toProposedIndexPath:(NSIndexPath
*)proposedDestinationIndexPath
UITableViewController
UITableViewController继承自UIViewController,自带一个tableView
self.view不是UIView而是UITableView
datasource和delegate默认都是self(UITableViewController)
开发中只需要建立UITableViewController子类
总结
编辑和移动的共同点都是首先要进入编辑状态,结束后要先修改数组或字典中的数据,再更改UI。
例题:
1.完成界面如下:
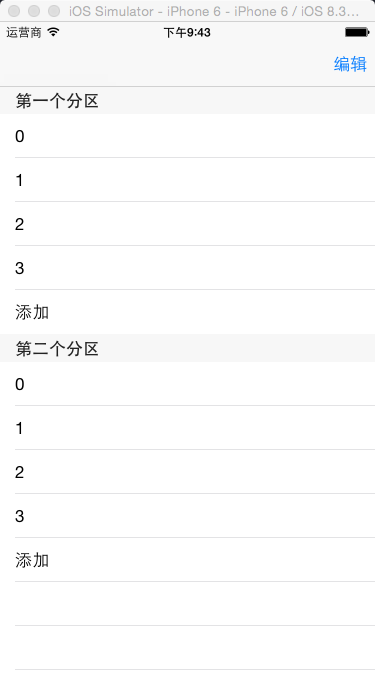
新建工程,创建一个视图控制器作为导航控制器的根视图控制器
RootViewController *rootVC = [[RootViewController alloc] init];
UINavigationController *navC = [[UINavigationController alloc] initWithRootViewController:rootVC];
self.window.rootViewController = navC;
[navC release];
[rootVC release];
2.在根视图控制器中加载数据
-(void)setUpData
{
    NSArray *arr = @[@"0", @"1", @"2", @"3", @"添加"];
    self.firstArr = [NSMutableArray arrayWithArray:arr];
    self.secondArr = [NSMutableArray arrayWithArray:arr];;
}
3.在根视图控制器添加TableView子视图
- (void)addTableView
{
    self.tableView = [[UITableView alloc] initWithFrame:[UIScreen mainScreen].bounds style:(UITableViewStylePlain)];

    self.tableView.dataSource = self;
    self.tableView.delegate = self;

    [self.view addSubview:self.tableView];
    [self.tableView release];
}
4.实现两个必须实现的代理方法(记得添加代理)
 最低0.47元/天 解锁文章


 382
382


 被折叠的 条评论
为什么被折叠?
被折叠的 条评论
为什么被折叠?
 到【灌水乐园】发言


