


1 TableView编程指南学习笔记
1.1 At a Glance
A table view is an instance of theUITableView class in one of two basic styles, plain or grouped. A plain table view is an unbroken list; a grouped table view has visually distinct sections. A table view has a data source and might have a delegate. The data source object provides the data for populating the sections and rows of the table view. The delegate object customizes its appearance and behavior.
1.2 Table Views Draw Their Rows Using Cells
A table view draws its visible rows using cells—that is, UITableViewCell objects. Cells are views that can display text, images, or other kinds of content. They can have background views for both normal and selected states. Cells can also have accessory views, which function as controls for selecting or setting an option.
The UIKit framework defines four standard cell styles, each with its own layout of the three default content elements: main label, detail label, and image. You may also create your own custom cells to acquire a distinctive style for your app’s table views.
When you configure the attributes of a table view in the storyboard editor, you choose between two types of cell content: static cells or dynamic prototypes.
● Static cells. Use static cells to design a table with a fixed number of rows, each with its own layout. Use static cells when you know what the table looks like at design time, regardless of the specific information it displays.
● Dynamic prototypes. Use dynamic prototypes to design one cell and then use it as the template for other cells in the table. Use a dynamic prototype when multiple cells in a table should use the same layout to display information. Dynamic prototype content is managed by the data source at runtime, with an arbitrary number of cells.
Related Chapters: Table View Styles and Accessory Views (page 12), A Closer Look at Table View Cells (page 55)
2 UITableViewCell
2.1 UITableViewCellStyle
iPhone提供了4种基本的表格视图单元格,在SDK 3.0 之后,每个单元格都有3个属性textLabel,detailTextLabel和imageView。
下面一一介绍这4种基本格式:
1、UITableViewCellStyleDefault
该格式提供了一个简单的左对齐的文本标签textLabel和一个可选的图像imageView。如果显示图像,那么图像将在最左边。这种格式虽然可以设置detailTextLabel,但是不会显示该标签。
2、UITableViewCellStyleSubtitle
该格式与前一种相比,增加了对detailTextLabel的支持,该标签将会显示在textLabel标签的下面,字体相对较小。
3、UITableViewCellStyleValue1
该格式居左显示textLabel,居右显示detailTextLabel,且字体较小。
4、UITableViewCellStyleValue2
该格式居左现实一个小型蓝色主标签textLabel,在其右边显示一个小型黑色副标题详细标签detailTextLabel。该格式不支持图像。
2.2 使用技巧
2.2.1 UITableViewCell去掉点击效果
相当于Android中的ListView的selector设置成空/透明的:
1.XIB设置
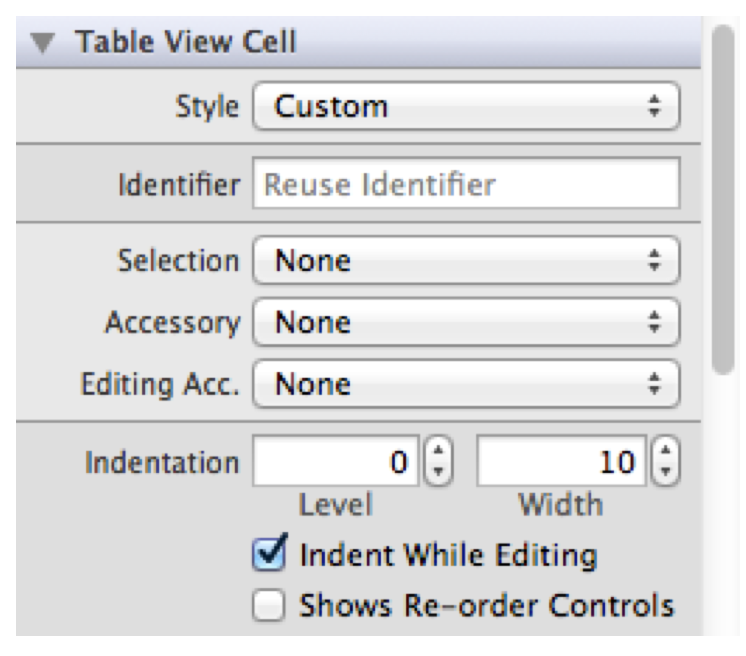
上图中的Selection设置成空。
2.代码
UITableViewCell *cell;
cell.selectionStyle = UITableViewCellSelectionStyleNone;
2.2.2 去掉分隔线
cityTableView.separatorStyle = UITableViewCellSeparatorStyleNone;
2.2.3 UITableview最后一行显示不全
tableview的高度减去tabbar的高度就好了。
float screenHeight = [[UIScreen mainScreen] applicationFrame].size.height;
float scale = [[UIScreen mainScreen] scale];
float statusHeight = [[UIApplication sharedApplication] statusBarFrame].size.height;
float navHeight = self.navigationController.view.frame.size.height;
float navBarHeight = self.navigationController.navigationBar.frame.size.height;
float tabBarHeight = self.navigationController.tabBarController.tabBar.frame.size.height;
float toolBarHeight = self.navigationController.toolbar.frame.size.height;
float contentViewHeight = navHeight - statusHeight - navBarHeight - tabBarHeight;
LOGDEBUG([NSString stringWithFormat: @"screenHeight:%f, navH:%f, navBarH:%f, tabBarH:%f, toolBarH:%f, contentViewHeight:%f", screenHeight, navHeight, navBarHeight, tabBarHeight, toolBarHeight, contentViewHeight]);
2.2.4 左滑删除实现
通过上面两步就实现了数据展示工作,接下就实现关键的数据删除了。
- (BOOL) tableView: (UITableView *)tableView canEditRowAtIndexPath: (NSIndexPath *)indexPath {
return YES;
}
- (void) tableView: (UITableView *)tableView commitEditingStyle:(UITableViewCellEditingStyle) editingStyle forRowAtIndexPath: (NSIndexPath *)indexPath {
if(editingStyle == UITableViewCellEditingStyleDelete) {
[dataArray removeObjectAtIndex: indexPath.row];
// Delete the row from the data source.
[testTableView deleteRowsAtIndexPaths:[NSArray arrayWithObject: indexPath] withRowAnimation: UITableViewRowAnimationFade];
}
else if(editingStyle == UITableViewCellEditingStyleInsert) {
// Create a new instance of the appropriate class, insert it into the array, and add a new row to the table view.
}
}
启用上面两个代理,并增加数据删除操作:
[dataArray removeObjectAtIndex: indexPath.row];
在一条数据上向右划动一下.
2.2.5 IOS7以后UItableview默认顶部有空白
解决方法:
在当前VC中设置:
self.edgesForExtendedLayout = UIRectEdgeNone;
2.2.6 自定义UITableViewCell分割线
- (UITableViewCell *) tableView: (UITableView*)tableView cellForRowAtIndexPath:(NSIndexPath*) indexPath{
UITableViewCell*cell = [tableView dequeueReusableCellWithIdentifier: kTableCellIdentifier];
if(cell == nil) {
cell = [[UITableViewCell alloc] initWithStyle: UITableViewCellStyleDefault reuseIdentifier: kTableCellIdentifier];
}
if (indexPath.section == 0) {
if (indexPath.row == 0) {
UIView *lineV1 = [[UIView alloc] initWithFrame: CGRectMake(0, 0, cell.frame.size.width, 0.5)];
lineV1.backgroundColor = [UIColor colorWithRed:200.0 / 255.0 green:200.0 / 255.0 blue:200.0 / 255.0 alpha:1.0];
[cell addSubview: lineV1];
[cell addSubview: _lNameTextField];
[self relayoutLoginNameTextField];
}
else if (indexPath.row == 1)
{
[cell addSubview: _lVerifyCodeGetButton];
UIView *lineV1 = [[UIView alloc] initWithFrame: CGRectMake(0, kLoginNameTextFieldHeight - 0.5, cell.frame.size.width, 0.5)];
lineV1.backgroundColor = [UIColor colorWithRed:200.0 / 255.0 green:200.0 / 255.0 blue:200.0 / 255.0 alpha:1.0];
[cell addSubview: lineV1];
}
}
return cell;
}
2.2.7 自定义Section样式
// 设置section的高度
- (CGFloat) tableView: (UITableView *)tableView heightForHeaderInSection: (NSInteger)section{
return 20;
}
- (UIView *) tableView: (UITableView *)tableView viewForHeaderInSection: (NSInteger)section {
UIView *sectionView = [[UIView alloc] initWithFrame: CGRectMake(0, 0, tableView.bounds.size.width, 20)];
[sectionView setBackgroundColor: [UIColor colorWithRed: 240.0/255 green: 243.0/255 blue: 245.0/255 alpha: 1.0]];
return sectionView;
}
2.2.8 去除UITableView多余分割线
看了好多东西,觉得隐藏多余的分割线,基本两个各思路,一个是通过代码,一个是代码配合背景图片。
第一种比较常见,在网上到处都是,我这也是抄别人的。主要就是说自己定义一个view,弄成透明的,然后盖在TableView的上部和下部,这样就“隐藏”了。
- (void) setExtraCellLineHidden: (UITableView *)tableView{
UIView *view = [[UIView alloc] init];
view.backgroundColor = [UIColor clearColor];
[tableView setTableFooterView: view];
[tableView setTableHeaderView: view];
[view release];
}
这个函数调用
- (void) viewDidLoad
{
[super viewDidLoad];
// Do any additional setup after loading the view.
[self setExtraCellLineHidden: _detailTableView];
}
好像这还不够,如果TableView没有数据时,会出问题,所以要在
-(NSInteger) tableView: (UITableView *) tableView numberOfRowsInSection: (NSInteger)section
判断dataSouce的数据个数
如果为零可以将_detailTableView.separatorStyle = UITableViewCellSeparatorStyleNone
然后在大于零时将其设置为
_detailTableView.separatorStyle = UITableViewCellSeparatorStyleSingleLine
第二种就是比较非主流的一种,给TableView设置没有分割线,然后给每个cell添加背景图片,图片上画一个线,这样,貌似还不用判断数据为空的情况。
第三种: 当背景横向为 有规律的 色变的 时候可以取背景图片 产生出一个color ok
fuelsTabelView.separatorColor = [UIColor colorWithPatternImage: [UIImage imageNamed: @"line2.png"]];
2.2.9 跟随滚动的头部视图
即把headerView放在整个TableView的头部视图中
_headerView = [[HJMainPageHeaderView alloc] initWithPersonalDataModel: _mainPageUserVM andFrame: CGRectMake(0, 0, w, 90)];
_headerView.layer.borderColor = [kHJBorderColor CGColor];
_headerView.layer.borderWidth = 0.5;
_postTableView = [[UITableView alloc]initWithFrame: CGRectMake(0, 0, w, h) style: UITableViewStylePlain];
[_postTableView registerClass: [HJPostInfoCell class] forCellReuseIdentifier: kHJPostInfoCellIdentifier];
self.postTableView.tableHeaderView = _headerView;
2.2.10 不跟随滚动的头部视图
即把headerView放在某个Section的头部视图中。
_headerView = [[HJMainPageHeaderView alloc] initWithPersonalDataModel: _mainPageUserVM andFrame: CGRectMake(0, 0, w, 90)];
_headerView.layer.borderColor = [kHJBorderColor CGColor];
_headerView.layer.borderWidth = 0.5;
- (CGFloat) tableView: (UITableView *) tableView heightForHeaderInSection: (NSInteger)section
{
return _headerView.frame.size.height;
}
- (UIView *) tableView: (UITableView *)tableView viewForHeaderInSection: (NSInteger)section
{
return _headerView;
}
2.2.11 UITableViewCell分割线左边部分缺少一些
- (void) viewDidLayoutSubviews{
if([self.mytableview respondsToSelector: @selector(setSeparatorInset:)]) {
[self.mytableview setSeparatorInset: UIEdgeInsetsZero];
}
if([self.mytableview respondsToSelector: @selector(setLayoutMargins:)]) {
[self.mytableview setLayoutMargins: UIEdgeInsetsZero];
}
}
- (void) tableView: (UITableView*)tableView willDisplayCell: (UITableViewCell *) cellforRowAtIndexPath: (NSIndexPath *)indexPath{
if([cell respondsToSelector: @selector(setLayoutMargins:)]) {
[cell setLayoutMargins: UIEdgeInsetsZero];
}
if([cell respondsToSelector: @selector(setSeparatorInset:)]){
[cell setSeparatorInset: UIEdgeInsetsZero];
}
}
2.2.12 禁止section的悬浮问题
//处理uitableview section的悬浮问题,禁止section悬浮停留
- (void) scrollViewDidScroll: (UIScrollView*)scrollView {
if ([super respondsToSelector: @selector(scrollViewDidScroll:)]) {
[super scrollViewDidScroll: scrollView];
}
CGFloat sectionHeaderHeight = 50;
if (scrollView.contentOffset.y <= sectionHeaderHeight && scrollView.contentOffset.y >= 0) {
scrollView.contentInset = UIEdgeInsetsMake(-scrollView.contentOffset.y, 0, 0, 0);
}
else if (scrollView.contentOffset.y >= sectionHeaderHeight) {
scrollView.contentInset = UIEdgeInsetsMake(-sectionHeaderHeight, 0, 0, 0);
}
}
2.2.13 为什么iphone6下手动打印UITableViewCell的宽度是320高度是44
因为在iOS5的时候, 默认Cell就是320宽(那阵屏幕就是那么宽,然后高度是44) 现在是在layoutSubViews 重新绘制这个cell的宽度和高度,所以才是屏幕上的宽度。
解决方案:
尽量将子视图的layout操作放到layoutSubviews方法中;另外,可以在cell初始化时手动设置宽度:
- (instancetype) initWithStyle: (UITableViewCellStyle)style reuseIdentifier: (NSString*)reuseIdentifier {
if (self = [super initWithStyle: style reuseIdentifier: reuseIdentifier]) {
self.selectionStyle = UITableViewCellSelectionStyleNone;
CGRect frame = self.frame;
frame.size.width = SCREEN_BOUNDS.size.width;
self.frame = frame;
}
return self;
}
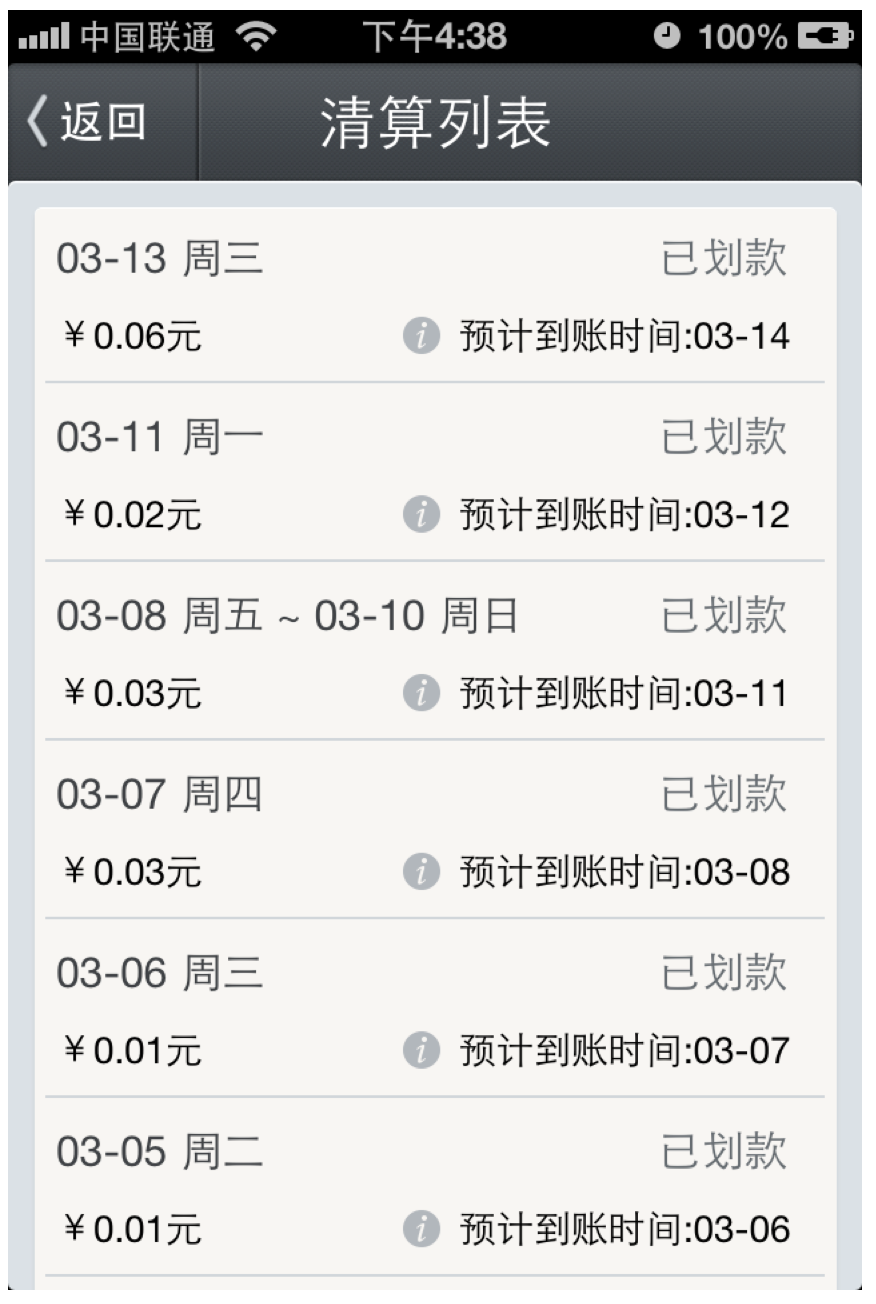
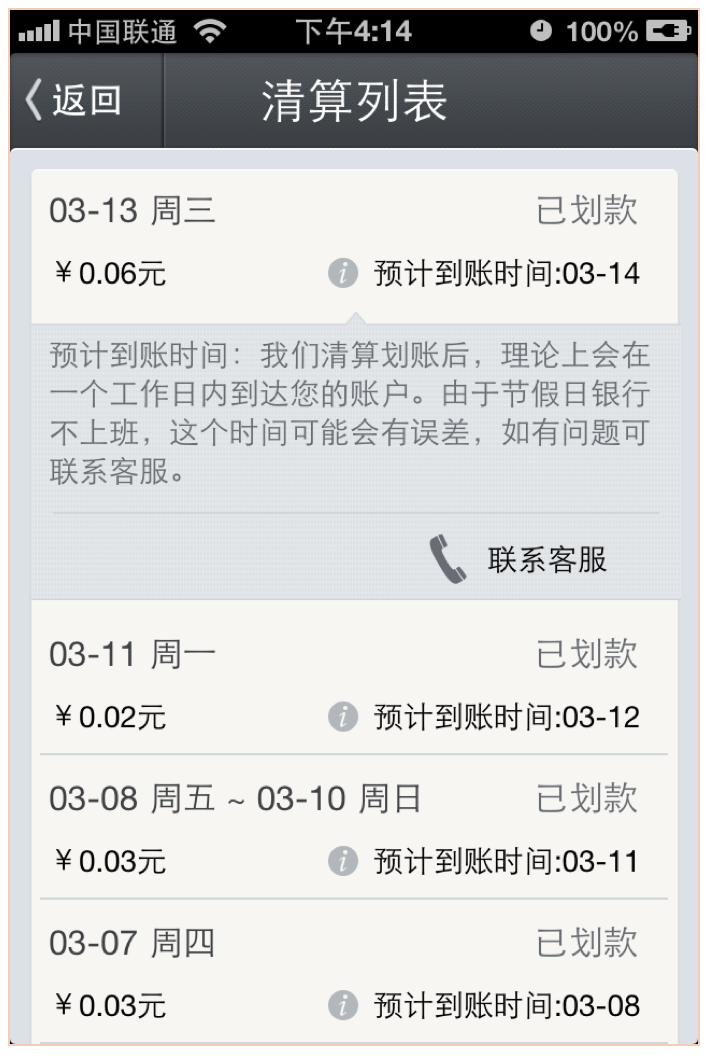
2.2.14 实现UITableViewCell展开/收缩效果
http://blog.sina.com.cn/s/blog_6b8c3d7a0101apmd.html
当初始化UITableView后,代理回调顺序如下
1: //返回cell个数
- (NSInteger) tableView: (UITableView *)tableView numberOfRowsInSection: (NSInteger)section
2: //返回每行的高度
- (CGFloat)tableView: (UITableView *)tableView heightForRowAtIndexPath: (NSIndexPath *)indexPath
3: //请求数据元代理为tableView插入需要的cell
- (UITableViewCell *) tableView: (UITableView *)tableView cellForRowAtIndexPath: (NSIndexPath *) indexPath
4: //监听点击的cell
- (void) tableView: (UITableView *)tableView didSelectRowAtIndexPath: (NSIndexPath *)indexPath
需要声明一个全局BOOL变量isOpen,记录当前cell的状态,声明一个NSInterger类型selectedIndex,记录选择的cell的row。
在heightForRowAtIndexPath代理里面实现。
//选中状态返回的高度
if (indexPath.row == selectedIndex.row && selectedIndex != nil ) {
if (isOpen == YES) {
//cell上的label高度自适应
CGSize size = [textStr sizeWithFont: [UIFont systemFontOfSize: 14] constrainedToSize: CGSizeMake(290, 1000) lineBreakMode: NSLineBreakByWordWrapping];
CGFloat f = size.height;
if (indexPath.row == [self.dataArr count]-1){
return 153.8+(f - 21);
}
return 155+(f - 21);
}else{
return 67;
}
}
同样在- (UITableViewCell*)tableView:(UITableView *)tableView cellForRowAtIndexPath:(NSIndexPath*)indexPath里实现一样的条件。
if (indexPath.row == selectedIndex.row && selectedIndex != nil) {
//如果是展开
if (isOpen == YES) {
//xxxxxx
}else{
//收起
}
//不是自身
} else {
}
当点击时候在
- (void) tableView: (UITableView *)tableView didSelectRowAtIndexPath: (NSIndexPath*)indexPath{
//将索引加到数组中
NSArray *indexPaths = [NSArray arrayWithObject: indexPath];
//判断选中不同row状态时候
if (self.selectedIndex != nil && indexPath.row== selectedIndex.row) {
isOpen = !isOpen;
}else if (self.selectedIndex != nil &&indexPath.row != selectedIndex.row) {
indexPaths = [NSArray arrayWithObjects: indexPath, selectedIndex, nil];
isOpen = YES;
}
//记下选中的索引
self.selectedIndex = indexPath;
//刷新
[tableView reloadRowsAtIndexPaths: indexPaths withRowAnimation: UITableViewRowAnimationFade];
}
经过不断调试,终于实现了点击任意一个cell展开收缩效果。
2.2.15 AccessoryDisclosureIndicator按钮旋转效果实现
[ios]如何旋转UITableViewCellAccessoryDisclosureIndicator?
http://www.itstrike.cn/Question/64f895e0-6e7f-4ea0-b8c3-8c96f989ce30.html
2.2.15.1 方案一CGAffineTransform
UIButton *button = [UIButton buttonWithType: UIButtonTypeDetailDisclosure];
下一步,旋转90度按钮:
CGAffineTransformrotationTransform = CGAffineTransformIdentity;
rotationTransform = CGAffineTransformRotate(rotationTransform, DegreesToRadians(90));
button.transform = rotationTransform;
最后,作为accessoryView使用按钮:
cell.accessoryView = button;
2.2.15.2 方案二UIImageOrientation
if (_isShowServiceSupportView) {
orientation = UIImageOrientationRight;
[cell addSubview: self.serviceSupportWebView];
}
else
{
[self.serviceSupportWebView removeFromSuperview];
}
UIImage *orientationImg = [self changeImageOrientation: orientation];
UIButton *btn = [[UIButton alloc] init];
btn.frame = CGRectMake(SCREEN_BOUNDS.size.width - 24, 14, 16, 16);
[btn setImage: orientationImg forState: UIControlStateNormal];
[cell addSubview: btn];
#pragma mark - 图片旋转
- (UIImage*) changeImageOrientation: (UIImageOrientation)orientation
{
UIImage *orientationImg = [UIImage imageNamed: @"disclosureIndicator"];
orientationImg = [UIImage imageWithCGImage: orientationImg.CGImage scale: [UIScreen mainScreen].scale orientation: orientation];
return orientationImg;
}
2.3 集成第三方效果
2.3.1 上提加载效果
iOS下拉刷新上拉加载更多EGOTableViewPullRefresh类库
http://blog.csdn.net/duxinfeng2010/article/details/9007311
https://github.com/emreberge/EGOTableViewPullRefresh
2.3.2 下拉刷新效果
iOS开发-ios7下拉刷新,上提加载快速集成
http://blog.csdn.net/fkuewfnh/article/details/36000129
2.4 性能优化
2.4.1 快速滑动性能优化方法
2.4.1.1 使用不透明视图
不透明的视图可以极大地提高渲染的速度。因此如非必要,可以将tablecell及其子视图的opaque属性设为YES(默认值)。其中的特例包括背景色,它的alpha值应该为1(例如不要使用clearColor);图像的alpha值也应该为1,或者在画图时设为不透明。
2.4.1.2 不要重复创建不必要的table cell
前面说了,UITableView只需要一屏幕的UITableViewCell对象即可。因此在cell不可见时,可以将其缓存起来,而在需要时继续使用它即可。而UITableView也提供了这种机制,只需要简单地设置一个identifier即可:
static NSString *CellIdentifier = @"xxx";
UITableViewCell *cell = [tableView dequeueReusableCellWithIdentifier: CellIdentifier];
if (cell == nil) {
cell = [[[UITableViewCell alloc] initWithStyle: UITableViewCellStyleDefault reuseIdentifier: CellIdentifier] autorelease];
}
值得一提的是,cell被重用时,它内部绘制的内容并不会被自动清除,因此你可能需要调用setNeedsDisplayInRect:或setNeedsDisplay方法。而且必须在父类TableCell的直接继续类中调用才起作用
2.4.1.3 减少视图的数目。
UITableViewCell包含了textLabel、detailTextLabel和imageView等view,而你还可以自定义一些视图放在它的contentView里。然而view是很大的对象,创建它会消耗较多资源,并且也影响渲染的性能。如果你的table cell包含图片,且数目较多,使用默认的UITableViewCell会非常影响性能。奇怪的是,使用自定义的view,而非预定义的view,明显会快些。当然,最佳的解决办法还是继承UITableViewCell,并在其drawRect:中自行绘制:
- (void) drawRect: (CGRect)rect {
if (image) {
[image drawAtPoint: imagePoint];
self.image =nil;
} else {
[placeHolder drawAtPoint: imagePoint];
}
[text drawInRect: textRect withFont: font lineBreakMode: UILineBreakModeTailTruncation];
}
不过这样一来,你会发现选中一行后,这个cell就变蓝了,其中的内容就被挡住了。最简单的方法就是将cell的selectionStyle属性设为UITableViewCellSelectionStyleNone,这样就不会被高亮了。此外还可以创建CALayer,将内容绘制到layer上,然后对cell的contentView.layer调用addSublayer:方法。这个例子中,layer并不会显著影响性能,但如果layer透明,或者有圆角、变形等效果,就会影响到绘制速度了。解决办法可参见后面的预渲染图像。
2.4.1.4 不要做多余的绘制工作。
在实现drawRect:的时候,它的rect参数就是需要绘制的区域,这个区域之外的不需要进行绘制。例如上例中,就可以用CGRectIntersectsRect、CGRectIntersection或CGRectContainsRect判断是否需要绘制image和text,然后再调用绘制方法。
2.4.1.5 预渲染图像。
你会发现即使做到了上述几点,当新的图像出现时,仍然会有短暂的停顿现象。解决的办法就是在bitmap context里先将其画一遍,导出成UIImage对象,然后再绘制到屏幕,详细做法可见《利用预渲染加速iOS设备的图像显示》。
IOS7.x下UIGraphicsGetImageFromCurrentImageContext引发内存暴涨,导致应用被结束掉
http://blog.163.com/l1_jun/blog/static/1438638820155593641529/
解决方案:
因为是修改别人的代码,优化时无意中解决了此问题,原来的调用方法是在A函数中调用UIGraphicsGetImageFromCurrentImageContext(在C函数中)生成UIImage,然后传递给B函数去处理,这样内存会暴涨。现在将C函数调用生成UIImage放到B函数中生成并使用,这样就能得到及时释放。
2.4.1.6 不要阻塞主线程。
做到前几点后,你的table view滚动时应该足够流畅了,不过你仍可能让用户感到不爽。常见的现象就是在更新数据时,整个界面卡住不动,完全不响应用户请求。出现这种现象的原因就是主线程执行了耗时很长的函数或方法,在其执行完毕前,无法绘制屏幕和响应用户请求。其中最常见的就是网络请求了,它通常都需要花费数秒的时间,而你不应该让用户等待那么久。解决办法就是使用多线程,让子线程去执行这些函数或方法。这里面还有一个学问,当下载线程数超过2时,会显著影响主线程的性能。因此在使用ASIHTTPRequest时,可以用一个NSOperationQueue来维护下载请求,并将其maxConcurrentOperationCount设为2。而NSURLRequest则可以配合GCD来实现,或者使用NSURLConnection的setDelegateQueue:方法。当然,在不需要响应用户请求时,也可以增加下载线程数,以加快下载速度:
- (void) scrollViewDidEndDragging: (UIScrollView*) scrollView willDecelerate: (BOOL)decelerate {
if (!decelerate) {
queue.maxConcurrentOperationCount = 5;
}
}
- (void) scrollViewDidEndDecelerating: (UIScrollView *)scrollView {
queue.maxConcurrentOperationCount = 5;
}
- (void) scrollViewWillBeginDragging: (UIScrollView *)scrollView {
queue.maxConcurrentOperationCount = 2;
}
此外,自动载入更新数据对用户来说也很友好,这减少了用户等待下载的时间。例如每次载入50条信息,那就可以在滚动到倒数第10条以内时,加载更多信息:
- (void) tableView: (UITableView *)tableView willDisplayCell: (UITableViewCell *)cell forRowAtIndexPath: (NSIndexPath *)indexPath {
if (count - indexPath.row <10 && !updating) {
updating = YES;
[self update];
}
}
// update方法获取到结果后,设置updating为NO
还有一点要注意的就是当图片下载完成后,如果cell是可见的,还需要更新图像:
NSArray *indexPaths = [self.tableView indexPathsForVisibleRows];
for (NSIndexPath *visibleIndexPath in indexPaths) {
if (indexPath == visibleIndexPath) {
MyTableViewCell *cell = (MyTableViewCell *)[self.tableView cellForRowAtIndexPath: indexPath];
cell.image = image;
[cell setNeedsDisplayInRect: imageRect];
break;
}
}
//也可不遍历,直接与头尾相比较,看是否在中间即可。
最后还是前面所说过的insertRowsAtIndexPaths:withRowAnimation:方法,插入新行需要在主线程执行,而一次插入很多行的话(例如50行),会长时间阻塞主线程。而换成reloadData方法的话,瞬间就处理完了。
3 参考链接
(good)优化UITableView性能
http://www.keakon.net/2011/08/03/优化UITableView性能
利用预渲染加速iOS设备的图像显示
http://www.keakon.net/2011/07/26/利用预渲染加速iOS设备的图像显示
优化UITableView滚动性能
http://blog.csdn.net/chaoyuan899/article/details/25467617
(good)复杂TableView在iOS上的性能优化
http://www.2cto.com/kf/201312/262041.html
(ok)提升UITableView性能-复杂页面的优化
http://www.imooc.com/wenda/detail/249535
关于UITableView的性能优化(历上最全面的优化分析)
http://bbs.51cto.com/thread-1123666-1.html
(ok)详细整理:UITableView优化技巧
http://www.cocoachina.com/ios/20150602/11968.html
iOS开发UI篇—UITableviewcell的性能优化和缓存机制
http://www.cnblogs.com/wendingding/p/3756257.html
优化UITableView性能
http://www.cnblogs.com/pengyingh/articles/2354714.html
(good)【原/转】UITableview性能优化总结
http://www.cnblogs.com/wengzilin/p/4288027.html
iOS保持界面流畅的技巧
http://blog.ibireme.com/2015/11/12/smooth_user_interfaces_for_ios/
UIImage缩放
http://286725277.blog.163.com/blog/static/12672858620113823553731/
UITableView划动删除的实现
http://rainbird.blog.51cto.com/211214/634587/
自定义UITableViewCell:Cell高度、分割线、间距等
http://blog.csdn.net/tt5267621/article/details/39584513
UITableView设置Section间距
http://blog.aizhet.com/Apple/6977.html
去除UITableView多余分割线
http://blog.csdn.net/wohenjinzhang/article/details/18262565
UITableVIew滚动流畅性优化
http://blog.csdn.net/enuola/article/details/41942963
uitableview处理section的不悬浮,禁止section停留的方法
http://www.wahenzan.com/a/mdev/ios/2015/0105/1412.html
实现UITableViewCell展开/收缩效果


 1816
1816

 被折叠的 条评论
为什么被折叠?
被折叠的 条评论
为什么被折叠?
 到【灌水乐园】发言


