


1 新建module hello-spring-boot-starter
继承 spring-boot-starter-parent
<?xml version="1.0" encoding="UTF-8"?>
<project xmlns="http://maven.apache.org/POM/4.0.0"
         xmlns:xsi="http://www.w3.org/2001/XMLSchema-instance"
         xsi:schemaLocation="http://maven.apache.org/POM/4.0.0 http://maven.apache.org/xsd/maven-4.0.0.xsd">
    <modelVersion>4.0.0</modelVersion>

    <groupId>com.cdchen</groupId>
    <artifactId>hello-spring-boot-starter</artifactId>
    <version>1.0-SNAPSHOT</version>

    <parent>
        <groupId>org.springframework.boot</groupId>
        <artifactId>spring-boot-starter-parent</artifactId>
        <version>1.5.6.RELEASE</version>
        <relativePath/>
    </parent>

    <properties>
        <project.build.sourceEncoding>UTF-8</project.build.sourceEncoding>
        <project.reporting.outputEncoding>UTF-8</project.reporting.outputEncoding>
        <java.version>1.8</java.version>
    </properties>

    <dependencies>
        <dependency>
            <groupId>org.springframework.boot</groupId>
            <artifactId>spring-boot-starter</artifactId>
        </dependency>

        <dependency>
            <groupId>org.springframework.boot</groupId>
            <artifactId>spring-boot-starter-test</artifactId>
            <scope>test</scope>
        </dependency>
        <dependency>
            <groupId>org.springframework.boot</groupId>
            <artifactId>spring-boot-configuration-processor</artifactId>
            <optional>true</optional>
        </dependency>
    </dependencies>
</project>
2 创建读取配置POJO,HelloServiceProperteis 指定前缀
import org.springframework.boot.context.properties.ConfigurationProperties;
@ConfigurationProperties(prefix="cdchen")
public class HelloServiceProperteis {
    private String msg;

    public String getMsg() {
        return msg;
    }

    public void setMsg(String msg) {
        this.msg = msg;
    }
}
3 创建测试服务类 HelloService
public class HelloService {
    private String msg;

    public void setMsg(String msg) {
        this.msg = msg;
    }

    public String getMsg() {
        return msg;
    }
    public void sayHello(){
        System.out.println("hello starter: hello "+ msg);
    }
}
4 重中之重,创建自动配置类,HelloAutoConfiguration
import org.springframework.beans.factory.annotation.Autowired;
import org.springframework.boot.autoconfigure.condition.ConditionalOnClass;
import org.springframework.boot.autoconfigure.condition.ConditionalOnMissingBean;
import org.springframework.boot.autoconfigure.condition.ConditionalOnProperty;
import org.springframework.boot.context.properties.EnableConfigurationProperties;
import org.springframework.context.annotation.Bean;
import org.springframework.context.annotation.Configuration;

@Configuration
@EnableConfigurationProperties(value = HelloServiceProperteis.class)
@ConditionalOnClass(HelloService.class)
@ConditionalOnProperty(prefix = "cdchen", value = "enable", matchIfMissing = true)
public class HelloAutoConfiguration {
    @Autowired
    private HelloServiceProperteis helloServiceProperteis;

    @Bean
    @ConditionalOnMissingBean(HelloService.class)
    public HelloService helloService() {
        HelloService helloService = new HelloService();
        helloService.setMsg(helloServiceProperteis.getMsg());
        return helloService;
    }
}
@Configuration:标识此类为一个spring配置类
@EnableConfigurationProperties(value = HelloServiceProperteis.class):启动配置文件,value用来指定我们要启用的配置类,可以有多个,多个时我们可以这么写value={xxProperties1.class,xxProperteis2.class…}
@ConditionalOnClass(HelloService.class):表示当classPath下存在HelloService.class文件时改配置文件类才有效
@ConditionalOnProperty(prefix = “cdchen”, value = “enable”, matchIfMissing = true):表示只有我们的配置文件是否配置了以hello为前缀的资源项值,并且在该资源项值为enable,如果没有配置我们默认设置为enable
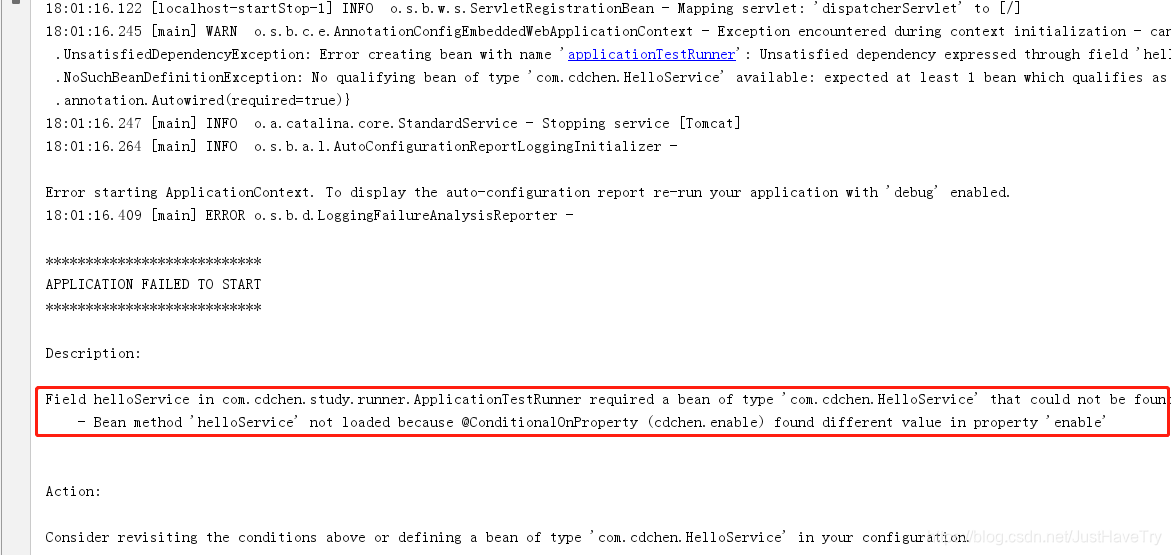
如果 enable设置false 则出现下面情况
5 指定引导类 在resources文件夹下新建 META-INF文件夹,并在该文件夹下新建文件spring.factories
内容为:org.springframework.boot.autoconfigure.EnableAutoConfiguration=com.cdchen.HelloAutoConfiguration
6 使用starter 在 springboot 项目中引入
<dependency>
            <groupId>com.cdchen</groupId>
            <artifactId>hello-spring-boot-starter</artifactId>
            <version>1.0-SNAPSHOT</version>
        </dependency>
7 增加配置文件
cdchen.msg=wo shi hello service
8 启动测试
@Component
public class ApplicationTestRunner implements ApplicationRunner, Ordered {
    @Autowired
    private HelloService helloService;
    @Override
    public int getOrder(){
        return 1;//通过设置这里的数字来知道指定顺序
    }

    @Override
    public void run(ApplicationArguments var1) throws Exception{
        System.out.println("MyApplicationRunner1!");
        helloService.sayHello();
    }

}


 1129
1129


 被折叠的 条评论
为什么被折叠?
被折叠的 条评论
为什么被折叠?
 到【灌水乐园】发言


