


搞了好久,终于找到了官方的文档,所以纪录下来,作为以后的参考
https://developer.apple.com/library/content/qa/qa1814/_index.html
说再多不如官方的文档,直接看吧。自己归纳出最核心的思想有四点
1、要先全部设置到默认值
2、再设置为automic
3、最后设置team 和build 信息
4、一定切记要restart
具体看下面吧
Setting up Xcode to automatically manage your provisioning profiles
Q: How do I configure my Xcode project to use automatic provisioning?
A: Many developers who are maintaining older apps may have specific selections for their code signing build settings; this Q&A discusses how to opt into Xcode's automatic provisioning by reverting those build settings to their defaults. This topic applies to both iOS and Mac app development.
Xcode's automatic provisioning is the preferred way to code sign apps during both development and distribution. In other words, this is the recommended approach for setting up your projects for both enterprise and App Store developer accounts. All developers should consider the code signing practices described in this document before resorting to other techniques. Also, this is the only process documented in the App Distribution Guide. Opting into automatic provisioning means that you will no longer supply choices for the Code Signing Identity or Provisioning Profile build settings, and this allows Xcode to make the best choice for you.
Follow these steps to use Xcode's automatic provisioning:
-
Set the project level code signing build settings to their defaults:
-
Navigate to the Project > Build Settings tab.
-
Set the Provisioning Profile build setting to Automatic for all build configurations.
-
Set the Code Signing Identity build setting:
-
Set to iOS Developer for all build configurations in iOS projects.
-
Set to Mac Developer or Developer ID, as appropriate, for all build configurations in OS X projects.
-
-
-
Set the targets' code signing build settings to their defaults:
-
Set the Target > General > Team to None.
-
Change the Provisioning Profile build setting to Automatic for all build configurations.
-
Set the Code Signing Identity build setting:
-
Set to iOS Developer for all build configurations in iOS targets.
-
Set to Mac Developer or Developer ID, as appropriate, for all build configurations in OS X targets.
-
-
-
Return to the Target > General tab for all of your app's targets and set the Team using these steps:
-
For Mac apps, set Target > General > "Signing" to Mac App Store.
-
Set the Target > General > Team to your team.
-
Note: It's just as important to set Target > General > Team to None before reverting all the code signing build settings to their defaults, as it is to set it back to the value of your team afterwards.
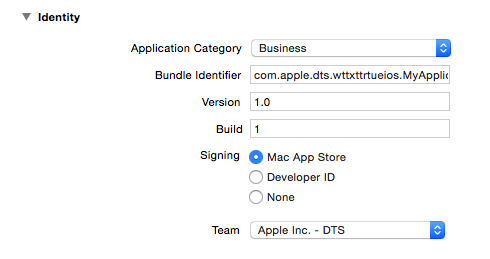
Compare your project with the figures below that illustrate correct configuration for automatic provisioning.
Figure 1 Build settings of an iOS project correctly configured for automatic provisioning.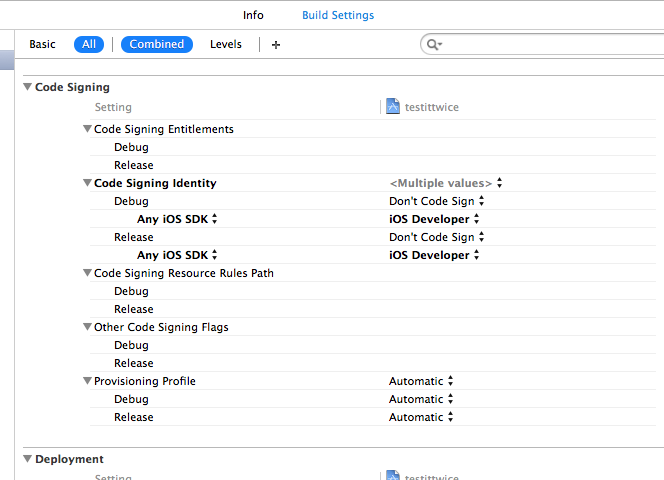 Figure 2 Build settings of an OS X project correctly configured for automatic provisioning.
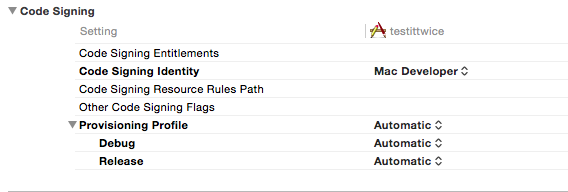 Figure 3 Target > General > Team of an iOS project correctly configured for automatic provisioning.
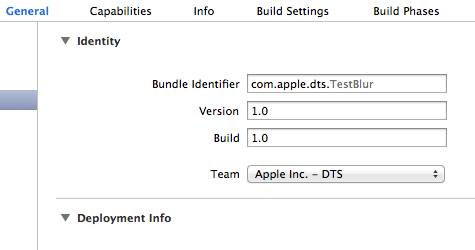 Figure 4 Target > General > Team of an OS X project correctly configured for automatic provisioning.
Once you have switched over to letting Xcode manage your applications provisioning profiles, capabilities should now be added to your project using the Capabilities pane in the project editor for your target. When you add capabilities to your app using Xcode, Xcode automatically configures your project to use them. Xcode edits the entitlements and information property list files for you and adds technology-specific frameworks as needed. For entitlements to take effect, Xcode creates code signing and provisioning assets for your team and sets your code signing build settings for you. Xcode creates a wildcard App ID and explicit App ID, if needed, to enable the app services you choose.
You can easily identify any Xcode-managed provisioning profiles in the Member Center that use an explicit App ID because they will begin with the text “iOS Team Provisioning Profile:” followed by the bundle ID. Xcode 5 requires that you create your own distribution profile in the Member Center. Xcode 6 will create any distribution certificates or distribution provisioning profiles that are required. When Xcode creates a distribution provisioning profile, the name of the distribution provisioning profile begins with the text XC: followed by the App ID. If you are using a wildcard App ID, the name of the distribution provisioning profile is XC:*.
Document Revision History
| Date | Notes |
|---|---|
| 2015-12-26 | emphasized this is the recommended approach for Code Signing |
| 2015-03-31 | Added images reflecting recommended build settings. |
| 2015-03-25 | Fixed broken link. |
| 2015-03-23 | Minor change. |
| 2015-03-17 | Rewrote for improved readability |
| 2014-10-07 | updated with information about Xcode 6 |
| 2014-04-24 | Added note about bundle seed id differing from team id. Updated for both iOS and OS X. |
| 2014-01-21 | New document that talks about how to set up Xcode to automatically manage your provisioning profiles. |


 2206
2206

 被折叠的 条评论
为什么被折叠?
被折叠的 条评论
为什么被折叠?
 到【灌水乐园】发言


