


部署前呢,要先把jenkins搭建好。
同时呢已经有了k8s的环境。
基于以上两步已经有了的情况,继续要实现jenkins+k8s持续集成,需要先准备四个文件:
| Dockerfile | 首先要准备好一个Dockerfile文件,用于构建Docker镜像的文本文件 |
| project.yaml | 这个是部署应用的yaml文件,名字可以取项目的名字,例如cool-hello.yaml |
| project-svc.yaml | 这个文件是将应用的端口和暴露对外的端口进行映射,名字可以是应用名字接svc来命名 |
| jenkins.sh | 是执行部署的脚本 |
目录
一、Dockerfile怎么写呢?
挂载目录和项目名字需要改成自己的。
# 基础镜像
FROM openjdk8-alpine-cst:v1.0.0
# author
MAINTAINER hello

# 挂载目录
VOLUME /home/hello
# 创建目录
RUN mkdir -p /home/hello
# 指定路径
WORKDIR /home/hello
# 复制jar文件到路径
COPY ./hello.jar /home/hello/hello.jar
# 启动认证服务
ENTRYPOINT java ${JAVA_OPTS} -Dfile.encoding=utf-8 -jar hello.jar --spring.profiles.active=${SPRING_PROFILES_ACTIVE}
二、project.yaml怎么写呢?
apiVersion: apps/v1
kind: Deployment
metadata:
  name: hello-deploy #这里可以改成自己项目+deploy
  namespace: hello #这个命名空间可以改成自己的
  labels: #本发布
    app: hello-deploy #这里可以改成自己项目+deploy
    version: v1.0.0
spec:
  replicas: 1
  revisionHistoryLimit: 3
  selector:
    matchLabels: #需匹配资源
      app: hello #这里可以改成自己项目名
      version: v1.0.0
  template:
    metadata:
      labels: # 资源标签
        app: hello #这里可以改成自己项目名
        version: v1.0.0
    spec: # 资源规范
      containers:
        - name: hello #这里可以改成自己项目名
          image: 镜像地址
          imagePullPolicy: Always
          env:
            - name: JAVA_OPTS
              value: "-Xmx1024m -Xms512m"
            - name: SPRING_PROFILES_ACTIVE
              value: "test"
          resources:
            limits:
              cpu: 2
              memory: 2Gi
            requests:
              cpu: 200m
              memory: 640Mi
          livenessProbe:
            httpGet:
              path: /healthCheck #这个地址必须要加入白名单,地址可以换成自己的地址
              port: 8089 #端口可以改成自己项目的端口
              scheme: HTTP
            initialDelaySeconds: 60
            timeoutSeconds: 10
            periodSeconds: 30
            successThreshold: 1
            failureThreshold: 5
          readinessProbe:
            httpGet:
              path: /healthCheck
              port: 8089 #端口可以改成自己项目的端口
              scheme: HTTP
            initialDelaySeconds: 60
            timeoutSeconds: 10
            periodSeconds: 30
            successThreshold: 1
            failureThreshold: 5
          ports:
            - name: http
              containerPort: 8089 #端口可以改成自己项目的端口
              protocol: TCP
      imagePullSecrets:
        - name: hello-secret #secret的名字,这个是连接镜像仓库的秘钥名字
三、project-svc.yaml怎么写呢?
apiVersion: v1
kind: Service
metadata:
  name: hello-svc #这里可以改自己的项目名+svc
  namespace: hello #这里可以改自己的命名空间
spec:
  type: NodePort #这里只能填NodePort
  selector:
    app: hello #这里可以改自己的项目名
  ports:
    - port: 8089 #应用的端口
      targetPort: 8089 #应用的端口
      nodePort: 32089 #映射端口,对外暴露的端口
      protocol: TCP
      name: restful
四、jenkins.sh脚本如何写?
#!/bin/bash

# master pwd and ip
master_pwd='把应用程序推送到目标机器(部署的机器)密码'
master_ip=把应用程序推送到目标机器(部署的机器)的ip

# full path
echo jar_path=${WORKSPACE}/${project_dir}${project_name}/target/${project_name}.jar

if [ ! -f $WORKSPACE/$project_dir$project_name/target/$project_name.jar ];then
  echo -------------------file not exists,path:${WORKSPACE}/${project_name}/target/${project_name}.jar-----------------------
  exit 1
fi

echo cd ${WORKSPACE}/${project_dir}${project_name}/target/ #进入到该目录,下面会将Dockerfile复制到这个目录
cd $WORKSPACE/$project_dir$project_name/target/

echo copy Dockerfile to target project
echo cp ${WORKSPACE}/${project_name}/k8s/* . #将Dockerfile文件复制到$WORKSPACE/$project_dir$project_name/target/
cp $WORKSPACE/$project_name/k8s/{project_name}/* .
#cp $WORKSPACE/k8s/$project_name/Dockerfile .

# delete nerdctl images by id
image_id=$(nerdctl images | grep "${group_name}/${project_name}" | awk '{print $3}')
echo image_id=${image_id}
# if exists
if [ -n "$image_id" ]; then
 echo '--------------------rm images--------------------'
 echo nerdctl rmi -f ${group_name}/${project_name}:${version}
 nerdctl rmi -f ${group_name}/${project_name}:${version}
fi

# delete none images
image_ids=$(nerdctl images | grep none | awk '{print $3}')
echo image_ids=${image_ids}
if [ -n "$image_ids" ]; then
  echo '--------------------rm images--------------------'
  nerdctl images | grep none
  nerdctl images | grep none | awk '{print $3}' | xargs nerdctl rmi
fi

echo nerdctl build -t ${group_name}/${project_name}:${version} .
nerdctl build -t ${group_name}/${project_name}:${version} .

echo nerdctl login #后面写镜像地址,登录到镜像
nerdctl login 镜像地址 -u 账号 -p 密码

echo nerdctl push ${group_name}/${project_name}:${version}#将打包好的镜像推送到镜像仓库
nerdctl push ${group_name}/${project_name}:${version}

echo sleep 5
sleep 5

echo kubectl rollout restart deployment ${project_name}-deploy -n ${namesapce}#部署deploy
sshpass -p ${master_pwd} ssh root@${master_ip} "kubectl rollout restart deployment ${project_name}-deploy -n ${namesapce}"

echo sleep 5
sleep 5

echo delay 5 seconds, search: kubectl get pods -n ${namesapce} ...
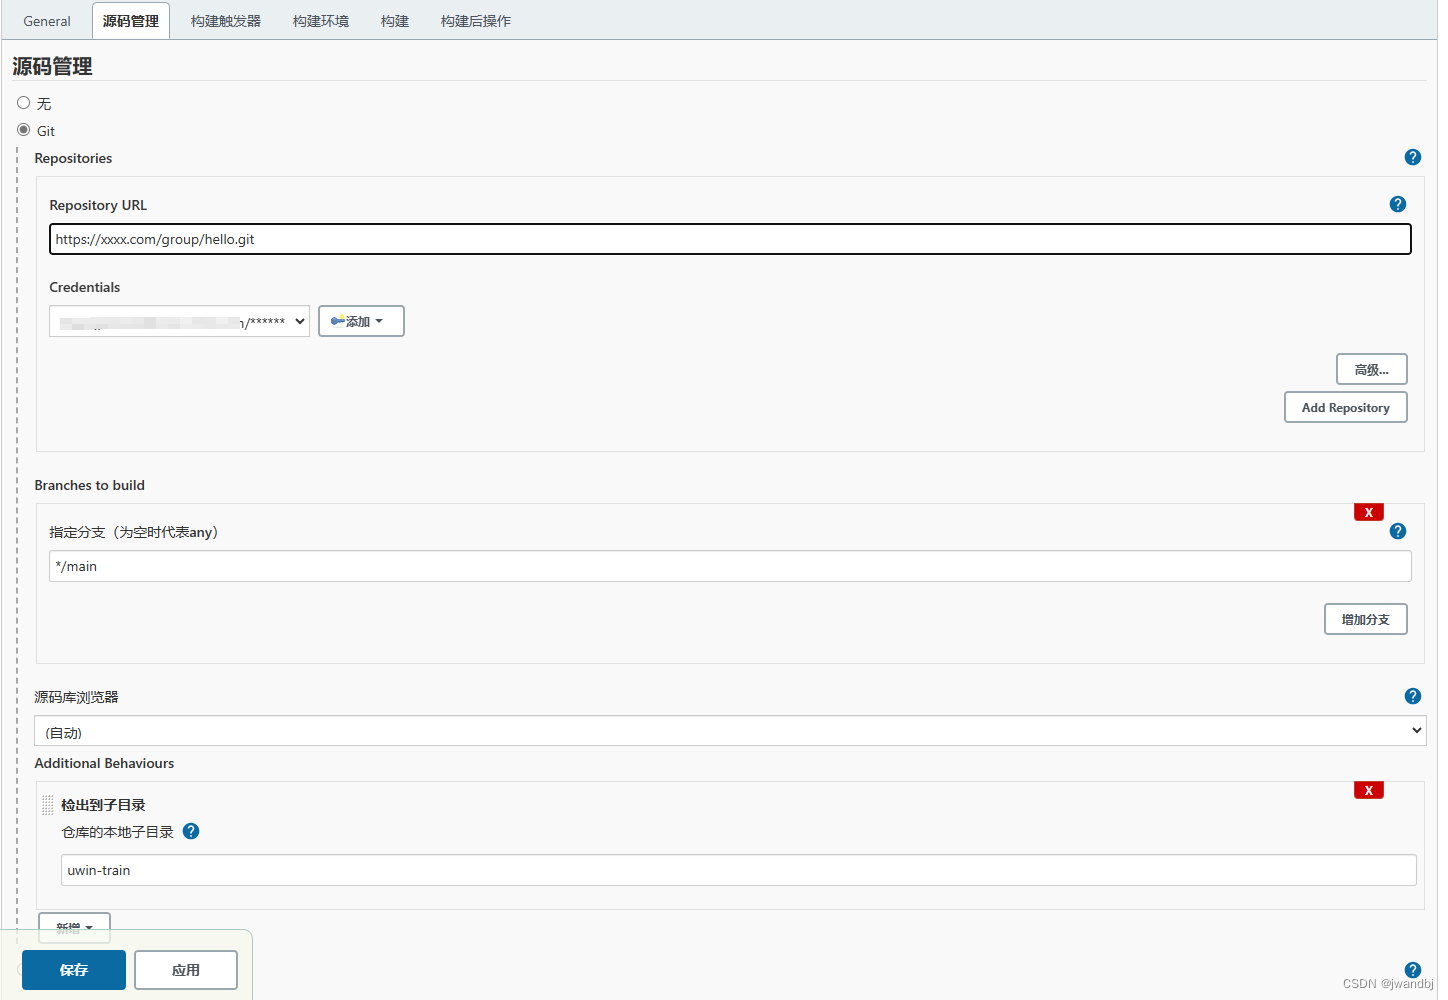
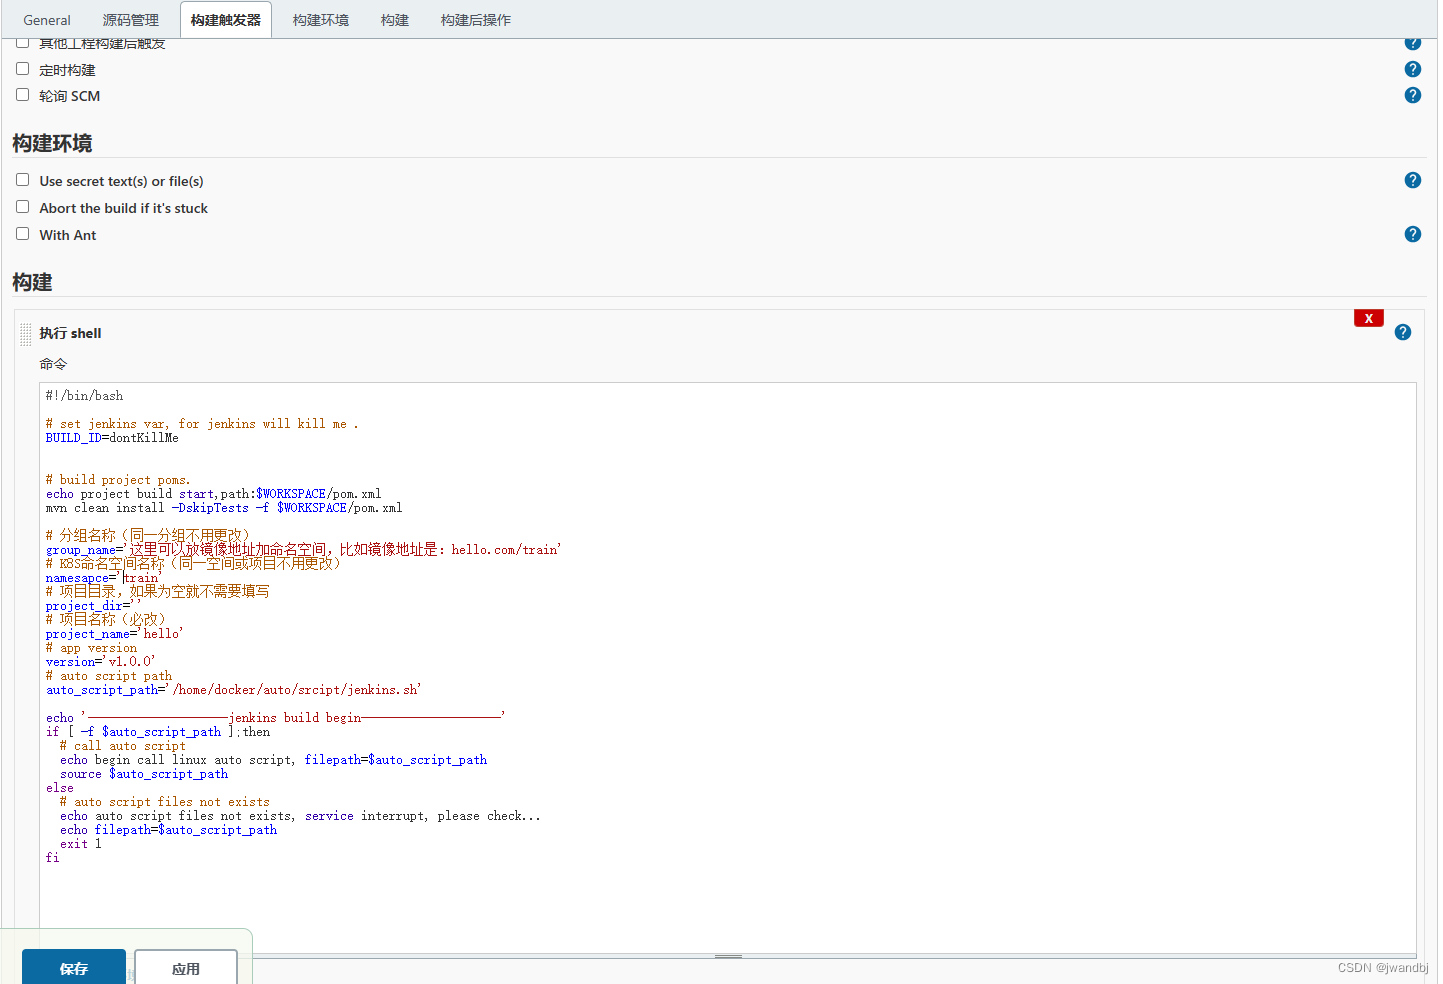
五、如何在jenkins里面进行配置呢?
#!/bin/bash

# set jenkins var, for jenkins will kill me .
BUILD_ID=dontKillMe


# build project poms.
echo project build start,path:$WORKSPACE/pom.xml
mvn clean install -DskipTests -f $WORKSPACE/pom.xml

# 分组名称(同一分组不用更改)
group_name='这里可以放镜像地址加命名空间,比如镜像地址是:hello.com/train'
# K8S命名空间名称(同一空间或项目不用更改)
namesapce='train'
# 项目目录,如果为空就不需要填写
project_dir=''
# 项目名称(必改)
project_name='hello'
# app version
version='v1.0.0'
# auto script path
auto_script_path='/home/docker/auto/srcipt/jenkins.sh'

echo '--------------------jenkins build begin--------------------'
if [ -f $auto_script_path ];then
  # call auto script
  echo begin call linux auto script, filepath=$auto_script_path
  source $auto_script_path
else
  # auto script files not exists
  echo auto script files not exists, service interrupt, please check...
  echo filepath=$auto_script_path
  exit 1
fi


 1万+
1万+


 被折叠的 条评论
为什么被折叠?
被折叠的 条评论
为什么被折叠?
 到【灌水乐园】发言


